For multi-branch codebases, it is a common requirement to move code from one branch to another.
There are two scenarios for this. In one case, you need all the code changes in another branch, so you use git merge. In the other case, you only need some of the code changes (a few commits), then you can use Cherry pick.
Basic usage
What the git cherry-pick command does is apply the specified commit to other branches.
|
|
The above command will then apply the specified commit commitHash, to the current branch. This will generate a new commit in the current branch, but with a different hash value.
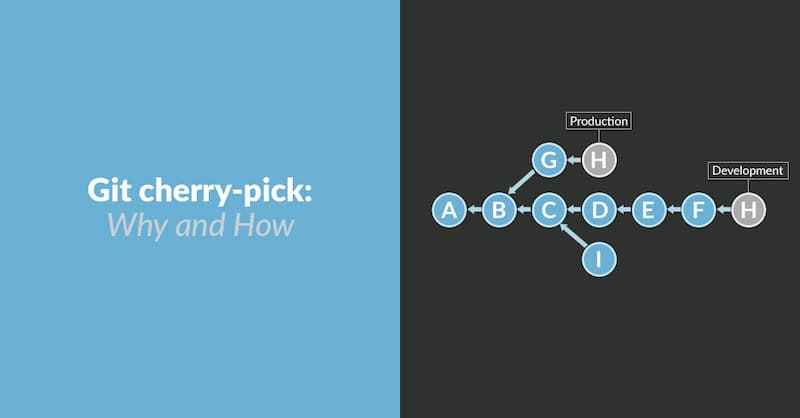
For example, the repository has two branches, master and feature.
Now apply the commit f to the master branch.
After the above operation is completed, the code base will look like the following.
As you can see above, a commit f has been added to the end of the master branch.
The argument to the git cherry-pick command, not necessarily the hash of the commit, but also the branch name, indicates that the latest commit of the branch is being moved.
|
|
The above code represents the most recent commit of the feature branch, moved to the current branch.
Transferring Multiple Submissions
Cherry pick supports transferring multiple commits at once.
|
|
The above command applies two commits, A and B, to the current branch. This generates two new commits in the current branch.
If you want to transfer a series of consecutive commits, you can use the following easy syntax.
|
|
The above command transfers all commits from A to B. They must be placed in the correct order: commit A must precede commit B, or the command will fail without reporting an error.
Note that with the above command, commit A will not be included in the Cherry pick. To include commit A, you can use the following syntax.
|
|
Configuration items
The common configuration items for the git cherry-pick command are as follows.
-
-e,--editOpen the external editor and edit the submission information.
-
-n,--no-commitOnly the workspace and staging area are updated, no new commits are generated.
-
-xAppend the line
(cherry picked from commit ...)to the end of the commit message to make it easier to find out how this commit was generated. to make it easier to find out how this commit was generated later. -
-s,--signoffAppend a line with the operator’s signature at the end of the commit message, indicating who performed the operation.
-
-m parent-number,--mainline parent-numberIf the original commit was a merge node from two branches, then Cherry pick will fail by default because it doesn’t know which branch’s code changes should be used.
The
-mconfiguration item tells Git which branch’s changes should be used. Its argument,parent-number, is an integer number starting with1that represents the parent branch number of the original commit.1$ git cherry-pick -m 1 <commitHash>The above command means that Cherry pick uses commit
commitHashfor changes from the parent branch numbered 1.In general, parent branch number 1 is the branch being merged into, and parent branch number 2 is the branch being merged from.
Code Conflict
If a code conflict occurs during the operation, Cherry pick will stop and let the user decide how to proceed.
-
--continueAfter the user resolves the code conflict, the first step is to add the modified file back to the staging area (
git add .), and then use the following command to continue the Cherry pick process.1$ git cherry-pick --continue -
--abortAfter a code conflict occurs, the merge is abandoned and returned to the way it was before the operation.
-
--quitExit Cherry pick after a code conflict occurs, but do not go back to the way it was before the operation.
Transfer to another code base
Cherry pick also supports transferring commits from another code base by first adding the base as a remote repository.
|
|
The above command adds a remote repository target.
Then, the remote code is grabbed locally.
|
|
The above command grabs the remote code repository locally.
Next, check the commit to be transferred from the remote repository and get its hash value.
|
|
Finally, use the git cherry-pick command to move the commit.
|
|
Reference https://www.ruanyifeng.com/blog/2020/04/git-cherry-pick.html