There is not really much software that uses Python to develop graphical interfaces. Compared to GUI interfaces, probably Web way applications are more popular. But for other programming languages like me you such as C# or WPF may not be a good tool.
Common GUI frameworks
- PyQt5: Qt is a cross-platform C++ GUI library. QT was once owned by Nokia and then sold to Digia, a Finnish software company. Oyj. PyQt5 is a Python interface based on Digia’s Qt5, and consists of a set of Python modules. It runs on multiple platforms, including Unix, Windows, and Mac OS.
- Pyside6: Pyside is the official Python package provided by QT, the last version is Pyside2, corresponding to QT5, the latest version of the naming rules have been adjusted, changed to Pyside6, corresponding to QT6 version. As the official production is more promising, the disadvantage is that the release is late and there is not as much information on the Internet as PyQt5.
- Tkinter: Python built-in GUI framework , using TCL implementation , Python embedded in the TCL interpreter , use it without installing additional extension packages , direct import , cross-platform . The downside is that the UI layout all by code, only 15 common components, the display effect is simple.
- PySimpleGUI: PySimpleGUI is a layer wrapper of Tkinter. Implementing a custom GUI using PySimpleGUI requires much less code than writing the same GUI directly using Tkinter.
- WxPython: wxPython is a Python language binding to the popular wxWidgets cross-platform GUI tool library. Used more widely, cross-platform, written in C++, with little documentation, users may then need to make some adjustments to the GUI code in different platforms according to the programming content. Problems are not easy to solve, code layout control, not intuitive.
- Wax: based on wxPython , a package made to overcome the problems of wxPython.
- Kivy: mainly for multi-touch programs, smartphones tablets, etc., also on systems without touch screen functionality, full platform support (Windows, Linux, Mac OS X, Android and iOS.) written in Python and cython, Chinese support Poor Chinese support, you need to download the Chinese library and make your own path.
- BeeWare: Write once. Deploy everywhere.
- Toga: a GUI toolkit for developing native apps using Python. Toga consists of a library of base components with shared interfaces to simplify platform-independent GUI development. toga is available for Mac OS, Windows, Linux ( GTK) as well as mobile platforms such as Android and iOS.
- Eel: A lightweight Python library for making simple offline HTML/JS GUI applications similar to (but lighter than) Electron, with full access to Python functions (capabilities) and libraries. Full access to Python features and libraries.
- Flexx: a pure Python toolkit for creating GUI applications. It uses Web technologies for rendering the interface. You can use Flexx to create desktop applications, as well as export an application to a standalone HTML document. Because it is developed in pure Python, Flexx is cross-platform. All you need is Python and a browser to run it.
- pywebview is a lightweight cross-platform wrapper (wrapper) around the webview component that allows HTML content to be displayed in its own native GUI window. It allows you to use Web technologies in your desktop applications while hiding the fact that the GUI was built using a browser to the greatest extent possible.
- enaml: A Python framework that allows you to implement high-quality GUI interfaces with minimal effort, and a unique programming language. enaml combines a declarative language with a constraint-based layout system, making it easy for users to define flexible enaml applications can run on any platform that supports Python and Qt.
Personal thoughts: too much to learn, first learn PyQt5, the reason is that there is more information, learn the rest of friends and then learn pyside6, and finally look at PySimpleGUI, to see if you can solve some simple problems.
PyQt5 Introduction
PyQt is a Python language implementation of the Qt framework, developed by Riverbank Computing, one of the most powerful GUI libraries.PyQt provides a collection of well-designed window controls, each PyQt control corresponds to a Qt control, so PyQt’s API interface is close to Qt’s API interface, but PyQt no longer uses the QMake system and Q_OBJECT macros.
PyQt5 is available in GPL and commercial versions. Free developers can use the free GPL license, and if they need to use PyQt for commercial applications, they must purchase a commercial license.
PyQt5 features are as follows.
- High-performance Qt-based GUI control set.
- Ability to run cross-platform on Linux, Window and Mac OS systems.
- Uses a signal slot mechanism for communication.
- Full encapsulation of Qt libraries.
- Can use a full-fledged IDE for interface design and automatic generation of executable Python code.
- Provides a full range of window controls.
PyQt5 is composed of a series of Python modules with over 620 classes and 6000 functions and methods, the main modules are as follows.
- QtCore: contains the core non-GUI functions. It is mainly used with time, files and folders, various data, streams, URLs, mime class files, processes and threads.
- QtGui: Contains the windowing system, event handling, 2D graphics, basic drawing, fonts and text classes.
- QtWidgets: Contains a set of UI elements for creating desktop applications.
- QtMultimedia: Contains classes for handling multimedia content and calling the camera API.
- QtBluetooth: Contains classes for finding and connecting to Bluetooth.
- QtNetwork: Contains classes for network programming. These tools make TCP/IP and UDP development easier and more reliable.
- QtPositioning: Contains classes for positioning, using satellites, WiFi and even text.
- Enginio: Contains classes for accessing and managing the Qt Cloud through the client.
- QtWebSockets: Contains classes for the WebSocket protocol.
- QtWebKit: Contains a WebKit2-based web browser.
- QtWebKitWidgets: Contains classes for the QtWidgets-based WebKit1.
- QtXml: Contains classes for handling xml, providing tools for SAX and DOM APIs.
- QtSvg: Provides classes for displaying the content of SVG, Scalable Vector Graphics (SVG), a graphics format that is based on Extensible Markup Language (XML) and is used to describe two-dimensional vector graphics (this quote is from Wikipedia).
- QtSql: Provides tools for working with databases.
- QtTest: Provides tools for testing PyQt5 applications.
Installation of PyQt5
Since I want to use fbs for packaging later, fbs may have compatibility problems for Python 3.7 and later, so I chose Python 3.6.8 to build the whole environment. The main content is: Python + PyCharm + PyQt5
Install PyQt5
where pyqt5-tools is a drag-and-drop interface design tool for Qt Designer. The following errors may be reported during installation.
|
|
Solution.
|
|
Configuration of Qt Designer
Qt Designer is a drag-and-drop way to place controls and view their effects in real time for quick UI design.
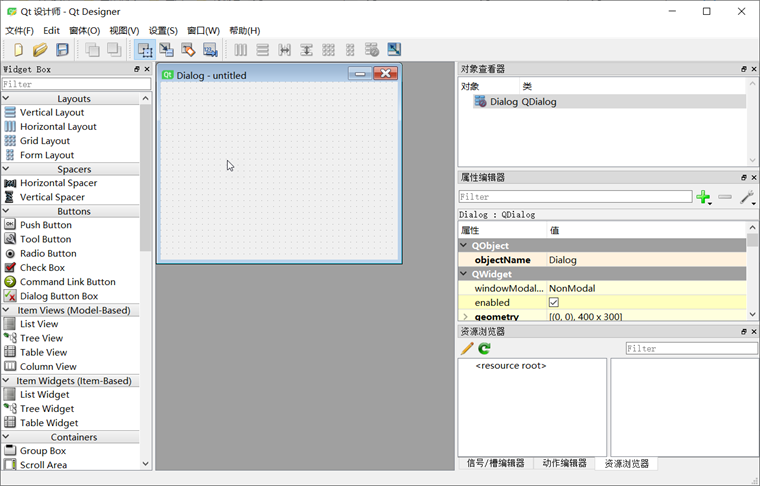
Composition of the whole screen.
- The “Widget Box” on the left is a variety of components that can be dragged around freely.
- The “MainWindow - untitled” form in the middle is the canvas.
- The “Object Inspector” at the top right is the structure of the current UI.
- The “Property Editor” in the middle of the right side allows you to set the properties of the currently selected component.
- The “Resource Browser” at the bottom right can add various materials, such as pictures, backgrounds, etc.
ui file (essentially a file in XML format), which can be used directly or converted into a .py file by pyuic5 tool.
QtDisigner Configuration
In Pycharm, open File - Settings - Tools - External Tools in order, click + Create Tool and configure as follows.
PyUIC Configuration
PyUIC mainly replaces the .ui file generated by Qt Designer with a .py file.
In Pycharm, open File - Settings - Tools - External Tools, click + Create Tool and configure as follows.
PyRCC Configuration
PyRCC is mainly about replacing the written .qrc resource file with a .py file.
In Pycharm, open File - Settings - Tools - External Tools in order, click + Create Tool and configure as follows.
PyQt5 Usage Examples
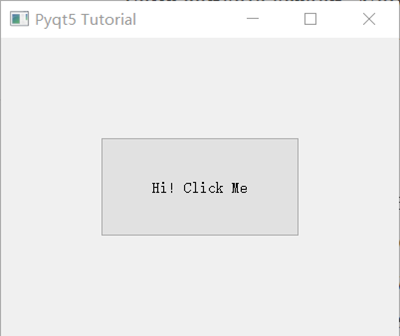
Create a blank screen.
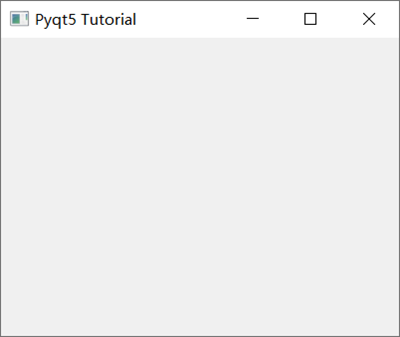
Among them.
- Qapplication(): Every GUI must contain a Qapplication. argv means get command line arguments, if you don’t need to get them, you can use [] instead.
- QMainWindow(): Similar to a container (window) used to contain widgets such as buttons, text, input boxes, etc. arg identifier to get the arguments for the command line execution.
- SetGeometry is used to define the dimensions of the QMainWindow() window, syntax: setGeometry(x, y, width, height ), where x,y is the coordinate point on the screen.
- show(): used to display the window
- exit(app.exec_()): set the window to run all the time to instruct to close it using the close button
Common Widgets supported by PyQt5 are.
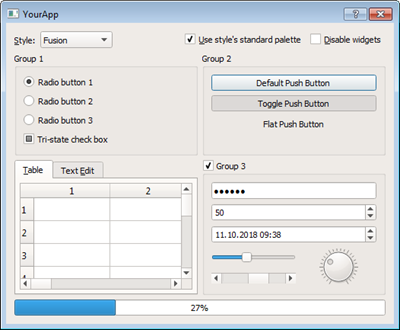
From top to bottom, from left to right: Qlabel, QcomboBox, QcheckBox, QradioButton, QpushButton, QtableWidget, QlineEdit, Qslider, QProgressBar
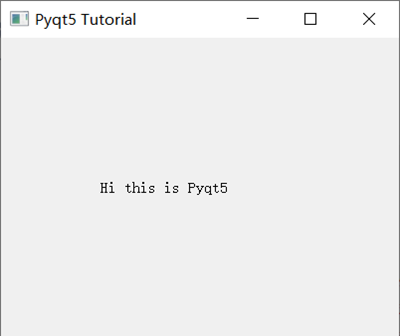
For setting text content using Pyqt5, we use Qlabel.
|
|
Buttons and events.
|
|
button.clicked.connect() executes a specific event after the button is clicked.
PyQt5 in action
Hands-on project: simple weather query software
Design an interface using Qt Designer
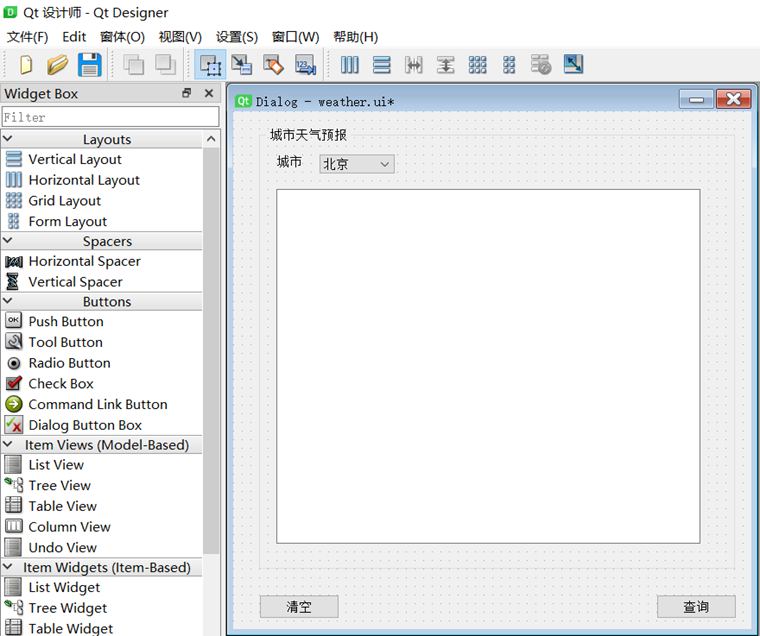
The controls used are Button, GroupBox, Label, ComboBox, TextEdit, and two buttons queryBtn and clearBtn are defined to query and clear the weather data respectively. We need to bind the slot function, the method is as follows.
- Select Signal/Slot Editor in the bottom right corner of Qt Designer, click + to add
- select queryBtn and clearBtn respectively, select signal clicked(), receiver Dialog and slot accept(), (slot function here do not know how to define, later in the code to modify)
After finishing the above, save it as Weather.ui file.
Convert .ui files to .py files
PyQt5 supports the direct use of .ui files.
However, for better customization and modification of the above slot functions, you can use External Tools - PyUIC, which generates Weather.py, and actually runs the command as follows.
|
|
Among the slot functions to which we need to bind the two buttons.
The final Weather.py reads as follows.
|
|
Calling the MainDialog
Call the interface class Ui_Dialog in MainDialog, and then add the business logic code for querying weather in it, so that the interface display and business logic are separated. Add a new demo.py file, and define two slot functions queryWeather() and clearText() in the MainDialog class, so that the two buttons (queryBtn and clearBtn) defined in the interface file Weather.ui can trigger clicked signals to bind to these two slot functions.
The complete code is as follows.
|
|
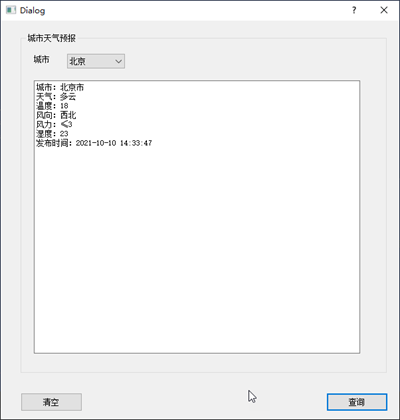
The result after running demo.py and executing the query.
Package the code into an exe file
The .py file is packaged into an executable exe in Python called freezing, commonly used tools are: PyInstaller, py2exe, cx_Freeze, bbfreze, py2app, etc. Functionality comparison.

- py2exe: software updates are no longer active, so it is skipped.
- pyinstaller: explicitly support win8, win10, theoretically support win7,, support apple Macos, linux. pyinsaller can be packaged in the form of a folder containing exe entry executable file, or a separate exe file.
- fbs: based on PyInstaller, more convenient to use
fbs is chosen here to package. fbs is installed as follows
|
|
To use, type in the command line.
|
|
After the execution, you need to enter some app names, etc. The following directory will be generated after completion.
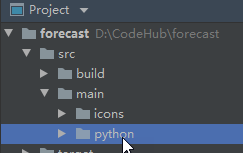
Drag the PyQt5 code you just wrote (demo.py and Weather.py) to the src/main/python folder, delete the original main.py, and modify demo.py to main.py. Then open main.py and add the following code to the header of the file.
|
|
When finished, execute.
|
|
to realize the package. The generated exe executable file is under \target\MyApp file.