APK file introduction
Each application that needs to be installed to the android platform is compiled and packaged as a separate file with the suffix .apk (Android application package), which contains the binary code, resources, configuration files, etc. of the application.

The apk file is actually a zip archive that can be unzipped by an unzip tool (change the suffix to .zip and then unzip it with the unzip file.) The approximate directory structure of the APK file is as follows.
AndroidManifest.xml
The official explanation of AndroidManifes.xml is the application manifest, which must contain one in the root directory of every application and the file name must be exactly the same. This file contains the configuration information of the APP, and the system needs to run the APP code and display the interface according to the content inside.
The above functions are explained in a very general way, the specific details are.
- Name the Java package for the application. The package name acts as a unique identifier for the application.
- Describes the components of the application, including the Activity, services, broadcast receivers, and content providers that make up the application. It also names the classes that implement each component and publishes its functionality, such as the Intent messages they can handle. These declarations inform the Android system about the components and the conditions under which they can be launched.
- Identifies the processes that host the application components.
- Declares what permissions the application must have to access protected parts of the API and interact with other applications. Also declares the permissions that other applications need to have to interact with the application component
- Lists the Instrumentation classes that provide analysis and other information at application runtime. These declarations will only appear in the manifest while the app is in the development phase and will be removed before the app is released.
- Declares the minimum Android API level required by the application
- List the libraries that the app must link to
The above is the official explanation. Many things are not understandable and not used yet, so let’s pick the ones we can understand first for explanation.
- The first one: provide the package name. This is the name of our apk, usually our name is something like “com.android.helloworld”, similar to the Java class name, the purpose is to make sure that it is a unique value.
- The second article: describes each component of the application. This is used to define the four main components. The one we use most often is the Activity component. It needs to define the presentation of the component (component name, theme, startup type), the actions the component can respond to (e.g. a certain startup intent), etc.
- Article 3, 4 and 5: Not used yet, no explanation.
- Article 5: Declares the minimum API level. This level can also be defined in the gradle file with the field minSdkVersion. it is less often defined in the AndroidManifest.xml file.
- Article 6: List the necessary lib libraries. This thing doesn’t seem to have much function in Android Studio after 0, because after 3.0 compilation uses CMakeLists.txt file, and build.gradle file to specify libraries.
Example of AndroidManifest.xml file.
|
|
This is a file from the teapots project in the official Google example, and we will analyze the meaning of the fields for this file. The reference for the meaning of the fields is official documentation.
<manifest> element: All xml’s must contain the <manifest> element. This is the root node of the file. It must contain the <application> element and specify the xmlns:android and package attributes.
Attributes in the <manifest> element :
- xmlns:android This attribute defines the Android namespace. It must be set to “http://schemas.android.com/apk/res/android". Do not change it manually.
- packageThis is a complete Java language style package name. Package names consist of letters (both upper and lower case), numbers and underscores. Each individual name must begin with a letter. The package name also represents the unique application ID, which is used to distribute the application. However, one thing to note is that in the last step of the APK build process, the package name is replaced by the applicationId property in the gradle file. If the two properties have the same value, then all is well, if not, then be careful. When building the APK, the build system uses this attribute to do two things.
- Use this name as namespace when generating java classes (for accessing resources of the APP). For example: package is set to com.sample.teapot, then the generated R class is: com.sample.teapot.
- Used to generate the full class name of the class defined in the manifest file. For example, if the package is set to sample.teapot and the activity element is declared as
<activity android:name=".MainActivity">, the full class name is com.sample.teapot MainActivity.
- android:versionCode: the internal version number. Used to indicate which version is updated. This number is not displayed to the user. This number must be an integer. This number must be an integer. It cannot be in hexadecimal, i.e. it does not accept parameters like “0x1″.
- android:versionName: the version number to be shown to the user.
elements in the <manifest> element
<uses-feature>element: Google Play uses the value of this element to filter the app from devices that don’t match the app’s needs. What this does is tell others about the hardware or software conditions that the app relies on. It states which features of the app can change with the device. When using it, note that each feature must be specified in a separate<uses-feature>element, and for multiple features, multiple<uses-feture>elements are required. For example, to require a device to have both Bluetooth and camera capabilities.
- Attributes of
<uses-feature>.- android:name: This attribute specifies the hardware or software feature to be used by the app as a string.
- android:required: This attribute is true if the feature is required or the app won’t work, false if it means the app will use the feature when necessary, but the app will work without it.
- android:glEsVersion: Specify the version of Opengl ES required by the application. The higher 16 bits indicate the major version number, and the lower 16 bits indicate the minor version number. For example, if it is to be version 2, it is 0x00030002. If multiple glEsVersions are defined, the application will automatically enable the highest setting.
<application>element: This element describes the configuration of the application. It is a required element that contains a number of child elements to describe the application’s components, and its attributes affect all child components. Many attributes (such as icon, label, permission, process, taskAffinity, and allowTaskReparenting) can be set to default values.<application>properties- android:allowBackup: Indicates whether to allow the app to be added to the backup restore structure. If set to false, then the app will not backup restore. The default value is true.
- android:fullBackupContent: This attribute points to an xml file that contains rules for full backups when automatic backups are performed. These rules define which files need to be backed up. This attribute is an optional attribute. By default, automatic backups include most of the app files.
- android:supportsRtl: Declares whether your app supports RTL (Right To Left) layout. If set to true, and targetSdkVersion is set to 17 or higher. Many RTL APIs will be set to fire so that your app can display RTL layouts. If set to false or targetSdkVersion is set to 16 or lower. which RTL APIs will not work. The default value of this property is false.
- android:icon: the icon of the app, and the default icon of each component. Icons can be customized in the group price. This property must be set to a reference to a drawable resource, which must contain an image. The system does not set a default icon. For example, mipmap/ic_launcher refers to the following resource
- android🏷️ a user-readable label, and the default label for all components. Child components can define their own label with their label property, or if none is defined, then this label is used. Labels must be set to a reference to a string resource. This way they can be positioned like anything else, such as @string/app_name. of course, you can also define a raw string for development convenience.
- android:theme: This attribute defines the theme’s used by the application, it is a reference to a style resource. Each activity can also set its own theme with its own theme property.
- android:name: the full name of the Application subclass. Include the preceding path. For example, sample.teapot.TeapotApplication. When the application is launched, the first instance of this class is created. This attribute is optional and is not required by most apps. In the absence of this attribute, Android will launch an instance of the Application class.
<activity>element: This element declares an Activity (a subclass of the Activity class) that implements the visual interface of the app. This is a required child element of the<application>element. All Activities must be represented by the<activity>element in the manifest file. Any Activity that is not declared there is not visible to the system and will never be executed.- android:name: The name of the Activity class, which is a subclass of the Activity class. The value of this attribute is the name of a fully qualified class, such as sample.teapot.TeapotNativeActivity. , then the package name in the
<manifest>element needs to be added. This name should not be changed once the application is published. There is no default value and the name must be specified. android:label: Activity label, which can be read by the user. The label is displayed on the screen when the Activity is active. If not set, use the label attribute in<application>. The requirements for setting the attribute are the same as in<application>.- android:configChanges: Lists the configuration change messages that the Activity will handle on its own. When a configuration change occurs at runtime, the default is to shut down the Activity and restart it, but declaring the configuration with this attribute will prevent the Activity from restarting. Instead, the Activity will remain running and the system will call its onConfigurationChanged() onConfigurationChanged(android.content.res.Configuration)) method. Note: This property should be avoided and should only be used as a last resort. For more information on how to properly handle restarts due to configuration changes, please read Handling Runtime Changes. There are many items that can be set for this property, here is a list of commonly used items.
- orientation: the screen has changed, e.g. the user has rotated the device
- keyboardHidden: the keyboard accessibility has changed, for example, the user shows the hardware keyboard
- android:launchMode: instructions on how to launch the Activity. There are four kinds of instructions: “standard”, “singleTop”, “singleTask”, " These modes are divided into two categories: “standard” and “singleTop” are one. The Activity in this mode can be instantiated multiple times. Instances can belong to any task and can be located anywhere in the Activity stack. singleTask” and “singleInstance” are a class. This mode can only start tasks, which are always located at the root of the Activity stack. In addition, the device can only keep one instance of Activity at a time. When set to singleTask, the system creates the Activity at the root of the new task and delivers an Intent to it. if an Activity instance already exists, the system delivers an Intent to it by calling the onNewIntent() method of that instance instead of creating a new Activity instance.
- android:theme: set the theme format, similar to the theme in
<application>.
- android:name: The name of the Activity class, which is a subclass of the Activity class. The value of this attribute is the name of a fully qualified class, such as sample.teapot.TeapotNativeActivity. , then the package name in the
<meta-data>element: specifies an additional data item, which is a name-value pair, to be provided to its parent component. This data will form a Bundle object that can be used by the metaData field. Although multiple<meta-data>element tags can be used, it is not recommended to use them this way. If there are multiple data items to be specified, the recommended practice is to combine multiple data items into a single resource and then use a single<meta-data>to include them. This element has three attributes.- android:name: the name of the data item, which is a unique value.
- android:resource: a reference to a resource.
- android:value: the value of the data item.
<intent-filter>element: indicates what kind of intent (intent) this activity can be launched with. This element has several child elements that can be included. We’ll start with the two that we encountered.<action>element: Indicates what action the activity is launched as. intent.action.MAIN indicates that it is launched as the main activity.<category>element: This is additional category information for the action element. intent.category.LAUNCHER indicates that this activity is the highest priority Activity for the current application.
It should be noted that the AndroidManifest.xml file extracted directly by zip is compressed. If you open it directly with notepad, it will be messy. You can unzip it by AXMLPrinter2 tool. The specific process will be described in detail later.
Res folder
Inside the Android project folder, the main resource files are placed in the res folder. The res folder is for all the resource files.
- res/assets: assets folder is to store the native files without compilation processing, that is, the files inside this folder will not be pre-compiled like xml, java files, and can store some images, html, js, css and other files. assets directory will not be mapped to R, so the resources cannot be obtained by id, but must be operated and obtained through AssetManager can be manipulated and obtained. assets can have multiple levels of directories (only the /assets directory can contain any list of subdirectories. (Each other directory can only have files of that directory level). Note: Gradle does not create the asserts folder by default, but its path already exists under the main folder.
- res/animator: The XML file used to define the attribute animation.
- res/anim: The XML file used to define the animation object. Holds XML files that define tweened animation or frame by frame animation.
- res/drawable: store various image types, can’t define the file name purely numeric, can also create a new .xml file type Usually custom control style will create a new .xml format file in this folder as background image.
- res/color: XML file for defining the color state list. See color state list resource
- res/layout: XML file for defining the layout of the user interface.
- res/menu: XML file for defining application menus (such as option menus, context menus or submenus).
- res/raw: any file to be saved in raw form. To open these resources using the raw InputStream, call Resources.openRawResource() with the resource ID (i.e. raw.filename). However, to access the original filename and file hierarchy, consider saving some resources in the assets/ directory instead of res/raw/. The files in assets/ do not have resource IDs, so you can only read them using the AssetManager.
- res/values: XML files that contain simple values such as strings, integers, and colors. XML resource files in other res/ subdirectories define a single resource based on the XML filename, while files in the values/ directory can describe multiple resources. For the files in this directory, each child element of the
<resources>element defines a resource. For example, the<string>element creates the string resource and the<color>element creates the R.color resource. Since each resource is defined using its own XML element, you can name the files as you like and put different resource types in a given file. However, you may need to put unique resource types in different files to make them visible at a glance. For example, for the resources that can be created in this directory, the appropriate filename conventions are given below.- xml: array of resources (type array).
- xml: color value.
- xml: size value.
- xml: string value.
- xml: style.
- res/xml: Any XML file that can be read at runtime by calling getXML(). Various XML configuration files (such as searchable configurations) must be saved here.
- res/xml: a font file with an extension (such as .ttf, .otf, or .ttc), or an XML file containing the
<font-family>element.
resources.arsc file
The resource.arsc file is a resource index file generated during the Apk packaging process. You can see the resource.arsc file when you decompress the apk or analyze the apk with Android Studio. By learning the structure of resource.arsc file, it can help us understand the duplicate resource removal and resource file name obfuscation techniques used in apk package volume optimization.
arsc file role
Accessing a file in Java is required to provide the file path, e.g.
|
|
But in Android, you can get the resource file by drawable Id:
|
|
Here the content of the resource file can be obtained with an id, eliminating the need for manual input of the file path, which is achieved behind the scenes by reading the arsc file. These values of R.drawable.xxx, R.layout.xxx, R.string.xxx, etc. (stored in R.jar or R.java files) are called resource indexes, through which the actual resource paths or resource values can be retrieved in the arsc file. For example: getDrawable(R.drawable.img) becomes getDrawable(2131099964) after compilation, then convert the id to hex: 2131099964 = 0x7f06013c. This time the resource index is 0x7f06013c.
The resource index has a fixed format: 0xPPTTEEEE, PackageId (2 bits) + TypeId (2 bits) + EntryId (4 bits) :.
- PP:Package ID, the namespace of the package, takes values in the range of [0x01, 0x7f], third-party applications are 7f.
- TT:Resource type, there are anim, layout, mipmap, string, style and other resource types.
- EEEE:represents the value of a certain type of resource in the offset array
So 0x7f06013c in PackageId = 0x7f, TypeId = 0x06, EntryId = 0x013c
At its simplest, we can imagine the arsc function as a file with multiple Pair arrays, and each resource type (TypeId) corresponds to a Pair[] (or more, just one for ease of understanding). So to find the value of element 0x7f06013c in arsc is to try to find the array Pair[] corresponding to TypeId=0x06, and then find the element Pair[0X013c] with the number 0X013c. This element happens to be Pair(“img”, “. /res/drawable-xxhdpi/img.png”), with the resource name img on the left and the file path of the resource on the right “. /res/drawable-xxhdpi/img.png”, with the file path, the program can access the corresponding resource file.
Of course, the actual arsc file is a little bit more complicated in structure, so here is the analysis of the arsc file structure.
chunk
For the sake of understanding, before formally introducing the resource.arsc (hereinafter referred to as arsc) file, we need to explain the chunk, and the word “chunk” has been used many times in other articles. (For example, a tree can be divided into three chunks: the crown, the stem, and the roots. You can also consider a tree as a chunk, and this chunk is the tree.
arsc file structure
resources.arsc is a binary file whose internal structure is defined in ResourceTypes.h. The arsc file structure.
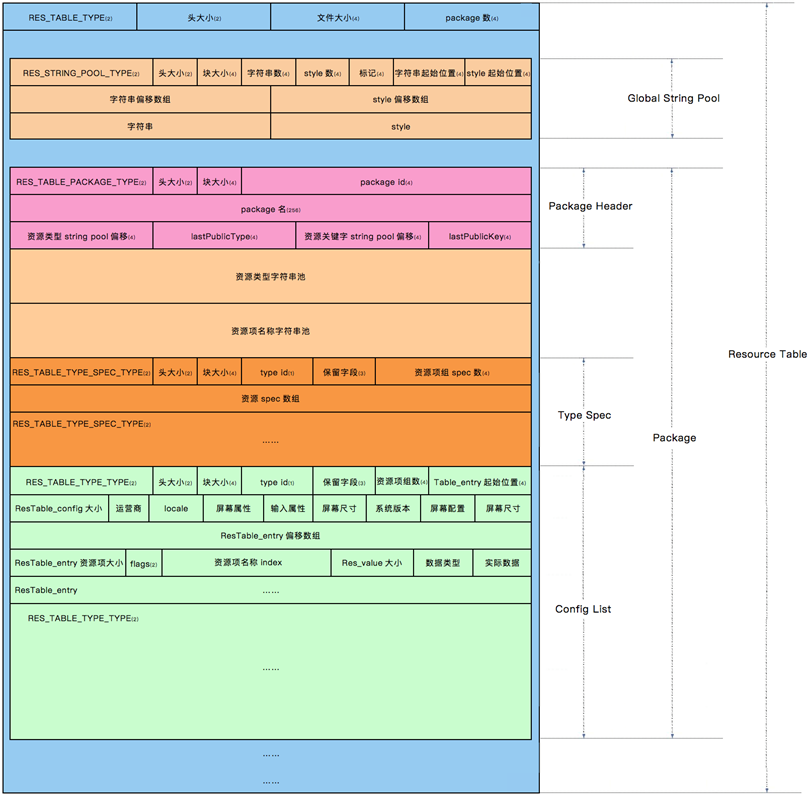
The image as a whole describes the relationship of each chunk in the arsc file (note the combination of the left and right sides of the image):
- The entire arsc file is a chunk of type RES_TABLE_TYPE.
- RES_TABLE_TYPE can be divided into three parts: the file header and two subchunks ( RES_STRING_POOL_TYPE , RES_TABLE_PACKAGE_TYPE ).
- RES_TABLE_PACKAGE_TYPE contains: a header, a pool of resource type string constants, a pool of resource item name string constants, and multiple subchunks (RES_TABLE_TYPE_SPEC_TYPE and RES_TABLE_TYPE_TYPE );
- Each type of chunk contains a header structure
META-INF directory
The signature information is stored in META-INF directory, which is used to ensure the integrity of apk package and the security of the system. can be installed and used normally, to a certain extent, to achieve the purpose of security.
There are four files in the META-INF directory: MANIFEST.MF, CERT.
- MF (summary file): The program iterates through all the files in the APK package, generates summary information with SHA1 for non-folder non-signature files one by one, and encodes it with Base64. If the files in the APK package are modified, the program will not be installed properly if the modified files are different from the verification information in MANIFEST.MF when the APK is installed and verified.
- SF (signature file for summary file): For the generated MANIFEST.MF file use SHA1-RSA algorithm to sign the developer’s private key. Only the public key can decrypt it during installation. After decryption it is compared with the unencrypted digest information and if it matches then the file has not been modified.
- RSA stores the public key, encryption algorithm, and other information.
When APK is installed, the APK can be secured by a loop that starts with the MANIFEST.MF file. For example, after getting an apk package, if you want to replace a picture, a piece of code, or a piece of copyright information inside, it is basically impossible to unzip, replace and repackage it directly. This makes it more difficult for virus infection and malicious modification, and helps to protect the security of the system. However, if these files or keys are obtained by the attacker or broken by the attacker through some technical means, the Android OS cannot verify its security.
classes.dex file
dex file is a kind of file in Android system, it is a special data format, similar to APK, jar and other format files. It is a file format that can be recognized, loaded and executed by DVM. Compared with the java virtual machine on PC that can run .class; the Davlik virtual machine on android can run .dex. when Java program compiled into class, you also need to use the dx tool to integrate all the class files into a dex file, the purpose is that each class can share data, to a certain extent to reduce the redundancy, but also The file structure is more compact, and experiments show that the dex file is about 50% of the size of a traditional jar file.
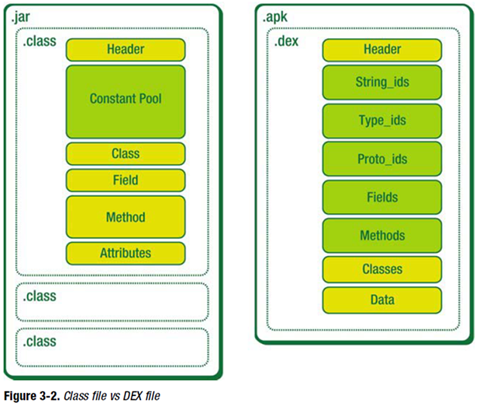
Before understanding what a Dex file is, it’s important to understand JVM, Dalvik and ART. JVM is a JAVA virtual machine used to run JAVA bytecode programs. Dalvik is a runtime environment designed by Google for the Android platform, suitable for systems with limited memory and processor speed in mobile environments. ART is a new Android runtime environment designed by Google to replace Dalvik, which was introduced in Android 4.4. ART has better performance than Dalvik. Dex file format is a compression format designed for Dalvik. So it can be simply understood that Dex file is the product of processing many .class files, which can be executed in Android runtime environment.
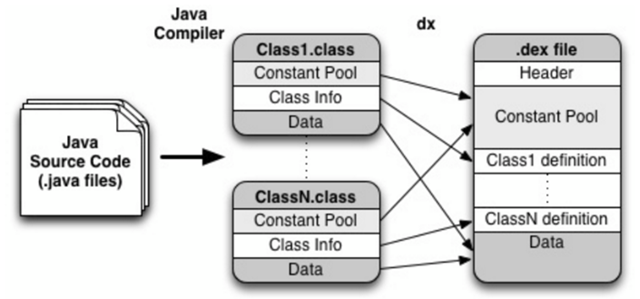
The flow of converting Java code into dex files is shown in the diagram, but of course the real process is not that simple, so here is just a visual representation.
lib folder
Referenced so files of third-party sdk with C/C++ compilation.
Apk packaging process
Let’s first have a brief understanding of the Android packaging process so that we can understand how the .java file becomes part of the apk step by step. The process of generating the apk mainly consists of the following processes, with the tools used represented in parentheses.
- Package the resource file to generate the java file (aapt)
- Process the aaidl file to generate the corresponding .java file (aaidl)
- Compile the project source code to generate class files (javac)
- Convert all class files to generate dex files (dx)
- Compiled resources and .dex files are packaged by apkbuilder tool into the final .apk file. (apkbuilder)
- Signing of APK files (jarsigner)
- Alignment of the signed APK file (zipalign)

APK file decompilation
Resource file acquisition
apktool is mainly used for resource file fetching. The main functions of Apktool are.
- Restore resource files to their original form (9.png, xml)
- Decompile Android dex files into smali source code
- Recompile decompiled resources into APK/JAR
So Apktool can not only disassemble apk, but also add the already disassembled apk resources to reassemble into apk.
It’s easy to use, you can decompile by executing the following command directly.
Apktool, since it can decompile, can also recompile to Apk files.
Using apktool has the following functions:
- View the content of AndroidManifest file, know the absolute path of each Activity, easy to view the code later to quickly locate
- Get the complete resource files (assest, drawable, resouces… directory files)
- If we are familiar with smali syntax, we can also modify other people’s code and repackage it into apk (such as cracking membership verification)
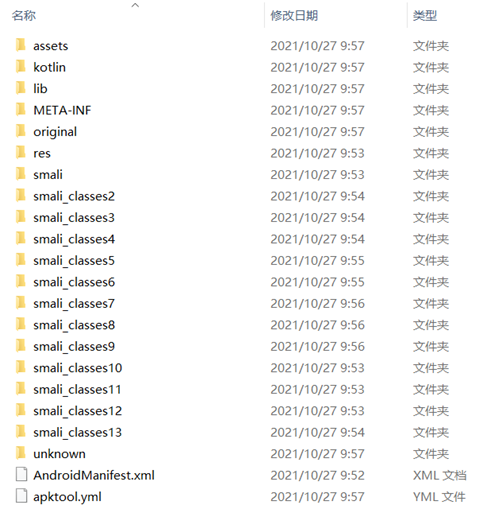
After decompression, we get AndroidManifest.xml file, assets folder, res folder, smali folder, etc. The original folder is the original AndroidManifest.xml file, the res folder is all the resources decompiled, and the smali folder is the decompiled code. Note that the structure under smali folder is exactly the same as the package of our source code, except that it is replaced by smali language. It is somewhat similar to assembly syntax, which is the register language used by Android virtual machine.
When using apktool version, if the version is too low, the following error will be reported.
|
|
The solution is to go to the official website to download the latest version and replace it if the following errors are found.
The reason is that the latest version of apktool has removed SmaliDebugging, my solution is to download version 2.0.9.
Decompilation of XML files
The xml file in the apk is compressed and can be uncompiled by AXMLPrinter2 tool with a command like.
java -jar . \AXMLPrinter2.jar . \AndroidManifest.xml > . \AndroidManifest.txt
apktool already comes with AndroidManifest.xml file decompression, so this tool is not very valuable.
classes.dex file decompilation
classes.dex is the java bytecode file generated after the java source code is compiled. But because the dalvik virtual machine used by Android is incompatible with the standard java virtual machine, the dex file is different from the class file, both in terms of file structure and opcode. At present, the common java decompiler tools can not handle dex files. dexdump, a decompiler tool for dex files, is provided in Android emulator. However, the readability of the result is very poor. Here is a tool with better readability.
Steps of decompiling.
- Extract the dex file from the APK, and get it by decompressing the APK file. Put it into the directory of dex2jar, open cmd and run bat classes.dex to generate classes.dex.dex2jar.jar.
- Run the JD-GUI tool and open the above jar file to see the source code.
Tools included in the dex2jar package.
- d2j-jar2dex: call dx to convert jar to dex
- d2j-jar-remap: rename package/class/method/field in the jar file.
- d2j-dex2jar: convert dex to jar
- dex2jar: this tool is deprecated, use d2j-dex2jar if possible
- d2j-jasmin2jar: compile .j files to .class files
- d2j-jar-access: add or remove access to class/method/field from jar files
- d2j-asm-verify: verify the .class file in the jar file
- d2j-dex-dump: dump the data from .dex or .apk file to dump.jar file
- d2j-init-deobf: generate the initialization configuration file for the anti-obfuscation jar file
- d2j-apk-sign: digitally sign the apk file with a test certificate
- d2j-jar2jasmin: disassemble the .class file from the jar file to the jasmin file
Enjarify is a Python3-based decompiler tool launched by Google, similar to dex2jar, which can convert Dalvik bytecode to the corresponding Java bytecode, with more excellent compatibility, accuracy and higher efficiency.
Sometimes when you decompile with JD-GUI, some files (Constants class i.e. constant class) open with // INTERNAL ERROR //, solution, use other Luyten or [jadx](https:/ /github.com/skylot/jadx) instead.
Automation Tools Summary (Onekey Decompile Apk)
onekey-decompile-apk
onekey-decompile-apk is the apk decompile tool that I used earlier, the function is relatively simple, mainly apktool/dex2jar/jd-gui only need to execute one step to decompile all the apk files (resource files and jar, etc.). The usage is very simple.
- Unzip the downloaded onekey-decompile-apk.zip
- Put the apk file into onekey-decompile-apk directory
- Drag and drop the apk file to _onekey-decompile-apk.bat
Since the author has not updated for a long time, you can actually upgrade the tools in the _tool directory yourself and change the path to the latest version of the software in _onekey-decompile-apk.bat.
TTDeDroid
TTDeDroid is also a one-key decompile tool, supports decompile apk/aar/dex/jar, mainly integrated with jadx/dex2jar/enjarify (no need to install Python manually)
Google Official: android-classysh
android-classysh is a one-click decompilation tool exited by Google,, directly open Apk file, you can see all the file structure in Apk, and even integrated dex file view, java code view, method number analysis, import obfuscation mapping file and a series of tools. The purpose of Google to launch this tool is to let us developers more clearly understand what files are in their Apk, what changes before and after the obfuscation, and to facilitate us to further optimize their Apk packaging implementation. A rather bad experience is that exporting is not possible.
Python implementation of the tool: Androguard
Androguard integrates a toolkit for decompiling various files such as resources and code. You need to install the Python environment to run this tool, which is written as different py function modules according to different decompilation needs, and static analysis functions. So if you want to use Python to develop a service to parse Apk files and perform static scan analysis, you can quote this tool to achieve it.
Android Killer
AndroidKiller combines Apk decompiling, Apk packaging, Apk signing, code interchange, ADB communication (application installation-uninstallation-running-device file management) and other features in one, supports logcat log output. Syntax highlighting, keyword-based (support for single-line code or multi-line code segment) project search, customizable external tools; absorption and integration of a variety of tools and features to create a one-stop reverse tool operating experience, greatly simplifying the user in the Android application / game modification process of all kinds of tedious work.
GDA
GDA supports package filtering analysis, algorithm tools, file conversion tools, etc. in addition to decompiling.
Bytecode Viewer
Bytecode Viewer is a powerful decompiler tool that integrates six Java decompiler libraries (including Fernflower and CFR), Andorid decompiler library and bytecode class library.
This tool provides a GUI interface that can enhance the user experience of using CFR.
APK Decompilation Advanced
The extent to which Java code in an Android APK can be decompiled depends on the level of encryption in the APK.
- The first case: no obfuscation, no encryption, no shelling. Directly use Dex2jar and JD-GUI to extract the source code from the APK, the code logic is clear and basically reusable, only the resource file references need to be calculated.
- The second case: obfuscation. Usually the protection is done with ProGuard. Because it is an irreversible obfuscation of the jar (unless there is mapping), it cannot be reverted to the original code. However, the code structure and logic are the same, so if you spend a long time combing the code, you can find the core code, and the decryption method is the same as the first one.
- The third case: encryption. Take DexGuard as an example. For this kind of code encryption method, it will definitely be decrypted when the program is running, as long as the logic of decryption is extracted.
- The fourth case: shelling. This case is similar to the third one. No matter how you add the shell, it will definitely run with Dalvik-identifiable Odex code, so it is recommended to dump it directly in memory.
Android obfuscation handling: ProGuard
The Android SDK comes with the obfuscation tool Proguard, which is located under \tools\proguard in the root directory of the SDK. ProGuard is a free Java class file shrinker, optimizer, obfuscator and pre-checker. It can detect and remove unused classes, fields, methods and properties. It optimizes bytecode and removes unused directives. It can rename classes, fields and methods using short meaningless names. Finally, the pre-checked Java 6 or the processed code as described for Java MicroEdition. If obfuscation is enabled, Proguard will by default obfuscate all code, including third-party packages, but some code or third-party packages cannot be obfuscated, so we need to manually write obfuscation rules to keep the parts that cannot be obfuscated.
The “obfuscation” in Android can be divided into two parts, one is the optimization and obfuscation of Java code, which relies on the proguard obfuscator, and the other is the resource compression, which removes unused resources from the project and dependent libraries.
Code obfuscation
- Shrinking: enabled by default to reduce the size of the application, remove unused classes and members, and re-execute the optimization action after it has been performed (since it may expose some unused classes and members again).
- Optimization: Enabled by default to perform optimizations at the bytecode level to make the application run faster.
- Obfuscation: enabled by default, increases the difficulty of decompiling, class, function and variable names will be randomly named into meaningless code names such as: a,b,c…etc. unless protected by keep.
These features are turned on by default, to turn them off you just need to configure the corresponding rules. By default, obfuscation generates a mapping.txt file in the project directory app/build/outputs/mapping/release, which is the obfuscation rule according to which we can push the obfuscated code back to the source code. In principle, the more messy and irregular the code is after obfuscation, the better, but there are some places where we have to avoid obfuscation, otherwise the program will run wrong.
Resource Compression
Resource compression removes unused resources from the project and dependent libraries, which can be useful in reducing the size of apk packages and is generally recommended. Note that resource compression will only take effect if code compression is enabled with minifyEnabled true. Resource compression consists of two processes, “merge resources” and “remove resources”. In the “merge resources” process, resources with the same name are considered duplicates and are merged. Note that this process is not controlled by the shrinkResources property and cannot be disabled. gradle will do this, as it will cause errors if resources with the same name exist in different projects. gradle looks for duplicate resources in four places.
- src/main/res/ path
- different build types (debug, release, etc.)
- different build channels
- Third-party libraries that the project depends on Merge resources in the following order of priority.
dependencies -> main -> channels -> build types
For example, if duplicate resources exist in both the main folder and in different channels, gradle will choose to keep the resources in the channels. Also, if duplicate resources are present at the same level, such as src/main/res/ and src/main/res2/, gradle will not be able to complete the resource merge and will report a resource merge error. The “remove resources” process is known by its name. Note that, similar to the code, obfuscating resource removal can also define which resources need to be kept, which is given below.
DexGuard Obfuscation (Anti-Secondary Packaging)
DexGuard is developed by the same company as ProGuard, the main obfuscation tool on Android, but it has more features and stronger obfuscation than the free ProGuard.
- Progurad is free and already integrated into Android ADT, it is easy to use. proguard can only protect the code, but not our apk files. Anyone can use apktool tool to decompile our developed apk file, and then change various resources in it, or change part of the code, or even inject the code, and then package it back to apk, after secondary distribution, to achieve their own purpose. Or add ads, or add a malicious Trojan virus, etc. No multi-dex is required.
- DexGuard is paid. DexGuard is based on Proguard with more protection. After using DexGuard to obfuscate the generated apk file, it can’t be decompiled normally with apktool. Although it is still possible to decompile some of the resource files, they cannot be packaged into apk again because the decompilation process is incomplete. This protects our apk files from being packaged and distributed twice. Code obfuscation is stronger + resource obfuscation + so shelling etc. Comes with multi-dex scanning.
Apk file shelling
Apk shelling is the process of adding a layer of protection to the target Apk to hide important data and information. The Apk shell is essentially a class loader. The system executes the shell code first, then decrypts the encrypted dex and loads it into the system memory to run.
Android dex shelling principle
There are three main procedures in the shelling process.
- The source Apk1 (the original application without shelling)
- Shell APK2 (used to decrypt and run apk1 program)
- Encryption tool (encrypts the source APK1 and merges it with the dex of the shell APK2 to form a new dex)
Encryption process.
- Get the apk to be encrypted and your own shelling program apk1.
- Encrypt the source apk with the shelling tool. Write the encrypted apk data to the end of the Dex of the sheller and add the size of the encrypted data to the end of the file; modify the signature and file_size headers in the Dex header of the sheller; merge to get the new Dex1 file.
- Then replace the dex file in the original sheller apk1 with the new Dex1 file. A new apk is generated, called the stripper apk.
Shelling process.
- Read the data at the end of the Dex file to get the length of the encrypted data to be shelled.
- Read the decrypted data from the Dex file and decrypt the encrypted data. Save the decrypted data as a file to *.apk file.
- Load *.apk dynamically by DexClassLoader.
Shell History
First generation shell: DEX encryption (obfuscation technique)
- Dex string encryption
- Resource encryption
- Anti-decompilation
- Anti-debugging
- Custom DexClassLoader
Second generation shells: Dex extraction and So hardening (shelling technology)
- Against the common dex method of first-generation shells
- Dex Method code extraction to the outside
- Dex Dynamic Loading
- So encryption
Class extraction is conventionally done by hiding the dex file and modifying the dex structure. Hiding dex file is done by encrypting or compressing the target dex file as a whole, converting the whole dex into another file and storing it in assert folder or other places, then decrypting it in memory and loading it using class loader technology. The dex structure is modified by extracting the bytecode instructions from the DexCode and filling them with zeros, or by modifying the method properties, and then making corrections and fixes in memory at runtime.
Regarding the dynamic loading of Dex, we should mention the dalvik virtual machine. Like the java virtual machine, it first needs to load the corresponding class into memory when running the program. In a standard virtual machine, class loading can be done either from a class file or from other binary streams, so that the class can be loaded manually while the program is running, thus allowing dynamic code execution. There are two classes commonly used: DexClassLoader and PathClassLoader, PathClassLoader is the default loader in Android applications. Differences.
- DexClassLoader can load any path of dex/dex/jar
- PathClassLoader can only load the apk in data/app, which is already installed in the phone. This is also the reason why PathClassLoader is the default class loader, because generally the program is installed and then opened, when PathClassLoader will load the specified apk.
Third Generation Shell: Dex Dynamic Decryption and So Obfuscation (Instruction Extraction)
- Dex Method code dynamic decryption
- So code inflation obfuscation
- Against all previously emerged decryption methods
Fourth generation shells: arm vmp (instruction conversion)
vmp:The process of restoration after being hardened with vmp is more complex and difficult, and requires a lot of time for analysis.
Identification of shells
Domestic third-party technology companies that provide apk hardening include: Naga, Love Encryption, Bang Bang Hardening, 360 Hardening Protection, Baidu Hardening, Tencent Hardening, etc.
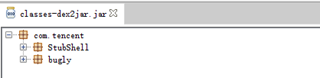
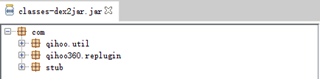
After reinforced apk, decompiled by dex2jar.
Tencent Le solidification.
360 reinforcement.
By looking at the information, I found that most encryptions generate a corresponding feature so file. This way, we can check the shell according to the so.
| Features So file | belong to reinforcement company |
|---|---|
| libchaosvmp.so | naga |
| libddog.so | Naga |
| libfdog.so | Naga |
| libedog.so | Naga Enterprise |
| libexec.so | Love Encryption |
| libexecmain.so | Love Encryption |
| ijiami.dat | Love Encryption |
| ijiami.ajm | Naga Enterprise |
| libsecexe.so | Bang Bang Bang Free Edition |
| libsecmain.so | Bang Bang Bang Free Edition |
| libSecShell.so | Bang Bang Bang Free |
| libDexHelper.so | Bang Bang Bang Enterprise |
| libDexHelper-x86.so | 梆 Enterprise |
| libprotectClass.so | 360 |
| libjiagu.so | 360 |
| libjiagu_art.so | 360 |
| libjiagu_x86.so | 360 |
| libegis.so | password |
| libNSaferOnly.so | passwordshield |
| libnqshield.so | netqin |
| libbaiduprotect.so | baidu |
| aliprotect.dat | AlijuSecurity |
| libsgmain.so | aliju security |
| libsgsecuritybody.so | aliju security |
| libmobisec.so | Alijou Security |
| libtup.so | tencent |
| libexec.so | Tencent |
| libshell.so | Tencent |
| mix.dex | tencent |
| lib/armeabi/mix.dex | cent |
| lib/armeabi/mixz.dex | cent |
| libtosprotection.armeabi.so | 腾讯御安全 |
| libtosprotection.armeabi-v7a.so | Tencent |
| libtosprotection.x86.so | Tencent Security |
| libnesec.so | NetEaseShield |
| libAPKProtect.so | APKProtect |
| libkwscmm.so | Several Dimensional Security |
| libkwscr.so | several-dimensional security |
| libkwslinker.so | several-dimensional security |
| libx3g.so | Top Image Technology |
| libapssec.so | Shanda |
| librsprotect.so | Risingstar |
This feature can be used as the characteristics of the shelling vendor. In this way, you can get the set of vendors shelling, and there is a way to crack the shelling. The working principle of ApkScan-PKID is to match the shelling vendor based on the feature file generated after the apk shelling.
Commonly used shelling software
VirtualXposed
VirtualXposed: You can use Xposed framework without rooting your phone.
ZjDroid
ZjDroid is a dynamic reverse analysis module based on Xposed Framewrok, reverse analysts can use ZjDroid to do the following: 1. memory dump of DEX files 2. memory based on Dalvik key pointers BackSmali, effectively crack the mainstream reinforcement program 3, dynamic monitoring of sensitive API 4, the specified memory area data dump 5, get the application loaded DEX information. 6、Get the specified DEX file loading class information. 7、dump Dalvik java heap information. 8、Run lua script dynamically in the target process.
FDex2
FDex2, can dump export useful dex file from android app for subsequent then export jar package from dex, jar package export java source code, very powerful function.
frida
The principle of frida is that by installing Frida on the PC, running frida-server on the phone, to achieve PC control of the phone, while the way through js injection, the dex from the “shell” “hook” out. It is a python based hook (hook) tool, so before installing it we need to configure the Py environment, now frida only supports the environment below 3.7, above 3.8 is not supported for the time being. FRIDA-DEXDump
dumpDex
dumpDex is an Android shelling tool, need xposed support
drizzleDumper
drizzleDumper is a memory search-based Android deshelling tool that can export dex files from running Android apps using the ptrace mechanism