The blog was previously deployed on Ali cloud and was about to expire, so I migrated the server to Tencent cloud for the Double 11 event. At the same time, we intend to change the operating system for deployment, and replace the original CentOS 7.4 with Ubuntu 20.04 LTS.
The rest of the environment is basically the same, still using Nginx + MariaDB + phpMyAdmin + Let’s Encrypt as before, but since CentOS and Ubuntu use different package management tools, there are some differences in the installation. There are still some differences in the installation.
Pre-installation equipment
1、Check and confirm the system version
2、Modify the software source
1
2
|
sudo cp /etc/apt/sources.list /etc/apt/sources.list.backup
sudo nano /etc/apt/sources.list
|
Tencent Cloud has already helped to modify the software source, so there is no need to make changes here.
3、Update the system
1
2
|
sudo apt update
sudo apt upgrade
|
Install Nginx
 1
 2
 3
 4
 5
 6
 7
 8
 9
10
|
sudo apt install nginx

# 查看服务是否已经启动
systemctl status nginx
# 添加开机启动
sudo systemctl enable nginx

sudo systemctl stop nginx
sudo systemctl start nginx
sudo systemctl restart nginx
|
Open firewall
1
2
3
4
5
6
7
8
|
# 打开OpenSSH的端口
sudo ufw allow OpenSSH
# 打开 Nginx的端口
sudo ufw allow 'Nginx Full'
# 开启防火墙
sudo ufw enable
# 查看ufw状态
sudo ufw status
|
 1
 2
 3
 4
 5
 6
 7
 8
 9
10
11
12
|
ubuntu@VM-0-7-ubuntu:~$ sudo ufw enable
Command may disrupt existing ssh connections. Proceed with operation (y|n)? y
Firewall is active and enabled on system startup
ubuntu@VM-0-7-ubuntu:~$ sudo ufw status
Status: active

To                         Action      From
--                         ------      ----
OpenSSH                    ALLOW       Anywhere
Nginx Full                 ALLOW       Anywhere
OpenSSH (v6)               ALLOW       Anywhere (v6)
Nginx Full (v6)            ALLOW       Anywhere (v6)
|
Install PHP 7.4
Determine the PHP version in the software source.
1
|
apt search --names-only ^php
|
As you can see the current version is PHP 7.4, if you want to install the latest 7.4 in Ubuntu 18.04 you need to install the additional source.
1
2
3
4
5
|
# Install PHP 7.4 on Ubuntu 18.04
sudo apt-get update
sudo apt -y install software-properties-common
sudo add-apt-repository ppa:ondrej/php
sudo apt-get update
|
Install PHP programs and common modules/extensions
1
|
sudo apt install php7.4
|
 1
 2
 3
 4
 5
 6
 7
 8
 9
10
11
12
13
14
15
16
|
ubuntu@VM-0-7-ubuntu:~$ sudo apt install php7.4
Reading package lists... Done
Building dependency tree
Reading state information... Done
The following additional packages will be installed:
  apache2 apache2-bin apache2-data apache2-utils libapache2-mod-php7.4 libapr1 libaprutil1 libaprutil1-dbd-sqlite3 libaprutil1-ldap libjansson4 liblua5.2-0 php-common php7.4-cli php7.4-common php7.4-json php7.4-opcache
  php7.4-readline ssl-cert
Suggested packages:
  apache2-doc apache2-suexec-pristine | apache2-suexec-custom www-browser php-pear openssl-blacklist
The following NEW packages will be installed:
  apache2 apache2-bin apache2-data apache2-utils libapache2-mod-php7.4 libapr1 libaprutil1 libaprutil1-dbd-sqlite3 libaprutil1-ldap libjansson4 liblua5.2-0 php-common php7.4 php7.4-cli php7.4-common php7.4-json php7.4-opcache
  php7.4-readline ssl-cert
0 upgraded, 19 newly installed, 0 to remove and 0 not upgraded.
Need to get 5,881 kB of archives.
After this operation, 26.0 MB of additional disk space will be used.
Do you want to continue? [Y/n]
|
Here you can see that in addition to the installation of PHP will also install some other module components, here also installed apache, because the server uses Nginx, so do not need Apache.
1
2
|
# 禁用Apache
sudo systemctl disable --now apache2
|
Installation of PHP components and modules
Install the components as follows
1
|
sudo apt install php7.4-extension_name
|
Commonly used components are organized here.
1
|
sudo apt install php7.4-fpm php7.4-cli php7.4-common php7.4-json php7.4-opcache php7.4-readline php7.4-dev php7.4-mysql php7.4-sqlite3 php7.4-xml php7.4-xmlrpc php7.4-curl php7.4-gd php7.4-imagick php7.4-imap php7.4-soap php7.4-mbstring php7.4-zip php7.4-ssh2 php7.4-intl php7.4-zip
|
Modify PHP configuration file
1
|
sudo nano /etc/php/7.4/fpm/php.ini
|
The main modification of the security risk will improve performance.
1
2
3
4
5
6
7
|
cgi.fix_pathinfo=0
upload_max_filesize = 32M
post_max_size = 48M
memory_limit = 256M
max_execution_time = 600
max_input_vars = 3000
max_input_time = 1000
|
Restart php-fpm after the changes are made and let the configuration take effect:
1
|
sudo systemctl restart php7.4-fpm
|
Modify Nginx configuration to test if PHP is installed successfully
1
|
sudo nano /etc/nginx/sites-available/default
|
Remove the comments under the following lines of code.
 1
 2
 3
 4
 5
 6
 7
 8
 9
10
|
# pass PHP scripts to FastCGI server
#
location ~ \.php$ {
        include snippets/fastcgi-php.conf;
#
#       # With php-fpm (or other unix sockets):
        fastcgi_pass unix:/var/run/php/php7.4-fpm.sock;
#       # With php-cgi (or other tcp sockets):
#       fastcgi_pass 127.0.0.1:9000;
}
|
Reload the Nginx configuration file to allow the configuration to take effect:
1
2
|
sudo nginx -t
sudo systemctl reload nginx
|
Create the PHP file.
1
|
sudo nano /var/www/html/info.php
|
file content.
Save the file and open: http://your_server_ip/info.php to see if the PHP information page can be opened normally.
Note: It is recommended to delete the info.php file after viewing, otherwise there may be security risks.
1
|
sudo rm /var/www/html/info.php
|
Install MariaDB
1
2
3
4
5
6
7
|
sudo apt install mariadb-server mariadb-client
sudo systemctl status mariadb
sudo systemctl stop mariadb
sudo systemctl start mariadb
sudo systemctl enable mariadb
# 初始化设置:
sudo mysql_secure_installation
|
Installing phpMyAdmin
1
|
sudo apt install phpmyadmin
|
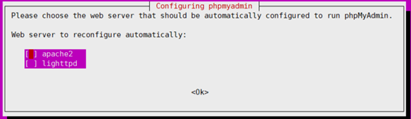
The installer will ask you to select the web server that should be automatically configured to run phpMyAdmin. There is no option to select Nginx, press ESC here to exit.
Next, the installer will ask if you want to use the dbconfig-common tool to set up the database. Select Yes, then press Enter.

Enter the phpMyAdmin password to register in the database, select OK, and press Enter.
Configuring Nginx
Make the phpMyAdmin program files accessible to Nginx: /usr/share/phpmyadmin,
1
2
3
|
sudo ln -s /usr/share/phpmyadmin /var/www/html/phpmyadmin
sudo chmod 775 -R /usr/share/phpmyadmin/
sudo chown root:www-data -R /usr/share/phpmyadmin/
|
Modify the /etc/nginx/sites-available/default file.
1
|
sudo nano /etc/nginx/sites-available/default
|
Add index.php to the default file
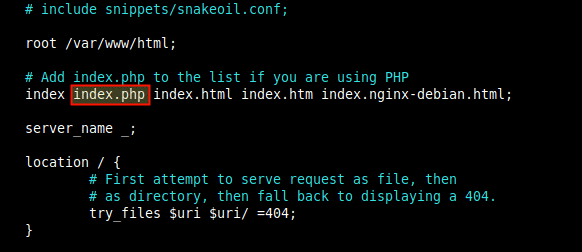
Then restart sudo systemctl restart nginx. You can access it via http://your_server_ip/phpmyadmin/ after it finishes.
The login account is phpmyadmin and the password is the one you just set. After logging in aggressively, you find that you do not have permission to create new tables, etc.
After logging out and changing the root account to log in, I found that I could not log in because by default the root account uses the auth_socket plugin for authentication.
Solution 1: Change the login of root account
1
2
3
4
|
SELECT user,plugin,host FROM mysql.user WHERE user = 'root';
ALTER USER 'root'@'localhost' IDENTIFIED WITH mysql_native_password BY '******';
FLUSH PRIVILEGES;
EXIT;
|
Solution 2: Add an administrator account:.
1
2
3
|
GRANT ALL PRIVILEGES ON *.* TO 'dbadmin'@'localhost' IDENTIFIED BY 'password';
FLUSH PRIVILEGES;
EXIT;
|
Just log in to phpmyadmin with the root account or a new administrator account when you are done.
phpMyAdmin Security Settings
Installing phpMyAdmin directly on the server may have some security risks. The solution is to mask the directory.
1
2
|
cd /var/www/html/
sudo mv phpmyadmin nothingtosee
|
The directory name here can be set by yourself. The purpose is to prevent others from guessing the phpMyAdmin path for attacks.
Add Nginx authentication to hide the phpMyAdmin login screen.
1
2
3
4
5
6
7
8
9
10
|
# 生成密码加密后值
openssl passwd nginx_password
# 输出值
tpr9W.ydSHL7M
# 创建密码文件
sudo nano /etc/nginx/pma_pass
# 密码文件内容:
sammy:tpr9W.ydSHL7M
|
The colon is preceded by the username for the next login, followed by the encrypted password you just generated.
Modify the Nginx configuration unseen by adding the following.
1
2
3
4
5
6
7
8
|
server {
. . .
location /nothingtosee {
auth_basic "Admin Login";
auth_basic_user_file /etc/nginx/pma_pass;
}
. . .
}
|
1
2
|
sudo nginx -t
sudo systemctl reload nginx
|
The modified address is: https://server_domain_or_IP/nothingtosee and requires Nginx authentication before entering.
Deploy Wordpress
1
2
3
4
5
6
7
8
9
10
|
# 安装上传下载工具
sudo apt install lrzsz
# 上传打包网站文件后修改目录权限
sudo chown -R www-data:www-data /srv/www/www.biaodianfu.com/
sudo chmod -R 755 /srv/www/www.biaodianfu.com/
sudo find /srv/www/www.biaodianfu.com/ -type d -exec chmod 755 {} \;
# 配置文件
sudo nano /etc/nginx/sites-enabled/www.biaodianfu.com
|
1
2
3
4
5
6
7
8
9
10
11
12
13
14
15
16
17
18
19
20
21
22
23
24
25
26
27
28
29
30
31
32
33
34
35
36
37
38
|
server {
listen 80;
listen [::]:80;
server_name biaodianfu.com www.biaodianfu.com;
root /srv/www/www.biaodianfu.com/;
index index.html index.htm index.php;
charset utf-8;
add_header X-Frame-Options DENY;
add_header X-Content-Type-Options nosniff;
# include snippets/well-known;
access_log /var/log/nginx/www.biaodianfu.com.access.log;
error_log /var/log/nginx/www.biaodianfu.com.error.log;
client_max_body_size 100M;
autoindex off;
location / {
try_files $uri $uri/ /index.php?$args;
}
location ~ .php$ {
include snippets/fastcgi-php.conf;
fastcgi_pass unix:/var/run/php/php7.4-fpm.sock;
fastcgi_param SCRIPT_FILENAME $document_root$fastcgi_script_name;
include fastcgi_params;
fastcgi_read_timeout 300s;
}
location = /favicon.ico {
log_not_found off;
access_log off;
}
}
|
Install Let’s Encrypt
1
2
3
4
5
6
|
sudo apt install certbot
sudo mkdir -p /var/lib/letsencrypt/.well-known
sudo chgrp www-data /var/lib/letsencrypt
sudo chmod g+s /var/lib/letsencrypt
sudo nano /etc/nginx/snippets/well-known
|
1
2
3
4
5
6
|
location ^~ /.well-known/acme-challenge/ {
allow all;
root /var/lib/letsencrypt/;
default_type "text/plain";
try_files $uri =404;
}
|
Apply for a certificate
1
2
|
sudo certbot certonly --agree-tos --email username@email.com --webroot -w /var/lib/letsencrypt/ -d www.biaodianfu.com
sudo openssl dhparam -out /etc/ssl/certs/dhparam.pem 2048
|
Adjusting the Nginx configuration file.
 1
 2
 3
 4
 5
 6
 7
 8
 9
10
11
12
13
14
15
16
17
18
19
20
21
22
23
24
25
26
27
28
29
30
31
32
33
34
35
36
37
38
39
40
41
42
43
44
45
46
47
48
49
50
51
52
53
54
55
56
57
58
59
60
61
62
63
64
65
66
67
68
69
70
71
72
73
|
server {
    listen 80;
    listen [::]:80;

    server_name  biaodianfu.com www.biaodianfu.com;
    include snippets/well-known;
    return 301 https://$host$request_uri;
}

server {
    listen 443 ssl http2;
    listen [::]:443 ssl http2;

    server_name  biaodianfu.com www.biaodianfu.com;
    root   /srv/www/www.biaodianfu.com/;
    index index.html index.htm index.php;
    charset utf-8;

    if ($host != "www.biaodianfu.com") {
           return 301 https://www.biaodianfu.com$request_uri;
       }

    add_header X-Frame-Options DENY;
    add_header X-Content-Type-Options nosniff;

    include snippets/well-known;
    ssl_certificate /etc/letsencrypt/live/www.biaodianfu.com/fullchain.pem;
    ssl_certificate_key /etc/letsencrypt/live/www.biaodianfu.com/privkey.pem;

    ssl_session_timeout 1d;
    ssl_session_cache shared:SSL:50m;
    ssl_session_tickets off;

    ssl_trusted_certificate /etc/letsencrypt/live/www.biaodianfu.com/chain.pem;
    ssl_dhparam /etc/ssl/certs/dhparam.pem;

    ssl_protocols TLSv1 TLSv1.1 TLSv1.2 TLSv1.3;
    ssl_ciphers 'ECDHE-ECDSA-CHACHA20-POLY1305:ECDHE-RSA-CHACHA20-POLY1305:ECDHE-ECDSA-AES128-GCM-SHA256:ECDHE-RSA-AES128-GCM-SHA256:ECDHE-ECDSA-AES256-GCM-SHA384:ECDHE-RSA-AES256-GCM-SHA384:DHE-RSA-AES128-GCM-SHA256:DHE-RSA-AES256-GCM-SHA384:ECDHE-ECDSA-AES128-SHA256:ECDHE-RSA-AES128-SHA256:ECDHE-ECDSA-AES128-SHA:ECDHE-RSA-AES256-SHA384:ECDHE-RSA-AES128-SHA:ECDHE-ECDSA-AES256-SHA384:ECDHE-ECDSA-AES256-SHA:ECDHE-RSA-AES256-SHA:DHE-RSA-AES128-SHA256:DHE-RSA-AES128-SHA:DHE-RSA-AES256-SHA256:DHE-RSA-AES256-SHA:ECDHE-ECDSA-DES-CBC3-SHA:ECDHE-RSA-DES-CBC3-SHA:EDH-RSA-DES-CBC3-SHA:AES128-GCM-SHA256:AES256-GCM-SHA384:AES128-SHA256:AES256-SHA256:AES128-SHA:AES256-SHA:DES-CBC3-SHA:!DSS';
    ssl_prefer_server_ciphers on;
    ssl_stapling on;
    ssl_stapling_verify on;
    resolver 223.5.5.5 223.6.6.6 valid=300s;
    resolver_timeout 30s;

    # HSTS (ngx_http_headers_module is required) (15768000 seconds = 6 months)
    add_header Strict-Transport-Security max-age=15768000;

    access_log /var/log/nginx/www.biaodianfu.com.access.log;
    error_log /var/log/nginx/www.biaodianfu.com.error.log;


    client_max_body_size 100M;

    autoindex off;

    location / {
        try_files $uri $uri/ /index.php?$args;
    }

    location ~ .php$ {
         include snippets/fastcgi-php.conf;
         fastcgi_pass unix:/var/run/php/php7.4-fpm.sock;
         fastcgi_param SCRIPT_FILENAME $document_root$fastcgi_script_name;
         include fastcgi_params;
         fastcgi_read_timeout 300s;
    }


    location = /favicon.ico {
        log_not_found off;
        access_log off;
    }
}
|
Automatic renewal of certificates.
1
|
30 2 * */2 * /usr/bin/certbot renew --quiet --renew-hook "nginx -s reload" >> /var/log/letsencrypt/renew.log
|