We know that there are two main ways to integrate Flutter with native Android. One is to create a flutter module, and then rely on it as a native module; the other is to package the flutter module into aar, and then rely on the aar package in the native project, which is officially recommended. aar way to access.
1. Android native engineering
In Android native development, there are usually three ways to implement bottom Tab navigation, namely:
- RadioGroup + ViewPager + Fragment: Ability to preload adjacent Fragments
- FragmentTabHost + Fragment: Load the selected Fragment
- BottomNavigationView: has a selected animation effect
Here, we use BottomNavigationView to implement bottom tab navigation. First, we create a new Android native project, and then create three new Fragments. The activity_main.xml layout code is as follows:
 1
 2
 3
 4
 5
 6
 7
 8
 9
10
11
12
13
14
15
16
17
18
19
20
21
22
23
24
25
26
27
28
29
|
<androidx.constraintlayout.widget.ConstraintLayout xmlns:android="http://schemas.android.com/apk/res/android"
    xmlns:app="http://schemas.android.com/apk/res-auto"
    android:layout_width="match_parent"
    android:layout_height="match_parent"
    android:paddingTop="?attr/actionBarSize">


    <FrameLayout
        android:id="@+id/fl_container"
        android:layout_width="match_parent"
        android:layout_height="0dp"
        app:layout_constraintBottom_toTopOf="@id/bottom_navigation"
        app:layout_constraintLeft_toLeftOf="parent"
        app:layout_constraintTop_toTopOf="parent" />

    <com.google.android.material.bottomnavigation.BottomNavigationView
        android:id="@+id/bottom_navigation"
        android:layout_width="0dp"
        android:layout_height="wrap_content"
        android:layout_marginStart="0dp"
        android:layout_marginEnd="0dp"
        android:background="?android:attr/windowBackground"
        app:itemTextColor="@color/tab_text_color"
        app:layout_constraintBottom_toBottomOf="parent"
        app:layout_constraintLeft_toLeftOf="parent"
        app:layout_constraintRight_toRightOf="parent"
        app:menu="@menu/bottom_nav_menu" />

</androidx.constraintlayout.widget.ConstraintLayout>
|
The code introduces a bottom_nav_menu.xml layout, the code is as follows:
 1
 2
 3
 4
 5
 6
 7
 8
 9
10
11
12
13
14
15
16
|
<menu xmlns:android="http://schemas.android.com/apk/res/android">
    <item
        android:id="@+id/nav_home"
        android:icon="@drawable/tab_home"
        android:title="@string/tab_home" />

    <item
        android:id="@+id/nav_car"
        android:icon="@drawable/tab_car"
        android:title="@string/tab_car" />

    <item
        android:id="@+id/nav_me"
        android:icon="@drawable/tab_mine"
        android:title="@string/tab_me" />
</menu>
|
Among them, the commonly used properties of BottomNavigationView are as follows:
app:iteamBackground: refers to the background color of the bottom navigation bar, the default is the color of the theme
app:menu: refers to the bottom menu (text and pictures are written in this, it is recommended to use vector graphics)
app:itemTextColor: refers to the color of the navigation bar text
app:itemIconTint: refers to the color of the image in the navigation bar
Finally, implement Tab switching in MainActivity.java, the code is as follows:
 1
 2
 3
 4
 5
 6
 7
 8
 9
10
11
12
13
14
15
16
17
18
19
20
21
22
23
24
25
26
27
28
29
30
31
32
33
34
35
36
37
38
39
40
41
42
43
44
45
46
47
48
49
50
51
52
53
54
55
56
57
58
59
60
61
62
|
class MainActivity : AppCompatActivity() {

    private var fragments = mutableListOf<Fragment>()
    private var lastfragment = 0

    override fun onCreate(savedInstanceState: Bundle?) {
        super.onCreate(savedInstanceState)
        setContentView(R.layout.activity_main)

        initFragment()
        initNavigationSelectedListener()
    }


    private fun initFragment() {
        val homeFragment = HomeFragment()
        val carFragment = CarFragment()
        val mineFragment = MineFragment()
        fragments.add(homeFragment)
        fragments.add(carFragment)
        fragments.add(mineFragment)

        supportFragmentManager.beginTransaction()
            .replace(R.id.fl_container, homeFragment)
            .show(homeFragment)
            .commit()
    }

    private fun switchFragment(index: Int) {
        if (lastfragment != index) {
            val transaction = supportFragmentManager.beginTransaction()
            //隐藏上个Fragment
            transaction.hide(fragments[lastfragment])
            if (!fragments[index].isAdded) {
                transaction.add(R.id.fl_container, fragments[index])
            }
            transaction.show(fragments[index]).commitAllowingStateLoss()
            lastfragment = index
        }
    }


    private fun initNavigationSelectedListener() {
        findViewById<BottomNavigationView>(R.id.bottom_navigation).setOnNavigationItemSelectedListener { item ->
            when (item.itemId) {
                R.id.nav_home -> {
                    switchFragment(0)
                    return@setOnNavigationItemSelectedListener true
                }
                R.id.nav_car -> {
                    switchFragment(1)
                    return@setOnNavigationItemSelectedListener true
                }
                R.id.nav_me -> {
                    switchFragment(2)
                    return@setOnNavigationItemSelectedListener true
                }
            }
            false
        }
    }
}
|
2. Introducing Flutter Module
First, create a Flutter Module project. There are two ways to create a Flutter Module, one is to use Android Studio to generate it, and the other is to use the command line directly. Use the command line to create a flutter module as follows:
1
|
flutter create -t module flutter_module
|
Then, enter the flutter_module, and execute the flutter build aar command to generate the aar package. If there is no error, the /flutter_module/.android/Flutter/build/outputs directory, as shown below.
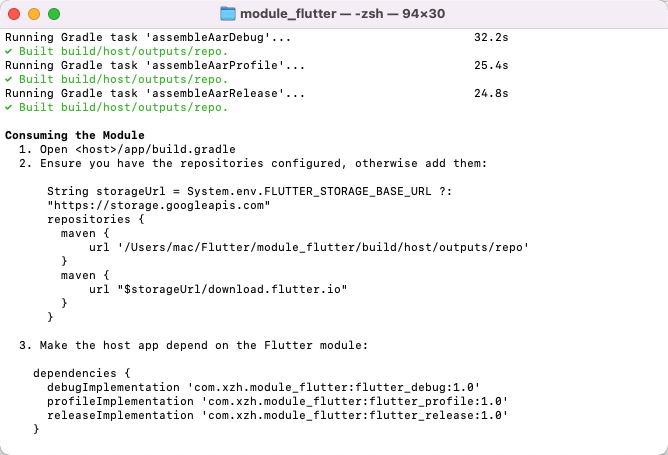
Next, we copy the generated aar package to the libs of the Android project, and then open app/build.grade to add local dependencies.
 1
 2
 3
 4
 5
 6
 7
 8
 9
10
11
12
13
14
15
16
|
repositories {
    flatDir {
        dirs 'libs'
    }
}

dependencies {
    ...
    //添加本地依赖
    implementation fileTree(dir: 'libs', include: ['*.jar'])
    implementation(name: 'flutter_relaese-1.0', ext: 'aar')
    implementation 'io.flutter:flutter_embedding_debug:1.0.0-f0826da7ef2d301eb8f4ead91aaf026aa2b52881'
    implementation 'io.flutter:armeabi_v7a_debug:1.0.0-f0826da7ef2d301eb8f4ead91aaf026aa2b52881'
    implementation 'io.flutter:arm64_v8a_debug:1.0.0-f0826da7ef2d301eb8f4ead91aaf026aa2b52881'
    implementation 'io.flutter:x86_64_debug:1.0.0-f0826da7ef2d301eb8f4ead91aaf026aa2b52881'
}
|
Then declare it as a local dependency in the outer build.gradle, the code is as follows:
 1
 2
 3
 4
 5
 6
 7
 8
 9
10
11
12
|
buildscript {
repositories {
   ...
    maven {
        url "http://download.flutter.io"        //flutter依赖
    }
  }

dependencies {
    classpath 'com.android.tools.build:gradle:4.0.0'
  }
}
|
##s 3. Use Flutter Module
By default, Android provides FlutterActivity, Fragment and FlutterView views. In this example, we are talking about the use of Fragment.
First, we create a FlutterEngineGroup object. FlutterEngineGroup can be used to manage multiple FlutterEngine objects, and multiple FlutterEngines can share resources in order to reduce the resource occupation of FlutterEngine. The code of MyApplication is as follows:
 1
 2
 3
 4
 5
 6
 7
 8
 9
10
|
class MyApplication : Application() {

    lateinit var engineGroup: FlutterEngineGroup

    override fun onCreate() {
        super.onCreate()
        // 创建FlutterEngineGroup对象
        engineGroup = FlutterEngineGroup(this)
    }
}
|
Next, create a FlutterEngineManager cache management class, and create a static method flutterEngine in FlutterEngineManager to cache FlutterEngine.
 1
 2
 3
 4
 5
 6
 7
 8
 9
10
11
12
13
14
15
16
17
18
19
20
|
object FlutterEngineManager {

    fun flutterEngine(context: Context, engineId: String, entryPoint: String): FlutterEngine {
        // 1. 从缓存中获取FlutterEngine
        var engine = FlutterEngineCache.getInstance().get(engineId)
        if (engine == null) {
            // 如果缓存中没有FlutterEngine
            // 1. 新建FlutterEngine,执行的入口函数是entryPoint
            val app = context.applicationContext as MyApplication
            val dartEntrypoint = DartExecutor.DartEntrypoint(
                FlutterInjector.instance().flutterLoader().findAppBundlePath(), entryPoint
            )
            engine = app.engineGroup.createAndRunEngine(context, dartEntrypoint)
            // 2. 存入缓存
            FlutterEngineCache.getInstance().put(engineId, engine)
        }
        return engine!!
    }

}
|
In the above code, we will first get the cached FlutterEngine from it, if not, create a new FlutterEngine, and then cache it.
Next, we bind FlutterEngine and FlutterFragment. If no route is provided by default, then the routing homepage of the flutter module is opened. If you want to specify the home page of the flutter module, you can use the setInitialRoute() method.
 1
 2
 3
 4
 5
 6
 7
 8
 9
10
11
12
13
14
15
16
17
18
19
20
21
22
23
24
|
class HomeFragment : Fragment() {

    // 1. FlutterEngine对象
    private lateinit var engine: FlutterEngine
    private var engineId="home_fra"

    override fun onCreate(savedInstanceState: Bundle?) {
        super.onCreate(savedInstanceState)
        // 2. 通过FBFlutterEngineManager获取FlutterEngine对象
        engine = FlutterEngineManager.flutterEngine(requireActivity(), engineId, "main")
        // 3. 用FlutterEngine对象构建出一个FlutterFragment
        val flutterFragment = FlutterFragment.withCachedEngine(engineId).build<FlutterFragment>()
        // 4. 显示FlutterFragment
        parentFragmentManager.beginTransaction().replace(R.id.home_fl, flutterFragment).commit()
    }

    override fun onCreateView(
        inflater: LayoutInflater,
        container: ViewGroup?,
        savedInstanceState: Bundle?
    ): View? {
        return inflater.inflate(R.layout.fragment_home, container, false)
    }
}
|
We use the cached FlutterEngine here to save resources, because when the Fragment of the Bottom Navigation Activity is switched back and forth, the Fragment will be re-created and destroyed, which consumes more resources.
If we enter the second-level page and return, we also need to hide the BottomNavigationView in activity_main.xml. The code involved is as follows.
 1
 2
 3
 4
 5
 6
 7
 8
 9
10
11
12
13
14
|
class MainActivity : AppCompatActivity() {

   ...//省略其他代码

    fun switchBottomView(show: Boolean) {
        val navView: BottomNavigationView = findViewById(R.id.nav_view)
        if (show) {
            navView.visibility = View.VISIBLE
        } else {
            navView.visibility = View.GONE
        }
    }

}
|
If we want to interact with Flutter, we can use MethodChannel, and then use setMethodCallHandler to call back Android data to Flutter. The code is as follows.
 1
 2
 3
 4
 5
 6
 7
 8
 9
10
11
12
13
14
15
16
17
18
19
20
21
22
23
24
25
26
27
28
29
30
31
32
33
34
35
36
37
38
39
40
41
42
43
44
45
46
47
48
49
50
51
52
53
54
|
class HomeFragment : Fragment() {

    // 1. FlutterEngine对象
    private lateinit var engine: FlutterEngine
    private var engineId="home_fra"
    private lateinit var channel: MethodChannel


    override fun onCreate(savedInstanceState: Bundle?) {
        super.onCreate(savedInstanceState)

        initEngine()
        initChannel()
    }

    private fun initEngine() {
        // 2. 通过FBFlutterEngineManager获取FlutterEngine对象
        engine = FlutterEngineManager.flutterEngine(requireActivity(), engineId, "main")
        // 3. 用FlutterEngine对象构建出一个FlutterFragment
        val flutterFragment = FlutterFragment.withCachedEngine(engineId).build<FlutterFragment>()
        // 4. 显示FlutterFragment
        parentFragmentManager.beginTransaction().replace(R.id.home_fl, flutterFragment).commit()
    }

    private fun initChannel() {
        channel = MethodChannel(engine.dartExecutor.binaryMessenger, "tab_switch")
        channel.setMethodCallHandler { call, result ->
            when (call.method) {
                "showTab" -> {
                    val activity = requireActivity() as MainActivity
                    activity.switchBottomView(true)
                    result.success(null)
                }
                "hideTab" -> {
                    val activity = requireActivity() as MainActivity
                    activity.switchBottomView(false)
                    result.success(null)
                }
                else -> {
                    result.notImplemented()
                }
            }
        }
    }

    override fun onCreateView(
        inflater: LayoutInflater,
        container: ViewGroup?,
        savedInstanceState: Bundle?
    ): View? {
        return inflater.inflate(R.layout.fragment_home, container, false)
    }

}
|
Then in Flutter, there is an invokeMethod method to inject.
1
2
3
4
5
6
7
8
9
|
class PluginManager {
  static const MethodChannel _channel = MethodChannel('tab_switch');

  static Future<String> showTab(Map params) async {
    String resultStr = await _channel.invokeMethod('showTab', params);
    return resultStr;
  }

}
|
At present, native mobile APP can integrate multiple Flutter Modules in the application, which facilitates our modular development of multiple services. In addition to FlutterActivity and Fragment, it is a little more complicated to use FlutterView in Android. A FlutterView needs to be bound to the life cycle, and developers need to manage the FlutterView life cycle by themselves.