Asynchronous programming
Before we start to explain asynchronous programming, let’s first understand a few related concepts.
Blocking
The state in which a program is hung when it has not been given the computational resources it needs.
A program is said to be blocking on an operation if it cannot do anything else on its own while waiting for that operation to complete.
Common forms of blocking are: network I/O blocking, disk I/O blocking, user input blocking, etc.
Blocking is ubiquitous, including when the CPU switches contexts and all processes cannot really do anything else, they will also be blocked. (In the case of multi-core CPUs, the core that is performing the context switch is not available.)
In simple terms, blocking means that A calls B, A hangs and waits for the result of B, and nothing can be done .
Non-blocking
A program is said to be non-blocking with respect to an operation if, while waiting for that operation, it is not blocking itself and can continue to run and do something else.
Non-blocking does not exist at any program level and under any circumstances.
It is only possible for a program to be non-blocking if it is encapsulated at a level that can encompass separate subroutine units.
Non-blocking exists because blocking exists, and it is because of the time consuming and inefficient nature of a blocking operation that we need to make it non-blocking.
In simple terms, non-blocking means A calls B, A doesn’t have to be hung up waiting for the result of B, A can do something else
Synchronisation
Different program units are said to be synchronous when they need to communicate in some way to coordinate their execution in order to complete a task.
For example, to update the inventory of a product in a shopping system, a “line lock” is used as a communication signal to force different update requests to be queued up and executed sequentially.
In short, synchronisation means order.
In simple terms, synchronisation means that A calls B and only returns when B has a result
Asynchronous
A way of completing a task without the need for communication and coordination between different program units in the process in order to complete the task.
It is possible for unrelated program units to be asynchronous with each other.
For example, a crawler downloads a web page. Once the scheduler has called the downloader, it can schedule other tasks without having to maintain communication with that downloading task to coordinate behaviour. Operations such as downloading and saving of different web pages are unrelated and do not need to be coordinated with mutual notifications. The moment of completion of these asynchronous operations is not determined.
In short, asynchrony means disorder.
In simple terms, asynchronous means that A calls B, which returns immediately without waiting. Wait for B to finish processing before telling A the result
Concurrency
Concurrency describes the organisation of a program. It refers to the fact that a program is to be designed as multiple subtasks that can be executed independently
The aim is to make use of limited computer resources so that multiple tasks can be executed in real time or near real time.
Parallel
Parallel describes the execution state of a program. It refers to the simultaneous execution of multiple tasks.
The aim is to use spare computing resources (multi-core CPUs) to accelerate the completion of multiple tasks.
Parallelism provides a way of organising a program so that solutions to problems can be executed in parallel, but parallel execution is not required.
In summary, parallelism is intended to use multiple cores to speed up the completion of multiple tasks; concurrency is intended to allow independent subtasks to complete as quickly as possible; non-blocking is intended to improve the overall running efficiency of the program, and asynchrony is the way to organise non-blocking tasks.
Concurrency
is the organisation of a program in such a way that it is designed as a number of sub-tasks that can be executed independently. The aim is to use limited computer resources so that multiple tasks can be executed in real time or near real time.
Parallel
refers to the execution state of a program in which multiple tasks are executed simultaneously. This is done for the purpose of using spare computing resources (multi-core cpu) to speed up the completion of multiple tasks.
Concurrency provides a way to organise the structure so that problem solving can be executed in parallel, but it is not required.
In summary
Parallelism is designed to use the spare computing resources of a multicore computer to speed up the completion of a multitasking program.
Concurrency is intended to give independent subtasks a chance to be executed as quickly as possible, but not necessarily to speed up overall progress.
Non-blocking is designed to improve the overall efficiency of program execution.
Asynchrony is the way to organise non-blocking tasks.
Asynchronous Programming
A programming style that uses processes, threads, concurrent threads, and functions/methods as the basic units for executing a task program, combined with mechanisms such as callbacks, event loops, and semaphores, in order to improve the overall execution efficiency and concurrency of the program.
A program that executes asynchronously must be out of order. If you can tell exactly what operation it is going to perform next, based on the instructions that have been executed, then it is a synchronous program. This is the difference between ordered and disordered.
The difficulty with asynchronous programming is that it becomes more complex and difficult in parallel because of the unpredictable order of execution of asynchronous programs.
So almost all asynchronous frameworks simplify the asynchronous programming model: only one event is allowed to be processed at a time. The discussion of asynchrony has therefore largely focused on single threads.
If the processing of a particular event takes too long, then the rest of the process gets blocked.
Asynchronous scheduling in asynchronous programming must therefore be “small enough” and not take too long.
A sensible approach to asynchronous programming can improve cpu utilisation and increase program efficiency.
Synchronous->asynchronous I/O
Take a crawler that downloads 10 web pages and use a few examples to show the move from synchronous -> asynchronous.
Synchronous blocking approach
The synchronous blocking approach is also the easiest way to write this program, i.e. downloading all 10 pages in sequence.
|
|
The execution event for this code is approximately 4.5 seconds. (averaged over several times)
In the above code, the function blocking_way() is used to establish a connection, send an HTTP request, and then read the HTTP response from the socket to the request and return the data.
sync_way() executes blocking_way() 10 times, i.e. we execute 10 accesses download example.com
Since network conditions and server-side processing vary, it is unpredictable when the server returns the response data and it is received by the client for the program to read. So the sock.connect() and sock.recv() calls are blocking by default.
Note: The sock.send() function does not block for long, it simply copies the request data into the system buffer of the TCP/IP stack and returns, and does not wait for an acknowledgement of the answer returned by the server.
If the network environment is poor and the TCP/IP handshake to create a network connection takes 1 second, then sock.connect() will block for 1 second. This is a second of wasted CPU time. Similarly, sock.recv() must wait until the response from the server has been received by the client before proceeding. The current example only needs to download one web page, so blocking 10 times may not seem like a problem, but if the demand is for 1000w pages, this blocking method is silly and inefficient.
Improvements: multi-processing
It seems a bit time consuming to execute 10 programs in sequence in one program, so maybe it would be better if we used multiple processes and started 10 identical programs together? And so the first improvement comes: multiprocess programming. The development line was the same. In earlier operating systems (Linux 2.4) and before, processes were entities of the OS scheduling tasks, an OS designed for processes.
|
|
The execution time of this code is approximately 0.6 seconds.
It is reasonable to assume that using 10 identical processes to execute this program would reduce the execution time to 1/10th of the original time, but it doesn’t. Some of this time is consumed by process switching.
When the CPU switches from one process to another, it needs to save all the register states and memory states of the old process when it was running, and then restore the data previously saved by the other process. Process switching is necessary when the number of processes is larger than the number of CPU cores.
Generally speaking, the number of processes that a server can handle at the same time is in the scale of tens to hundreds, provided that it can run stably. If the number of processes is larger in size, the system will run unstably and there will often be insufficient memory resources available. In addition to the high switching overhead and the small size of the tasks that can be supported, there are other disadvantages to multi-processing, such as problems with state sharing.
Improvements: Multi-threading
The data structure of threads is more lightweight than processes, and the same process can accommodate several threads.
Later OS also shifted the scheduling unit from processes to threads, with processes acting only as containers for threads to manage the resources required by the process. And OS-level threads can be assigned to different CPU cores to run simultaneously.
|
|
The total running time is roughly 0.43 seconds.
In terms of runtime, multithreading seems to have solved the problem of high process switching overhead and the size of the number of tasks that can be supported, which has become hundreds to thousands.
However, because multithreading in CPython does not take advantage of CPU multicore because of GIL, only one thread is allowed to be running in a Python process.
When making blocking system calls, such as sock.connect(), sock.recv(), the current thread will release the GIL and allow another thread to have a chance to execute. But within a single thread, it is still blocking on blocking calls.
Time.sleep is blocking in Python, and it is known to be used with caution, but in multi-threaded programming, time.sleep does not block other threads.
There is a general problem with all multithreads except GIL. They are scheduled by the OS and the scheduling policy is preemptive to ensure that threads of equal priority have an equal chance of execution. So there could be a race condition. If in a complex crawler system the URLs to be crawled are taken by multiple crawler threads, then how are the URLs distributed, this requires the use of “locks” or “synchronous queues” to ensure that download tasks are not repeated. The main problem with multithreading is the race condition. The main problem with multithreading is the race condition.
Non-blocking approach
The following example is the most primitive form of non-blocking.
|
|
The total time taken by the program was about 4.3 seconds.
When I finished executing this code, I felt as if I had been cheated, the code took about the same amount of time to execute as the non-blocking method, and the program was more complex. What’s the point of having non-blocking?
The code sock.setblocking(False) tells the OS to make all blocking calls on the socket non-blocking. Non-blocking means doing one thing without preventing the program calling it from doing something else. The above code does stop blocking after sock.connect() and sock.recv() are executed, so you can move on to the request preparation code or to the next read. Line 8 is placed within the try statement because the socket will also throw an exception when sending a non-blocking connection request. connect() can be called and the code in lines 12 and 13 can be executed immediately afterwards.
Although connect() and recv() are no longer blocking the main program, and the CPU is not idle during the free time, it is not using the free time to do anything meaningful, but is instead looping around trying to read and write to the socket (constantly judging the state of the non-blocking call to be ready). It also has to handle ignorable exceptions from the underlying layer. Nor can it handle multiple sockets at once. So the overall execution time is comparable to synchronous blocking.
Non-blocking improvements
epoll
Actually determining if a non-blocking call is ready can be left to the OS, instead of the application having to wait and determine this itself, it can use this free time to do other things.
The OS encapsulates all O/I changes into events, such as readable events and writable events. It also provides a system module that can be called to receive event notifications. This module is select, which allows applications to register file descriptors and callback functions via select. When the state of the file descriptor changes, select calls the pre-registered callback function.
Due to the inefficiency of the select algorithm, it was later improved into poll, and then further improved into the kqueue module for the BSD kernel, and into the epoll module for the Linux kernel. All four modules serve the same purpose and expose almost the same API to the programmer, the difference being that kqueue and epoll are more efficient when dealing with large numbers of file descriptors. A typical Linux server uses epoll.
Callbacks
Leave the listening for I/O events to the OS. What should the OS do when it knows that the I/O state has changed? Here it is generally done by way of a callback.
Wrap sending and reading data into separate functions, use epoll to listen to the socket state instead of the application, and tell epoll “If the socket state becomes available to write to (connection established successfully), please call the HTTP request send function. If the socket becomes ready to read data (the client has received a response), call the response handler function.”
|
|
The overall time taken is about 0.45 seconds.
What is less glancing than the previous function is that we will download 10 different URL interfaces and then store the relative paths to the URLs in urls_todo. The specific improvements are as follows.
Firstly, the loop of constantly trying to send() and recv() has been removed.
Secondly, the selectors module was imported and an instance of DefaultSelector was created. the selectors module provided by the Python standard library is a wrapper around the underlying select/poll/epoll/kqueue. the DefaultSelector class automatically selects the best module for the OS environment. That’s epoll on Linux 2.5.44 and newer.
It then registers the callback functions that should be taken when a socket writable event (EVENT_WRITE) and a readable event (EVENT_READ) occur respectively.
But here is the problem, how can we know which of the 20 events created by these 10 Crawler instances is the current event that is happening, take it out of the selector and get the corresponding callback function to execute it?
event loop
So we add an event loop at the end of the code, writing a function that loops through the selector module, waiting for it to tell us which event has occurred and which callback function should be the corresponding one.
In loop(), the event loop function uses a stopped global variable to control the stopping of the event loop, marking stopped as True when urls_todo has been consumed.
Inside the event loop there is a blocking call, selector.select(). If the event doesn’t happen, then the application has no event to process, so it simply blocks here and waits for the event to happen. It can be inferred, then, that if only one web page is downloaded, it must connect() before it can send() and then recv(), which is the same efficiency as blocking. Because instead of blocking on connect()/recv(), you have to block on select() as well.
So, the selector mechanism (later referred to as epoll/kqueue) is designed to handle large numbers of concurrent connections. The selector mechanism is most powerful when there are a large number of non-blocking calls to the system that can generate events at any time.
The problem of downloading 10 web pages simultaneously was solved in a single thread using event loops + callbacks. This is already asynchronous programming. Although there is a for loop that sequentially creates the Crawler instance and calls the fetch method, there is only connect() and registration of writable events within fetch, and it is clear from the execution time that multiple downloads are indeed taking place at the same time!
The above code is executed asynchronously by.
- Create an instance of Crawler.
- calling the fetch method, which creates a socket connection and registers writable events on the selector.
- There is no blocking operation within fetch and the method returns immediately.
- Repeat the 3 steps above, adding all 10 different download tasks to the event loop.
- start the event loop and enter round 1, blocking on the event listener.
- When a download task EVENT_WRITE is triggered, call back its CONNECTED method and the first round of the event loop ends.
- Enter the 2nd event loop, when an event is triggered on a download task, execute its callback function; at this point it is no longer possible to speculate which event occurred, as it is possible that the EVENT_READ from the last connected was triggered first, or that the EVENT_WRITE from some other task was triggered; (at this point, the time that would have been blocked on one download task is used to execute another download task)
- The loop repeats until all download tasks have been processed
- Exit the event loop and end the download process
In asynchronous programming, there is no escape from the “event loop + callback” pattern described above, even though it may not be an epoll or a while loop.
But what about some asynchronous programming where you don’t see the CallBack pattern? In Python’s asynchronous programming, for example, the main character is the coroutine.
coroutine with asyncio
coroutine
coroutine (Co-routine), which is a collaborative routine
It is a generalisation of a non-preemptive multi-tasking subroutine that allows multiple entry points at defined locations in the routine to control the suspension and resumption of program execution.
What are routines? A programming language defines segments of code that can be called as a series of instructions encapsulated together in order to perform a particular function. Programming languages in general are represented by code structures called functions or methods.
Firstly, it is important to understand that both multi-processing, multi-threading and coroutines are designed to solve the problem of multi-tasking at the same time. The key to implementing a multitasking system is how to pause the current task, save the context of the current task, select the next task, resume the context of the next task and execute the next task.
Context means different things to different levels of the computer.
- For the CPU, context is the operand registers, stack registers, status registers, and other types of registers.
- For processes, context is the hardware resources abstracted by the cpu, such as registers, signals, allocated memory space, file descriptors, etc.
- For a thread, the context is, registers, thread stacks…
- For a function, the context is the current namespace.
Switching processes requires switching system resources and instructions and takes the longest time.
For thread switching, no system resources need to be switched, only instructions, thread stack. However, this process also requires a system call.
Coroutine switching is done in user space and does not require a system call.
In Python, thread switching is controlled by the python virtual machine, through a system call. coroutine switching is entirely controlled by the program itself.
The main advantages of coroutines over threads are
- python threads are scheduled in such a way that in python2.x they stop every 100 bytes of code or blocking, in python3 they use a fixed time, instead of a ticks count of 100 to release the GIL, and then a system call is made to let the os kernel pick the next thread. But coroutines only switch to the next coroutine when they are blocked. 100 bytes of code is not much, not much, and may be lost in two library calls, so there are many ineffective thread switches, and the larger the number of threads, the greater the performance loss due to this inherent deficiency in the scheduling strategy.
- Threads need to make system calls, coroutines do not. System calls require access to the kernel state, and invalid scheduling makes this part of the overhead seem larger
- A coroutine can be scheduled autonomously, whereas a thread can only decide that it is appropriate to exit, but who the next thread is depends on the OS.
In Python, there are two kinds of coroutines, a stackless coroutine, represented by asyncio in python, and a stacked coroutine, represented by gevent in python.
yield and yield from
yield
The latest Python doesn’t use yield-based coroutines any more. But for a better understanding of coroutines, here’s a small, simple example of a yield.
The output of the above code is
Here the program runs to the first yield, saves the context of the function and exits, then enters the function via the next method, restores the context of the function just saved and continues to run.
All a coroutine program does is: save context switch run program restore context re-enter program .
The context in Cpython is encapsulated in a PyFrameObject structure, which can also be called a stack frame.
Source code.
|
|
In the actual execution of Python, a number of PyFrameObject objects are generated, which are then all linked together to form a chain.
The structure definition of a generator in Python is a macro that points to a PyFrameObject object that represents the context of this generator.
Within this structure of a generator there are 3 important things.
- a pointer to the generator context
- a string indicating the state of the generator not started, stopped, running, finished
- the generator’s bytecode
i.e. context + instruction sequence + state
In generators, next and send have the same effect, but send can be passed an argument.
yield from
In the generator, you can use return to return the value, but if send goes to the return statement it will report a StopIteration. The return value is in the value of the exception.
The following example is given.
The output from executing the above code is 2
On the one hand, it is an expression, which naturally has a value, and its value is the value returned by the generator return after yield from. The key point is that the yield statement of the generator produces the value outwards, but the value of return does not. To get the return value of the return, either catch the exception with a try statement or get the value with a yield from expression.
Take a look at the following example
Output result.
yield from expression has a value of 2
Another feature of yield from is the ability to pass the return value of the inner generator to the outer layer.
As in the following example.
The output is.
The inner generator test_gen1() can be yielded from to get the value out at the outermost level.
This way we can link multiple generators together using yield from.
Understanding yield in a nutshell
When you first encounter yield, it’s hard to understand how it’s used, what generators are and what arguments are passed. In fact, you can simply think of yield as a return, and the program will stop when it reaches yield.
Let’s look at a simple example
Output results:
The order of execution of the above code is as follows
- Once the program starts executing, the foo function doesn’t really execute because there is a yield keyword in the foo function, so the foo function doesn’t really execute, but first gets a generator g (equivalent to an object)
- until the next method is called, the foo function starts executing, first by executing the print method in the foo function, and then by entering the while loop
- the program encounters the yield keyword, then think of yield as return, return a 4, the program stops, and does not perform the assignment to the res operation, at this point the next(g) statement is completed, so the first two lines of output (the first is the result of the while above the print, the second is the result of the return) is executed print(next(g)).
- the program executes print("*" *20), outputting 20 *’s
- the following print(next(g)) is executed again, which is similar to the one above, but the difference is that it starts from where the next program stopped, which means that the assignment of res is executed. So the assignment of res is None, so the following output is res:None.
- the program will continue to execute in the while, and again encounter yield, this time also return 4, then the program stops, the print function output of 4 is this time return out of 4
yield and return relationship and the difference between the function with yield is a generator, not a function, this generator has a function is the next function, next is equivalent to the “next” generation of which number, this time the next place to start is followed by the last next place to stop the execution, so the call to next, the generator does not start from the beginning of the example function execution, just followed by the previous step to stop the place to start, and then encounter yield, return the number to be generated, this step will end.
Another example of send.
Output results
First of all, let’s talk about the concept of the send function: at this point you should notice the purple word above, and the value of the res above why is None, this becomes 7, in the end why, this is because, send is to send a parameter to the res, because the above mentioned, return, and did not assign the value of 4 to res, the next time when the implementation had to If we use send, we start the execution by following the previous one (after return 4) and assigning 7 to res, then we perform the role of next and meet the next yield, and end after return the result.
Picking up from the previous steps.
- the program executes g.send(7), which continues down the line from the yield keyword, and send assigns the value 7 to the res variable
- since the send method contains the next() method, the program will continue down the print method and then enter the while loop again
- when the program encounters the yield keyword again, the yield returns the value that follows and the program pauses again until the next method or send method is called again.
Generator-based coroutine
Having said all that, why use a coroutine to solve asynchronous problems in Python. Let’s look at the problems with the “event loop + callback” approach mentioned earlier.
The “event loop + callback” problem
Using the asynchronous programming in the previous crawler example within a single thread does make the program run much more efficiently. However, in a production project, the complexity to deal with is much greater. Consider the following problem.
- What happens if the callback function doesn’t execute properly?
- What if there are nested callbacks inside the callback? What if there are many layers of nesting?
- What happens if there are multiple layers, and something goes wrong in one of them?
- What if there is data that needs to be processed by each callback?
- ……
In practice, these problems are not easy to avoid, and they do have some drawbacks.
- Poor code readability when there are too many layers of callbacks
|
|
- Breaking the code structure When writing a synchronous program, the code generally runs from the top down.
In the above code, if the processing of fun_2 depends on the result of the processing of fun_1, but fun_1 is called asynchronously, then it is not known when fun_1 will return the value and the result of the subsequent processing needs to be returned to fun_1 in the form of a callback, so that fun_2 can be executed after fun_1 has finished executing, then the code becomes as follows.
|
|
If the whole process is handled asynchronously and then the process is longer.
|
|
In the case of a synchronously executing program, each step in the program is a flow controlled by the thread’s instruction pointer, whereas in the callback version, the flow is what the person programming needs to be aware of and arrange.
- Shared state management difficulties Looking back at the previous crawler code, the synchronous blocking version uses the sock object from start to finish, whereas in the callback version we have to keep its own sock object in the object self after the Crawler is instantiated. If an OOP style of programming is not used, then the state to be shared needs to be passed to each callback in a relay-like fashion. Exactly which state is to be shared between multiple asynchronous calls would have to be thought out and carefully designed beforehand.
- Error handling difficulties A sequence of callbacks forms a complete chain of calls. For example, a to f. What if d throws an exception? The entire call chain breaks and the state passed in succession is lost, a phenomenon known as call stack tearing. c doesn’t know what to do and continues with the exception, then the b exception, then the a exception. Well, the error log tells you that the a call went wrong, but it was actually d that went wrong. So, to prevent stack tearing, exceptions have to be returned as data, not just thrown, and then the return value of the last call needs to be checked in each callback to prevent the error from swallowing it.
The ugly style of the code is minor, but the two drawbacks of stack tearing and difficult state management can make callback-based asynchronous programming tough.
Python has derived coroutine-based solutions based on event loops + callbacks, represented by Tornado, Twisted, asyncio and others.
Future objects
Python has a special kind of object, the generator, which is much like a coroutine. Between each iteration, execution is suspended, and the next iteration continues without losing the previous state.
To support simple coroutines with generators, Python 2.5 has an enhancement to generators (PEP 342), the proposed enhancement is titled “Coroutines via Enhanced Generators”. With the addition of PEP 342, generators can pause execution and return data outwards via yield, send data within the generator via send(), and throw exceptions within the generator via throw() to terminate the generator at any time.
We don’t use callbacks here, how do we know the result of an asynchronous call? First, we design an object in which the result of the asynchronous call is placed when it is finished. This object is called a future object.
The future object has a result property which holds the result of the future execution. There is also a set_result() method which is used to set the result and will run the callback added to the future after the value of the result has been bound. The callback is added via the future object’s add_done_callback() method.
Although there is still a callback in this place, this callback is not quite the same as the previous one.
Refactoring the Crawler crawler
Since we have the Future object, we start by refactoring the crawler with Future.
|
|
The fetch method here has a yield expression inside it, so it becomes a generator. The generator needs to be started by first calling next() to iterate once or send(None), and then paused when it encounters a yield. So how does the fetch generator resume execution again? But there is still code for starting the generator. Here we need to add a Task object to start it.
Task object
follows a programming rule: a single responsibility, with each role having its own role. At the moment there is no role for the execution of the generator and managing the state of the generator, so we will create one.
|
|
The Task in the above code encapsulates the coro object, i.e. the object passed to it on initialisation, and the task being managed is the coroutine to be executed, so the coro here is the fetch() generator. It also has a step() method, which is executed once during initialisation. within step() the send() method of the generator is called, and the initialisation of the first send is None drives the first execution of coro i.e. fetch().
After send() finishes, the next future is obtained, and then a step() callback is added to the next future. add_done_callback() is not actually for writing crawler business logic.
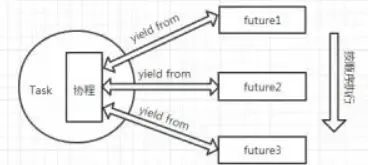
Look at the fetch() generator, which has all the business logic written inside it, including how to send the request and how to read the response. And the callback registered to the selector is quite simple - it binds the result value to the corresponding future object. Both yield expressions return the corresponding future object, which is then returned within Task.step(), so that Task, Future and Coroutine are all tied together.
After initialising the Task object, fetch() is driven to the yied f and that’s it, what should happen next.
The Event Loop drives the coroutine
Next, just wait for the EVENT_WRITE event that has been registered to occur. The event loop is like a heart, as long as it starts beating the whole program will keep running.
The entire crawler after refactoring
The complete program is as follows.
|
|
Summary of generator styles and callback styles
In the callback style.
- there are chained callbacks (although the example has only one layer of nested callbacks)
- the request and response also have to be split into two callbacks to the extent that it breaks the synchronous code kind of structure
- The programmer has to maintain mandatory state between callbacks.
Instead, the style based on the generator coroutine is.
- no chained calls
- the selector callback just sets the value for future and doesn’t care about the business logic
- callback() within loop no longer cares about who triggered the event
- Converges to the structure of synchronous code
- No need for programmers to maintain state between multiple coroutines, e.g. which one is their sock
yield from improve generator coroutine
What if fetch needs to be more fault-tolerant and the business functionality needs to be better? And the technical processing part (socket-related) is mixed with the business processing part (handling of requests and return data).
- Creating a socket connection can be reused in the abstract, right?
- Reading the entire response in a loop can be reused abstractly, right?
- The processing of socket.recv() within the loop can be abstractly reused, right?
But there are yields where these key nodes are, and the abstracted code needs to be generators as well. And fetch() would have to be a generator itself. Mashing generators within generators seems a bit tricky.
Good thing we have yield from to solve this problem.
yield from syntax
yield from is a new syntax introduced in Python 3.3 (PEP 380). It mainly addresses the problem of inconvenience of messing with generators in generators. It has two main functions.
The first feature is: instead of having to iterate through a loop to yield, nested generators can just yield from. the following two ways are equivalent.
The second function is to open a two-way channel between the sub-generator and the caller of the original generator, so that the two can communicate directly.
The two-way channel function of yield from is clearly understood by the above code. The keyword yield from opens up a communication channel between subgen() and main() inside gen(). main() can send data 1 directly to subgen(), subgen() can return the calculated data 2 to main(), and main() can throw an exception directly to subgen() to terminate subgen().
Refactoring the code
First we need to turn the Future object into an iter object.
|
|
After
abstracting the function of a socket connection.
|
|
Abstracting a single recv() and reading a full response function
|
|
Now refactor the Crawler class
|
|
With the introduction of the new yield from syntax in Python 3.3, it is no longer recommended to use yield as a coroutine. all use yield from allows us to pass data between coroutines as we wish due to its bi-directional channel feature.
With yield from, we can concatenate multiple generators. yield from is meant to concatenate these generators into a tree, and provides a convenient way to return the leaf nodes of the tree in turn. yield from concatenates multiple generators in such a way that we can extract all the yield returns in a very simple way. All the yield returns can be extracted in a very simple way. The generator at the root node is continuously sent.
The above example introduces yield and yield from, but what are the differences and connections between them and asyncio?
asyncio
Introduction to asyncio
asyncio is an asynchronous I/O framework introduced experimentally in Python 3.4 (PEP 3156), providing the infrastructure for writing single-threaded concurrent code based on coroutine for asynchronous I/O. The core components are Event Loop, Coroutine, Task, Future, and a number of other modules of an extended and auxiliary nature.
When asyncio was introduced, the function 还提供了一个装饰器@asyncio.coroutine用于装饰使用了yield from was used to mark it as a coroutine. But it was not mandatory to use this decorator.
Although the development of Python 3.4 made coroutines easier with the addition of yield from, many people still don’t understand the connection and difference between generators and coroutines, or the difference between yield and yield from, due to the historical baggage of coroutine development in Python. This confusion also goes against some of the guidelines of the Zen of Python.
So the designers of Python have added async/await syntax (PEP 492) in 3.5, which provides explicit and explicit support for coroutines, called native coroutines. async/await and yield from are two styles of coroutine that share a common implementation and are compatible with each other. and are compatible with each other.
In Python 3.6 the asyncio library was ‘converted’ from being experimental to being a full member of the standard library.
asyncio rewrites the crawler To rewrite a previously written example in asyncio.
|
|
The above code runs in roughly 0.36s
Compared to the previous one, the changes are significant.
- Instead of yield or yield from, it’s async/await
- no more self-made loop(), instead asyncio.get_event_loop()
- No need to do your own asynchronous operations on the socket, no need to explicitly register and deregister events, the aiohttp library already does that for you
- No more explicit Future and Task, asyncio already encapsulates them
- Less code, more elegant design
Code comparison with the synchronous blocking version.
- Asynchronous
- Comparable amount of code (even less with the introduction of the aiohttp framework)
- Same simple code logic, same structure, same logic as synchronous code
- Nearly 10x performance improvement
Simple implementation of asyncio
asyncio Logic Refresh
Let’s extract the previous code that implements asynchronous, the main three things are Future, Task, event_loop.
|
|
This code cannot be used directly of course, we need to adapt it.
The core of the asyncio library is the same three things, Future, Task and the event loop.
Before we get started, let’s write a small demo using asyncio and sort out the asyncio logic based on this demo.
In the above code we have constructed an asynchronous function get_html to simulate accessing a web page.
The first function executed in this code snippet is get_event_loop, which is a function that gets an event loop, keeps looping to check if an event is ready, and if it is ready, calls the callback function registered to the event until it stops and exits the loop. get_event_loop() returns an instance of the event loop class, which is inherited from BaseEventLoop.
The create_task() function is then executed to see what it does.
The BaseEventLoop definition is found in asyncio/base_events.py, and there is a create_task method in the BaseEventLoop class.
The core code of this method is just these two.
Each instance of the Task class wraps a coroutine (coro), which is then driven by the send function in step.
Each instance of the Task class wraps a coroutine (coro), which is then driven by the send function in step.
In the Task class, the coroutine is saved when the instance is initialised, and then the step function is used to start the coroutine, but the step function here is not quite the same as the one we extracted above, it has a lot more parameter checking and exception handling, and then the Task class we extracted above drives the whole coroutine at init time. coroutine, but in asyncio it doesn’t call the step function right away, it calls it (the _loop.call_soon function) in the next frame (the next loop).
The call_soon function here adds the _step function of the Task instance to the queue to be executed, which is also defined in the BaseEventLoop class of asyncio/base_events.py.
It returns an instance of the Handle class. The Handle class here is the one that wraps the callback function for the ready event, which defines a run method that executes the callback function directly. self._ready holds the instance of the Handle class, and the loop in asyncio keeps checking whether there is an event ready, i.e. checking whether self._ready is empty, and if it is not empty, the Handle instance is ejected from it. If it is not empty, the Handle instance is popped out of it, and then the run method of the Handle instance is called, which is actually a callback function registered to the ready event. Once there is a ready event, the callback function is called.
Now in the little demo we wrote, we have created a task instance by using task = loop.create_task(func), which wraps our own coroutine func, and when the task is initialized, it is called in the __init__ function with call_soon The next step is the run_until_complete function, which tells the next loop to execute the task’s _step function immediately.
The run_until_complete function is also defined in the BaseEventLoop class in asyncio/base_events.py. This function has the loop dead loop in it. (excerpted code, with some code removed)
|
|
The function first makes sure that the parameter passed in is future, Task is inherited from Future, so task is also future. the parameter we pass in outside is a task instance, so this function call returns what is actually itself (what is passed in is what is returned), then we pass in the task instance by calling add_done_callback to add the _run_until_complete_cb callback function. callback to add the _run_until_complete_cb callback function, this callback function is more critical, the most important thing that run_until_complete does is to add this callback to the task instance passed in, click into the _run_until_complete_cb, you can see that is to call the The meaning of this is that when the coroutine wrapped in the task we passed in is finished running, this callback will be called to jump out of the loop (which is equivalent to the role of the stopped variable in the code we extracted), otherwise the dead loop is really a dead loop and can never be jumped.
After that it’s really a dead loop, run forever.
Key code
This function constantly calls _run_once(), just as the following code is constantly called in the loop function that we extracted.
And in _run_once().
Here too, the ready event is selected and then added to the self._ready queue and subsequently executed. At the end of _run_once(), we see the following code.
|
|
Here is where the callback function for the ready event is called for execution. First we look at the _ready queue to see if there are any pending Handle instances, if there are, then we execute them one by one, and the _run() method in the handle is the callback function that executes the ready event. At this point, the logic of the loop() function we extracted corresponds to the loop in the asyncio source code.
Finally, let’s look at Future
As with the Future in the code we extracted above.
The presence of yield makes the iter function a generator, which itself has a next method, so no additional implementation is needed. yield from x first calls iter(x) to get an iterator (a generator is also an iterator).
The future here is the same structure as the future in asyncio, and has similar functionality. The final runtime is one layer of generators nested in one layer of generators.