1. Introduction
In Android window management, all windows are organized in a tree data structure, and knowing the tree of WMS helps us understand the management and display of windows. At the same time, the hierarchy of WMS also determines the hierarchy of SurfaceFlinger, which determines its display rules.
2. WMS top-level hierarchy construction
In Android 12, all window tree management is based on WindowContainer, each WindowContainer has a parent node and several children nodes, let’s see what types of WindowContainer are available in the framework.
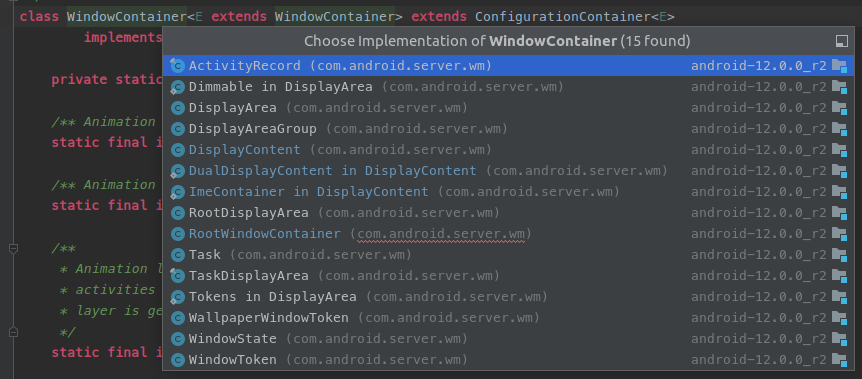
- RootWindowContainer: The top-level manager, directly managing DisplayContent
- DisplayContent: represents a real or virtual display device, in a common scenario, there is only one DisplayContent in the system
- TaskDisplayArea: is the parent node of all application tasks in the system, used to manage Task
- Task: represents a task
- ActivityRecord: represents an Activity node
- WallpaperWindowToken: represents a wallpaper node
- …
Before we start, we have roughly organized the relationship between the various nodes in the system.
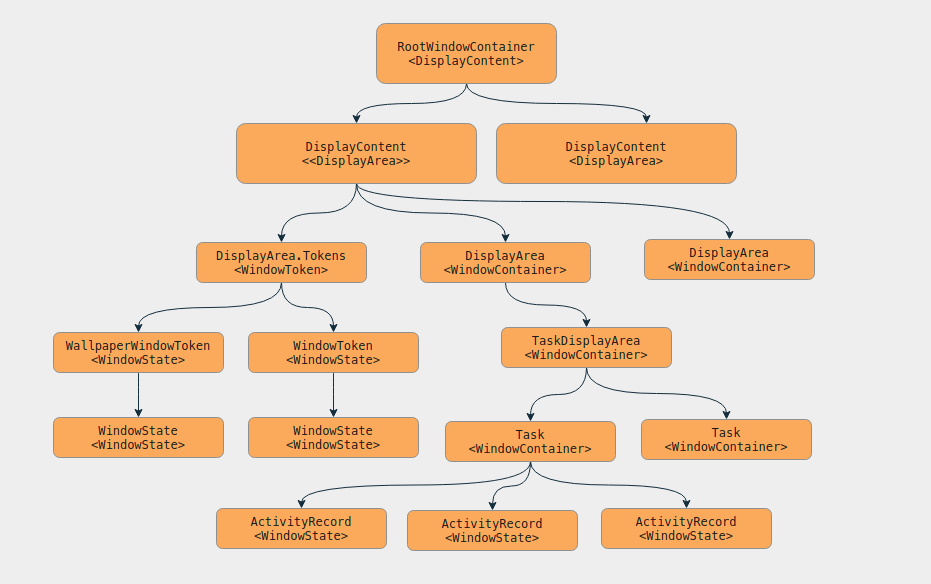
As you can see from the above diagram, the nesting relationship between nodes is quite complex (and this does not include the hierarchy after the introduction of the Feature mentioned in the following section), the top of the hierarchy is RootWindowContainer. Its child node can only be: DisplayContent.
|
|
Let’s take a look at the DisplayContent constructor. The core logic is just one sentence, relying on the DisplayAreaPolicy for cascading initialization.
|
|
|
|
On Android 12, Feature comes in handy, with the following Feature: added natively
- WindowedMagnification: The screen magnification function, through SystemUI mirrorSurface this node implements the content copy, see
WindowMagnificationGestureHandler#toggleMagnificationfor details. - HideDisplayCutout: Hide the bangs screen function, after turn on, the node will not extend to the bangs screen area (except for the status bar navigation bar and other windows, because it is not within the control of the node)
- OneHandedBackgroundPanel: This node will mount a solid color layer (under the wallpaper layer) in one-handed mode to prevent the dark color mode from being distinguished in one-handed mode.
- OneHanded: The related nodes in one-handed mode will do a downward displacement
- FullscreenMagnification: screen magnification function, through the accessibility service
FullScreenMagnificationController.SpecAnimationBridge#setMagnificationSpecLockedlast callDisplayContent#applyMagnificationSpecmethod to achieve node magnification. However, the source code does not use this Feature to achieve the relevant level of magnification, so the transformation is not complete - ImePlaceholder: the node used to place the input method under special circumstances
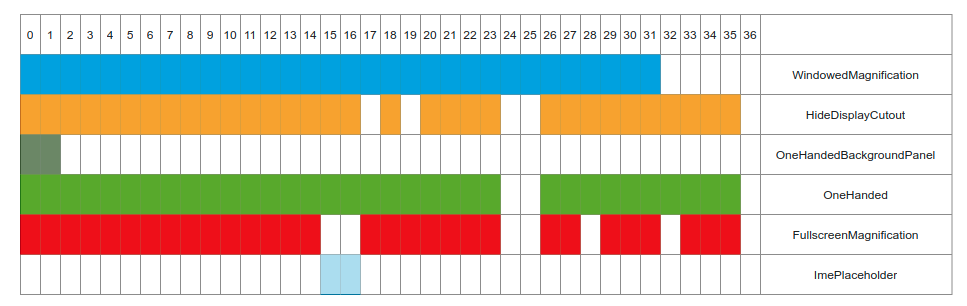
We know that Android system has the concept of Z-axis, different windows have different heights, all window types correspond to WMS will have a layer value, the larger the layer, the more it is displayed on top, WMS specifies 1~36 layers, each Feature specifies the layer layer it can affect. Each Feature specifies the layer it can affect. Here the different Feature layers are color coded.
After marking, you need to generate the window level according to the chart, the first marked chart to move up, move up rules: If the color block above is blank, you can move up until the top is the color block (I do not know if you have played the game 2048, move up logic is the same ~)
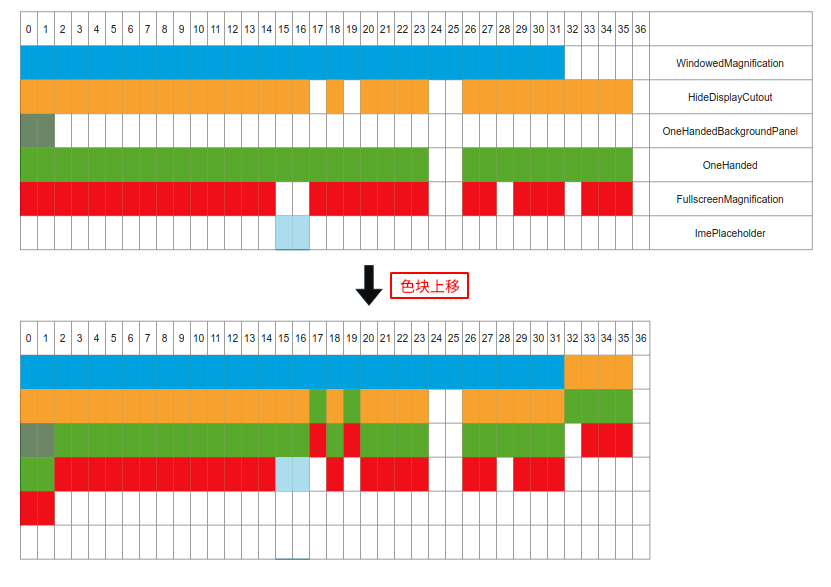
After moving up, we get the final diagram, and next the hierarchy is constructed using the following rules.
- adjacent blocks of the same color in the same row become a
Featurenode, and nodes are generated continuously from left to right according to the color, with all nodes in the same row hanging under the same parent node - The parent node is the node corresponding to the color block in the row directly above the vertical
- Add another node for all
Featurenodes at the end, and the last node added will be different according to the layer represented by the child nodes.- Tokens
(these nodes can only be added asWindowToken` nodes) - Nodes with layer = 2 (i.e.
APPLICATION_LAYER), mountTaskDisplayArea - nodes with layer equal to 15 and 16, mount
ImeContainer
- Tokens
With the above construction rules, we can obtain a tree hierarchy with the following characteristics.
- the most end node of the tree corresponds to a layer range, and the same layer value has only one end node corresponding to it
- A parent node is generated for all
Featuresto control the layers they can affect.
After generating the tree, we save two things.
- The most terminal node for all layer values, so we can add nodes based on window types
- all
Featurenodes saved asMap<Feature, List<DisplayArea>>, so we can retrieve all nodes corresponding to aFeaturelater
Now, although our WMS hierarchy is built, but for these Feature have no role at all, this piece is intended to be placed in the WM Shell topic to explain ~
3. DisplayAreaGroup
The above Feature description shows that different Features are parent-child nodes, so what if I want to divide a logical display area and configure different Features for this area? This is where you can use DisplayAreaGroup, the framework allows us to add multiple DisplayAreaGroup, and configure different Features for them.
As in the native demo, we can create two DisplayAreaGroups and split the screen in two to place each of them, both of which can be used as application containers, and unlike split screens, the two areas can have different Feature rules and other features, such as setting different DisplayArea#setIgnoreOrientationRequest values.
DisplayAreaGroup and DisplayContent are both direct subclasses of RootDisplayArea, and DisplayAreaGroup can be thought of as a Display divided into multiple Logical Displays, right? Of course, although AOSP introduces this concept and code, it is not actually used, so we can only get a glimpse of it from the test code DualDisplayAreaGroupPolicyTest.
4. Summary
WMS-related content system is too much, this article is only to analyze the top-level structure of the WMS window hierarchy, for the specific window addition and removal management has not been involved, the same, the native use of new Feature nodes are not involved (most of which are packaged into the WM Shell)