1. Introduction
A build system is an automated tool for generating target products from source code, including libraries, executables, generated scripts, etc. Build systems generally provide platform-related executables that can be triggered externally by executing commands, such as GUN Make, Ant, CMake, Gradle, etc. Gradle is a flexible and powerful open source Gradle is a flexible and powerful open source build system that provides cross-platform executables for external execution of Gradle builds via commands in a command line window, such as . /gradlew assemble command triggers a Gradle build task.
Modern mature IDEs integrate the required build systems, combine multiple command-line tools, encapsulate them into a set of automated build tools, and provide build view tools to improve developer productivity. In IntelliJ IDEA, it is possible to trigger the execution of Gradle tasks through the Gradle view tool, but it is not achieved by encapsulating command line tools, but by integrating the programming SDK - Gradle Tooling API specifically provided by Gradle, through which Gradle build capabilities can be embedded into the IDE or other tooling software.
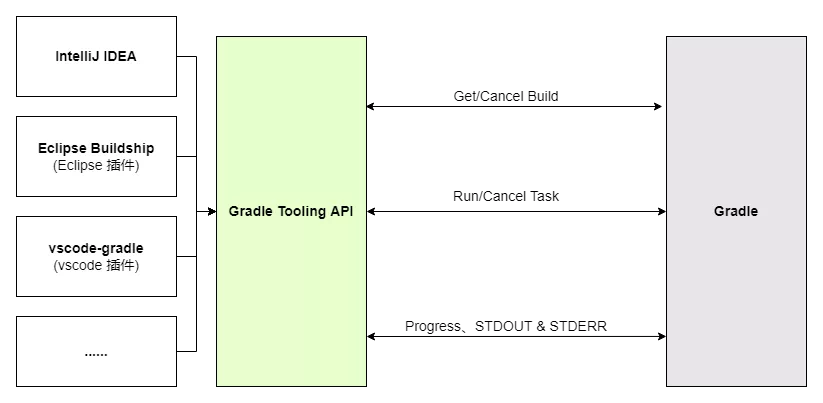
Why does Gradle provide a Tooling API specifically for external integration calls, rather than just an executable-based command approach like other build systems? The Tooling API is a major extension to Gradle that provides more controlled and deeper build control than the command approach, allowing IDEs and other tools to be more easily and tightly integrated with Gradle’s capabilities. The Tooling API interface can return build results directly, eliminating the need to manually parse the log output of command-line programs as in the command method, and can run version-independently, meaning that the same version of the Tooling API can handle builds from different Gradle versions, while being both forward and backward compatible.
2. Interface functions and call examples
2.1 Interface Functions
The Tooling API provides functions for executing and monitoring builds, querying build information, etc.
- Querying build information, including project structure, project dependencies, external dependencies, and project tasks.
- Executing build tasks and listening to the progress information of the build.
- Cancelling the executing build task.
- Automatically download the Gradle version that matches the project.
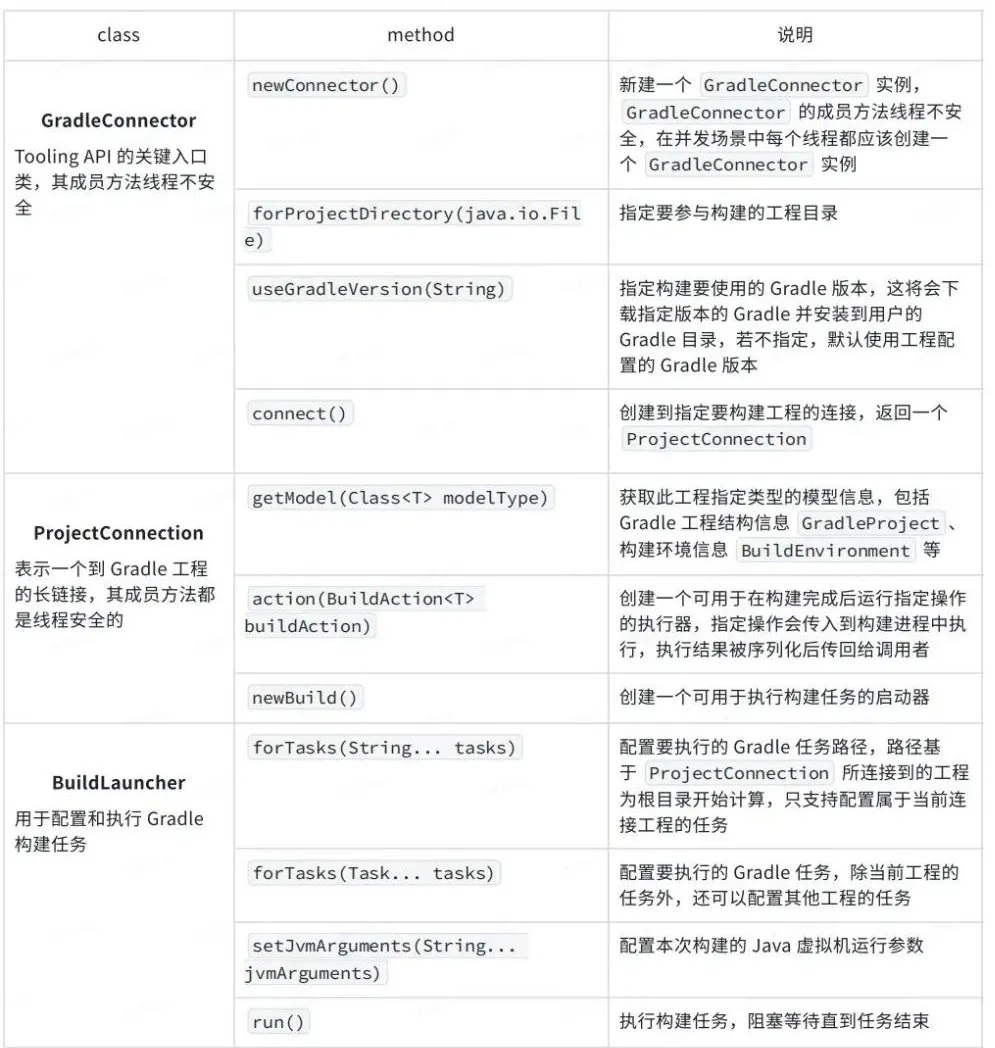
The key APIs are as follows.
2.2 Call example
Query project structure and tasks
|
|
As introduced in the API above, we first create a connection ProjectConnection to a participating build project via the Tooling API entry class GradleConnector, and then get the structure information model GradleProject of this project via getModel(Class<T> modelType), which contains information about the project structure, project tasks, etc. that we want to query.
Execute the build task
|
|
This example creates a BuildLauncher for executing build tasks via the newBuild() method of ProjectConnection, then configures the Gradle tasks to be executed via forTasks(String... tasks) to configure the Gradle tasks to be executed and configure the execution progress listener, etc., and finally trigger the execution of the tasks via run().
3. Principle analysis
3.1 How to communicate with Gradle build process?
The Gradle Tooling API does not have the real Gradle build capability, but provides an entry point to call the native Gradle program to facilitate the communication with Gradle in coded form. After calling the Gradle build capability through the API in our own tooling program, we still need to communicate with the real Gradle builder across processes. Whether it is an IDE or tooling application that interacts with Gradle through the Gradle Tooling API, or a command-line window application that interacts with Gradle in the form of a command, the client application that invokes the Gradle build across the process is a Gradle client, and the Gradle build that actually performs the task is the Gradle client. program is the Gradle build process .
The Gradle daemon process is a long-standing Gradle build process that improves build speed by circumventing the build Gradle JVM environment and memory cache, and is always enabled for Gradle clients that integrate the Gradle Tooling API. In other words, a tooling application that has integrated the Gradle Tooling API will always communicate with the daemon process across processes to invoke Gradle build capabilities. If a Gradle client wants to connect to a dynamically created daemon process, it needs to register the daemon process and open it to queries through a service registration and service discovery mechanism, which is provided by DaemonRegistry.
Client - Gradle Client
The following is an analysis of the cross-process communication mechanism of the Gradle Tooling API from the source code perspective, taking the project structure information as the starting point.
From the code, although ProjectConnection looks like it creates a link to the daemon process, it doesn’t. Instead, the link to the daemon process is actually created in the getModel(Class<T> modelType) method, which, internally, is called from the This method is called from the Tooling API side to the Gradle source code, and finally looks for an available daemon process in DefaultDaemonConnector.java.
|
|
Using the above daemon process lookup logic and related code, it can be concluded that.
- the daemon process includes six states Idle, Busy, Canceled, StopRequested, Stopped, Broken.
- when executing Gradle builds in daemon process mode, it will try to find the daemon process with Idle, Canceled status and compatible environment in turn, if not found, it will create a new daemon process compatible with Gradle client environment.
- all Daemon processes are recorded in the
DaemonRegistry.javaregistry for the Gradle client to obtain. - the environment compatibility determination of the Daemon process includes Gradle version, file encoding, JVM heap size and other attributes.
- after getting a compatible daemon process, it will link to the port the daemon process is listening on via socket, and then communicate with the daemon process via socket.
server side - Daemon process
When a Gradle client calls the Gradle build capability, it triggers the creation of a daemon process. The process entry function is in GradleDaemon.java, then it goes to DaemonMain.java to initialize the process, and finally in TcpIncomingConnector.java to open the Socket Server and bind to listen on a specified port.
|
|
The daemon process is then logged into the registry in DaemonRegistryUpdater.java.
|
|
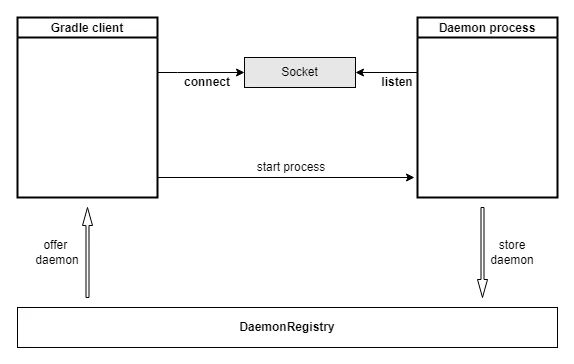
In this way, Gradle client can get the compatible daemon process and its port in the registry, so as to establish a connection with the daemon process for communication, as shown in the figure below.
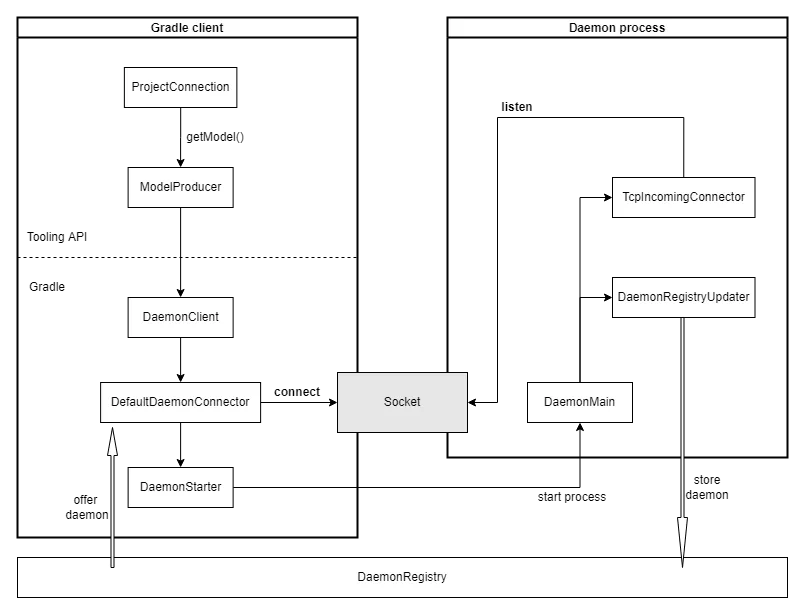
To summarize the process of establishing connection between Tooling API and Gradle Daemon process:
- the Tooling API itself is not too much code, the call to get the project information interface is wrapped by
ModelProducerabstraction, then it enters the Gradle source code, but still belongs to the Gradle client process. - in
DefaultDaemonConnectorit will try to get an available and compatible daemon process fromDaemonRegistry, if not, it will create a new daemon process. - the Daemon process will listen to the fixed port through socket binding after it starts, and then record the listening port and other information about itself into
DaemonRegistryfor Gradle client to query, get and establish connection.
3.2 How to achieve forward and backward compatibility?
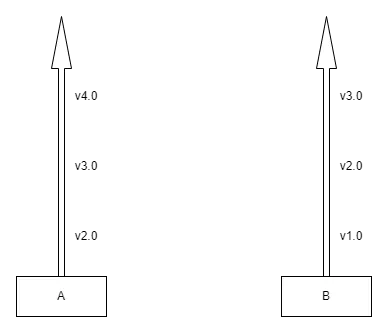
Tooling API supports Gradle 2.6 and higher, i.e. one version of Tooling API is forward and backward compatible with other versions of Gradle, and supports calling old or new versions of Gradle for Gradle building, but the interface functions included in Tooling API are not applicable to all Gradle versions; Gradle How is the compatibility between Gradle and Tooling API versions achieved?
Think about a question: If we have two pieces of software: Main Software A and Tooling Software B dedicated to calling A, how can we achieve maximum and elegant version compatibility between A and B? Here is a deeper analysis of the Tooling API and Gradle source code to see what technical solutions Gradle has adopted in terms of version compatibility that are worthy of attention.
Gradle Version Adaptation
In the Gradle Tooling API source code repository, there is a flowchart that describes the chain of calls to get project information.
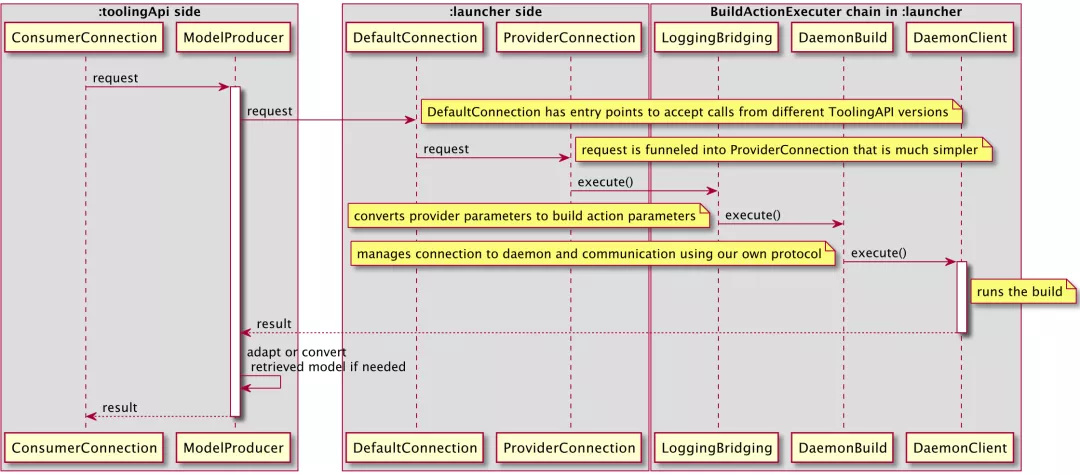
We will focus only on the DefaultConnection in the diagram - the key class for calls from the Tooling API to the Gradle launcher module.
DefaultConnection has entry points to accept calls from different ToolingAPI versions
The Tooling API side eventually loads DefaultConnection in DefaultToolingImplementationLoader.java via a custom URLClassLoader, and the custom URLClassLoader class load path specifies the corresponding The custom URLClassLoader class load path specifies the jar package under the lib of the corresponding Gradle version, so that it can load different Gradle versions of DefaultConnection.
|
|
It should be noted that although DefaultConnection is already a Gradle-side source, it is still part of the Gradle client-side process, i.e. a tooling program such as an IDE.
Model Class Adaptation
The getModel(Class<T> modelType) method can get the project structure information model GradleProject from the Gradle daemon process, while different Gradle versions may have different GradleProject definitions, how can multiple versions of the information model structure be compatible in the same version of the Tooling API?
Before requesting the information model, Tooling API will determine in VersionDetails.java whether the model is supported by the Gradle version, and if so, it will send a request to the daemon process. daemon process will return the information model of the corresponding version, and then send a request to Tooling API’s ProtocolToModel. API’s ProtocolToModelAdapter.java will encapsulate a layer of dynamic proxy and finally return it as a Proxy.
|
|
The final Tooling API returns a GradleProject that is simply a dynamic proxy interface, as follows.
As you can see, even for the supported information models, some of the contents may not be supported due to Gradle version mismatch, and the call will throw UnsupportedMethodException exception.
However, this approach also brings a disadvantage, because the Tooling API side can only get the model information interface, not the real model entity class, then the subsequent serialization or delivery of the whole model information class, you need to do another layer of conversion, to construct a real entity class containing the content, Android sdktools library for the AndroidProject model, the real content of the entity class IdeAndroidProjectImpl constructed.
4. Summary
This article firstly introduces Gradle Tooling API from the combination of modern IDE and build system, and introduces its special significance to Gradle build system, then introduces its main functions through the specific API and call examples of Tooling API, and finally analyzes cross-process communication and version compatibility principle, which are two very important mechanisms in Tooling API, in conjunction with source code.
Through the analysis of Gradle Tooling API, we can have a deep understanding of the overall architecture of Tooling API, so that we can better develop Gradle-capable tooling software based on it, and we can also learn some methodologies in similar technical architecture scenarios: when you need to communicate with services dynamically created at program runtime, you can generally introduce As a tool program for external access, when similar programs only provide the command line approach, we should dare to break the rules and provide a new approach, so that we can empower other software to a greater extent and achieve a win-win situation for both sides.