sobyte

dapr, which I have been following for some time, has been officially released in v1.0 (in fact, v1.0.1 was updated when this article was published), which means that dapr has entered a stable state to some extent and can be tried in practice. As a project I’ve been following, I tried it out in the first place and tried to introduce it into a real project, and this article is some preliminary testing for that.

What is dapr?

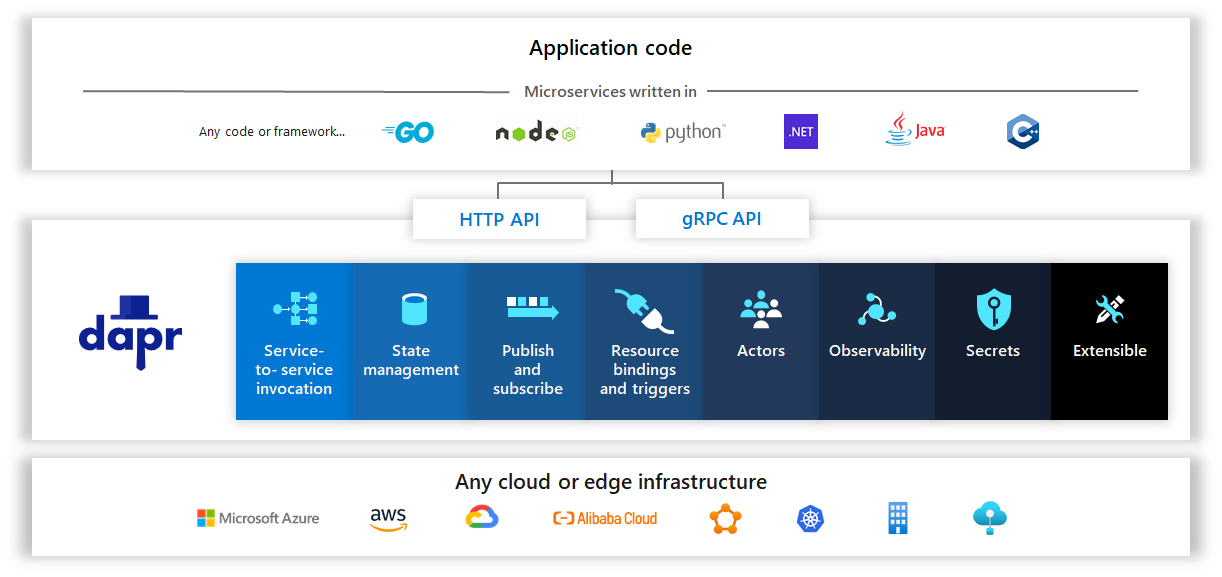
dapr was first open sourced by Microsoft, a portable, event-driven program runtime that makes it easy for any developer to build resilient, stateless/stateful applications running in the cloud and on the edge, with the flexibility to support multiple development languages. In other words, in my opinion, dapr can be seen and handled as a serverless landing solution for programs that are only concerned with the provided store and message queue interfaces and don’t need to care about more than the architectural level.

sobyte

However, in the official example tutorial, the environment used is a container environment to deploy and manage dapr. In fact, dapr can be configured to run in self-hosted mode on the local machine, except in a container environment or container cluster environment.

Local installation

The dapr installation can be done with the official dapr-cli, which can be quickly installed with the one-click install command.

 1
 2
 3
 4
 5
 6
 7
 8
 9
10
11
12
13
14
15
# wget -q https://raw.githubusercontent.com/dapr/cli/master/install/install.sh -O - | /bin/bash
Your system is linux_amd64

Dapr CLI is detected:
main: line 86: 43656 Segmentation fault      $DAPR_CLI_FILE --version
Reinstalling Dapr CLI - /usr/local/bin/dapr...

Getting the latest Dapr CLI...
Installing v1.0.0 Dapr CLI...
Downloading https://github.com/dapr/cli/releases/download/v1.0.0/dapr_linux_amd64.tar.gz ...
dapr installed into /usr/local/bin successfully.
CLI version: 1.0.0
Runtime version: n/a

To get started with Dapr, please visit https://docs.dapr.io/getting-started/

You can confirm that the dapr-cli program was installed successfully by entering the dapr command.

Next, use dapr-cli to install all runtime and other applications.

 1
 2
 3
 4
 5
 6
 7
 8
 9
10
11
12
13
# dapr init --slim
⌛  Making the jump to hyperspace...
↘  Downloading binaries and setting up components...
Dapr runtime installed to /root/.dapr/bin, you may run the following to add it to your path if you want to run daprd directly:
    export PATH=$PATH:/root/.dapr/bin
✅  Downloaded binaries and completed components set up.
ℹ️  daprd binary has been installed to /root/.dapr/bin.
ℹ️  placement binary has been installed to /root/.dapr/bin.
✅  Success! Dapr is up and running. To get started, go here: https://aka.ms/dapr-getting-started

# dapr --version
CLI version: 1.0.0
Runtime version: 1.0.1

In the official documentation, if you choose to initialize with the init command, dapr-cli will automatically try to use the container environment to manage related programs, and will only choose to run locally if you add the -slim argument. See the dapr help init help for more information on usage. By default, program-related content is installed in the $HOME/.dapr directory, here I used the root user for simplicity, so the program command directory is /root/.dapr/bin, and the following commands are installed.

1
2
# ls ~/.dapr/bin
daprd  dashboard  placement  web

From the file name you can see that daprd is the deamon process, dashboard is the management panel, and placement is the tool used to manage the actor distribution scheme and key range. The official documentation mentions that Reids will be used as the default storage and pub/sub components after installation, but my actual installation is actually not there, I don’t know if the documentation is a bit out of date. If you start the program and try to save the data in the store according to the official documentation example, you will get an error.

1
2
3
4
5
6
7
// 第一个session中执行:
# dapr run --app-id myapp --dapr-http-port 3500

// 第二个session中执行:
# curl -X POST -H "Content-Type: application/json" -d '[{ "key": "name", "value": "Bruce Wayne"}]' http://localhost:3500/v1.0/state/statestore

{"errorCode":"ERR_STATE_STORES_NOT_CONFIGURED","message":"state store is not configured"}

But actually adding components is relatively easy in dapr, by adding the corresponding yaml file under $HOME/.dapr/components.

Adding Redis as a component

We can find a Redis component configuration template in the official documentation that It can be quickly used to.

 1
 2
 3
 4
 5
 6
 7
 8
 9
10
11
12
13
14
# redis-store.yml
apiVersion: dapr.io/v1alpha1
kind: Component
metadata:
  name: redis-store
  namespace: default
spec:
  type: state.redis
  version: v1
  metadata:
  - name: redisHost
    value: 127.0.0.1:6379
  - name: redisPassword
    value: ""

Of course, we can also use the Redis Stream function to do pub/sub functions, although this function has been GA, but because of the characteristics of Redis Stream, you need to be careful with this function, here just because it is a demonstration so it does not matter.

 1
 2
 3
 4
 5
 6
 7
 8
 9
10
11
12
13
14
15
16
# redis-pubsub.yml
apiVersion: dapr.io/v1alpha1
kind: Component
metadata:
  name: redis-pubsub
  namespace: default
spec:
  type: pubsub.redis
  version: v1
  metadata:
  - name: redisHost
    value: 127.0.0.1:6379
  - name: redisPassword
    value: ""
  - name: consumerID
    value: "myGroup"

Here we have defined a store called redis-store, so we need to modify the above command.

1
2
3
4
5
# curl -X POST -H "Content-Type: application/json" -d '[{ "key": "name", "value": "Bruce Wayne"}]' http://localhost:3500/v1.0/state/redis-store

// 获取存储内容
# curl http://localhost:3500/v1.0/state/redis-store/name
"Bruce Wayne"

You can also get the content stored in Redis through redis-cli.

1
2
3
4
5
6
7
8
# redis-cli
127.0.0.1:6379> keys *
1) "myapp||name"
127.0.0.1:6379> hgetall "myapp||name"
1) "data"
2) "\"Bruce Wayne\""
3) "version"
4) "1"

When we added Redis as storage, we also added Redis to support publish/subscribe functionality. Here you may need to write additional programs to implement it. Let’s use the official example here. There are two types of subscriptions in dapr, one is in the form of a yaml declaration component, and the other can be implemented by writing code. Of course, the first and second approaches have advantages and disadvantages, the former being more suitable for seamless integration and the latter for development control. Here, for the sake of intuitiveness, we directly use the code-writing approach.

 1
 2
 3
 4
 5
 6
 7
 8
 9
10
11
12
13
14
15
16
17
18
19
20
21
22
23
24
25
26
27
28
29
package main

import (
	"io"
	"log"
	"net/http"

	"github.com/gin-gonic/gin"
)

func main() {
	r := gin.Default()
	r.GET("/dapr/subscribe", func(ctx *gin.Context) {
		ctx.JSON(http.StatusOK, []map[string]string{
			{
				"pubsubname": "redis-pubsub",
				"topic":      "deathStarStatus",
				"route":      "dsstatus",
			},
		})
	})
	r.POST("/dsstatus", func(c *gin.Context) {
		b, _ := io.ReadAll(c.Request.Body)
		defer c.Request.Body.Close()
		log.Println(string(b))
		c.JSON(http.StatusOK, map[string]interface{}{"success": true})
	})
	r.Run("127.0.0.1:5000")
}

Start the compiled daprdemo with the following command, note that you need to fill in the path when specifying the file name or in $PATH.

1
# dapr --app-id subapp --app-port 5000 run ~/daprdemo

In the program startup log we can see that dapr tries to access some default endpoint to read possible configurations.

 1
 2
 3
 4
 5
 6
 7
 8
 9
10
INFO[0000] application discovered on port 5000           app_id=subapp instance=127.0.0.1 scope=dapr.runtime type=log ver=1.0.1
== APP == [GIN] 2021/03/11 - 10:45:02 | 404 |         949ns |       127.0.0.1 | GET      "/dapr/config"

INFO[0000] application configuration loaded              app_id=subapp instance=127.0.0.1 scope=dapr.runtime type=log ver=1.0.1
INFO[0000] actor runtime started. actor idle timeout: 1h0m0s. actor scan interval: 30s  app_id=subapp instance=127.0.0.1 scope=dapr.runtime.actor type=log ver=1.0.1
== APP == [GIN] 2021/03/11 - 10:45:02 | 200 |     540.891µs |       127.0.0.1 | GET      "/dapr/subscribe"

INFO[0000] app is subscribed to the following topics: [deathStarStatus] through pubsub=redis-pubsub  app_id=subapp instance=127.0.0.1 scope=dapr.runtime type=log ver=1.0.1
WARN[0000] redis streams: BUSYGROUP Consumer Group name already exists  app_id=subapp instance=127.0.0.1 scope=dapr.contrib type=log ver=1.0.1
INFO[0000] dapr initialized. Status: Running. Init Elapsed 49.674504ms  app_id=subapp instance=127.0.0.1 scope=dapr.runtime type=log ver=1.0.1

Next we try to use dapr-cli to send a message to the myapp we started earlier.

1
dapr publish --publish-app-id myapp --pubsub redis-pubsub --topic deathStarStatus --data '{"status": "completed"}'

The output obtained in the program log is .

1
2
3
== APP == [GIN] 2021/03/11 - 10:45:05 | 200 |      122.15µs |       127.0.0.1 | POST     "/dsstatus"

== APP == 2021/03/11 10:45:05 {"id":"9c237504-7cab-4a13-8582-92d9130fd016","source":"myapp","pubsubname":"redis-pubsub","traceid":"00-fba669a086f84650e882e3cadc55082c-ea466c080e359e68-00","data":{"status":"completed"},"specversion":"1.0","datacontenttype":"application/json","type":"com.dapr.event.sent","topic":"deathStarStatus"}

Of course, in addition to the pub/sub approach, we can also use the routing capabilities provided by dapr to make service calls directly.

1
2
# curl http://127.0.0.1:3500/v1.0/invoke/subapp/method/dsstatus -X POST
{"success":true}

Other component functions can be configured by referring to the description in the official documentation.

Summary

dapr is a powerful serverless runtime that, in addition to the above-mentioned message- and request-store-oriented features, can also control HTTP requests and gRPC requests of an application, etc. In addition to these features, service management is included, as well as observability support, making it a very promising runtime choice.