This article firstly introduces the main process and basic principle of decoding video with FFmpeg as the topic; secondly, it also describes the simple applications related to FFmpeg video decoding, including how to play video in a certain timeline order based on the original FFmpeg video decoding, and how to add the logic of seek when playing video. Besides, the article focuses on the details that may be easily missed when decoding video, and finally, it briefly explains how to package a VideoDecoder with basic video decoding functions.
Preface
FFmpeg
FFmpeg is a set of open source computer programs that can be used to record, convert and stream digital audio and video. It generates libraries for processing and manipulating multimedia data, including the advanced audio and video decoding library libavcodec and the audio and video format conversion library libavformat.
FFmpeg six common function modules
- libavformat: encapsulation and decapsulation libraries for multimedia files or protocols, such as mp4, flv and other file encapsulation formats, rtmp, rtsp and other network protocol encapsulation formats.
- libavcodec: core library for audio and video decoding.
- libavfilter: audio/video and subtitle filter library.
- libswscale: image format conversion library.
- libswresample: audio resampling library.
- libavutil: tool library
Introduction to video decoding basics
-
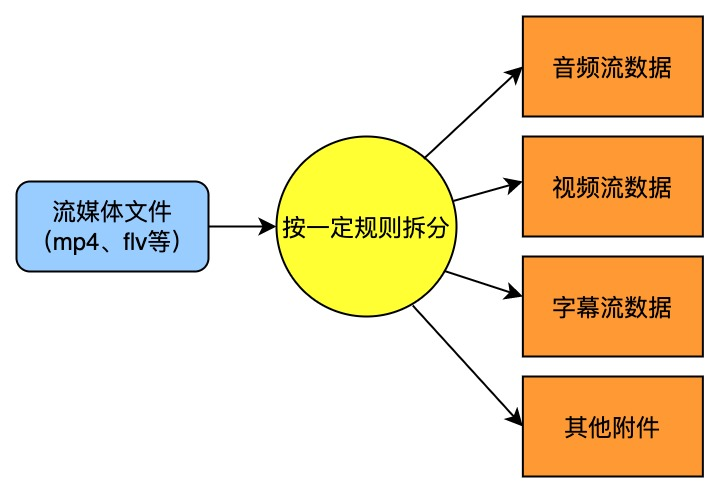
Demultiplexing (Demux): Demultiplexing can also be called decapsulation. There is a concept called encapsulation format here, and encapsulation format refers to the combined format of audio and video, commonly known as mp4, flv, mkv, etc. In layman’s terms, encapsulation is the product of combining audio streams, video streams, subtitle streams and other accessories into a package according to certain rules. Decapsulation plays the opposite role of encapsulation, breaking a streaming file into audio data and video data. At this point, the split data is compressed and encoded, and the common video compression data formats are h264.
-
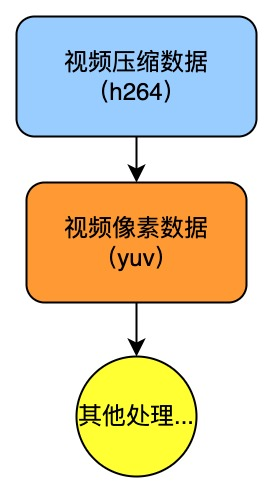
Decode: Simply speaking, it is to decompress the compressed encoded data into raw video pixel data, commonly used raw video pixel data formats are yuv.
-
Color Space Convert: Normally, for image displays, it is used to display images through the RGB model, but using the YUV model can save bandwidth when transferring image data. Therefore, it is necessary to convert the data in yuv pixel format to rgb pixel format before rendering when displaying the image.
-
Render: The data of each video frame that has been decoded and color space converted earlier is sent to the graphics card to be drawn on the screen.
1. Preparation before importing FFmpeg
1.1 FFmpeg so library compilation
-
Download the source library from the FFmpeg official website and extract it.
-
Download the NDK library and extract it.
-
configure the unpacked FFmpeg source code library directory, modify the highlighted parameters to the following, the main purpose is to generate the format of the name-version.so file that can be used by Android.
 1
 2
 3
 4
 5
 6
 7
 8
 9
10
11
12
13
14
15
16
17
18
# ······ # build settings SHFLAGS='-shared -Wl,-soname,$$(@F)' LIBPREF="lib" LIBSUF=".a" FULLNAME='$(NAME)$(BUILDSUF)' LIBNAME='$(LIBPREF)$(FULLNAME)$(LIBSUF)' SLIBPREF="lib" SLIBSUF=".so" SLIBNAME='$(SLIBPREF)$(FULLNAME)$(SLIBSUF)' SLIBNAME_WITH_VERSION='$(SLIBNAME).$(LIBVERSION)' # 已修改配置 SLIBNAME_WITH_MAJOR='$(SLIBNAME)$(FULLNAME)-$(LIBMAJOR)$(SLIBSUF)' LIB_INSTALL_EXTRA_CMD='$$(RANLIB)"$(LIBDIR)/$(LIBNAME)"' SLIB_INSTALL_NAME='$(SLIBNAME_WITH_MAJOR)' SLIB_INSTALL_LINKS='$(SLIBNAME)' # ······ -
Create a new script file
build_android_arm_v8a.shin the FFmpeg repository directory, configure the path to the NDK in the file, and enter the rest of the following.1 2 3 4 5 6 7 8 9 10 11 12 13 14 15 16 17 18 19 20 21 22 23 24 25 26 27 28 29 30 31 32 33 34 35 36 37 38 39 40 41 42 43 44 45 46 47 48 49 50 51 52 53# 清空上次的编译 make clean # 这里先配置你的 NDK 路径 export NDK=/Users/bytedance/Library/Android/sdk/ndk/21.4.7075529 TOOLCHAIN=$NDK/toolchains/llvm/prebuilt/darwin-x86_64 function build_android { ./configure \ --prefix=$PREFIX \ --disable-postproc \ --disable-debug \ --disable-doc \ --enable-FFmpeg \ --disable-doc \ --disable-symver \ --disable-static \ --enable-shared \ --cross-prefix=$CROSS_PREFIX \ --target-os=android \ --arch=$ARCH \ --cpu=$CPU \ --cc=$CC \ --cxx=$CXX \ --enable-cross-compile \ --sysroot=$SYSROOT \ --extra-cflags="-Os -fpic $OPTIMIZE_CFLAGS" \ --extra-ldflags="$ADDI_LDFLAGS" make clean make -j16 make install echo "============================ build android arm64-v8a success ==========================" } # arm64-v8a ARCH=arm64 CPU=armv8-a API=21 CC=$TOOLCHAIN/bin/aarch64-linux-android$API-clang CXX=$TOOLCHAIN/bin/aarch64-linux-android$API-clang++ SYSROOT=$NDK/toolchains/llvm/prebuilt/darwin-x86_64/sysroot CROSS_PREFIX=$TOOLCHAIN/bin/aarch64-linux-android- PREFIX=$(pwd)/android/$CPU OPTIMIZE_CFLAGS="-march=$CPU" echo $CC build_android -
Set permissions for all files in the NDK folder
chmod 777 -R NDK. -
Execute the script
. /build_android_arm_v8a.shto start compiling FFmpeg. The compiled file will be in theandroiddirectory under FFmpeg, and multiple .so files will appear.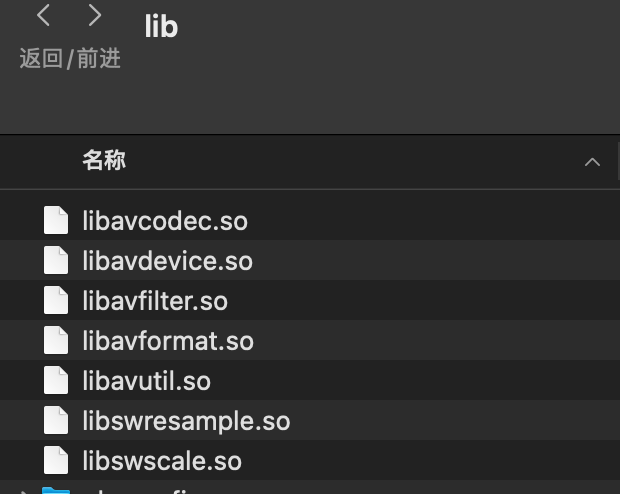
-
To build arm-v7a, just copy and modify the above script to the following
build_android_arm_v7a.sh.1 2 3 4 5 6 7 8 9 10#armv7-a ARCH=arm CPU=armv7-a API=21 CC=$TOOLCHAIN/bin/armv7a-linux-androideabi$API-clang CXX=$TOOLCHAIN/bin/armv7a-linux-androideabi$API-clang++ SYSROOT=$NDK/toolchains/llvm/prebuilt/darwin-x86_64/sysroot CROSS_PREFIX=$TOOLCHAIN/bin/arm-linux-androideabi- PREFIX=$(pwd)/android/$CPU OPTIMIZE_CFLAGS="-mfloat-abi=softfp -mfpu=vfp -marm -march=$CPU "
1.2 Introducing FFmpeg’s so library in Android
-
NDK environment, CMake build tool, LLDB (C/C++ code debugging tool).
-
New C++ module, which usually generates the following important files:
CMakeLists.txt,native-lib.cpp,MainActivity. -
Next, under the
jniLibsdirectory, create thearm64-v8adirectory and paste the compiled .so file into it; then paste the compiled . h header file (FFmpeg’s exposed interface) intoincludein thecppdirectory. The .so dynamic library directory and .h header directory above are explicitly declared and linked inCMakeLists.txt. -
The top-level
MainActivitywhere the C/C++ code compiled libraries are loaded:native-lib.native-libis added to the library named “ffmpeg” inCMakeLists.txt, so the input inSystem.loadLibrary()is “ffmpeg”.1 2 3 4 5 6 7 8 9 10 11 12 13 14 15 16 17 18 19 20 21 22class MainActivity : AppCompatActivity() { override fun onCreate(savedInstanceState: Bundle?) { super.onCreate(savedInstanceState) setContentView(R.layout.activity_main) // Example of a call to a native method sample_text.text = stringFromJNI() } // 声明一个外部引用的方法,此方法和 C/C++ 层的代码是对应的。 external fun stringFromJNI(): String companion object { // 在 init{} 中加载 C/C++ 编译成的 library:ffmpeg // library 名称的定义和添加在 CMakeLists.txt 中完成 init { System.loadLibrary("ffmpeg") } } } -
native-lib.cppis a C++ interface file where the external methods declared in the Java layer are implemented. -
CMakeLists.txtis a build script to configure the build information for the so librarynative-libthat can be compiled.1 2 3 4 5 6 7 8 9 10 11 12 13 14 15 16 17 18 19 20 21 22 23 24 25 26 27 28 29 30 31 32 33 34 35 36 37 38 39 40 41 42 43 44 45 46 47 48 49 50 51 52 53 54 55 56 57 58 59 60 61 62 63 64 65 66 67 68 69 70 71 72 73 74 75 76 77 78 79 80 81 82 83 84 85 86 87# For more information about using CMake with Android Studio, read the # documentation: https://d.android.com/studio/projects/add-native-code.html # Sets the minimum version of CMake required to build the native library. cmake_minimum_required(VERSION 3.10.2) # Declares and names the project. project("ffmpeg") # Creates and names a library, sets it as either STATIC # or SHARED, and provides the relative paths to its source code. # You can define multiple libraries, and CMake builds them for you. # Gradle automatically packages shared libraries with your APK. # 定义 so 库和头文件所在目录,方便后面使用 set(FFmpeg_lib_dir ${CMAKE_SOURCE_DIR}/../jniLibs/${ANDROID_ABI}) set(FFmpeg_head_dir ${CMAKE_SOURCE_DIR}/FFmpeg) # 添加头文件目录 include_directories( FFmpeg/include ) add_library( # Sets the name of the library. ffmmpeg # Sets the library as a shared library. SHARED # Provides a relative path to your source file(s). native-lib.cpp ) # Searches for a specified prebuilt library and stores the path as a # variable. Because CMake includes system libraries in the search path by # default, you only need to specify the name of the public NDK library # you want to add. CMake verifies that the library exists before # completing its build. # 添加FFmpeg相关的so库 add_library( avutil SHARED IMPORTED ) set_target_properties( avutil PROPERTIES IMPORTED_LOCATION ${FFmpeg_lib_dir}/libavutil.so ) add_library( swresample SHARED IMPORTED ) set_target_properties( swresample PROPERTIES IMPORTED_LOCATION ${FFmpeg_lib_dir}/libswresample.so ) add_library( avcodec SHARED IMPORTED ) set_target_properties( avcodec PROPERTIES IMPORTED_LOCATION ${FFmpeg_lib_dir}/libavcodec.so ) find_library( # Sets the name of the path variable. log-lib # Specifies the name of the NDK library that # you want CMake to locate. log) # Specifies libraries CMake should link to your target library. You # can link multiple libraries, such as libraries you define in this # build script, prebuilt third-party libraries, or system libraries. target_link_libraries( # Specifies the target library. audioffmmpeg # 把前面添加进来的 FFmpeg.so 库都链接到目标库 native-lib 上 avutil swresample avcodec -landroid # Links the target library to the log library # included in the NDK. ${log-lib}) -
The above operation will introduce FFmpeg into the Android project.
2. Principles and details of FFmpeg decoding video
2.1 Main flow
2.2 Fundamentals
2.2.1 Common ffmpeg interfaces
|
|
2.2.2 Overall idea of video decoding
-
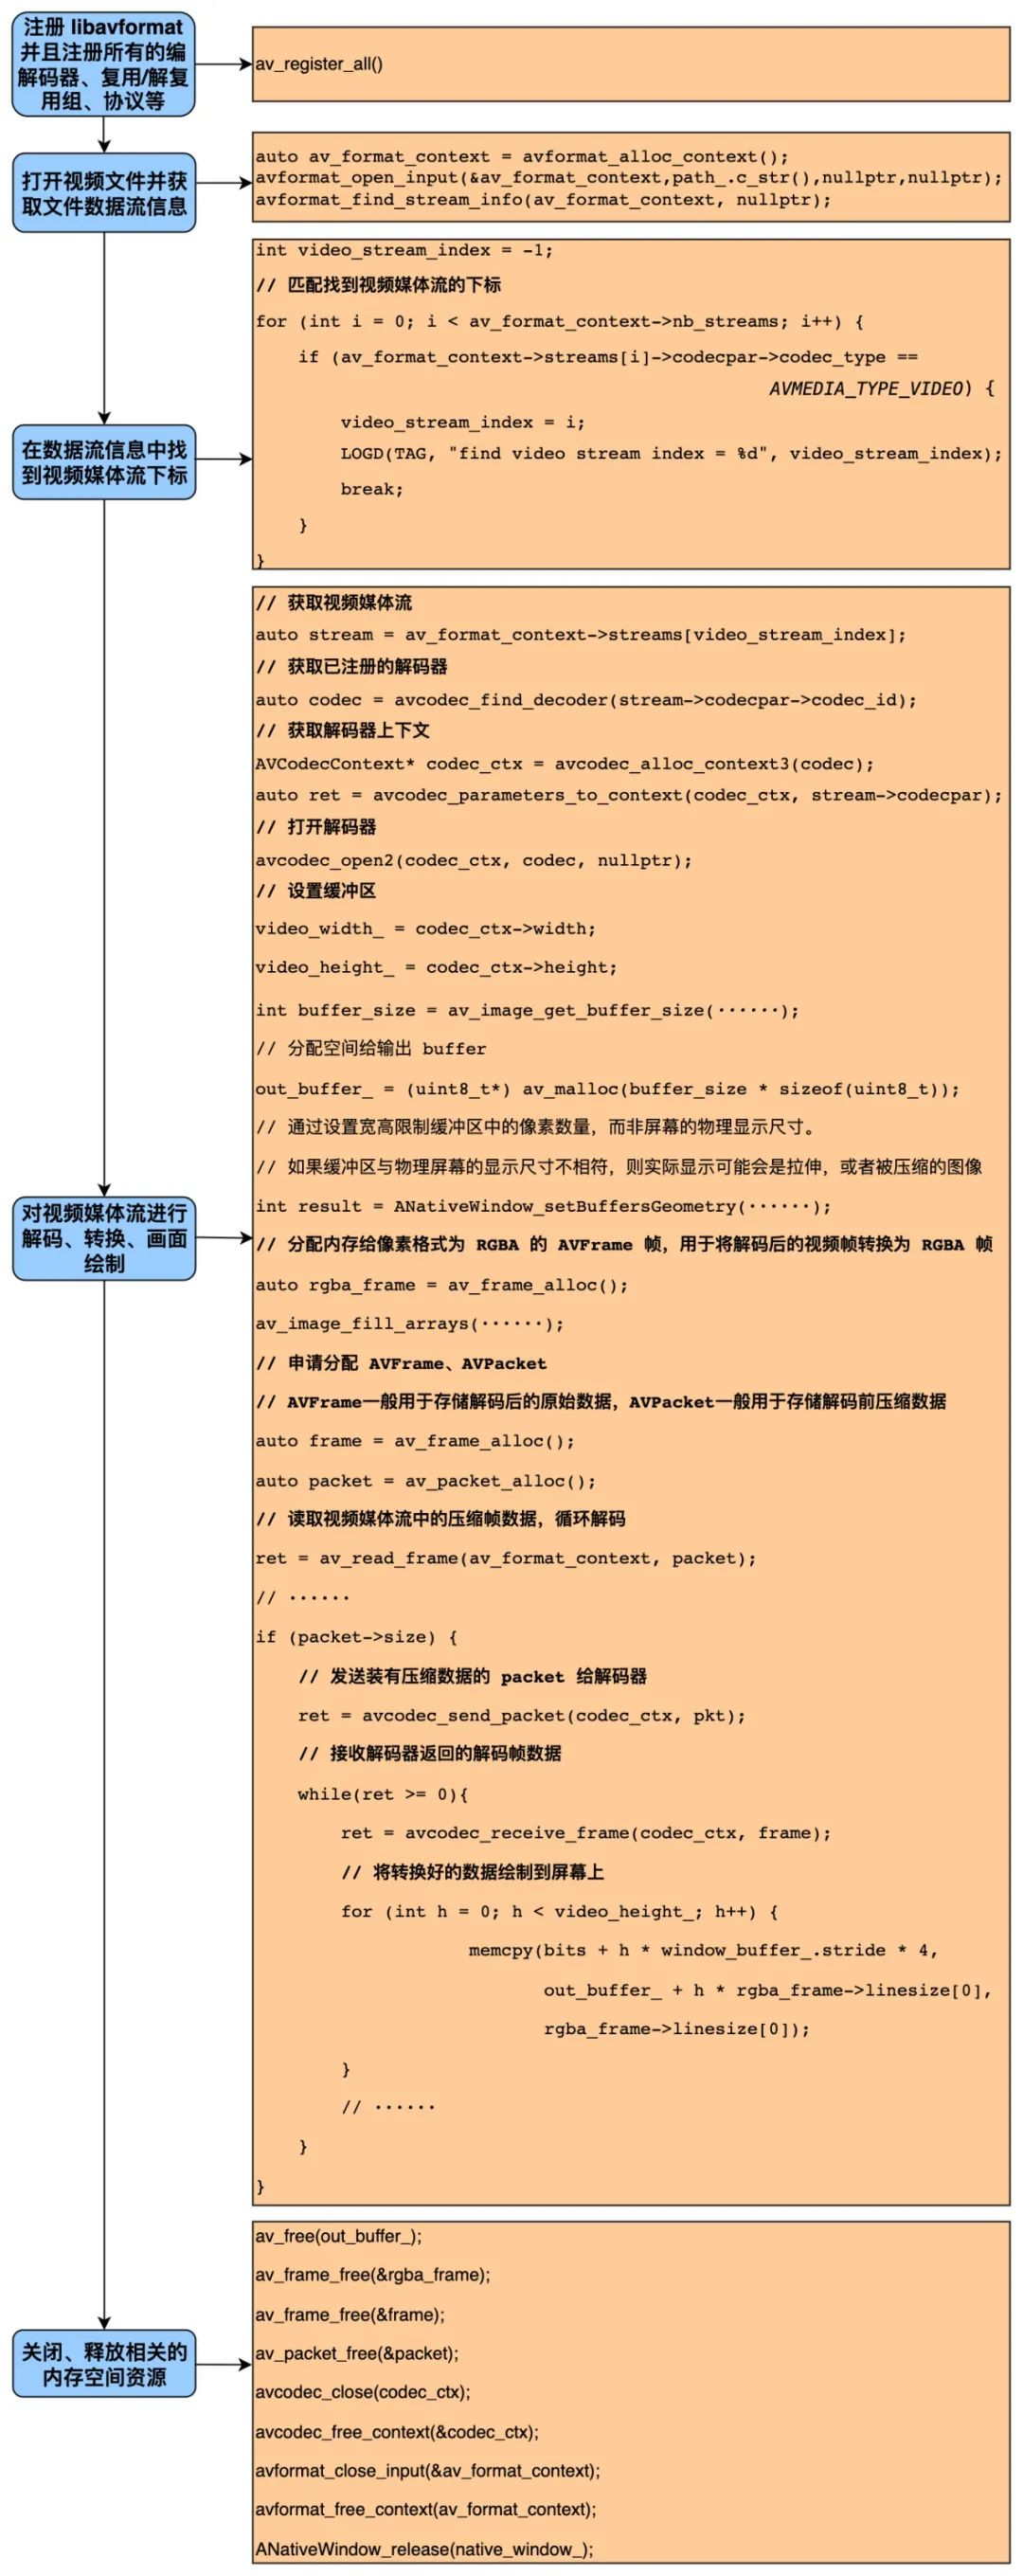
First of all, register
libavformatand register all codecs, multiplex/demultiplex groups, protocols, etc. It is the first function called in all FFmpeg-based applications, and only when this function is called can you use FFmpeg’s functions properly. Also, in the latest versions of FFmpeg it is now possible to use this line of code without it.1av_register_all(); -
Open the video file and extract the data stream information from the file.
-
Then get the subscript of the video media stream in order to find the video media stream in the file.
1 2 3 4 5 6 7 8 9int video_stream_index = -1; for (int i = 0; i < av_format_context->nb_streams; i++) { // 匹配找到视频媒体流的下标, if (av_format_context->streams[i]->codecpar->codec_type == AVMEDIA_TYPE_VIDEO) { video_stream_index = i; LOGD(TAG, "find video stream index = %d", video_stream_index); break; } } -
obtaining the video media stream, obtaining the decoder context, obtaining the decoder context, configuring the parameter values of the decoder context, and opening the decoder.
1 2 3 4 5 6 7 8 9 10 11 12 13 14// 获取视频媒体流 auto stream = av_format_context->streams[video_stream_index]; // 找到已注册的解码器 auto codec = avcodec_find_decoder(stream->codecpar->codec_id); // 获取解码器上下文 AVCodecContext* codec_ctx = avcodec_alloc_context3(codec); // 将视频媒体流的参数配置到解码器上下文 auto ret = avcodec_parameters_to_context(codec_ctx, stream->codecpar); if (ret >= 0) { // 打开解码器 avcodec_open2(codec_ctx, codec, nullptr); // ······ } -
Calculate the memory size needed for the required buffer by specifying the pixel format, image width, and image height, and allocate the set buffer; and since it is an up-screen drawing, we need to use
ANativeWindowand set the properties of this drawing window usingANativeWindow_setBuffersGeometry.1 2 3 4 5 6 7 8 9 10 11video_width_ = codec_ctx->width; video_height_ = codec_ctx->height; int buffer_size = av_image_get_buffer_size(AV_PIX_FMT_RGBA, video_width_, video_height_, 1); // 输出 buffer out_buffer_ = (uint8_t*) av_malloc(buffer_size * sizeof(uint8_t)); // 通过设置宽高来限制缓冲区中的像素数量,而非显示屏幕的尺寸。 // 如果缓冲区与显示的屏幕尺寸不相符,则实际显示的可能会是拉伸,或者被压缩的图像 int result = ANativeWindow_setBuffersGeometry(native_window_, video_width_, video_height_, WINDOW_FORMAT_RGBA_8888); -
Allocate memory space to an AVFrame in the pixel format RGBA to hold the frame data after conversion to RGBA; set the rgba_frame buffer to be associated with out_buffer_.
-
Get
SwsContext, which is used when calling sws_scale() for image format conversion and image scaling. yuv420p to rgba conversion may fail to return the correct height value when calling sws_scale, because of the flags when calling sws_getContext, you need to change SWS _BICUBIC to SWS_FULL_CHR_H_INT | SWS_ACCURATE_RND. -
Allocate memory space to
AVFramefor storing raw data, pointing to raw frame data, and toAVPacketfor storing pre-decoded video data. -
Loop through the compressed frame data from the video stream and start decoding.
-
Send the
packetwith the native compressed data as input to the decoder in theDecode()function. -
The decoder returns the decoded frame data to the specified
frame, and theptsof the decodedframecan subsequently be converted to timestamps and drawn to the playback screen frame by frame in the display order of the timeline.1 2 3 4 5 6 7 8 9 10 11 12 13 14 15 16 17 18 19 20while (ret >= 0 && !is_stop_) { // 返回解码后的数据到 frame ret = avcodec_receive_frame(codec_ctx, frame); if (ret == AVERROR(EAGAIN) || ret == AVERROR_EOF) { return; } else if (ret < 0) { return; } // 拿到当前解码后的 frame,对其 pts 换算成时间戳,以便于跟传入的指定时间戳进行比 auto decode_time_ms = frame->pts * 1000 / stream->time_base.den; if (decode_time_ms >= time_ms_) { last_decode_time_ms_ = decode_time_ms; is_seeking_ = false; // ······ // 图片数据格式转换 // ······ // 把转换后的数据绘制到屏幕上 } av_packet_unref(pkt); } -
Before drawing the screen, we have to convert the image data format, here we have to use the
SwsContextobtained earlier. -
Because it is an up-screen drawing,
ANativeWindowandANativeWindow_Bufferare used. Before drawing the screen, the next drawingsurfaceof the locked window is used to draw, then the data of the frame to be displayed is written to the buffer, and finally the drawingsurfaceof the unlocked window is used to post the data from the buffer to the screen display.1 2 3 4 5 6 7 8 9 10 11 12 13 14 15 16// 播放 result = ANativeWindow_lock(native_window_, &window_buffer_, nullptr); if (result < 0) { LOGE(TAG, "Player Error : Can not lock native window"); } else { // 将图像绘制到界面上 // 注意 : 这里 rgba_frame 一行的像素和 window_buffer 一行的像素长度可能不一致 // 需要转换好 否则可能花屏 auto bits = (uint8_t*) window_buffer_.bits; for (int h = 0; h < video_height_; h++) { memcpy(bits + h * window_buffer_.stride * 4, out_buffer_ + h * rgba_frame->linesize[0], rgba_frame->linesize[0]); } ANativeWindow_unlockAndPost(native_window_); } -
The above is the main decoding process. Besides, because C++ needs to release resources and memory space by itself when using them, it also needs to call the release interface to release resources after decoding to avoid memory leakage.
1 2 3 4 5 6 7 8 9 10 11 12sws_freeContext(data_convert_context); av_free(out_buffer_); av_frame_free(&rgba_frame); av_frame_free(&frame); av_packet_free(&packet); avcodec_close(codec_ctx); avcodec_free_context(&codec_ctx); avformat_close_input(&av_format_context); avformat_free_context(av_format_context); ANativeWindow_release(native_window_);
2.3 Simple application
In order to better understand the process of video decoding, a video decoder VideoDecoder is encapsulated here, and the decoder will initially have the following functions.
In this video decoder, the decoded frame data will be returned after the specified timestamp is input. The more important one is the DecodeFrame(long time_ms) function, which can be called by the user to pass in the timestamp of the specified frame and then decode the corresponding frame data. In addition, a synchronization lock can be added to separate the decoding thread from the using thread.
2.3.1 Adding synchronization lock to realize video playback
If the video is only to be decoded, there is no need to use synchronous waiting.
However, if the video is to be played, a lock is needed to wait for each decoded and drawn frame, because the video needs to be decoded and drawn separately and in a certain timeline order and speed.
|
|
Wake up the synchronization lock when the upper layer calls the DecodeFrame function to pass in the decoded timestamp and let the decoded drawing loop continue to execute.
2.3.2 Add seek_frame during playback
Under normal playback, the video is decoded and played frame by frame; however, if the progress bar is dragged to the specified seek point, it may not be very efficient if the video is still decoded to the seek point frame by frame from the beginning to the end. At this time, we need to check the timestamp of seek point within certain rules, and seek to the specified timestamp directly if the condition is met.
av_seek_frame in FFmpeg
-
av_seek_framecan locate keyframes and non-keyframes, depending on the selectedflagvalue. Since the decoding of video depends on keyframes, we generally need to locate keyframes; the -
The
flaginav_seek_frameis used to specify the relationship between the sought I-frame and the incoming timestamp. When seeking a timestamp that has already passed, the timestamp will not necessarily be at the exact location of the I-frame, but since decoding depends on the I-frame, an I-frame near this timestamp needs to be found first, whereflagindicates whether to seek to an I-frame before or after the current timestamp. -
flaghas four options.
| flag option | description |
|---|---|
| AVSEEK_FLAG_BACKWARD | The first Flag is the nearest keyframe before seek to the requested timestamp. Normally, seek is in ms units, and if the specified ms timestamp is not a keyframe (most likely), it will automatically seek back to the nearest keyframe. Although this flag positioning is not very precise, it is a good way to deal with the mosaic problem, because the BACKWARD approach will seek back to the keyframe and locate the keyframe. |
| AVSEEK_FLAG_BYTE | The second flag is to seek to the corresponding position (in bytes) in the file, exactly the same as AVSEEK_FLAG_FRAME, but with a different search algorithm. |
| AVSEEK_FLAG_ANY | The third Flag is to seek to any frame, not necessarily a keyframe, so it may appear as a mosaic, but the progress is exactly the same as hand-sliding. |
| AVSEEK_FLAG_FRAME | The fourth Flag is the timestamp of seek corresponding to the frame number, which can be interpreted as going backward to find the nearest keyframe, the opposite direction of BACKWARD. |
-
flagmay contain more than one of these values at the same time. For exampleAVSEEK_FLAG_BACKWARD | AVSEEK_FLAG_BYTE. -
FRAMEandBACKWARDare to project the target position of seek by the interval between frames, which is suitable for fast forward and fast reverse;BYTEis suitable for large slide.
Scenarios for seek
-
If the timestamp passed in when decoding is in the forward direction and is a certain distance beyond the previous frame, then seek is required, the “certain distance” here is estimated through several experiments, not always the 1000ms used in the following code.
-
if the direction is backward and less than the last decoding timestamp, but the distance from the last decoding timestamp is larger (e.g. more than 50ms), seek to the last keyframe.
-
The bool variable
is_seeking_is used to prevent other operations from interfering with the current seeking operation, in order to control that only one seek operation is currently in progress.1 2 3 4 5 6 7 8 9 10 11if (!is_seeking_ && (time_ms_ > last_decode_time_ms_ + 1000 || time_ms_ < last_decode_time_ms_ - 50)) { is_seeking_ = true; // seek 时传入的是指定帧带有 time_base 的时间戳,因此要用 times_ms 进行推算 LOGD(TAG, "seek frame time_ms_ = %ld, last_decode_time_ms_ = %ld", time_ms_, last_decode_time_ms_); av_seek_frame(av_format_context, video_stream_index, time_ms_ * stream->time_base.den / 1000, AVSEEK_FLAG_BACKWARD); }
insert seek logic
Since we have to check if seek before decoding, we have to insert the logic of seek before the av_read_frame function (which returns the next frame of the video media stream), use av_seek_frame to reach the specified I-frame when the seek condition is met, and then continue decoding to the destination timestamp position after av_read_frame.
2.4 Details of the decoding process
2.4.1 Conditions for seek during DecodeFrame
When using the av_seek_frame function, you need to specify the correct flag and also agree on the conditions for the seek operation, otherwise the video may appear as a splash screen (mosaic).
2.4.2 Reducing the number of decodes
When decoding video, there are conditions under which it is possible to decode frame data without passing in a timestamp. For example.
-
the current decoding timestamp does not need to be decoded if it is in the forward direction and is the same as the previous decoding timestamp or the same as the timestamp currently being decoded.
-
if the current decoding timestamp is not greater than the previous decoding timestamp and the distance between it and the previous decoding timestamp is small (e.g. not more than 50ms), decoding is not required.
1 2 3 4 5 6 7 8 9 10 11 12 13 14bool VideoDecoder::DecodeFrame(long time_ms) { LOGD(TAG, "DecodeFrame time_ms = %ld", time_ms); if (last_decode_time_ms_ == time_ms || time_ms_ == time_ms) { LOGD(TAG, "DecodeFrame last_decode_time_ms_ == time_ms"); return false; } if (time_ms <= last_decode_time_ms_ && time_ms + 50 >= last_decode_time_ms_) { return false; } time_ms_ = time_ms; condition_.notify_all(); return true; }
With the above constraints, some unnecessary decoding operations will be reduced.
2.4.3 Using pts of AVFrame
-
AVPacketstores the data before decoding (encoded data: H264/AAC, etc.), and saves the data after decapsulation and before decoding, which is still compressed data;AVFramestores the data after decoding (pixel data: YUV/RGB/PCM, etc.). -
There is a difference in the meaning of
ptsofAVPacketandptsofAVFrame. The former indicates when this decompressed packet is displayed, the latter indicates when the frame data is displayed.1 2 3 4 5 6 7 8 9 10 11 12 13 14 15 16 17// AVPacket 的 pts /** * Presentation timestamp in AVStream->time_base units; the time at which * the decompressed packet will be presented to the user. * Can be AV_NOPTS_VALUE if it is not stored in the file. * pts MUST be larger or equal to dts as presentation cannot happen before * decompression, unless one wants to view hex dumps. Some formats misuse * the terms dts and pts/cts to mean something different. Such timestamps * must be converted to true pts/dts before they are stored in AVPacket. */ int64_t pts; // AVFrame 的 pts /** * Presentation timestamp in time_base units (time when frame should be shown to user). */ int64_t pts; -
Whether or not the currently decoded frame data is drawn to the screen depends on the result of comparing the incoming decoding timestamp with the timestamp of the decoded frame returned by the current decoder.
ptsofAVPacketmay not be used here, it is probably not an incremental timestamp. -
frame drawing is required provided that the specified decoding timestamp passed in is not greater than the converted timestamp of the pts of the currently decoded frame.
2.4.4 Decoding the last frame when the video has no more data
Use av_read_frame(av_format_context, packet) to return the next frame of the video media stream to AVPacket. If the function returns an int value of 0 it is Success, if it is less than 0 it is Error or EOF.
So if the value returned when playing video is less than 0, call the avcodec_flush_buffers function to reset the state of the decoder, flush the contents of the buffer, and then seek to the current incoming timestamp to finish the post-decoding callback and let the sync lock wait.
|
|
2.5 Wrapping decoder VideoDecoder in upper layer
If you want to encapsulate a VideoDecoder in the upper layer, you just need to expose the interface of the C++ layer VideoDecoder in native-lib.cpp, and then the upper layer calls the C++ interface by JNI.
For example, if the upper layer wants to pass in the specified decoding timestamp for decoding, write a deocodeFrame method, and then pass the timestamp to the nativeDecodeFrame of the C++ layer for decoding, and the implementation of the nativeDecodeFrame method is written in native-lib.cpp.
|
|
Then the interface DecodeFrame of the C++ layer VideoDecoder is called in native-lib.cpp, thus establishing the connection between the upper layer and the C++ base layer by means of JNI.
3. Insights
Technical experience
-
FFmpeg is compiled and combined with Android to realize video decoding and playback, which is convenient.
-
Since the specific decoding process is implemented with C++ layer, it will be difficult to learn, so it is better to have some C++ foundation.
4. Appendix
C++ wrapped VideoDecoder
-
VideoDecoder.h1 2 3 4 5 6 7 8 9 10 11 12 13 14 15 16 17 18 19 20 21 22 23 24 25 26 27 28 29 30 31 32 33 34 35 36 37 38 39 40 41 42 43 44 45 46 47 48 49 50 51 52 53 54 55 56 57 58#include <jni.h> #include <mutex> #include <android/native_window.h> #include <android/native_window_jni.h> #include <time.h> extern "C" { #include <libavformat/avformat.h> #include <libavcodec/avcodec.h> #include <libswresample/swresample.h> #include <libswscale/swscale.h> } #include <string> /* * VideoDecoder 可用于解码某个音视频文件(比如.mp4)中视频媒体流的数据。 * Java 层传入指定文件的路径后,可以按一定 fps 循环传入指定的时间戳进行解码(抽帧),这一实现由 C++ 提供的 DecodeFrame 来完成。 * 在每次解码结束时,将解码某一帧的时间戳回调给上层的解码器,以供其他操作使用。 */ namespace codec { class VideoDecoder { private: std::string path_; long time_ms_ = -1; long last_decode_time_ms_ = -1; bool is_seeking_ = false; ANativeWindow* native_window_ = nullptr; ANativeWindow_Buffer window_buffer_{};、 // 视频宽高属性 int video_width_ = 0; int video_height_ = 0; uint8_t* out_buffer_ = nullptr; // on_decode_frame 用于将抽取指定帧的时间戳回调给上层解码器,以供上层解码器进行其他操作。 std::function<void(long timestamp)> on_decode_frame_ = nullptr; bool is_stop_ = false; // 会与在循环同步时用的锁 "std::unique_lock<std::mutex>" 配合使用 std::mutex work_queue_mtx; // 真正在进行同步等待和唤醒的属性 std::condition_variable condition_; // 解码器真正进行解码的函数 void Decode(AVCodecContext* codec_ctx, AVPacket* pkt, AVFrame* frame, AVStream* stream, std::unique_lock<std::mutex>& lock, SwsContext* sws_context, AVFrame* pFrame); public: // 新建解码器时要传入媒体文件路径和一个解码后的回调 on_decode_frame。 VideoDecoder(const char* path, std::function<void(long timestamp)> on_decode_frame); // 在 JNI 层将上层传入的 Surface 包装后新建一个 ANativeWindow 传入,在后面解码后绘制帧数据时需要用到 void Prepare(ANativeWindow* window); // 抽取指定时间戳的视频帧,可由上层调用 bool DecodeFrame(long time_ms); // 释放解码器资源 void Release(); // 获取当前系统毫秒时间 static int64_t GetCurrentMilliTime(void); }; } -
VideoDecoder.cpp1 2 3 4 5 6 7 8 9 10 11 12 13 14 15 16 17 18 19 20 21 22 23 24 25 26 27 28 29 30 31 32 33 34 35 36 37 38 39 40 41 42 43 44 45 46 47 48 49 50 51 52 53 54 55 56 57 58 59 60 61 62 63 64 65 66 67 68 69 70 71 72 73 74 75 76 77 78 79 80 81 82 83 84 85 86 87 88 89 90 91 92 93 94 95 96 97 98 99 100 101 102 103 104 105 106 107 108 109 110 111 112 113 114 115 116 117 118 119 120 121 122 123 124 125 126 127 128 129 130 131 132 133 134 135 136 137 138 139 140 141 142 143 144 145 146 147 148 149 150 151 152 153 154 155 156 157 158 159 160 161 162 163 164 165 166 167 168 169 170 171 172 173 174 175 176 177 178 179 180 181 182 183 184 185 186 187 188 189 190 191 192 193 194 195 196 197 198 199 200 201 202 203 204 205 206 207 208 209 210 211 212 213 214 215 216 217 218 219 220 221 222 223 224 225 226 227 228 229 230#include "VideoDecoder.h" #include "../log/Logger.h" #include <thread> #include <utility> extern "C" { #include <libavutil/imgutils.h> } #define TAG "VideoDecoder" namespace codec { VideoDecoder::VideoDecoder(const char* path, std::function<void(long timestamp)> on_decode_frame) : on_decode_frame_(std::move(on_decode_frame)) { path_ = std::string(path); } void VideoDecoder::Decode(AVCodecContext* codec_ctx, AVPacket* pkt, AVFrame* frame, AVStream* stream, std::unique_lock<std::mutex>& lock, SwsContext* sws_context, AVFrame* rgba_frame) { int ret; /* send the packet with the compressed data to the decoder */ ret = avcodec_send_packet(codec_ctx, pkt); if (ret == AVERROR(EAGAIN)) { LOGE(TAG, "Decode: Receive_frame and send_packet both returned EAGAIN, which is an API violation."); } else if (ret < 0) { return; } // read all the output frames (infile general there may be any number of them while (ret >= 0 && !is_stop_) { // 对于frame, avcodec_receive_frame内部每次都先调用 ret = avcodec_receive_frame(codec_ctx, frame); if (ret == AVERROR(EAGAIN) || ret == AVERROR_EOF) { return; } else if (ret < 0) { return; } int64_t startTime = GetCurrentMilliTime(); LOGD(TAG, "decodeStartTime: %ld", startTime); // 换算当前解码的frame时间戳 auto decode_time_ms = frame->pts * 1000 / stream->time_base.den; LOGD(TAG, "decode_time_ms = %ld", decode_time_ms); if (decode_time_ms >= time_ms_) { LOGD(TAG, "decode decode_time_ms = %ld, time_ms_ = %ld", decode_time_ms, time_ms_); last_decode_time_ms_ = decode_time_ms; is_seeking_ = false; // 数据格式转换 int result = sws_scale( sws_context, (const uint8_t* const*) frame->data, frame->linesize, 0, video_height_, rgba_frame->data, rgba_frame->linesize); if (result <= 0) { LOGE(TAG, "Player Error : data convert fail"); return; } // 播放 result = ANativeWindow_lock(native_window_, &window_buffer_, nullptr); if (result < 0) { LOGE(TAG, "Player Error : Can not lock native window"); } else { // 将图像绘制到界面上 auto bits = (uint8_t*) window_buffer_.bits; for (int h = 0; h < video_height_; h++) { memcpy(bits + h * window_buffer_.stride * 4, out_buffer_ + h * rgba_frame->linesize[0], rgba_frame->linesize[0]); } ANativeWindow_unlockAndPost(native_window_); } on_decode_frame_(decode_time_ms); int64_t endTime = GetCurrentMilliTime(); LOGD(TAG, "decodeEndTime - decodeStartTime: %ld", endTime - startTime); LOGD(TAG, "finish decode frame"); condition_.wait(lock); } // 主要作用是清理AVPacket中的所有空间数据,清理完毕后进行初始化操作,并且将 data 与 size 置为0,方便下次调用。 // 释放 packet 引用 av_packet_unref(pkt); } } void VideoDecoder::Prepare(ANativeWindow* window) { native_window_ = window; av_register_all(); auto av_format_context = avformat_alloc_context(); avformat_open_input(&av_format_context, path_.c_str(), nullptr, nullptr); avformat_find_stream_info(av_format_context, nullptr); int video_stream_index = -1; for (int i = 0; i < av_format_context->nb_streams; i++) { // 找到视频媒体流的下标 if (av_format_context->streams[i]->codecpar->codec_type == AVMEDIA_TYPE_VIDEO) { video_stream_index = i; LOGD(TAG, "find video stream index = %d", video_stream_index); break; } } // run once do { if (video_stream_index == -1) { codec::LOGE(TAG, "Player Error : Can not find video stream"); break; } std::unique_lock<std::mutex> lock(work_queue_mtx); // 获取视频媒体流 auto stream = av_format_context->streams[video_stream_index]; // 找到已注册的解码器 auto codec = avcodec_find_decoder(stream->codecpar->codec_id); // 获取解码器上下文 AVCodecContext* codec_ctx = avcodec_alloc_context3(codec); auto ret = avcodec_parameters_to_context(codec_ctx, stream->codecpar); if (ret >= 0) { // 打开 avcodec_open2(codec_ctx, codec, nullptr); // 解码器打开后才有宽高的值 video_width_ = codec_ctx->width; video_height_ = codec_ctx->height; AVFrame* rgba_frame = av_frame_alloc(); int buffer_size = av_image_get_buffer_size(AV_PIX_FMT_RGBA, video_width_, video_height_, 1); // 分配内存空间给输出 buffer out_buffer_ = (uint8_t*) av_malloc(buffer_size * sizeof(uint8_t)); av_image_fill_arrays(rgba_frame->data, rgba_frame->linesize, out_buffer_, AV_PIX_FMT_RGBA, video_width_, video_height_, 1); // 通过设置宽高限制缓冲区中的像素数量,而非屏幕的物理显示尺寸。 // 如果缓冲区与物理屏幕的显示尺寸不相符,则实际显示可能会是拉伸,或者被压缩的图像 int result = ANativeWindow_setBuffersGeometry(native_window_, video_width_, video_height_, WINDOW_FORMAT_RGBA_8888); if (result < 0) { LOGE(TAG, "Player Error : Can not set native window buffer"); avcodec_close(codec_ctx); avcodec_free_context(&codec_ctx); av_free(out_buffer_); break; } auto frame = av_frame_alloc(); auto packet = av_packet_alloc(); struct SwsContext* data_convert_context = sws_getContext( video_width_, video_height_, codec_ctx->pix_fmt, video_width_, video_height_, AV_PIX_FMT_RGBA, SWS_BICUBIC, nullptr, nullptr, nullptr); while (!is_stop_) { LOGD(TAG, "front seek time_ms_ = %ld, last_decode_time_ms_ = %ld", time_ms_, last_decode_time_ms_); if (!is_seeking_ && (time_ms_ > last_decode_time_ms_ + 1000 || time_ms_ < last_decode_time_ms_ - 50)) { is_seeking_ = true; LOGD(TAG, "seek frame time_ms_ = %ld, last_decode_time_ms_ = %ld", time_ms_, last_decode_time_ms_); // 传进去的是指定帧带有 time_base 的时间戳,所以是要将原来的 times_ms 按照上面获取时的计算方式反推算出时间戳 av_seek_frame(av_format_context, video_stream_index, time_ms_ * stream->time_base.den / 1000, AVSEEK_FLAG_BACKWARD); } // 读取视频一帧(完整的一帧),获取的是一帧视频的压缩数据,接下来才能对其进行解码 ret = av_read_frame(av_format_context, packet); if (ret < 0) { avcodec_flush_buffers(codec_ctx); av_seek_frame(av_format_context, video_stream_index, time_ms_ * stream->time_base.den / 1000, AVSEEK_FLAG_BACKWARD); LOGD(TAG, "ret < 0, condition_.wait(lock)"); // 防止解码最后一帧时视频已经没有数据 on_decode_frame_(last_decode_time_ms_); condition_.wait(lock); } if (packet->size) { Decode(codec_ctx, packet, frame, stream, lock, data_convert_context, rgba_frame); } } // 释放资源 sws_freeContext(data_convert_context); av_free(out_buffer_); av_frame_free(&rgba_frame); av_frame_free(&frame); av_packet_free(&packet); } avcodec_close(codec_ctx); avcodec_free_context(&codec_ctx); } while (false); avformat_close_input(&av_format_context); avformat_free_context(av_format_context); ANativeWindow_release(native_window_); delete this; } bool VideoDecoder::DecodeFrame(long time_ms) { LOGD(TAG, "DecodeFrame time_ms = %ld", time_ms); if (last_decode_time_ms_ == time_ms || time_ms_ == time_ms) { LOGD(TAG, "DecodeFrame last_decode_time_ms_ == time_ms"); return false; } if (last_decode_time_ms_ >= time_ms && last_decode_time_ms_ <= time_ms + 50) { return false; } time_ms_ = time_ms; condition_.notify_all(); return true; } void VideoDecoder::Release() { is_stop_ = true; condition_.notify_all(); } /** * 获取当前的毫秒级时间 */ int64_t VideoDecoder::GetCurrentMilliTime(void) { struct timeval tv{}; gettimeofday(&tv, nullptr); return tv.tv_sec * 1000.0 + tv.tv_usec / 1000.0; } }