Starting with the OCI specification
The OCI (Open Container Initiative) specification is the de facto container standard that has been adopted by most container implementations and container orchestration systems, including Docker and Kubernetes, and was introduced in 2015 by Dokcer as the lead company.
Starting with the OCI specification to understand container images allows us to build a clearer picture of container technology rather than getting bogged down in implementation details. The OCI specification is divided into two parts, Image spec and Runtime spec, which cover different phases of the container lifecycle.
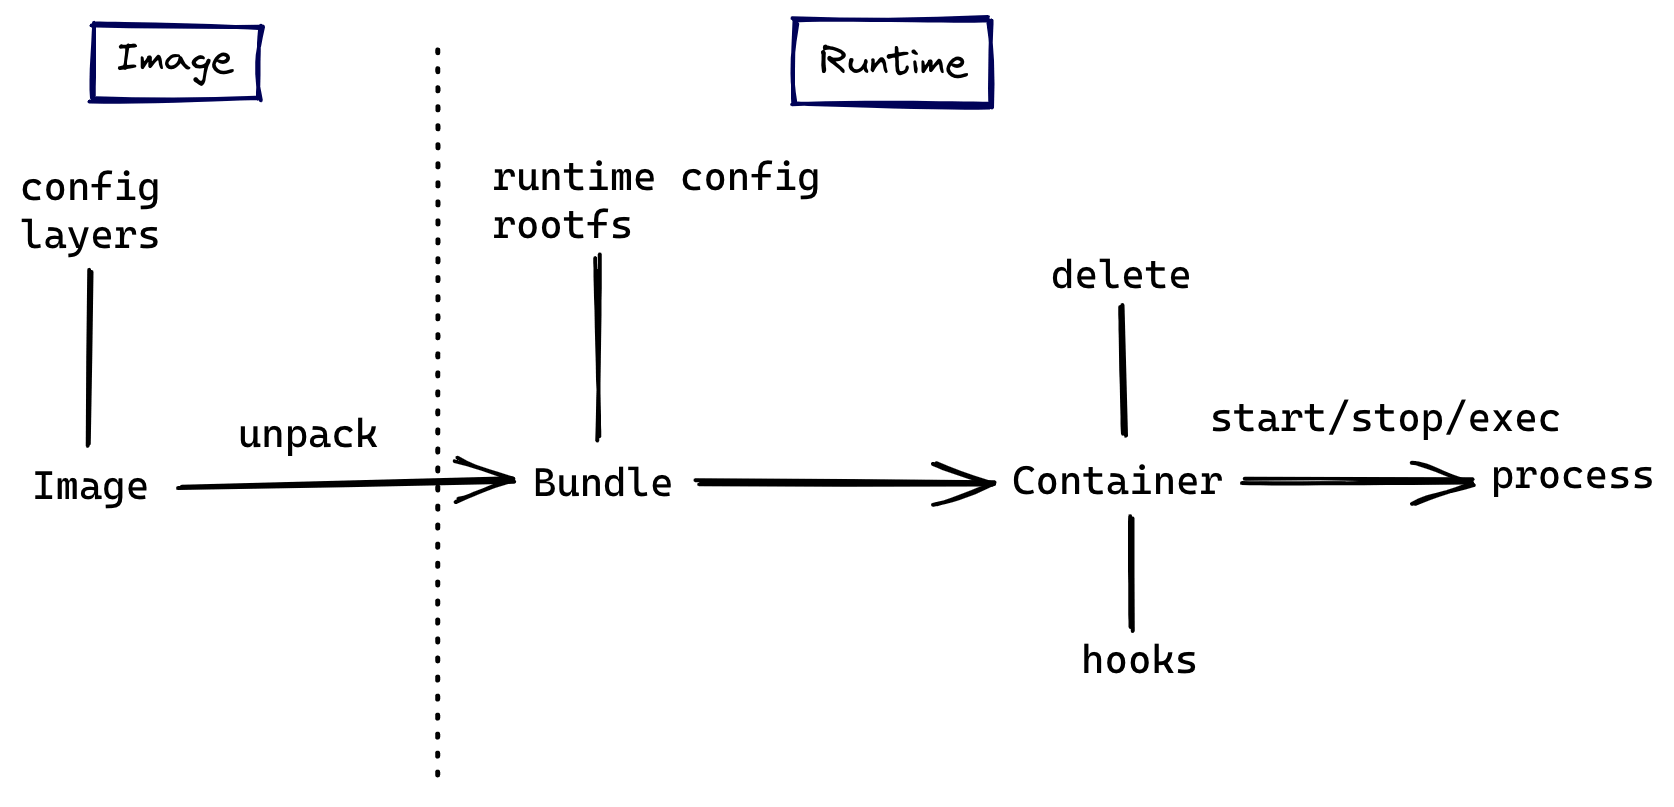
Image Specification
The image specification defines how to create an OCI-compliant image. It specifies the content and format that the image’s build system needs to output, and the output container image can be unpacked into a runtime bundle, which is a folder consisting of specific files and directory structures from which the container can be run according to runtime standards.
What’s inside the image
The specification requires that the contents of the image must include the following 3 parts.
- Image Manifest: Provides configuration and filesystem layer location information for an image, which can be thought of as a directory for the image, in
jsonfile format. - Image Layer Filesystem Changeset: serialized filesystem and filesystem changes that can be applied sequentially layer by layer as a container rootfs, so often also called a
layer(synonymous with the image layer mentioned below), file format can betar,gzipand other archive or compressed formats. - Image Configuration: contains the execution parameters used by the image at runtime as well as ordered rootfs change information, file type
json.
rootfs (root file system), the file system mounted by the / root mount point, is the files, configurations, and directories contained in an operating system, but not the operating system kernel, which is shared by all containers on the same machine with the kernel of the host operating system.
Next, let’s explore the actual contents of an image using Docker and nginx as examples. Pull a recent version of the nginx image, save it as a tar file, and extract it.
Get the contents of the nginx-img directory as follows.
|
|
First look at the contents of the manifest.json file, which is the Image Manifest for the image.
|
|
It contains the file location information for Config and Layers, which are the Image Layer Filesystem Changeset and Image Configuration as specified in the standard.
Config is stored in a separate json file, which is more extensive than we can show, and contains the following information.
- The configuration of the image, which will be written to the runtime configuration file after the image is extracted into a
runtime bundle. - Diff IDs between the
layersof the images. - Meta information such as the build history of the image.
The tar files in the Layers list together form the rootfs of the generated container, the image of the container is built in layers, the order of the elements in Layers also represents the order of the stack of image layers, all layers form a stack structure from bottom to top. Let’s first look at the contents of the base layer, the first record.
The contents of the extracted file in the base directory are as follows.
|
|
This is already a complete rootfs, look at the contents of the file obtained from the top layer of layer.
There is only one shell script file, which means that the image is built incrementally, with each layer containing only the contents of files that have changed compared to lower layers, which is why the container image is kept small.
How to delete a file in a image layer
Each layer in Layers is a ChangeSet for the file system, and the ChangeSet contains three kinds of changes: add, modify and delete. The case of adding or modifying (replacing) a file is better handled, but how to delete a file when applying a ChangeSet? The answer is to use Whiteouts to indicate the file or folder to be deleted.
A Whiteouts file is an empty file with a special filename, and the prefix .wh. added to the base name of the path to be deleted in the filename indicates that a path (at a lower layer) should be deleted. Suppose there are the following files in a layer.
If a higher level layer of the application contains . /etc/.wh.my-app-config, the original . /etc/my-app-config path will be removed when that layer is changed.
How to merge multiple image layers into a single file system
The specification has only a schematic description of how to apply multiple image layers into a single file system, so if we want to apply Layer B on top of Layer A.
- first copy the filesystem directory in
Layer Ato another snapshot directoryA.snapshotwith the file attributes preserved - Then execute the file changes contained in
Layer Bin the snapshot directory, all changes will not affect the original changeset.
In practice more efficient implementations such as federated file systems are used.
What is Union File System
Union File System, also known as UnionFS, is a system that mounts multiple directories from different locations to the same directory.
The following is an example of Ubuntu distribution and unionfs-fuse implementation to demonstrate the effect of union mount.
-
First install
unionfs-fuse, which is an implementation of UnionFS, using the package manager.1$ apt install unionfs-fuse -
Then create the following directory structure.
-
Create directory C and co-mount directories A and B under C.
1$ unionfs ./B:./A ./C -
The contents of the C directory after mounting are as follows.
-
If we edit the x files in directories A and B separately, we will find that accessing the x files in directory C gives us the contents of B/x (because B is higher up in the mount).
How OverlayFS in Docker works
The current federated filesystem implementation used by most distributions of Docker is overlay2, which is much lighter and more efficient than other implementations, so here is an example to understand how it works.
Following the example of the nginx image above, pull the image and extract the corresponding layer to the /var/lib/docker/overlay2 directory.
|
|
We save the output to the layers.a file for later comparison. The six l directories contain the six layers of the image (the directory names do not correspond to the names in manifest.json), and the l directory contains soft links to the layers folder, mainly for the purpose of shortening the directory identifiers to avoid exceeding the page size limit when executing the mount command.
The contents of each layer folder are as follows.
|
|
link records the short links in the l directory, lower records the lower layer of the layer (if there is no such file, the current layer is already the lowest layer, i.e. the base layer), the work directory is used internally by overlay2, and the diff directory holds the contents of the filesystem contained in the layer.
|
|
Now let’s try to run a container based on this image and see the effect of co-mounting during the container phase.
|
|
Execute the mount command to confirm the addition of a read/write overlay mount point.
|
|
This mount point contains a rootfs that is a combination of all the image layers layer.
|
|
In addition to co-mounting the original image layer to the merged directory as shown above, the diff command shows that two new layer directories are added to /var/lib/docker/overlay2 after the container runs successfully, and merged is also located in one of them.
|
|
Probing the GraphDriver of a running container with the inspect command allows you to see more clearly how the container’s layers have changed compared to the image.
|
|
LowerDir records the original image layer file system, in addition to a new init layer at the top, they are read-only in the container runtime; MergedDir records all the directories of LowerDir for joint mounting mount point; UpperDir is also a new layer, at this time is also a new layer, which is at the top of all the above layers and is read and writeable compared to the other image layers. The layers of the container stage are shown below.
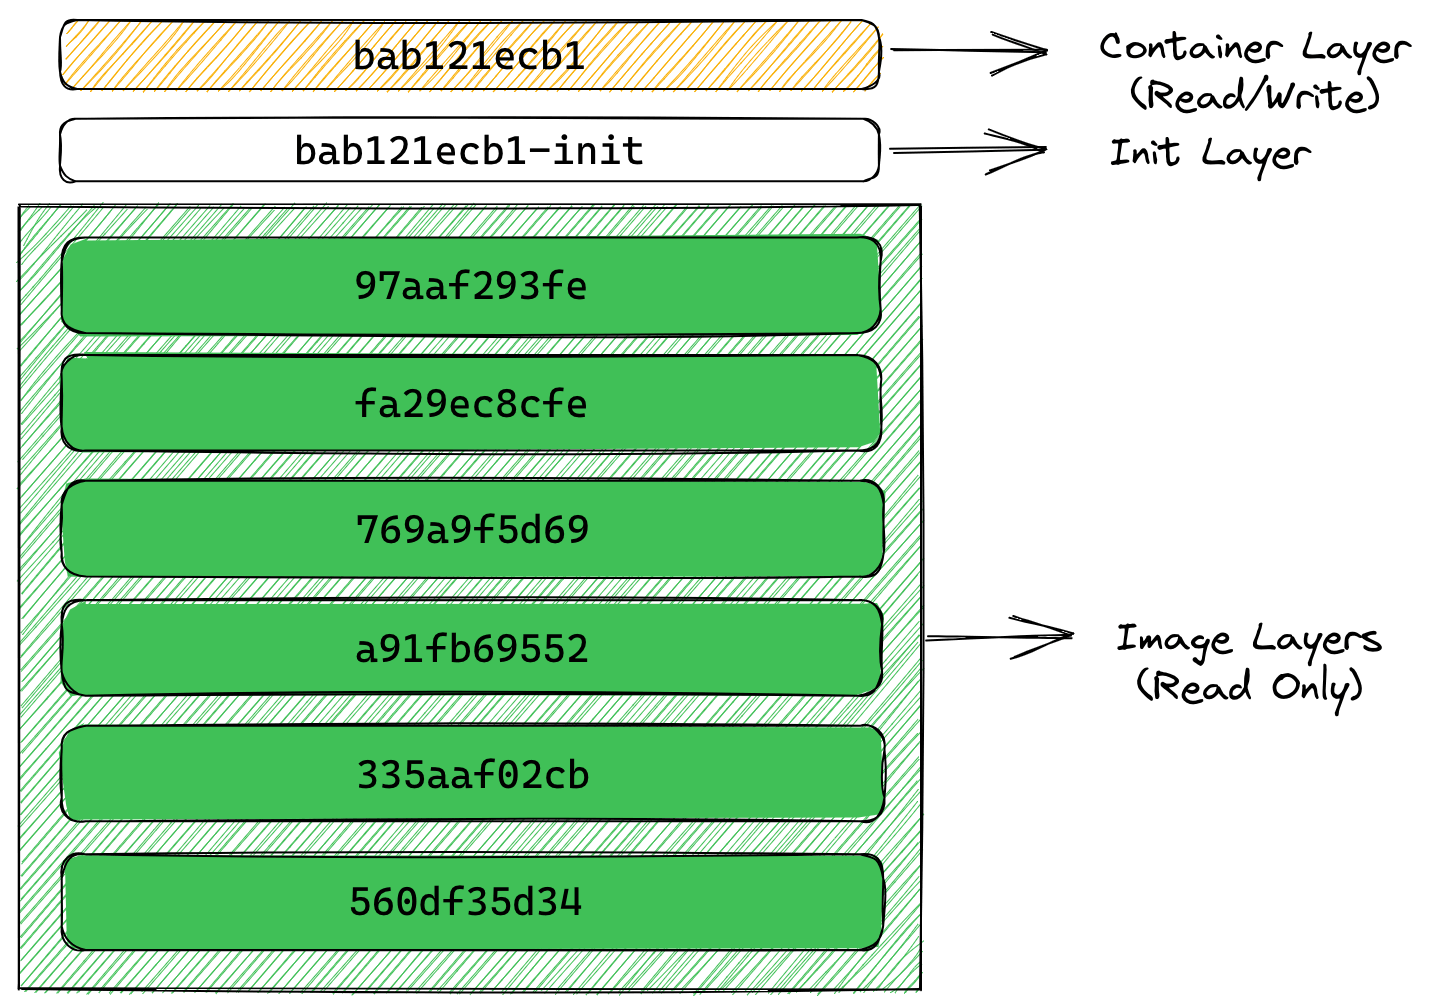
The new writable layer added when creating a container is called container layer, and any changes to the file system during the container runtime are only written to this layer, including additions, modifications and deletions of files, without changing the contents of the original image at lower layers. This greatly improves the efficiency of image distribution. The init layer between the image layer and the container layer records some configuration files written by the container at startup, which happens before the new read/write layer is added, and we do not want to write this data to the original image.
These two new layers exist only during the container runtime, and they will be deleted when the container is deleted. Multiple different containers can be created from the same image, and only multiple different writeable layers need to be created; containers that have been changed at runtime can also be repackaged into a new image by adding the writeable layer to the read-only layer of the new image.
Why containers are not as efficient as native file systems for reading and writing
To minimize I/O and reduce image size, a container’s federated file system uses a copy-on-write strategy for reading and writing files. If a file or directory exists on a lower tier in the image and another tier (including the writable tier) needs to read access to it, it will access the file on the lower tier directly. The first time another layer needs to write to that file (when building an image or running a container), the file is copied to that layer and modified. This greatly reduces the startup time of the container (the new writeable layer at startup has very few files to write), but each time a file is modified for the first time after the container is running, the entire file needs to be copied to the container layer first.
For the above reasons, the read and write efficiency of container runtime is not as good as the native file system (especially the write efficiency), so it is not suitable to do a lot of file reading and writing in the container layer. Bind Mount) directly in the read-write layer, bypassing the performance loss caused by copy-on-write.
Runtime specification
The runtime specification describes the configuration, execution environment and lifecycle of a container. It describes in detail the field format of the configuration file config.json for different container runtime architectures, how to apply and inject these configurations in the execution environment to ensure a consistent environment between different runtimes for programs running inside a container, and defines a uniform set of operational behaviors through the container’s lifecycle.
Container lifecycle
The container lifecycle, as defined by the specification, describes a timeline consisting of events that occur from the creation to the exit of a container, which defines 13 different events, and the following diagram depicts the changes in the container state in the timeline.
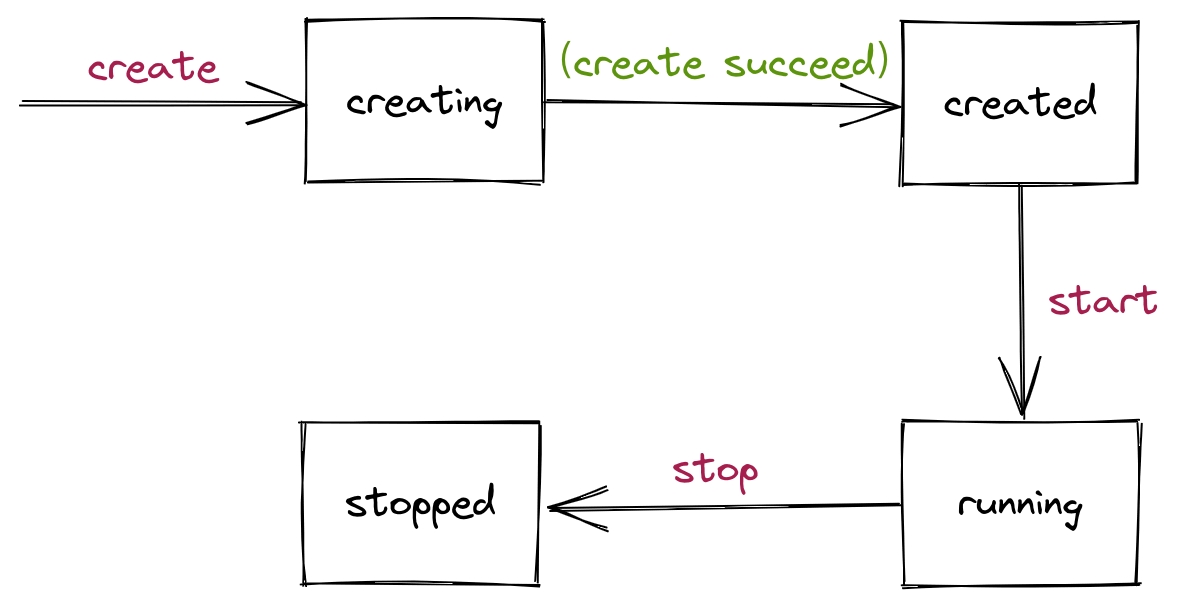
Only four container states are defined in the specification, and runtime implementations can add other states to the specification, while the standard also specifies the runtime must support Operations.
- Query State, which queries the current state of the container
- Create, which creates a new container based on the image and configuration, but does not run the user-specified program
- Start, runs the user-specified program in a created container
- Kill, send a specific signal to terminate the container process
- Delete, which deletes the resources created by the stopped container
Each operation is also preceded or followed by different hooks, which must be executed by the compliant runtime.
The essence of a container is a process
The concept of container process is used in the runtime specification. container process is equivalent to the user-specified program and container process mentioned above, and some scenarios also refer to the process as the container’s init process. To run a container, you must define the container’s container process in config.json, and the fields that can be defined include command parameters, environment parameters, execution paths, and so on.
The change of container state actually reflects the change of container process. We can divide the container’s life cycle and state changes into the following phases.
- Before
container processexecution.- The
createcommand is executed at runtime to create the specified resource based onconfig.json. - When the resource is created successfully, the container enters the
createdstate.
- The
- Execute the
container process.- The
startcommand is executed at runtime. - The user-specified program,
container process, is run at runtime. - The container enters the
runningstate.
- The
- The
container processprocess ends, either because the program has finished executing, because of an error or because it has crashed, or because thekillcommand signals it to terminate at runtime.- The container enters the
stoppedstate. - All resources created by the
createcommand are cleared by executing thedeletecommand at runtime.
- The container enters the
The core of the container runtime is the container process: the image file system satisfies the dependencies needed to run the process, the runtime preparation is to run the process correctly, the runtime continuously monitors the state of the process, once the process is finished the container is declared (temporarily) dead, and the runtime performs the finishing cleanup.
Of course, other processes can be run in the container, but they only share the container process environment.
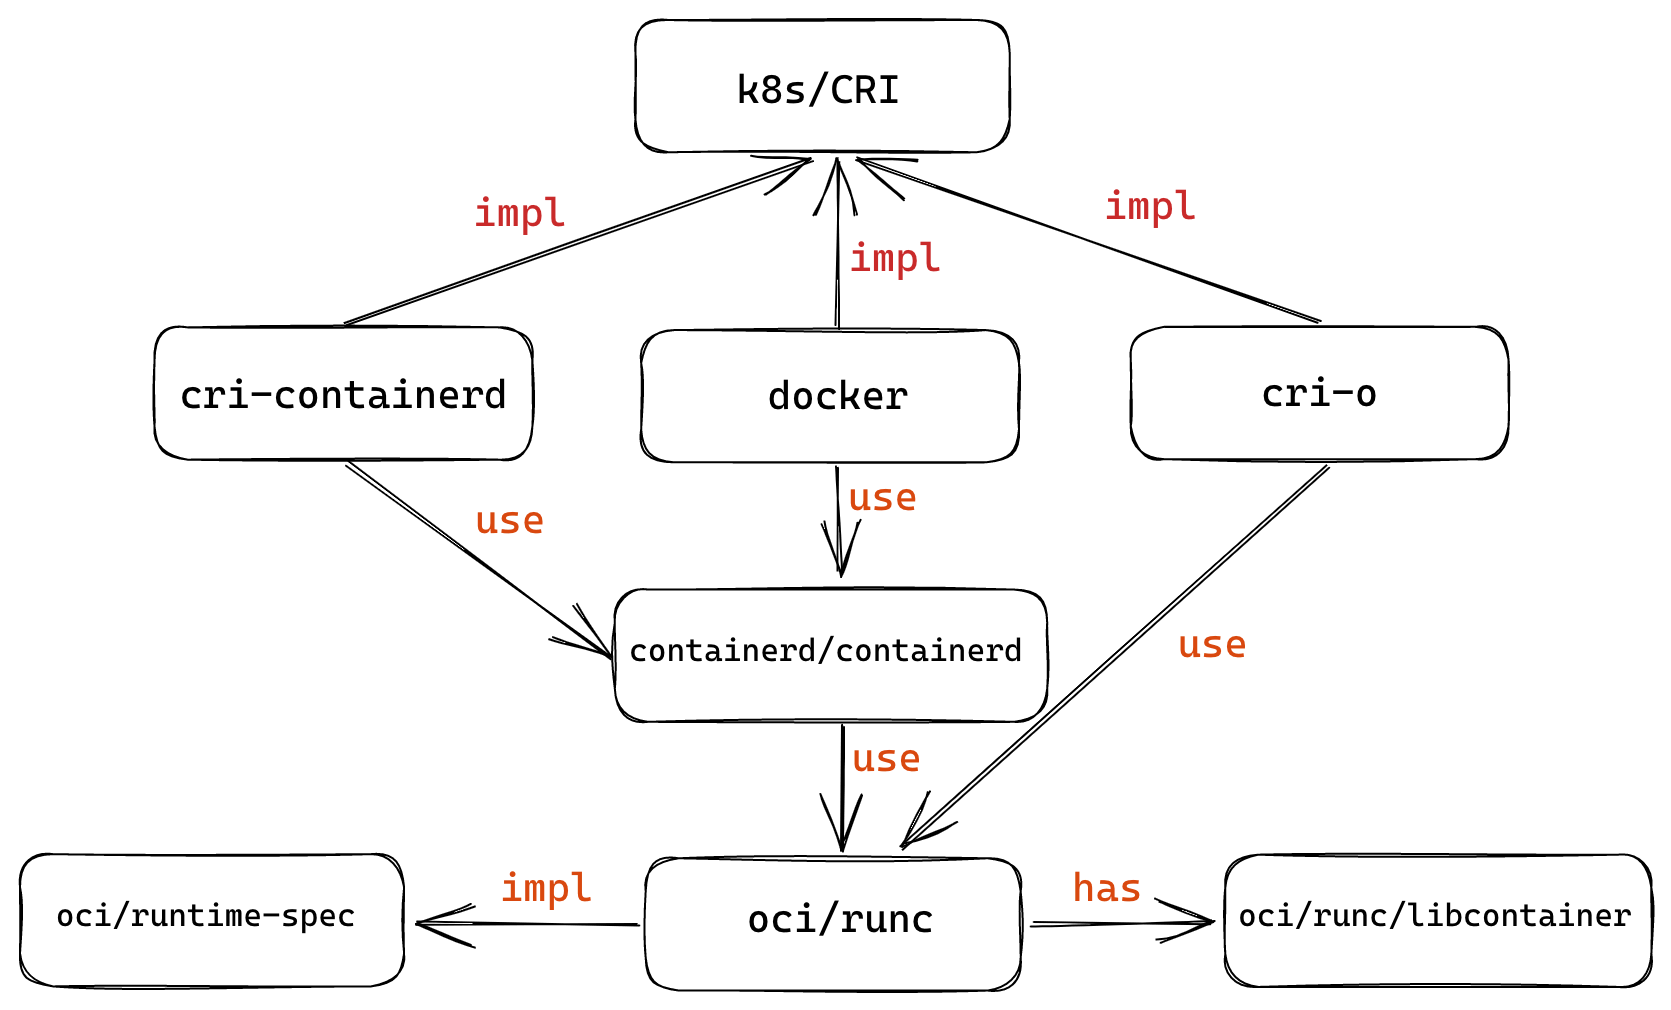
Implementation and Ecology
Docker has donated its container runtime runC project to the OCI specification as a standard implementation of the specification. Most of the container projects that exist today directly use runC as their runtime implementation.
The following diagram summarizes the relationship between Docker-related organizations and projects within the container ecosystem.
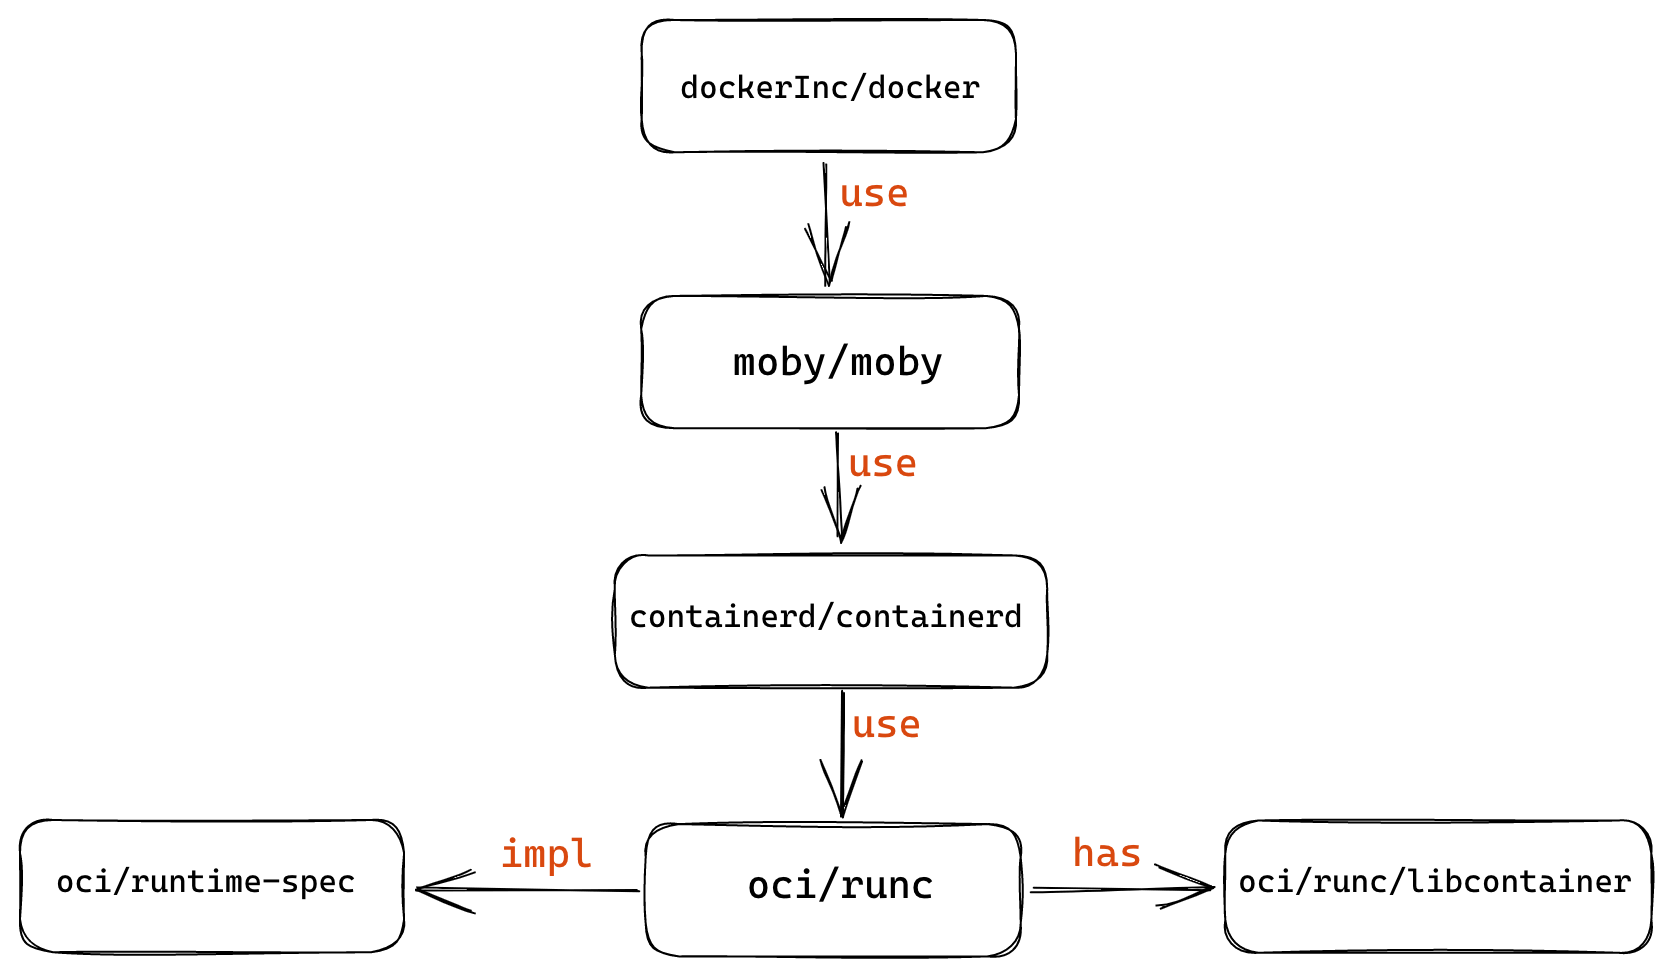
Kubernetes defines a CRI (Container Runtime Interface) to implement an interchangeable container runtime, and there are several implementations such as cri-containerd, cri-o and docker, but they are all actually based on runC as well.