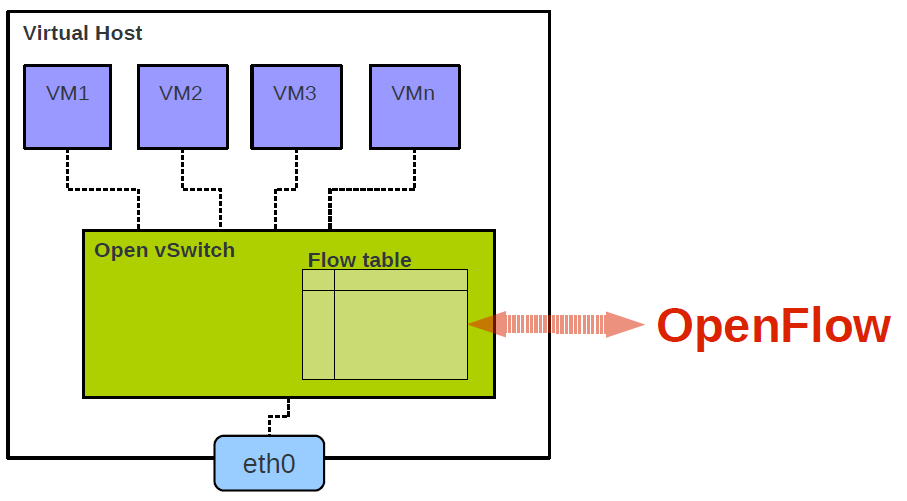
Open vSwitch is an open source implementation of virtual switches. Widely used in the cloud computing industry to provide network administrators with visibility and control of traffic between and within virtual cloud hosts, Open vSwitch is designed to solve network problems with a virtualization solution that works with controller software to enable distributed virtual switching technology. This means that the switch and controller software can create clustered network configurations across multiple servers, eliminating the need for separate network configurations on each cloud host and physical host. This switch also supports VLAN trunking, visibility through NetFlow, sFlow and RSPAN, and management through the OpenFlow protocol. It also has several other features: strict flow control, which is enabled by the OpenFlow switch protocol; and remote management capabilities, which enable more control through network policies.
In terms of Flow controllers or management tools for virtual switches, OvS requires the use of third-party controllers or management tools to implement complex forwarding policies. For example, if OvS supports the OpenFlow protocol, we can use any controller that supports the OpenFlow protocol to remotely manage OvS. However, this does not mean that OvS must have a controller to work. Without an external controller attached, OvS itself can rely on MAC address learning for Layer 2 packet forwarding functions, just like Linux Bridge.
In short, Open vSwitch, the open OpenFlow switch, is capable of product-level quality, meaning it can be deployed for use in a number of production environments. It supports not only basic Layer 2 switching, but also standard management machine interfaces and protocols (e.g. NetFlow, sFlow, SPAN, RSAPN, CLI, LACP, 802.1ag), which can be well integrated with SDN systems.
List of Open vSwitch features.
- Support for enabling internal VM communications to be monitored via NetFlow, sFlow, IPFIX, SPAN, RSPAN and GRE-tunneled mirrors.
- Support for the LACP (IEEE 802.1AX-2008, multi-port binding) protocol.
- Support for the standard 802.1Q VLAN model as well as Trunk mode.
- Support for BFD and 802.1ag link status monitoring.
- Support for STP (IEEE 802.1D-1998).
- Support for fine-grained QoS.
- Support for HFSC system-level traffic control queues.
- Support traffic control policy for per-VM NIC traffic.
- Support for multi-port binding based on source MAC load balancing mode, primary and secondary mode, and L4 hash mode.
- Support for OpenFlow protocol (including many virtualization enhancements).
- Support for IPV6
- Support for multiple tunneling protocols (GRE, VXLAN, IPsec, GRE and VXLAN over IPsec)
- Support for remote configuration via C or Python interfaces.
- Support for kernel-state and user-state forwarding engine settings.
- Support for send cache engines for multi-list forwarding.
- Support for forwarding layer abstraction for easy orientation to new software or hardware platforms.
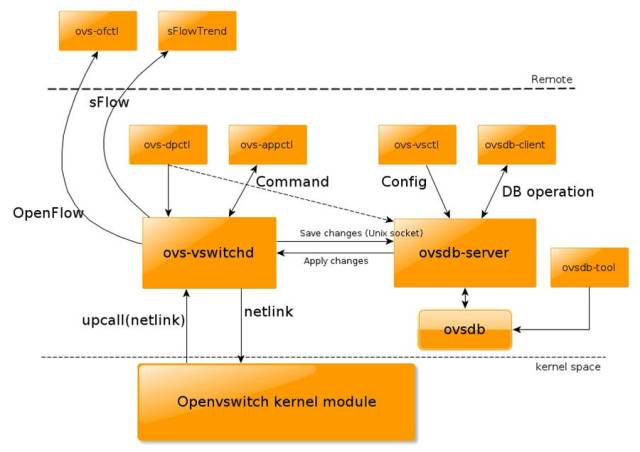
System Architecture
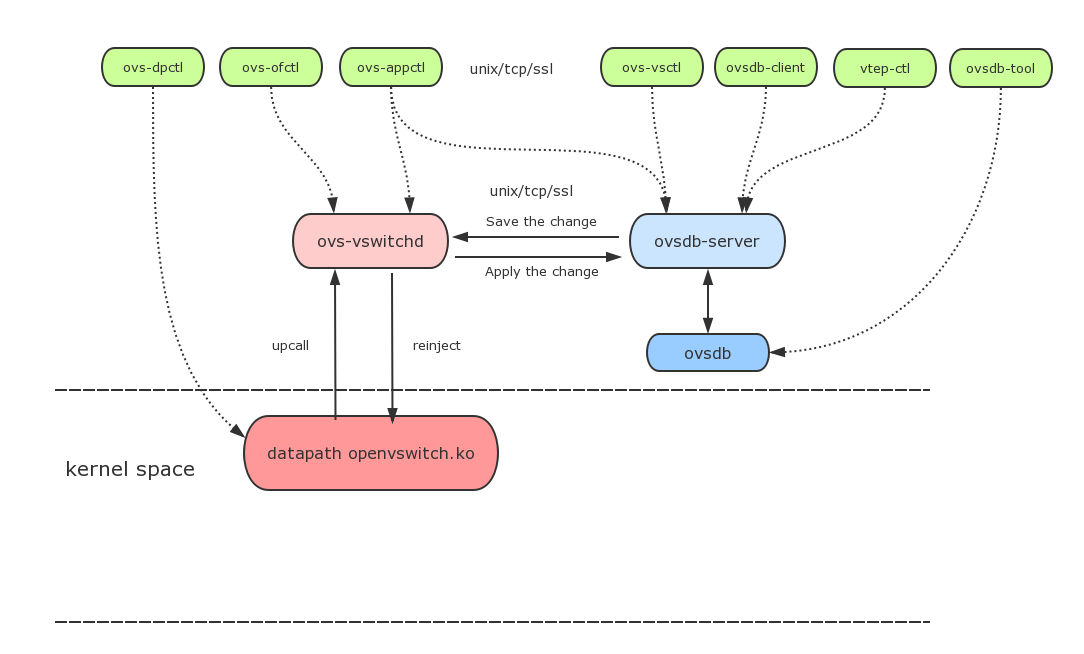
OvS consists of three main components.
- The main user space components are ovsdb-server and ovs-vswitchd
- The kernel space consists of the datapath kernel module
- The top Controller represents the OpenFlow controller, which is connected to OvS through the OpenFlow protocol
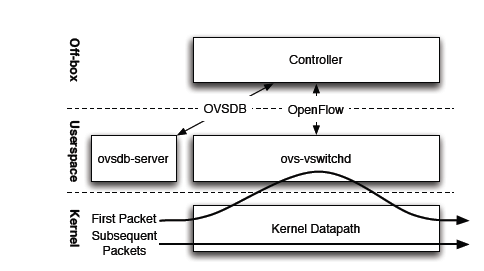
- ovs-vswitchd: The main module that implements kernel datapath upcall processing and ofproto table lookup, as well as the dpdk datapath handler.
- ovsdb-server: database server, using the currently accepted ovsdb protocol.
- ovs-vsctl: bridge, interface creation, deletion, setup, query, etc.
- ovs-dpctl: configuration of vswitch kernel module
- ovs-appctl: send command messages to ovs-vswithchd, check the status of different modules
- ovs-ofctl: send down flow table information. This command can configure other openflow switches (with openflow protocol)
ovsdb
ovsdb is an OvS lightweight database service that stores configuration information for the entire OvS, including interfaces, switch contents, VLANs, virtual switch creation, NIC additions, and other information and operations, all stored by ovsdb in a conf.db file (JSON format) and served via db.sock. vswitchd works based on the configuration information in the database.
|
|
/etc/openvswitch/conf.db: is the database file location, ovsdb-server needs this file to start, you can useovsdb-tool createcommand to create and initialize this database file.--remote=punix:/var/run/openvswitch/db.sock: implements a Unix Sockets connection through which the OvS master process ovs-vswitchd or other command tool (e.g. ovsdb-client) manages ovsdb./var/log/openvswitch/ovsdb-server.log: The runtime log file of ovsdb-server.
ovs-vswitchd
ovs-vswitchd is essentially a daemon, the core component of OvS. ovs-vswitchd and Datapath work together to implement Flow-based Switching for OvS.
- Can communicate with OpenFlow controllers via the OpenFlow protocol
- Communicates with the ovsdb-server database service using the ovsdb protocol
- Uses netlink and Datapath kernel modules to communicate.
ovs-vswitchd supports multiple independent Datapaths. ovs-vswitchd requires the Datapath kernel module to be loaded for proper operation. ovs-vswitchd reads the configuration information from ovsdb-server at startup and then automatically configures the Datapaths and OvS Switches’ When the configuration content in ovsdb is modified, ovs-vswitched automatically updates its configuration to keep the data synchronized. ovs-vswitchd can also obtain flow table entries from the OpenFlow controller. ovs-vswitchd can also obtain flow table entries from the OpenFlow controller.
datapatch
In the semantics of OpenFlow Switch rules, a technical term called Datapath is given to switches, or bridges. open vSwitch’s kernel module openvswitch.ko implements multiple Datapaths, each of which can have multiple Ports. Datapath listens to the NIC interface devices, matches the packets in the flow table, and returns the corresponding Actions to Datapath as a description of the data processing behavior after finding the matching flow table entry. The kernel module information of Datapath is as follows.
More information on Datapath can be found at The Design and Implementation of Open vSwitch.
How it works
The Bridge processes data frames according to the following rules.
- A frame received on a Port does not send this frame to this Port again.
- Incoming frames learn their Source MAC address.
- If the frame is a multicast or broadcast packet (determined by the Layer 2 MAC address) it is forwarded to all ports except the receiving port, and if the upper layer protocol is interested, it is also passed to the upper layer for processing.
- If the address of the data frame cannot be found in the CAM (MAC-Port Mapping) table, it is forwarded to all ports outside the receiving port.
- If it can be found in the CAM table, it is forwarded to the corresponding Port, or not sent if both sending and receiving are the same Port.
- The bridge works in promiscuous mode, and data frames with all MAC addresses can pass through.
The user space ovs-vswitchd and the kernel module Datapath determine the forwarding of packets as follows.
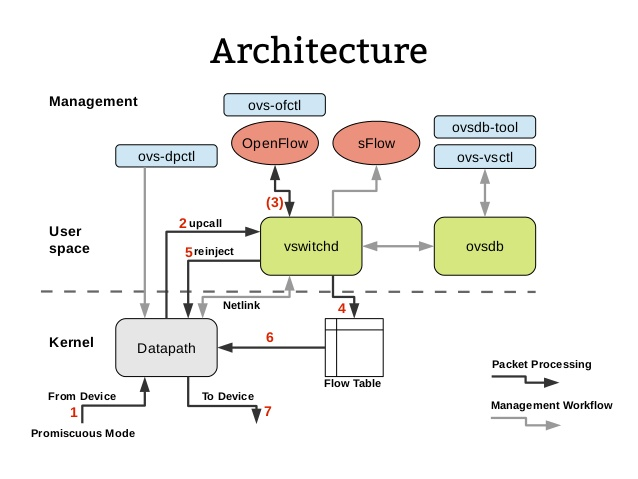
- The kernel-state Datapath listens for incoming packets from the interface device.
- If Datapath does not find a matching flow table entry in the kernel-state flow table cache, it passes (upcalls) the packet to the user-state ovs-vswitchd daemon for processing.
- (Optional) User-state ovs-vswitchd has full flow table entries and communicates with the OpenFlow controller or the ovs-ofctl command-line tool via the OpenFlow protocol, mainly to receive flow table entries from the OpenFlow controller’s southbound interface. Or, depending on the flow table entry settings, ovs-vswitchd may send network packets to the OpenFlow controller for processing as Packet-In messages.
- ovs-vswitchd updates the kernel-state Flow Table upon receiving a message from the OpenFlow controller or the ovs-ofctl command-line tool. Alternatively, based on the locality principle, the user-state ovs-vswitchd injects into the Flow Table the flow table entries that were not cached by the Datapath that was just executed.
- ovs-vswitchd reinjects the packets into Datapath after matching the Flow Table entries.
- Datapath accesses the Flow Table again to get the flow table entries for matching.
- Finally, the network packet is forwarded or dropped by Datapath based on the Flow Table entry Actions.
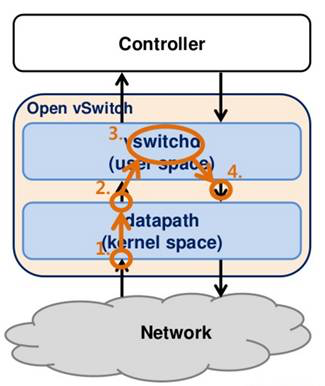
The above, Datapath and ovs-vswitchd interworking contains two ways of handling network packets.
- Fast Path : After Datapatch is loaded into the kernel, it registers a hook function on the NIC, which is called whenever a network packet arrives at the NIC, starts unpacking the network packet layer by layer (MAC layer, IP layer, TCP layer, etc.), then matches it with a flow table entry, and if a matching flow table entry is found then the network packet is processed according to the established policy (e.g. Modify MAC, modify IP, modify TCP port, which NIC to send it from, etc.), and then send the network packet from the NIC. This process is all done in the kernel, so it is very fast and is called Fast Path.
- Slow Path: The kernel state is not allocated much memory, so the kernel state can save very few stream table entries, and often the old ones are discarded when new stream table entries arrive. If you cannot find a stream table entry in the kernel state, you need to look it up in the user state. Network packets are sent to ovs-vswitchd via netlink (a mechanism for interaction between the kernel state and the user state). ovs-vswitchd has a listening thread, and when it finds a network packet from the kernel state, it enters its own processing and reinjects the network packet into Datapath again. Obviously, processing in the user state is relatively slow, so the value is called Slow Path.
In the user state ovs-vswtichd does not need to skimp on memory, it contains all the flow table entries that may have been issued by the OpenFlow controller via the OpenFlow protocol or set by the OvS command line tool ovs-ofctl. ovs-vswtichd will match network packet information layer by layer until it finds a flow table entry for processing. If none is found, the default stream table entry is usually used, such as dropping the packet.
When a stream table entry is finally matched, it is sent down to the kernel via the netlink protocol based on the “locality principle (local data is accessed frequently over time, which is the basis of cache design)”, and when the policy is sent down to the kernel, if the kernel does not have enough memory space, it will starts eliminating some of the old policies. This ensures that the next network packet of the same type can be matched directly from the kernel, thus speeding up execution. Due to the proximate effect, the next network packet should most likely be able to match this policy. For example, if a file is transferred, a steady stream of network packets of the same type will arrive.
Command line tools
- ovs-vsctl : Used to manage the configuration information of ovs-vswitchd.
- ovs-ofctl : Used to manage the flow table information of OvS.
- ovs-pki : Used to manage the TSL communication framework between OvS and OpenFlow Controller.
- ovs-dpctl : Used to manage Datapath, such as viewing Datapath information.
- ovs-appctl : Application layer command set, e.g. simulate packets for testing OvS Switch data forwarding flow.
|
|
Installation and Deployment
OS : CentOS7
Step1. Shut down SELinux, otherwise ovsdb-server Manager will not work properly.
Step 2. yum install
|
|
Step 3. Start the service
View the current version of OvS:
View a list of OvS service processes.
|
|
To view the loaded kernel modules.
ovs-db
The carrier of ovs-db on the operating system is the JSON file /etc/openvswitch/conf.db, whose contents can be viewed by executing the command ovsdb-client dump, e.g.
|
|
The use of graphical tools allows for a more user-friendly view of.
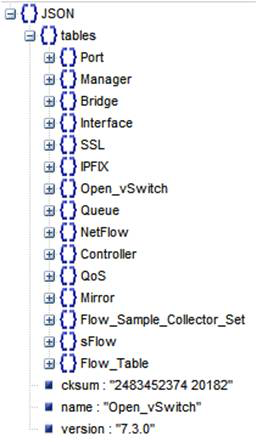
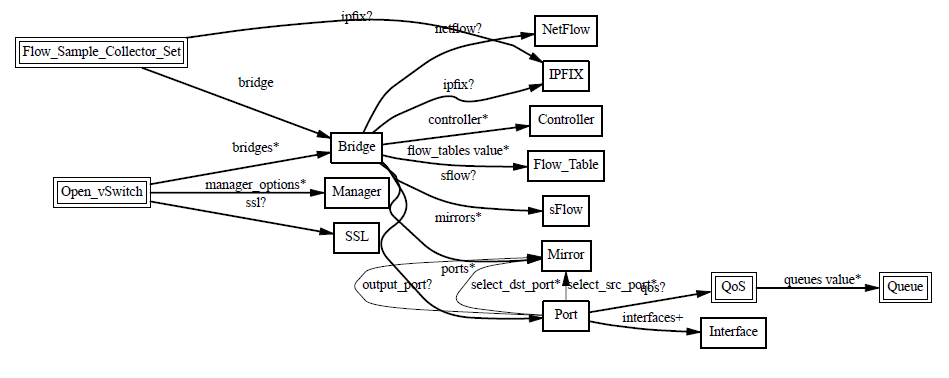
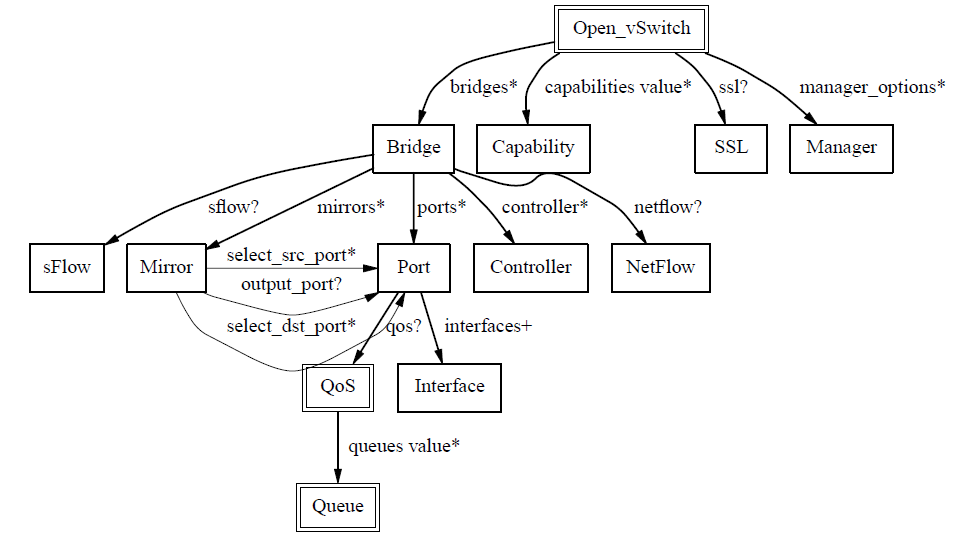
The relationship between the database tables is shown in the following diagram.
The Open_vSwitch table is the root of the OvS DB.
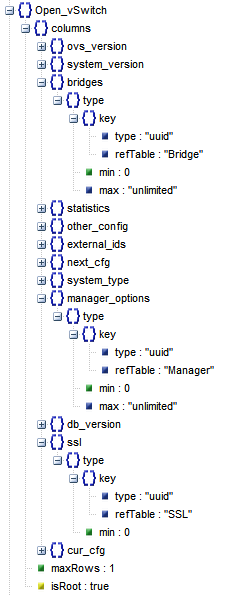
It has the following table structure, which records the configuration information of ovs-vswitchd, e.g.
- Configuration of the Bridge device
- The configuration of the OvS itself
- other_config:stats-update-interval: the interval to write statistics to the database
- other_config:flow-restore-wait: for hot-upgrade, if True then no packets are processed. The general procedure is: first stop ovs-vswitchd, then set this value to True, then start ovs-vswitchd, which does not process any packets, then use ovs-ofctl to restore the flow table to a correct state, and finally set this value to False to start processing packets.
- other_config:flow-limit: Specify the number of flow entries in the Flow Table
- other_config:n-handler-threads: the number of threads used to process the new Flow
- other_config:n-revalidator-threads: the number of threads used to validate the Flow
- other_config:enable-statistics: whether to count the following items
- statistics:cpu: statistics on the number of CPUs, threads
- statistics:load_average: system load
- statistics:memory: total RAM, Swap
- statistics:process_NAME: statistics memory size, cpu time, etc. (with NAME replaced by a process name)
- statistics:file_systems: mount point, size, used
- client request id: cur_cfg and next_cfg, when a Client finishes modifying the database, next_cfg adds 1, then wait for OvS to apply the changes, when the application is finished, cur_cfg adds 1, at this time cur_cfg equals next_cfg. This configuration is obviously there to ensure consistency for highly concurrent requests.
- The configuration for ovsdb-server points to the Manager table, ovs-vswitchd as one of the Clients of ovsdb-server, and the Manager configures the DB Connection field.
- Configuration of the SSL DB Connection: points to the SSL table, which mainly configures the path to the private key, certificate, etc. files needed for SSL secure communication.
Operational Objects of Open vSwitch
The database structure is a mapping of a software’s resource model design, and the following is an overview of the characteristics and roles of each resource object based on the resource model of OvS.
Manager
The Manager object is used to configure the connection of ovsdb-server so that Clients (e.g. ovs-vswitchd, ovs-vsctl, host) can perform DB operations on ovsdb-server remotely. server is the RPC interface for ovs-db to provide management. The manager_options field in the Open_vSwitch table is loaded as the listening port.
The table structure of Manager

The most important field is target, which records information about the ovsdb-server’s listening parameters.
- Active database connection methods.
ssl:ip[:port]: listens on the Port of the specified Remote IP, protocol is SSLtcp:ip[:port]: Listens on the Port of the specified Remote IP, protocol is TCPunix:FILE: Unix domain socket named FILE
- Passive database connection methods:
pssl:[port][:ip]: Listens on the specified Port of the local IP, protocol is SSLptcp:[port][:ip]: Listens on the specified Port of the local IP, protocol is TCP
Set by the following command.
NOTE: TCP-based DB Connection that allows ovs-vsctl to control ovsdb-server even on remote machines.
Configuring Manager OvS DB Connection
|
|
Check that the Port is turned on properly.
To perform a connection from a remote computer.
NOTE : Note the firewall interference factor.
SSL
If the Open vSwitch is configured to connect to the OpenFlow controller over the network (between ovs-vswitchd and ovs-controller), then it is recommended that you use OpenSSL to build secure network communications. Bidirectional SSL ensures the integrity and and security of the OpenFlow connection to each other.
To establish an SSL connection, you first need to obtain the relevant CA certificates and record these certificates in the SSL table. When you start ovsdb-server, you can use the option -private-key=db:Open_vSwitch,SSL,private_key --certificate=db:Open_vSwitch,SSL,certificate --bootstrap-ca-cert =db:Open_vSwitch,SSL,ca_cert to specify that these parameters are applied.
SSL Table Structure.
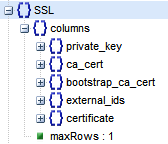
SSL Table Properties :
- private_key: private key
- ca_cert: CA root certificate
- bootstrap_ca_cert (Boolean): If True, the latest CA certificate is obtained from the Controller every time ovsdb-server is started. Otherwise, the old CA certificate will continue to be used.
- certificate: the certificate issued by CA
The public key of the host (client) is included in the certificate issued by CA, and then signed by the private key of the CA center, which guarantees that the certificate is legitimate. In order to verify the CA signature, the public key of CA is also needed and put into the CA certificate pointed to by ca_cert. The CA’s own public key also needs to be guaranteed by the CA with higher signature or the CA (root CA) itself.
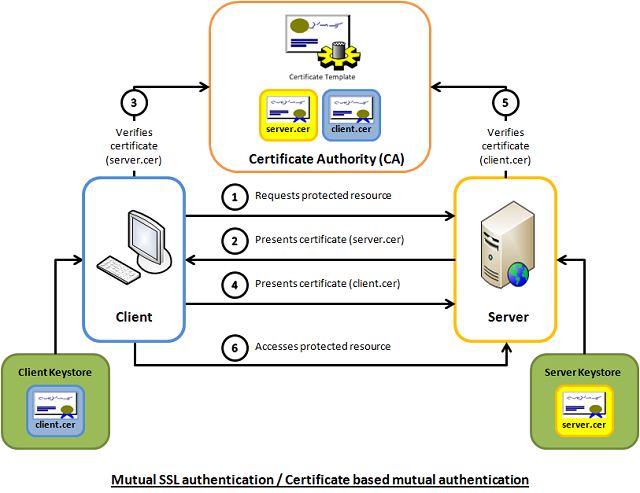
SSL verification process:
-
client holds CA root certificate (ca_cert) and verifies it with CA private key (CA root certificate is self-issued by CA through its own private key), if the verification is successful, it means the CA is the root CA and can guarantee itself.
-
the client holds the certificate (certificate, containing the client’s public key) issued by the CA and verifies it with the CA root certificate (the certificate issued by the CA can be unlocked with the CA’s private key), and returns the client’s public key if the verification is successful.
-
the client holds its own private key and verifies it with the client’s public key unlocked by the CA, and if the verification is successful, the client is guaranteed by the CA.
-
The client establishes an SSL connection with the server.
-
In short, the client needs to ensure that it has its own private key, a CA-issued certificate, and a CA root certificate in order to complete SSL authentication.
Configuring SSL Connection
Self-issuing CA Root Certificate:
- Step 1. Generate the RSA private key for the CA root certificate
- Step 2. generate the signing request (CSR) for the CA root certificate
|
|
- Step 3. issue your own CA root certificate (with the CA’s public key included)
|
|
PS : Self-issued, i.e., you guarantee yourself and issue your own CSR with your own private key, so it is also called a root certificate.
Issuance of client certificate.
- Step 1. Generate the client private key
- Step 2. generating client-side signature requests
|
|
- Step 3. CA center issues client certificate (CA center guarantees the client)
Configuring the SSL Connection.
NOTE : set-ssl must specify the absolute path, otherwise the certificate file will not be loaded correctly.
VIEW MODIFY.
|
|
Authentication.
- At this point, if you do not enter the PKI configuration, you will not be able to pass SSL authentication
|
|
- Copy copies of cliu8private.key, cliu8certificate.pem, and cacertificate.pem to the client
|
|
- Request an SSL connection on the client side
NOTE :
Bridge
Bridge means bridge, but in Linux semantics Bridge has the same meaning as Ethernet switch and is the core object of Open vSwitch. The following is a list of common OvS Bridge operations.
Bridge Common Operation Commands
|
|
- Creating a virtual switch.
- Creating a virtual “netline” (VETH pair).
- View newly created devices.
|
|
- Connecting one end of the virtual “network cable” to the virtual switch.
|
|
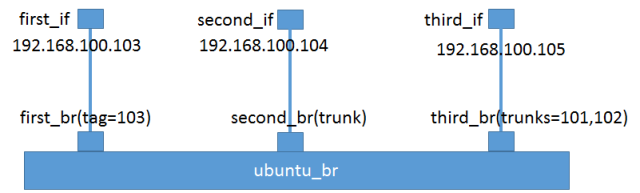
NOTE: The eponymous Port of Bridge ubuntu_br is generally the management port of the Bridge, analogous to the management port of a physical switch, for which an IP address is generally configured.
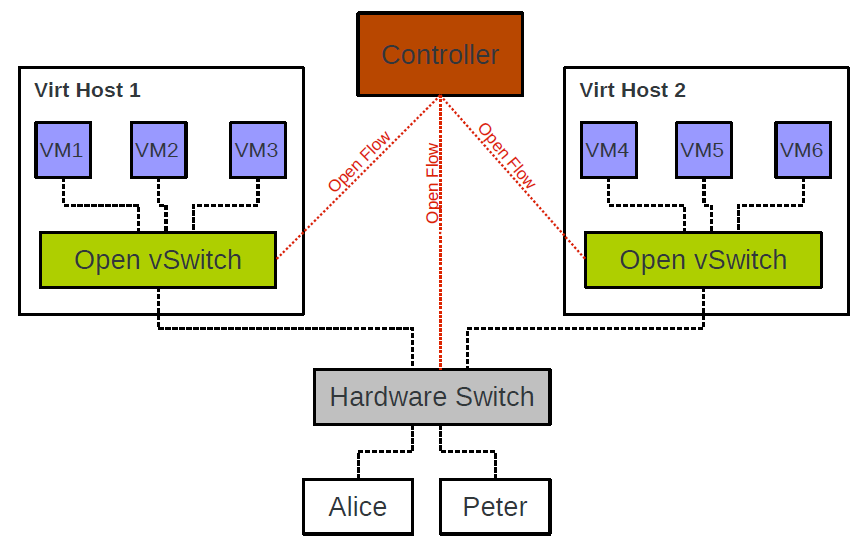
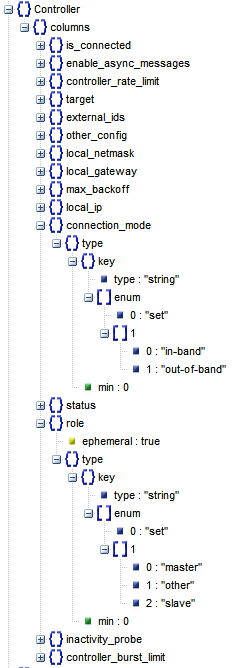
Controller
OvS is an OpenFlow Switch implementation, which can unify the management of all distributed Bridges through OpenFlow Controlle. The so-called “management” is actually the management of the Bridge’s Flow Table. The core of SDN Controller is to control the issuance of policies and use them to make decisions about the flow of data .
Controller has two types.
- Primary Controller: Really controls the Bridge’s Flow Table. The Bridge maintains a connection to the Controller, and if the connection fails or is disconnected, it depends on the Bridge’s Fail Mode to handle it. A Bridge can connect to multiple Controllers, but the collaboration between Controllers needs to be done by the Controllers themselves.
- Service Controller: Used only for Support, occasional operation, Maintain use, Bridge’s Fail Mode will not work if Connection is disconnected from Bridge.
OvS provides the following two Fail Modes for the Bridge.
- Secure: After disconnecting, the Bridge tries to reconnect to the Controller until it succeeds, and does not maintain its own Flow Table.
- Standalone: If the Bridge fails to connect to the Controller after three attempts, it will create and maintain its own independent Flow Table.
|
|
Controller table structure:
Controller Common Commands
|
|
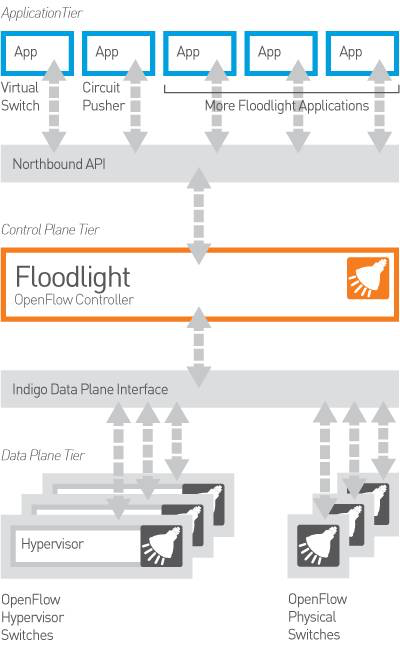
Install Floodlight
There are various types of OpenFlow Controllers, such as OpenDaylight, etc. A detailed list can be found at OpenFlow Controllers in GENI". This article takes Floodlight as an example to feel the controller’s flow control function for Bridge.
Official website: http://www.projectfloodlight.org/getting-started/ Official deployment manual: https://floodlight.atlassian.net/wiki/spaces/floodlightcontroller/pages/1343544/Installation+Guide
Installing Floodlight :
NOTE : Tag version 1.2 is used here
Running Floodlight in the Terminal:
|
|
Check the Controller’s listening port.
NOTE: Floodlight will get the Bridge connection by listening to /0.0.0.0:6653 socket.
Connecting Bridge to Controller.
|
|
NOTE: Once the Bridge is connected to the Controller, the Controller can collect, send and manage information about the Bridge (e.g. Flow Table).
Access to Web GUI.
|
|
Connecting KVM Virtual Machines to the OvS Bridge
Plugging three KVM virtual machines into the Bridge.
|
|
NOTE : VM1, 2 and 3 are all connected to the same Bridge, so as long as all three have the IP address of the network segment, they can communicate.
Check the Floodlight Dashboard.
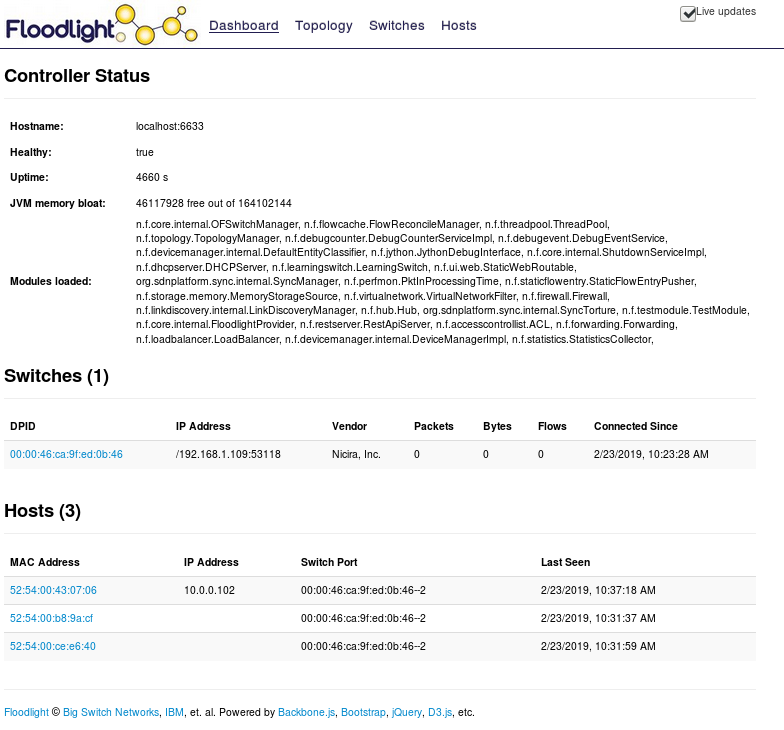
Wait for a period of time and Floodlight will collect the Bridges on the host, Hosts on the Bridge, IP/MAC addresses of the Hosts, etc.
Floodlight Controller Common Commands
The Floodlight Dashboard is basically a display only, so most of the operations still need to be done through the command line.
- Request the DPID of all Switches on this Controller
|
|
- View stream table entries
|
|
- View the flow table entries for the specified Switch
|
|
- Add static flow table entries
|
|
- Static flow tables that allow only 10.0.0.101 and 10.0.0.103 to ping each other
|
|
- Delete the specified flow table
|
|
- Delete all flow tables for a given Switch
|
|
Mirror
The function of Mirror is to configure a Bridge to send certain packets with certain conditions to the specified Mirrored Ports.
The packet conditions are the following.
- select_all
- select_dst_port
- select_src_port
- select_vlan
The designated purpose Ports are either.
- output_port (SPAN Switched Port ANalyzer)
- output_vlan (RSPAN Remote Switched Port ANalyzer)
SPAN
Source (SPAN) port - A port that is monitored with use of the SPAN feature. Destination (SPAN) port - A port that monitors source ports, usually where a network analyzer is connected.

|
|
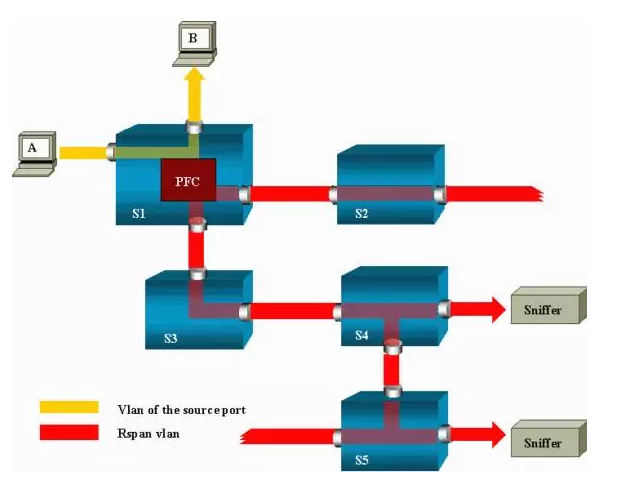
RSPAN
- The monitored traffic is not sent to a specified port, but Flooded to a specified VLAN
- The listening port does not have to be on the local Switch, it can be on any Switch in the specified VLAN
- S1 is a source switch
- S2 and S3 are intermediate switches
- S4 and S5 are destination switches.
- learning is disabled to enable flooding
Port and Interface
A Port is a port of a Bridge, and each Port belongs to a Bridge, while an Interface is a network interface device connected to a Port and is actually responsible for receiving and sending packets. Normally, Port and Interface have a one-to-one relationship, but when Port is configured in bond mode, Port:Interface is a 1:N relationship.
Port has the following 3 types.
- Normal: You can mount an existing NIC (physical or virtual) from HostOS to the Bridge, and OvS will generate a Port with the same name on the Bridge to handle the packets to and from this NIC. Note that networks mounted to the Bridge do not support the assignment of IP addresses.
- Internal : is a virtual NIC interface created internally by OvS. Whenever an Internal type Port is created, OvS automatically creates an internal Interface with the same name on HostOS and mounts it to the Port. Only the Internal type Interface device supports configuring IP address information.
|
|
- Patch: When there are multiple OvS Bridges on HostOS, you can connect two Bridges together using Patch Port (Virtual Wire Port).Patch Port always comes in pairs, connected to two bridges, and packets received from one Patch Port will be forwarded to the other Patch Port. Similar to the VETH Pair in Linux, two bridges connected with a Patch Port are no different from one.
- Tunnel: Common tunneling technologies are GRE or VxLAN. tunneling is the construction of a virtual network on top of an existing physical network, with the upper layer applications related only to the virtual network, thus enabling a more flexible virtual network configuration than the physical network and enabling L2 communication across hosts. Tunneling allows Bridges on different hosts to interoperate as if they were connected to a single large Bridge.
|
|
- netdev: generic NIC device (e.g. eth0, veth)
- Receive: A netdev receives a message at L2 and processes it directly through the OvS receive function, without going through the traditional kernel TCP/IP stack.
- send: A stream in OvS specifying that it is sent from that netdev is sent through that NIC device.
- internal: Virtual NIC device
- Receive: The OvS receive processing function is entered when a message from the system is routed to be sent through this device.
- send: When a flow in OvS is formulated to be sent from this internal device, the message is reinjected into the kernel stack.
- gre device: tunnel device (no matter how many GRE tunnels are created in user state, there is one and only one GRE device in kernel state)
- Receive: When the system receives a GRE message, it is passed to the L4 layer to parse the gre header and then passed to the OvS receive processing function.
- Send: A flow in OvS is formulated to be sent from this GRE device, and the message will be sent according to the flow table rules plus the GRE header and the outer wrapper IP, and find the route.
VLAN for Port
An important feature of the Port is VLAN Configuration, which has two types.
- Trunk Port
- Access Port
Trunk Port.
- This port is not configured with Tag, configured with trunks.
- If trunks is empty, then all VLANs are trunked and the default VLAN ID is 0, all are allowed to pass.
- If trunks is not empty, only VLANs that match the condition (ID) can pass.
In short, it is the Trunk port of the physical switch that matches the VLAN ID of the Trunks list to pass through.
Access Port.
- This Port is configured with a Tag, and packets coming in from this Port are tagged with a Tag (ID).
- If a packet coming in from another Trunk Port has a VLAN ID of its own, it will be sent out from this Port if the VLAN ID is equal to the Tag of this Port.
- Packets coming in from other Access Ports with the same Tag will also be Forwarded to this Port.
- Packets out of an Access Port are stripped of their Tag and do not carry a VLAN ID.
- If a packet arrives at the Access Port with a VLAN ID of its own, even if the VLAN ID is equal to the Tag, it is discarded and the Access Port only accepts Untag packets.
In short, packets received by the Access Port are tagged and the Access Port only accepts Untag packets, otherwise they are discarded. Packets with the same VLAN ID are forwarded to the corresponding Access Port and then untagged for retransmission.
VLAN common operation commands for Port
|
|
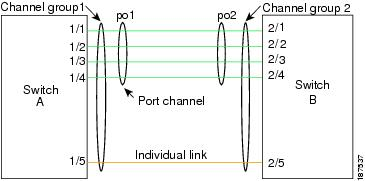
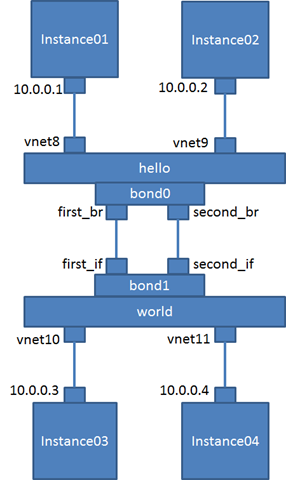
Bonding of Ports
The relationship between Port and Interface is a one-to-many relationship because OvS supports the Bond feature. Bonding is the process of “bundling” multiple Interfaces together to form a virtual connection, thus achieving high availability and high throughput.
Common bond_modes are as follows.
- active-backup: Failover, where one connection is active and the others are backup.
- balance-slb: Load balancing, load balancing based on source MAC and output VLAN.
- balance-tcp: Load balancing, must support LACP protocol to do so, can load balance based on L2, L3, L4.
- stable (LACP): Attempts to always assign a given flow to the same slave consistently.
PS: LACP (Link Aggregation Control Protocol).
Bond model for OvS:
QoS for Ports
Qos in OvS is often used in conjunction with Flow Policy. It is well known that QoS has two directions, one for Ingress and one for Egress.

Network Process QoS Implementation Principles and Methods
The most commonly used network QoS on Linux is the TC tool, which is mainly implemented by means of Queuing.
-
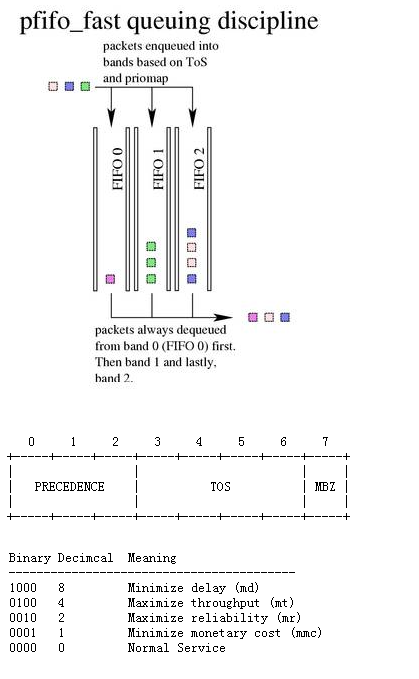
Classless Queuing Disciplines: default is pfifo_fast, a technique that does not classify network packets. pfifo_fast checks the corresponding Band in the priomap of TOS according to the number corresponding to the TOS in the network packet, and different Bands correspond to different queues.

-
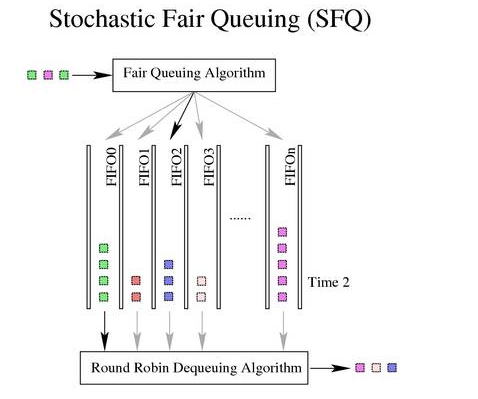
SFQ, Stochastic Fair Queuing: There are many queues of FIFOs, and TCP sessions or UDP streams are assigned to a queue. Packets are RoundRobin’d from each queue and sent. This way one Session does not take up all the traffic. But instead of having a queue for each Session, a large number of Sessions are assigned to a limited number of queues through a Hash algorithm. This way two or more Sessions will share a queue and may affect each other. Therefore, the Hash function changes frequently so that Sessions do not always affect each other.
-
TBF, Token Bucket Filter: All network packets are queued for sending, but not at the head of the queue, but only when the packet has a Token. tokens are generated according to a set rate (Rate), so even if the queue is long, they are sent according to the Rate. When there are no packets in the queue, Tokens are still generated at a set rate, but they do not accumulate indefinitely until the Buckets are full, and the size of the Buckets is often set by the burst/buffer/maxburst parameter. Token, then suddenly a large number of packets come in and each one gets a Token, resulting in an instant traffic spike.
-
Classful Queuing Disciplines: typical of these is HTB, Hierarchical Token Bucket.
-
Shaping: Occurs only at leaf nodes and depends on other Queues.
-
Borrowing: When network resources are free, borrow some for my use.
-
Rate: The set rate.
-
Ceil: The maximum rate. The difference between Ceil and Rate indicates the maximum amount that can be borrowed from others.
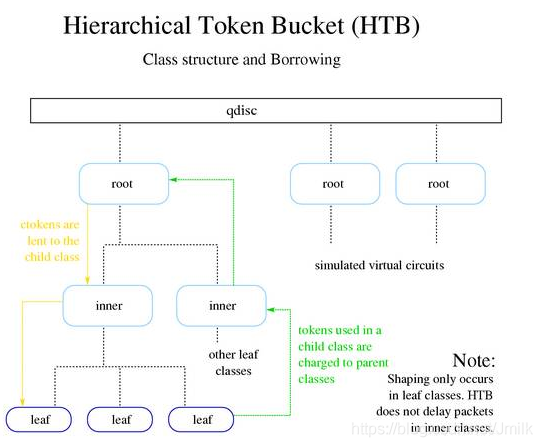
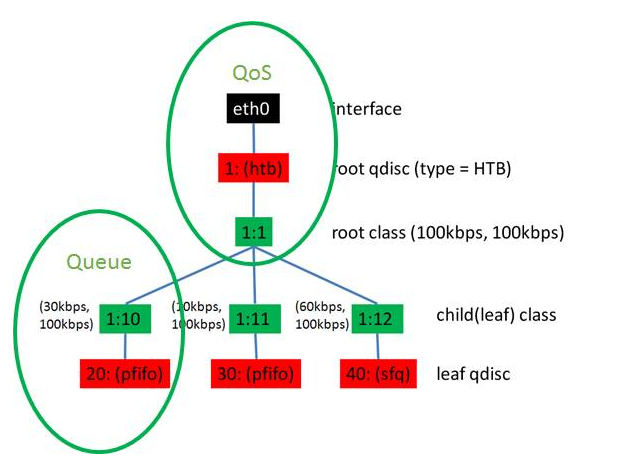
Create an HTB (Hierarchical Token Bucket) tree using TC
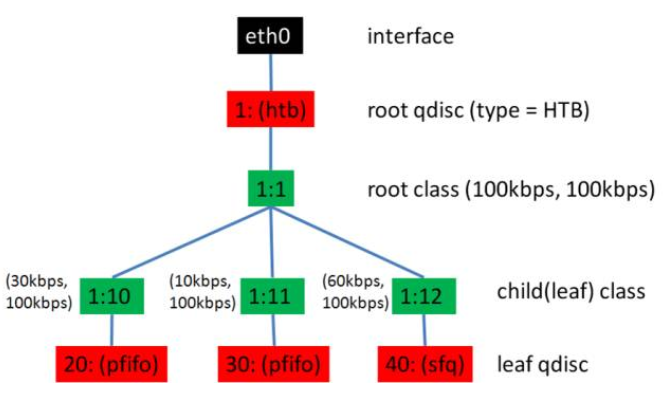
|
|
In fact, the only thing OvS can control is the Egress QoS, which is implemented through Shaping. The Ingress QoS cannot be controlled, but only the specified packets can be dropped by Policy.
Ingress policy.
Egress shaping : Port QoS policy is only supported for HTB.
- QoS can be created on the Port
- A QoS can have multiple Queues
- Rules are set via Flow
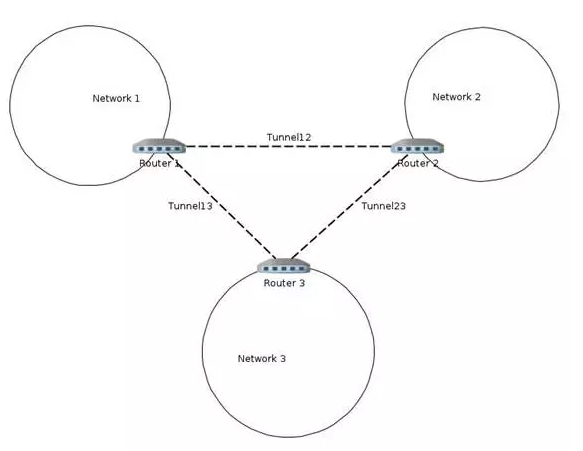
Tunnel
OvS supports three types of tunnels, all of which are described in the Networking Basics Terminology/Concepts, and will not be repeated.
- GRE
- VxLAN
- IPSec_gre
Example of OvS Tunnel operation command
|
|
Flow Tables
Open vSwitch defines a series of Flow Tables that control the flow and structure of network packets.
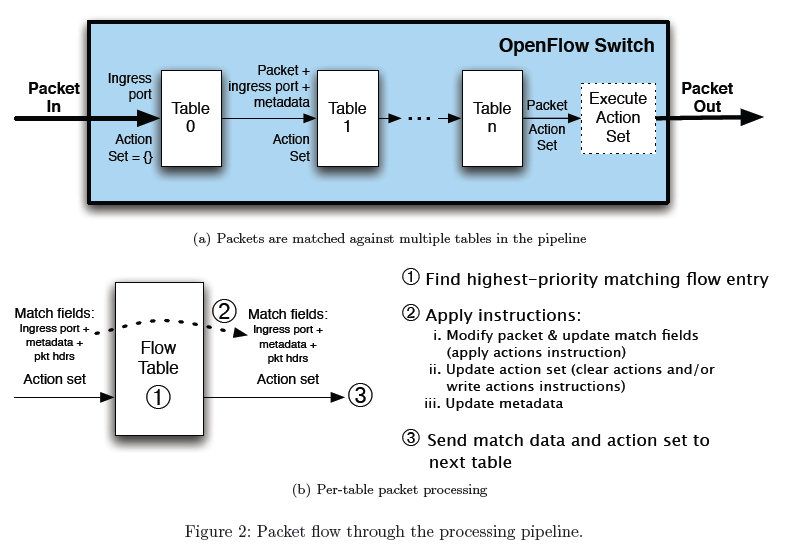
According to the OpenFlow protocol, a Flow Entry should consist of two parts.
- Match Field
- Action
If the packet matches the Match then the Action is executed.

Match Field parses network packets covering all layers of the TCP/IP protocol family, with the following fields to see if they can match a value.
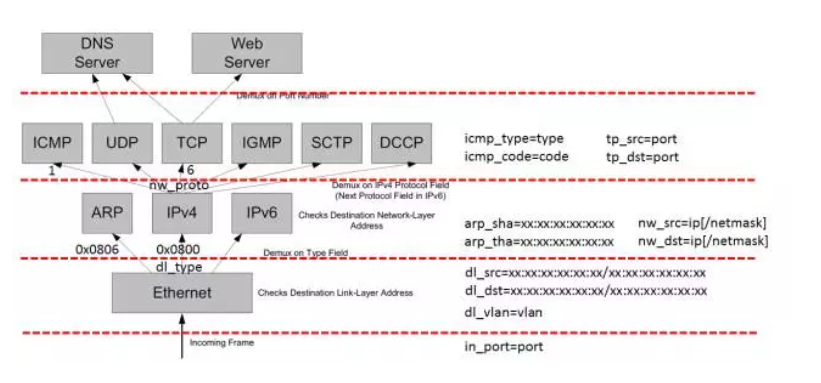
- Layer 1 - Tunnel ID, In Port, QoS priority, skb mark
- Layer 2 - MAC address, VLAN ID, Ethernet type
- Layer 3 - IPv4/IPv6 fields, ARP
- Layer 4 - TCP/UDP, ICMP, ND
Action mainly contains the following actions.
- Output to port (port range, flood, mirror)
- Discard, Resubmit to table x
- Packet Mangling (Push/Pop VLAN header, TOS, …)
- Send to controller, Learn
Common Flow Table Operations Commands
The management of Flow Table by OvS is mainly done through the ovs-ofctl utility.
|
|