Thinking
Let’s first think about what few things need to be done to switch StorageClass. First you need to reduce the number of copies of the application to 0, then create a new PVC, copy the data from the old PV to the new PV, then let the application use the new PV and expand the copies to the original number, and finally delete the old PV. This whole process also prevents Kubernetes from deleting the PV when the PVC is deleted.
Of course, some CSI drives or storage backends may have more convenient data migration techniques, but this article provides a more general solution, regardless of the storage backend.
The persistent volume declaration (PVC) used by KubeSphere 3.3.0 after turning on all components is as follows.
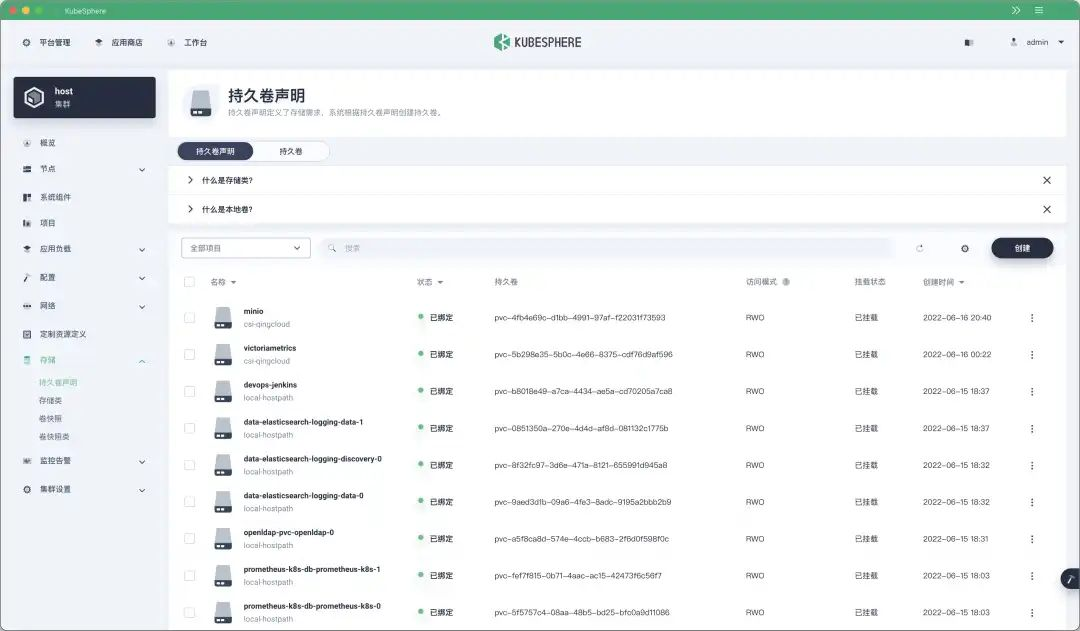
This article uses Elasticsearch as an example to demonstrate how to replace Elasticsearch’s storage with distributed storage from local storage.
Backup PVC and PV
The first step is to back up the PVC and PV, in case the operation fails later, there is room for reversal.
 1
 2
 3
 4
 5
 6
 7
 8
 9
10
11
|
$ kubectl -n kubesphere-logging-system get pvc
NAME STATUS VOLUME CAPACITY ACCESS MODES STORAGECLASS AGE
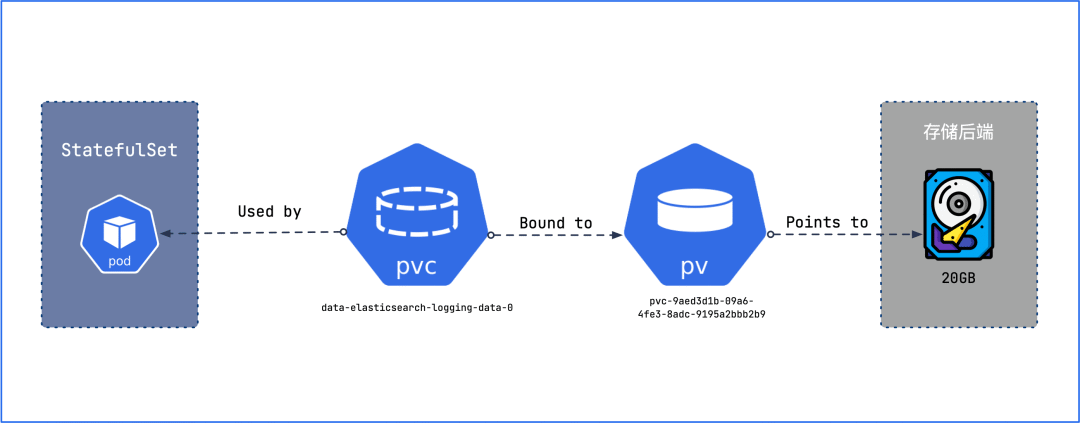
data-elasticsearch-logging-data-0 Bound pvc-9aed3d1b-09a6-4fe3-8adc-9195a2bbb2b9 20Gi RWO local-hostpath 28h
data-elasticsearch-logging-data-1 Bound pvc-0851350a-270e-4d4d-af8d-081132c1775b 20Gi RWO local-hostpath 28h
data-elasticsearch-logging-discovery-0 Bound pvc-8f32fc97-3d6e-471a-8121-655991d945a8 4Gi RWO local-hostpath 28h
$ kubectl -n kubesphere-logging-system get pv pvc-9aed3d1b-09a6-4fe3-8adc-9195a2bbb2b9 -o yaml > pvc-9aed3d1b-09a6-4fe3-8adc-9195a2bbb2b9.yaml
$ kubectl -n kubesphere-logging-system get pv pvc-0851350a-270e-4d4d-af8d-081132c1775b -o yaml > pvc-0851350a-270e-4d4d-af8d-081132c1775b.yaml
$ kubectl -n kubesphere-logging-system get pvc data-elasticsearch-logging-data-0 -o yaml > data-elasticsearch-logging-data-0.yaml
$ kubectl -n kubesphere-logging-system get pvc data-elasticsearch-logging-data-1 -o yaml > data-elasticsearch-logging-data-1.yaml
|
Copy data
Whether the accessModes of PV is ReadWriteOnce or ReadWriteMany, the number of copies of the application should be reduced to 0 before copying data, because ReadWriteOne mode allows only one Pod to be mounted at the same time and new Pods cannot be mounted, while ReadWriteMany mode if If the ReadWriteMany mode does not reduce the number of copies to 0, new data may be written when the data is copied. So by all means, reduce the number of replicas to 0.
 1
 2
 3
 4
 5
 6
 7
 8
 9
10
11
|
$ kubectl -n kubesphere-logging-system get sts
NAME                              READY   AGE
elasticsearch-logging-data        2/2     28h
elasticsearch-logging-discovery   1/1     28h

$ kubectl -n kubesphere-logging-system scale sts elasticsearch-logging-data --replicas=0

$ kubectl -n kubesphere-logging-system get sts
NAME                              READY   AGE
elasticsearch-logging-data        0/0     28h
elasticsearch-logging-discovery   1/1     28h
|
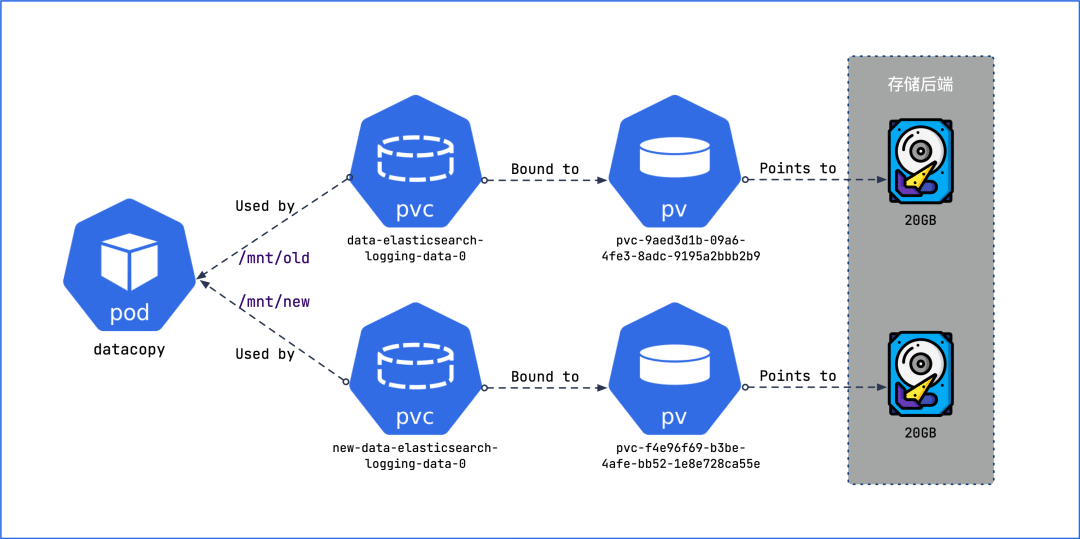
Create a new PVC called new-data-elasticsearch-logging-data-0 with the same capacity as data-elasticsearch-logging-data-0, and specify storageClassName as the new StorageClass.


Create a Deployment, mount both the new PV and the old PV, and then copy the data from the old PV to the new PV.
Click “Create” in the “Workload” screen, and paste the YAML below into it.
 1
 2
 3
 4
 5
 6
 7
 8
 9
10
11
12
13
14
15
16
17
18
19
20
21
22
23
24
25
26
27
28
29
30
31
32
33
34
35
36
37
38
|
apiVersion: apps/v1
kind: Deployment
metadata:
  namespace: kubesphere-logging-system
  labels:
    app: datacopy
  name: datacopy
spec:
  replicas: 1
  selector:
    matchLabels:
      app: datacopy
  template:
    metadata:
      labels:
        app: datacopy
    spec:
      containers:
        - name: datacopy
          image: ubuntu
          command:
            - 'sleep'
          args:
            - infinity
          volumeMounts:
            - name: old-pv
              readOnly: false
              mountPath: /mnt/old
            - name: new-pv
              readOnly: false
              mountPath: /mnt/new
      volumes:
        - name: old-pv
          persistentVolumeClaim:
            claimName: data-elasticsearch-logging-data-0
        - name: new-pv
          persistentVolumeClaim:
            claimName: new-data-elasticsearch-logging-data-0
|
This Deployment mounts both the new PV and the old PV, and later we will copy the data from the old PV to the new PV.
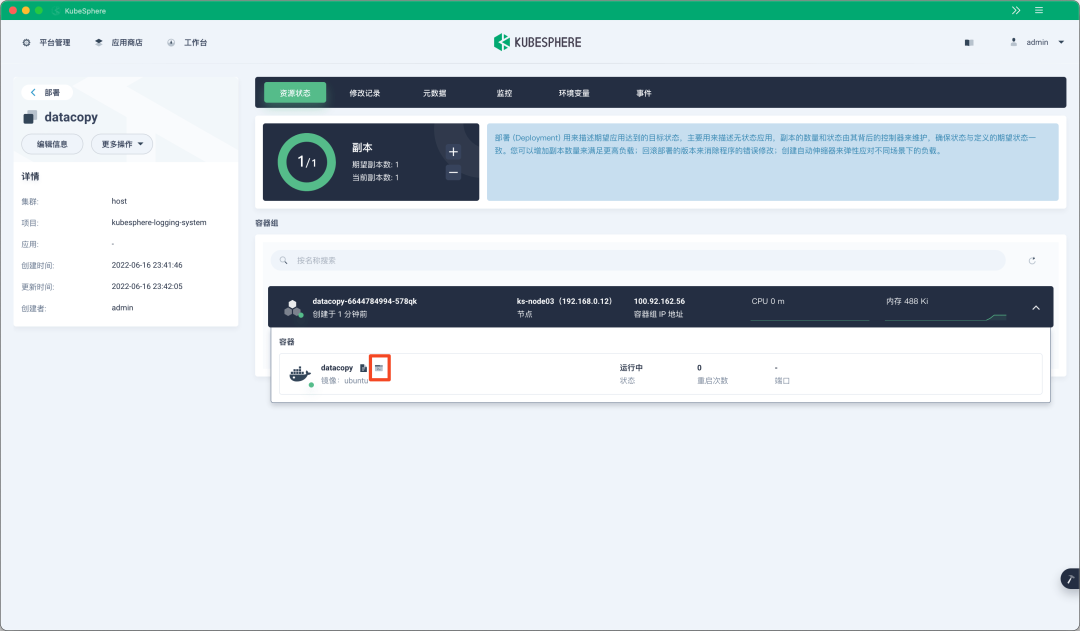
After the Pod starts successfully, click the container’s terminal icon to enter the container’s terminal.
Verify in the container that the mount point of the old PV contains application data and that the mount point of the new PV is empty before executing the command (cd /mnt/old; tar -cf - .) | (cd /mnt/new; tar -xpf -) to ensure that all data ownership and permissions are inherited.
After execution is complete, verify that the mount point of the new PV contains the data of the old PV and that ownership and permissions are properly inherited.
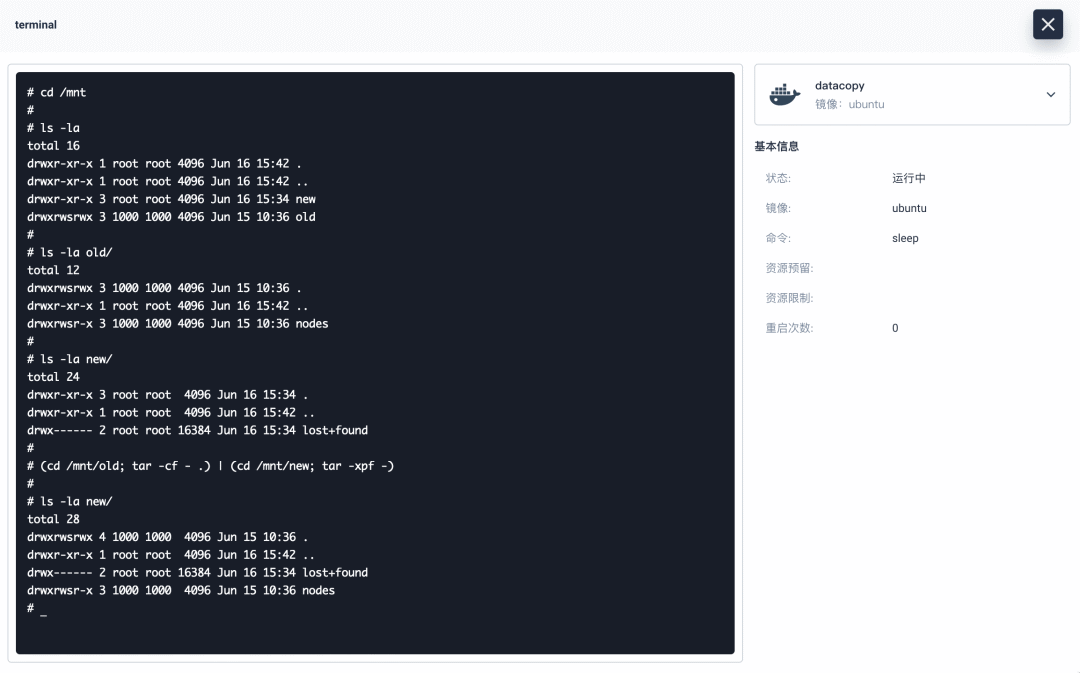
Here the task of copying the data is done, now we need to reduce the number of datacopy copies to 0.

Migrating PVCs
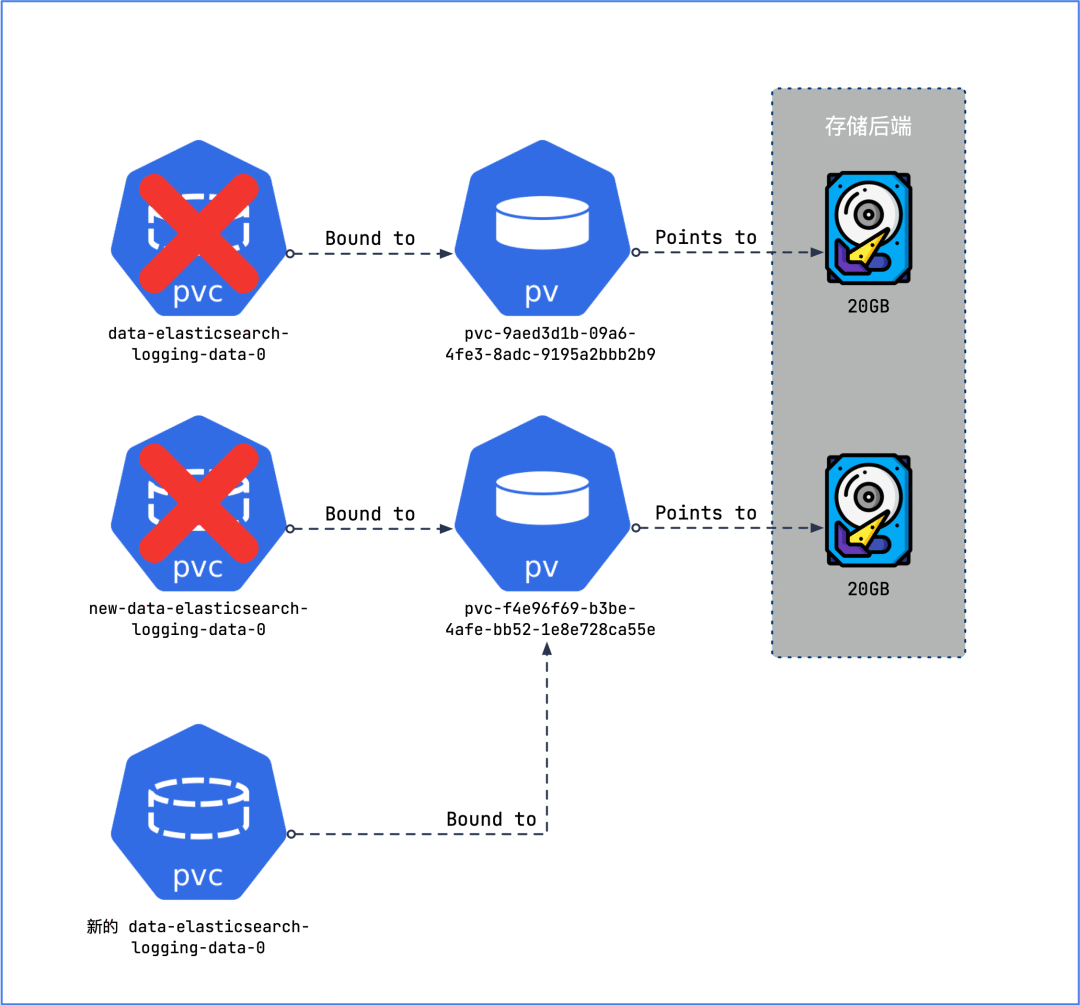
The ideal state for migrating storage would be to use the old PVC and point it to the new PV, so that the YAML configuration list of the workload does not need to be changed in any way. However, the binding relationship between the PVC and the PV is immutable, and to get them to unbind, you must first delete the old PVC, then create a PVC with the same name and bind the old PV to it.
Note that by default the recycling policy for PVs is Delete, once a PVC is deleted, the PV bound to it and the data in the PV will be deleted. We don’t want to see this, so we need to modify the recycling policy so that the PV will be preserved when the PVC is deleted.
In fact, the global reclaim policy can be set via StorageClass, if not, the default is Delete. You can see the reclaimPolicy of a PV by using the command kubectl describe pv <pv-name>.
 1
 2
 3
 4
 5
 6
 7
 8
 9
10
11
12
13
14
15
16
17
18
19
20
21
|
$ kubectl describe pv pvc-9aed3d1b-09a6-4fe3-8adc-9195a2bbb2b9
Name:              pvc-9aed3d1b-09a6-4fe3-8adc-9195a2bbb2b9
Labels:            openebs.io/cas-type=local-hostpath
Annotations:       pv.kubernetes.io/provisioned-by: openebs.io/local
Finalizers:        [kubernetes.io/pv-protection]
StorageClass:      local-hostpath
Status:            Bound
Claim:             kubesphere-logging-system/data-elasticsearch-logging-data-0
Reclaim Policy:    Delete
...

$ kubectl describe pv pvc-f4e96f69-b3be-4afe-bb52-1e8e728ca55e
Name:              pvc-f4e96f69-b3be-4afe-bb52-1e8e728ca55e
Labels:            <none>
Annotations:       pv.kubernetes.io/provisioned-by: disk.csi.qingcloud.com
Finalizers:        [kubernetes.io/pv-protection external-attacher/disk-csi-qingcloud-com]
StorageClass:      csi-qingcloud
Status:            Bound
Claim:             kubesphere-logging-system/new-data-elasticsearch-logging-data-0
Reclaim Policy:    Delete
...
|
We can set the recycling policy for old and new PVs to Retain with the patch command.
1
2
3
4
5
|
$ kubectl patch pv pvc-9aed3d1b-09a6-4fe3-8adc-9195a2bbb2b9 -p '{"spec":{"persistentVolumeReclaimPolicy":"Retain"}}'
persistentvolume/pvc-9aed3d1b-09a6-4fe3-8adc-9195a2bbb2b9 patched

$ kubectl patch pv pvc-f4e96f69-b3be-4afe-bb52-1e8e728ca55e -p '{"spec":{"persistentVolumeReclaimPolicy":"Retain"}}'
persistentvolume/pvc-9aed3d1b-09a6-4fe3-8adc-9195a2bbb2b9 patched
|
⚠️Note: This command has no effect on the stability and availability of PV and can be executed at any time.
Now you can delete all the old and new PVCs without any impact on the PV.
1
2
3
|
$ kubectl -n kubesphere-logging-system delete pvc data-elasticsearch-logging-data-0 new-data-elasticsearch-logging-data-0
persistentvolumeclaim "data-elasticsearch-logging-data-0" deleted
persistentvolumeclaim "new-data-elasticsearch-logging-data-0" deleted
|
Before creating the final PVC, we have to make sure that the newly created PVC can be bound to the new PV. With the following command you can see that the new PV is currently released and cannot be bound by the new PVC.
 1
 2
 3
 4
 5
 6
 7
 8
 9
10
11
12
13
|
$ kubectl describe pv pvc-f4e96f69-b3be-4afe-bb52-1e8e728ca55e
Name:              pvc-f4e96f69-b3be-4afe-bb52-1e8e728ca55e
Labels:            <none>
Annotations:       pv.kubernetes.io/provisioned-by: disk.csi.qingcloud.com
Finalizers:        [kubernetes.io/pv-protection external-attacher/disk-csi-qingcloud-com]
StorageClass:      csi-qingcloud
Status:            Released
Claim:             kubesphere-logging-system/new-data-elasticsearch-logging-data-0
Reclaim Policy:    Retain
Access Modes:      RWO
VolumeMode:        Filesystem
Capacity:          20Gi
...
|
This is because the PV still references the deleted PVC in spec.claimRef.
 1
 2
 3
 4
 5
 6
 7
 8
 9
10
11
12
13
14
15
16
17
18
19
20
21
22
23
|
$ kubectl get pv pvc-f4e96f69-b3be-4afe-bb52-1e8e728ca55e -o yaml
apiVersion: v1
kind: PersistentVolume
metadata:
  ...
  name: pvc-f4e96f69-b3be-4afe-bb52-1e8e728ca55e
  ...
spec:
  accessModes:
  - ReadWriteOnce
  capacity:
    storage: 20Gi
  claimRef:
    apiVersion: v1
    kind: PersistentVolumeClaim
    name: new-data-elasticsearch-logging-data-0
    namespace: kubesphere-logging-system
    resourceVersion: "657019"
    uid: f4e96f69-b3be-4afe-bb52-1e8e728ca55e
  ...
  persistentVolumeReclaimPolicy: Retain
  storageClassName: csi-qingcloud
  volumeMode: Filesystem
|
To solve this problem, you can edit the PV directly with the command kubectl edit pv <pv-name> and delete all the contents of claimRef. Then check that the PV is available.
 1
 2
 3
 4
 5
 6
 7
 8
 9
10
11
12
|
$ kubectl describe pv pvc-f4e96f69-b3be-4afe-bb52-1e8e728ca55e
Name:              pvc-f4e96f69-b3be-4afe-bb52-1e8e728ca55e
Labels:            <none>
Annotations:       pv.kubernetes.io/provisioned-by: disk.csi.qingcloud.com
Finalizers:        [kubernetes.io/pv-protection external-attacher/disk-csi-qingcloud-com]
StorageClass:      csi-qingcloud
Status:            Available
Claim:
Reclaim Policy:    Retain
Access Modes:      RWO
VolumeMode:        Filesystem
Capacity:          20Gi
|
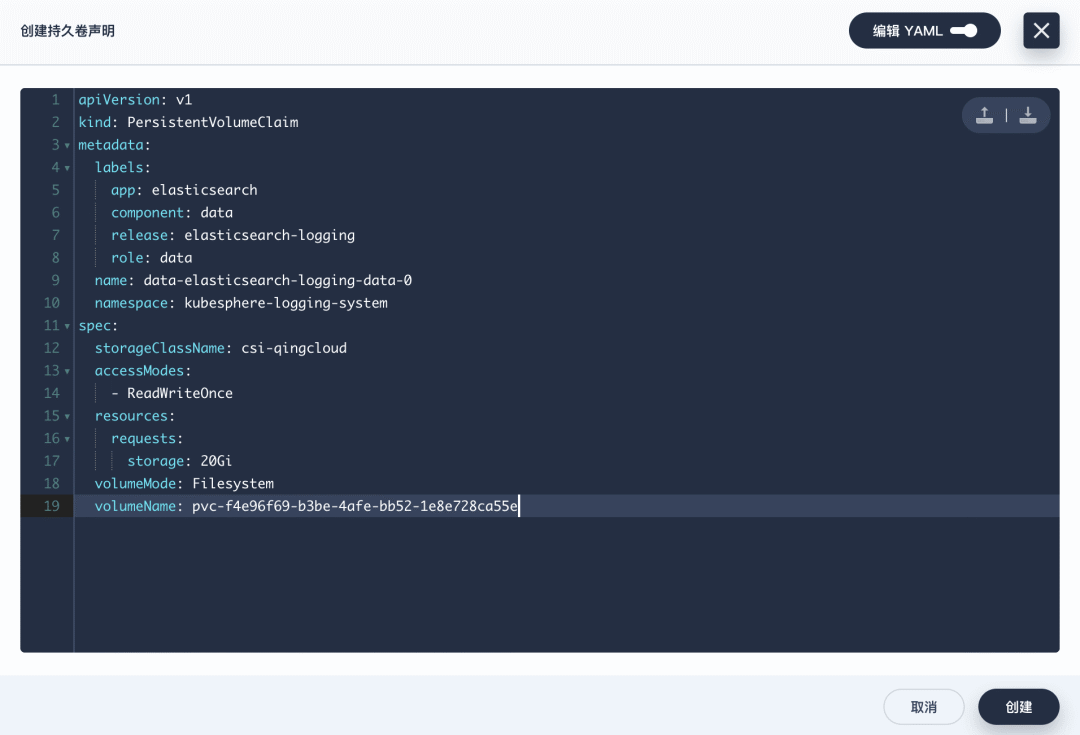
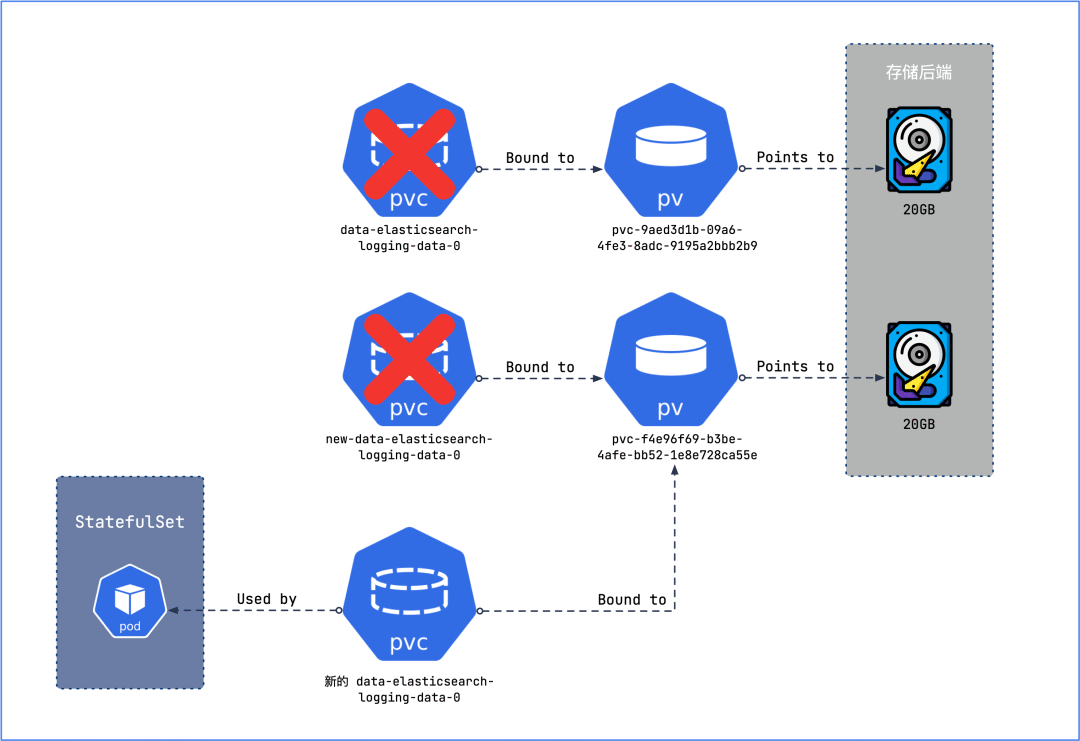
Ultimately we need to create a new PVC with the same name as the old PVC and, as far as possible, with the same parameters as the old PVC: * The new PVC has the same name as the old PVC.
- the name of the new PVC is the same as the name of the old PVC.
spec.volumeName pointing to the new PV.metadata.annotations and metadata.labels of the new PVC are kept the same as the old PVC, as these values may affect the application deployment (e.g. Helm chart, etc.).
The final PVC contents are as follows.
 1
 2
 3
 4
 5
 6
 7
 8
 9
10
11
12
13
14
15
16
17
18
19
|
apiVersion: v1
kind: PersistentVolumeClaim
metadata:
  labels:
    app: elasticsearch
    component: data
    release: elasticsearch-logging
    role: data
  name: data-elasticsearch-logging-data-0
  namespace: kubesphere-logging-system
spec:
  storageClassName: csi-qingcloud
  accessModes:
    - ReadWriteOnce
  resources:
    requests:
      storage: 20Gi
  volumeMode: Filesystem
  volumeName: pvc-f4e96f69-b3be-4afe-bb52-1e8e728ca55e
|
Click “Create” on the “Storage Volume Declaration” screen.
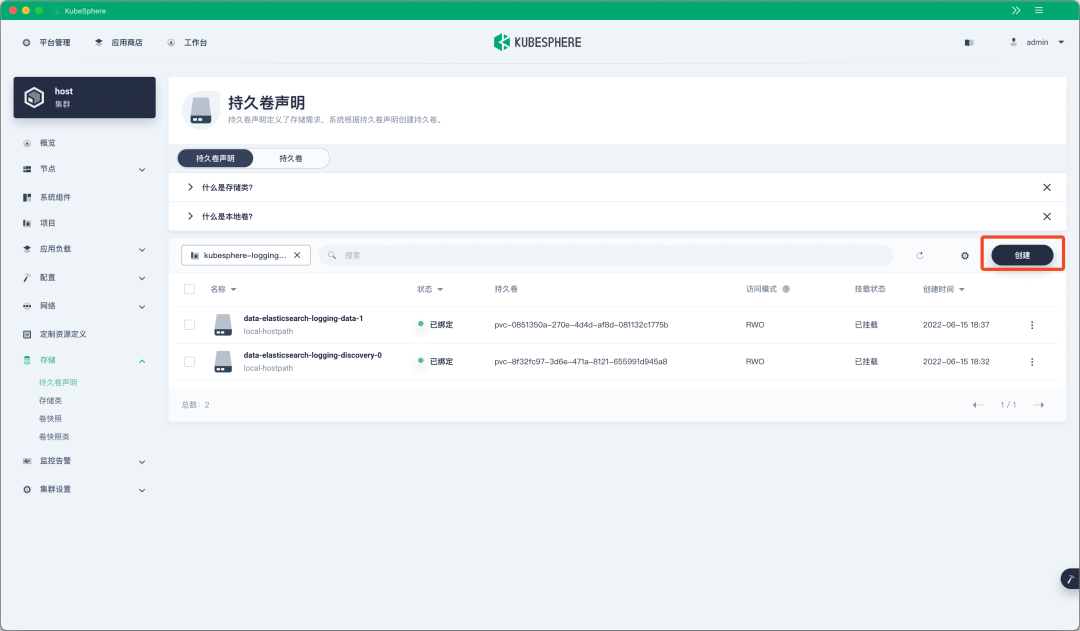
Select ‘Edit YAML’, copy and paste the above YAML content into it, and click ‘Create’.
Finally, you can see that the new PVC and PV are all in Bound state.
1
2
3
4
5
6
7
|
$ kubectl -n kubesphere-logging-system get pvc data-elasticsearch-logging-data-0
NAME                                STATUS   VOLUME                                     CAPACITY   ACCESS MODES   STORAGECLASS    AGE
data-elasticsearch-logging-data-0   Bound    pvc-f4e96f69-b3be-4afe-bb52-1e8e728ca55e   20Gi       RWO            csi-qingcloud   64s

$ kubectl get pv pvc-f4e96f69-b3be-4afe-bb52-1e8e728ca55e
NAME                                       CAPACITY   ACCESS MODES   RECLAIM POLICY   STATUS   CLAIM                                                         STORAGECLASS    REASON   AGE
pvc-f4e96f69-b3be-4afe-bb52-1e8e728ca55e   20Gi       RWO            Retain           Bound    kubesphere-logging-system/data-elasticsearch-logging-data-0   csi-qingcloud            11h
|
One more time
So far, we have only migrated the data for data-elasticsearch-logging-data-0, for data-elasticsearch-logging-data-1, just repeat the steps above, remember to change the PVC in datacopy to data- elasticsearch-logging-data-1 and new-data-elasticsearch-logging-data-0, and change the rest of the configuration to the new one.
Restore Workload
Now that all the storage is migrated, the PVC names remain the same and the PV is using the new storage.
1
2
3
4
5
6
7
8
9
|
$ kubectl get pv -A|grep elasticsearch-logging-data
pvc-0851350a-270e-4d4d-af8d-081132c1775b   20Gi       RWO            Retain           Released   kubesphere-logging-system/data-elasticsearch-logging-data-1        local-hostpath            40h
pvc-9aed3d1b-09a6-4fe3-8adc-9195a2bbb2b9   20Gi       RWO            Retain           Released   kubesphere-logging-system/data-elasticsearch-logging-data-0        local-hostpath            40h
pvc-d0acd2e7-ee1d-47cf-8506-69147fe25563   20Gi       RWO            Retain           Bound      kubesphere-logging-system/data-elasticsearch-logging-data-1        csi-qingcloud             9m53s
pvc-f4e96f69-b3be-4afe-bb52-1e8e728ca55e   20Gi       RWO            Retain           Bound      kubesphere-logging-system/data-elasticsearch-logging-data-0        csi-qingcloud             11h

$ kubectl -n kubesphere-logging-system get pvc|grep elasticsearch-logging-data
data-elasticsearch-logging-data-0        Bound    pvc-f4e96f69-b3be-4afe-bb52-1e8e728ca55e   20Gi       RWO            csi-qingcloud    27m
data-elasticsearch-logging-data-1        Bound    pvc-d0acd2e7-ee1d-47cf-8506-69147fe25563   20Gi       RWO            csi-qingcloud    3m49s
|
Restore copies of the workload to the previous number.
1
2
3
4
5
6
7
|
$ kubectl -n kubesphere-logging-system scale sts elasticsearch-logging-data --replicas=2
statefulset.apps/elasticsearch-logging-data scaled

$ kubectl -n kubesphere-logging-system get pod -l app=elasticsearch,component=data
NAME                           READY   STATUS    RESTARTS   AGE
elasticsearch-logging-data-0   1/1     Running   0          4m12s
elasticsearch-logging-data-1   1/1     Running   0          3m42s
|
Perfect!
There is one last bit of finishing work, we need to reset the recycling policy for all new PVs to Delete.
 1
 2
 3
 4
 5
 6
 7
 8
 9
10
11
|
$ kubectl patch pv pvc-d0acd2e7-ee1d-47cf-8506-69147fe25563 -p '{"spec":{"persistentVolumeReclaimPolicy":"Delete"}}'
persistentvolume/pvc-d0acd2e7-ee1d-47cf-8506-69147fe25563 patched

$ kubectl patch pv pvc-f4e96f69-b3be-4afe-bb52-1e8e728ca55e -p '{"spec":{"persistentVolumeReclaimPolicy":"Delete"}}'
persistentvolume/pvc-f4e96f69-b3be-4afe-bb52-1e8e728ca55e patched

$ kubectl get pv -A|grep elasticsearch-logging-data
pvc-0851350a-270e-4d4d-af8d-081132c1775b   20Gi       RWO            Retain           Released   kubesphere-logging-system/data-elasticsearch-logging-data-1        local-hostpath            40h
pvc-9aed3d1b-09a6-4fe3-8adc-9195a2bbb2b9   20Gi       RWO            Retain           Released   kubesphere-logging-system/data-elasticsearch-logging-data-0        local-hostpath            40h
pvc-d0acd2e7-ee1d-47cf-8506-69147fe25563   20Gi       RWO            Delete           Bound      kubesphere-logging-system/data-elasticsearch-logging-data-1        csi-qingcloud             15m
pvc-f4e96f69-b3be-4afe-bb52-1e8e728ca55e   20Gi       RWO            Delete           Bound      kubesphere-logging-system/data-elasticsearch-logging-data-0        csi-qingcloud             11h
|
At the end of the day, you can delete all the old PVs.
1
2
3
4
5
|
$ kubectl delete pv pvc-0851350a-270e-4d4d-af8d-081132c1775b
persistentvolume "pvc-0851350a-270e-4d4d-af8d-081132c1775b" deleted

$ kubectl delete pv pvc-9aed3d1b-09a6-4fe3-8adc-9195a2bbb2b9
persistentvolume "pvc-9aed3d1b-09a6-4fe3-8adc-9195a2bbb2b9" deleted
|