1. Specify the Node by nodeSelector when creating the load
-
Add a label to the node
1kubectl label node node2 project=A -
Specify the nodeSelector to create the workload
 1
 2
 3
 4
 5
 6
 7
 8
 9
10
11
12
13
14
15
16
17
18
19
20
21
22
cat <<EOF | kubectl apply -f - apiVersion: apps/v1 kind: Deployment metadata: name: nginx-nodeselector spec: replicas: 1 selector: matchLabels: app: nginx-nodeselector template: metadata: labels: app: nginx-nodeselector spec: nodeSelector: project: A containers: - name: nginx image: nginx EOF -
View Workload
As expected, the Pod is running on the specified node node2.
-
Clean up the environment
In fact, there is another node selection parameter, nodeName, which specifies the node name directly. However, this setting is too rigid and overrides Kubernetes’ own scheduling mechanism, and is rarely used in production.
2. Bind namespaces to nodes via access control
Specifying nodeSelector when creating a load allows you to set the nodes under which the Pod will run. However, if you want to bind all Pods under a namespace to run under a given node, it is not possible. This can be done with kube-apiserver access control, a feature that entered alpha in Kubernetes 1.5.
2.1 Modifying kube-apiserver parameters
Edit the kube-apiserver file:
|
|
Add PodNodeSelector to admission-plugins :
|
|
Here NodeRestriction is enabled by default. If it is a highly available cluster, then you need to modify each kube-apiserver and wait a while for the kube-apiserver to complete the reboot process.
2.2 Adding annotations to Namespace
Edit the namespace and add annotations:
|
|
scheduler.alpha.kubernetes.io/node-selector can be either a node name or a label key-value pair.
2.3 Adding a specified label to a node
Label the node3 node with project=A.
|
|
Here, the load on namespace default is bound to node node3.
2.4 Creating Loads
-
Create a load for testing
1 2 3 4 5 6 7 8 9 10 11 12 13 14 15 16 17 18 19 20cat <<EOF | kubectl apply -f - apiVersion: apps/v1 kind: Deployment metadata: name: nginx-scheduler spec: replicas: 3 selector: matchLabels: app: nginx-scheduler template: metadata: labels: app: nginx-scheduler spec: containers: - name: nginx image: nginx EOF -
View Load Distribution
1 2 3 4 5 6kubectl get pod -o wide NAME READY STATUS RESTARTS AGE IP NODE NOMINATED NODE READINESS GATES nginx-scheduler-6478998698-brkzn 1/1 Running 0 84s 10.233.92.52 node3 <none> <none> nginx-scheduler-6478998698-m422x 1/1 Running 0 84s 10.233.92.51 node3 <none> <none> nginx-scheduler-6478998698-mnf4d 1/1 Running 0 84s 10.233.92.50 node3 <none> <none>
As you can see, although there are 4 available nodes on the cluster, the load under the default space is running under the node3 node.
2.5 Cleaning up the environment
-
Cleanup label
1kubectl label node node3 project- -
Clearing the load
1kubectl delete deployments nginx-scheduler -
Cleanup Notes
1kubectl edit ns default
Note that if the namespace has scheduler.alpha.kubernetes.io/node-selector turned on and the node does not have a tag associated with it, the Pod will remain in the Pending state and will not be scheduled until a node matching the tag is available.
3. Grouping nodes using topology domains
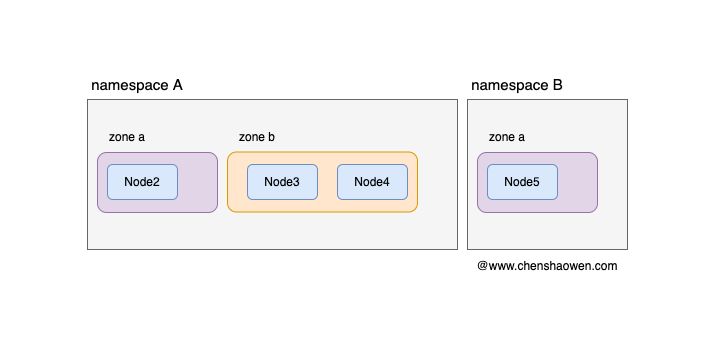
As shown in the figure below, with kube-apiserver’s access control plugin, we can build models with one namespace per project and each namespace contains specified nodes. This meets the requirements of, business isolation and cost billing. However, as the cluster gets larger, the project needs to divide several availability zones under the cluster for securing business availability.
The topology domain is mainly to solve the problem of Pod distribution in the cluster, and can be used to achieve the demand of Pod to node directional selection. The topology domain feature of Kubernetes Cluster Scheduler entered Alpha phase in 1.16 and Beta phase in 1.18. Here we perform some experiments:
-
Dividing nodes into different topological domains
Here, node2 is assigned to zone a and node3 and node4 are assigned to zone b.
1kubectl label node node2 zone=a1kubectl label node node3 node4 zone=b -
Creating Loads
1 2 3 4 5 6 7 8 9 10 11 12 13 14 15 16 17 18 19 20 21 22 23 24 25 26 27cat <<EOF | kubectl apply -f - apiVersion: apps/v1 kind: Deployment metadata: name: nginx-topology spec: replicas: 20 selector: matchLabels: app: nginx-topology template: metadata: labels: app: nginx-topology spec: topologySpreadConstraints: - maxSkew: 1 topologyKey: zone whenUnsatisfiable: DoNotSchedule labelSelector: matchLabels: app: nginx-topology containers: - name: nginx image: nginx EOFHere
topologyKeyis used to specify the Key for dividing the topology domain,maxSkewmeans the difference in the number of Pods in zone=a and zone=b cannot exceed 1,whenUnsatisfiable: DoNotSchedulemeans no scheduling is done when the condition is not satisfied. -
View Pod distribution
1 2 3 4 5 6 7 8 9 10 11 12 13 14 15 16 17 18 19 20 21 22 23kubectl get pod -o wide NAME READY STATUS RESTARTS AGE IP NODE NOMINATED NODE READINESS GATES nginx-topology-7d8698544d-2srcj 1/1 Running 0 3m3s 10.233.92.63 node3 <none> <none> nginx-topology-7d8698544d-2wxkp 1/1 Running 0 3m3s 10.233.96.53 node2 <none> <none> nginx-topology-7d8698544d-4db5b 1/1 Running 0 3m3s 10.233.105.43 node4 <none> <none> nginx-topology-7d8698544d-9tqvn 1/1 Running 0 3m3s 10.233.96.58 node2 <none> <none> nginx-topology-7d8698544d-9zll5 1/1 Running 0 3m3s 10.233.105.45 node4 <none> <none> nginx-topology-7d8698544d-d6nbm 1/1 Running 0 3m3s 10.233.105.44 node4 <none> <none> nginx-topology-7d8698544d-f4nw9 1/1 Running 0 3m3s 10.233.96.54 node2 <none> <none> nginx-topology-7d8698544d-ggfgv 1/1 Running 0 3m3s 10.233.92.66 node3 <none> <none> nginx-topology-7d8698544d-gj4pg 1/1 Running 0 3m3s 10.233.92.61 node3 <none> <none> nginx-topology-7d8698544d-jc2xt 1/1 Running 0 3m3s 10.233.92.62 node3 <none> <none> nginx-topology-7d8698544d-jmmcx 1/1 Running 0 3m3s 10.233.96.56 node2 <none> <none> nginx-topology-7d8698544d-l45qj 1/1 Running 0 3m3s 10.233.92.65 node3 <none> <none> nginx-topology-7d8698544d-lwp8m 1/1 Running 0 3m3s 10.233.92.64 node3 <none> <none> nginx-topology-7d8698544d-m65rx 1/1 Running 0 3m3s 10.233.96.57 node2 <none> <none> nginx-topology-7d8698544d-pzrzs 1/1 Running 0 3m3s 10.233.96.55 node2 <none> <none> nginx-topology-7d8698544d-tslxx 1/1 Running 0 3m3s 10.233.92.60 node3 <none> <none> nginx-topology-7d8698544d-v4cqx 1/1 Running 0 3m3s 10.233.96.50 node2 <none> <none> nginx-topology-7d8698544d-w4r86 1/1 Running 0 3m3s 10.233.96.52 node2 <none> <none> nginx-topology-7d8698544d-wwn95 1/1 Running 0 3m3s 10.233.96.51 node2 <none> <none> nginx-topology-7d8698544d-xffpx 1/1 Running 0 3m3s 10.233.96.59 node2 <none> <none>There are 10 Pods in node2, 7 nodes in node3, and 3 nodes in node4. You can see that the Pods are evenly distributed on zone=a and zone=b.
-
Clean up the environment
4. Summary
As clusters get larger, issues such as isolation between businesses and exclusivity of businesses to nodes surface. Usually, each business will have a separate namespace, so we can bind the namespace to the nodes.
This article mainly gives two methods, one is to set nodeSelector directly when creating loads, and the tricky way is to use namespace value as value; the other way is to use the access control plugin provided by kube-apiserver to filter the specified nodes by tag when creating loads under namespaces through annotation to complete the binding between namespaces and nodes. The other way is to use the access control plugin provided by kube-apiserver to filter nodes by tag when creating loads under namespaces.
Consider further that if the number of nodes is very large and we need to divide the available zones to spread the load, then we can do so with the help of topology domains. Through topology domains, we can make the load evenly distributed on the specified availability zones and cabinets according to the configured policies.