cargo new generates the beginnings of a project, providing the src/main.rs and src/lib.rs files, but as the project grows, the amount of code becomes larger, and it is not appropriate to maintain a large amount of code in one file. This is when files are usually split by “modules”, and rust is no exception.
Here we learn how the code is organized in rust, mainly involving the following concepts.
- package: a concept in Cargo that manages crate
- crate: a collection of modules, compilation units, both lib and bin, that is, for others to call, or an executable file
- module: used to organize code within crate
- workspace: when the project is complex, manage multiple packages
package
The cargo new command creates a new project, also a package, with a cargo.toml file that defines the package, the required external dependencies, and how to compile the crate, etc.
crate
There are two types of crate in rust, lib types and bin types, and by default crate is handled by the following rules based on filename.
- src/main.rs: indicates that the crate is a bin type crate
- src/lib.rs: means the crate is a lib type crate
Both src/main.rs and src/lib.rs are the root of crate, which is the entry point for crate references, rustc compilation.
In addition, crate in a package has the following constraints.
- multiple crates of type bin
- 0 or 1 crate of type lib
Where 1 and 2 are not mutually exclusive, i.e. a project can have 1 lib and multiple bin crates, i.e. a package can also compile multiple executables.
Only if there are multiple bin crates, one src/main.rs will not work, it will have to be placed under src/bin, one file per crate, in other words, each file is a different crate.
mod
Code with more code can be split in mod (file/folder) for code, instead of writing all code in src/lib.rs or src/main.rs.
Take for example a crate of type lib, the entry point of that crate is in src/lib.rs, which is also the root of the crate. Defining the module in src/lib.rs is simple.
In a real project, we can’t have just one lib.rs file, but will split the code into multiple modules by function, etc.
Module splitting
In general, a file is considered as a mod, and mods can be defined in nested sets. Nested defined mods can either be written in the same file or through folders.
Let’s look at a few examples.
Suppose the current project file structure is as follows.
Three mods are shown defined here: mod_a, mod_b and mod_c, where mod_a is in the form of a folder, while mod b and mod c have corresponding files. Where mod_b is a submodule of mod_a.
Let’s take a look at how each module is declared and how it should be referenced.
First, let’s look at the root of crate, which is the entry lib.rs.
Two mods are declared here, and if you need to access them outside crate, you can add the pub keyword in front of the mod. Note that there is no need to declare mod_c, a submodule of mod_a, which needs to be declared by mod_a.
Let’s take a look at these two mods. mod_a is a mod that exists in a folder, and according to the rules of cargo, there should be a file named mod.rs under the folder that defines the contents of the mod. The contents of this file are as follows.
As you can see, this file is similar to lib.rs in that it declares mods, and the code for mod_b declared in this file is saved as mod_b.rs.
Look again at the code for mod_c.
In addition to how to define mods, it is also important to note how to reference the definitions of other mods. Here in mod_c, to use mod_b, you can use the absolute path form use crate::mod_a::mod_b.
And to use mod_c in mod_b, you use use super::super::mod_c which is in the form of a path first.
Add main.rs
Finally, add main.rs to the above code to see how to use mod_a above as an external crate.
The only thing I would like to remind is that the lib reference method cannot be referenced by absolute or relative paths starting with crate, but must be referenced by the name of the crate (i.e., the name in Cargo.toml, in this case testlib). This is because main and lib belong to different crates.
If you change testlib above to crate, the compiler will report the following error.
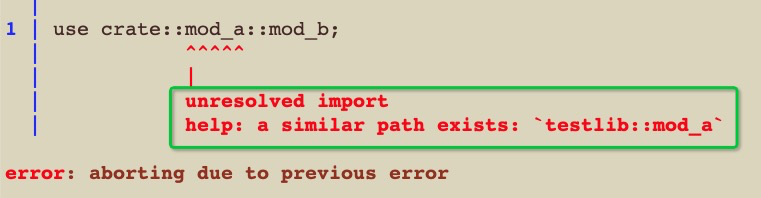
Many times the compiler is our best teacher.
pub modifiers
Structs and Enumerations
To access structures in other mods, you need to declare the structure as pub, but this can only access the structure only, if you want to manipulate the fields inside, there are two ways.
- Provide the method of pub to modify the field
- Modify the field you want to manipulate directly as a pub type
The former is probably more “object-oriented”.
In the case of enumeration types, you only need to add pub in front of the enumeration name, and do not need to set the variant in it.
use statement
Told so many basic concepts, the following look at how to use.
In crate and module may have defined functions, structures, etc., to be used in other modules or crate, you need to introduce it into the current scope, similar to the function of java’s import, rust need to use use.
How to represent the object to be referenced (called item in rust), rust called path, can be understood as we use the file in the operating system a little.
There are two forms of path in rust, also like the file system, absolute paths and relative paths.
- absolute paths start at the root of crate (src/main.rs or src/lib.rs) and can be represented by the crate name or by the literal value of crate
- Relative paths can use the current module name, objects available in the current module, super and self, etc.
The hierarchy in path uses two colons, similar to the slash in the file system.
Suppose you have the following code (from trpl).
Line 9 above is a reference in the form of an absolute path, while line 12 is a reference in the form of a relative path. Here, front_of_house is under the root of crate, and not under any other submodule.
There are some restrictions to know.
- You cannot use private items from a child module in the parent module
- All items in the parent module can be used by the child module
Note that the front_of_house module is not pub, but eat_at_restaurant can be used because they are under the same module, which does not need to be pub to be used, otherwise all items would have to be pub to be used. But the hosting module and the add_to_waitlist method must be of type pub, otherwise they can’t be used from items in their parent module.
The following is an example of using super.
The fix_incorrect_order method belongs to the back_of_house module, and the serve_order to be called is at the same level as back_of_house. Therefore, in the functions in the back_of_house module, you can use super::serve_order to access the module’s sibling serve_order method.
If the paths behind use have a common parent, you can use the simplified pattern.
For example.
It can be simplified as follows.
|
|
If there is a parent-child relationship between mods that are used at the same time, you can also simplify it as above by using self for the parent mod. e.g.
It can be simplified as follows.
|
|
If you want to bring all the public items under a path into the current scope, you can use * .
|
|
Commonly used in unit tests within general business code files.
This allows all the items in the parent mod to be used in a single-test mod.
Levels
Compare the two pieces of code.
These two methods have the same result, but give a different feeling when reading them. The former is generally recommended because it is clear that the method used is an external method of the hosting module, while in the latter case it is not clear whether the method is imported through use or defined in this module.
Name conflicts
There may be times when an item with the same name is introduced from a different crate or mod, the easiest way to rename it is to use the as keyword.
re-exporting
When an external item is imported into the current scope using the use keyword, the item is private in the current scope, and if you use pub use, you can also let a third party using the current mod use the item introduced in that mod.
This mechanism is called re-exporting.
workspace
The workspace is used to manage multiple related packages, different packages have their own Cargo.toml, but the whole workspace shares a single Cargo.lock and only one target directory (compiled output).
Although the projects in the workspace share a single Cargo.lock, they do not depend on each other by default and need to show the dependencies added between them. And if you want to use the dependency in other projects, you need to declare it again.
However, as far as I can see, the workspace feature is not particularly powerful, and you can manage several Cargo projects at the same time without using this feature, so I won’t go into depth here.