SchemaHero is an open source declarative database schema migration cloud-native tool that converts schema definitions into migration scripts that can be applied in any environment. Written as a CLI tool and Kubernetes Operator, SchemaHero eliminates the task of creating and managing sequential migration scripts that are compatible with all environments in which applications are running.
Many database schema management tools create an imperative interface that requires the developer to know the current state of the schema and the relevant commands to migrate the current schema (and associated data) to the new schema. SchemaHero proposes a declarative interface approach to replace the traditional imperative interface.
Declarative Models
Managing database schema in a declarative manner has the following benefits.
- the ability to comply with change management processes
- repeatable deployment to new environments
- compatibility with new runtimes
In a declarative model, only the current state of the schema is defined and the declarative schema manager takes care of the commands needed to migrate the schema from any previous state to the desired state. The advantage of storing only the current state is that when a new environment or instance is created, the previously used database extensions, tables, and other data will not be needed.
Traditional database engines receive schema changes through a subset of SQL statements called DDL (Data Definition Language). Developers do not need to understand the differences between DDLs for each database engine they target; conversion from a uniform declarative model to the appropriate DDL commands can be handled programmatically, depending on the capabilities and state of the database.
When a declarative schema is used to define database schema management, it is possible to validate the schema against a set of policies before it is applied. This is not easy to do with imperative tools that only store migration scripts. With all the available state needed, database schema can be evaluated against a set of rules to ensure that policies and best practices are implemented.
Data Migration
There are two types of migrations that need to be managed and deployed.
- Schema migration
- Data Migration
Schema migrations can be used to represent in SQL syntax and change the structure of the database. These are often some new tables, column changes, changes to index data, etc. These are commonly written and can always be expressed in idempotent syntax. Different database engines enforce different rules on how to apply these rules. For example, MySQL does not allow schema migration to be performed in a transaction, while Postgres does. schema management is often unique to the way databases are managed, while SchemaHero focuses on handling schema migration.
Less commonly, developers must migrate some data to a new format in the database. This may involve calculating a new column and writing it, or creating new values in code and inserting them into them. Many traditional database management tools combine the tasks of shema migration and data migration into one tool.
SchemaHerois currently focused on schema migration and plans to support data migration in the future.
Useage
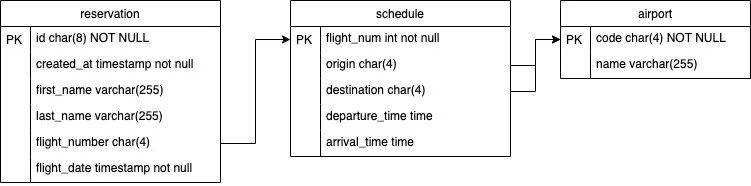
Next we will deploy SchemaHero and a sample database that will design a very basic database for a virtual airline reservation system and deploy it to PostgreSQL.
At first we will deploy an empty database, create an initial schema, and then modify that schema so that it ends up with the following table structure.
Install SchemaHero
Install kubectl plugin
The SchemaHero client component is packaged as a kubectl plugin and distributed through the krew package manager, so first we need to install krew first. After installing krew, use the following command to install the SchemaHero client.
|
|
After installation, you can use the following command to verify if the installation is successful.
|
|
Normally you will see the installed version of SchemaHero (0.12.1 or similar).
Install the components in the cluster
Once the kubectl plugin is installed, we can install the SchemaHero components in the Kubernetes cluster with a single click using the following command
|
|
This command will create a namespace named schemahero-system and deploy a SchemaHero operator. You can confirm that SchemaHero is installed by executing the following command.
|
|
Normally you should see 1 pod running and the output will look something like the following.
Once the client and cluster components have been installed, we can go ahead and connect to the database.
Connecting to the database
Next we need to deploy a PostgreSQL instance and then configure SchemaHero to manage that database instance.
For convenience, I’ll add the rendered YAML file of PostgreSQL’s Helm Chart template directly to the SchemaHero code repository here, which we deploy to a namespace called schemahero-tutorial.
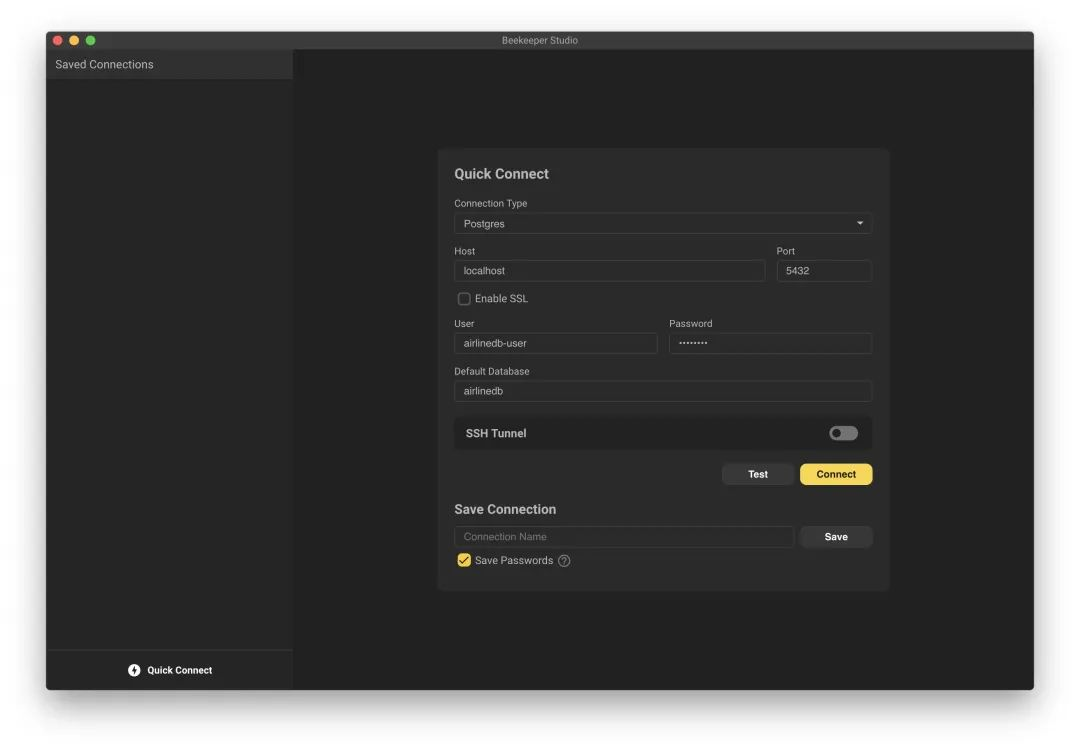
Once PostgreSQL is deployed, we can use the following command to connect to that database instance.
The password for airlinedb-user is password.
Here we use Beekeeper Studio, the database management tool we described earlier, to manage the database instance.
By default, the PostgreSQL instance we deployed above is not accessible outside the cluster, so we can use kubectl to create a port forwarding to expose the database instance.
|
|
Then we can connect to the database 127.0.0.01:5432 using the user airlinedb-user, the database airlinedb and the password password.
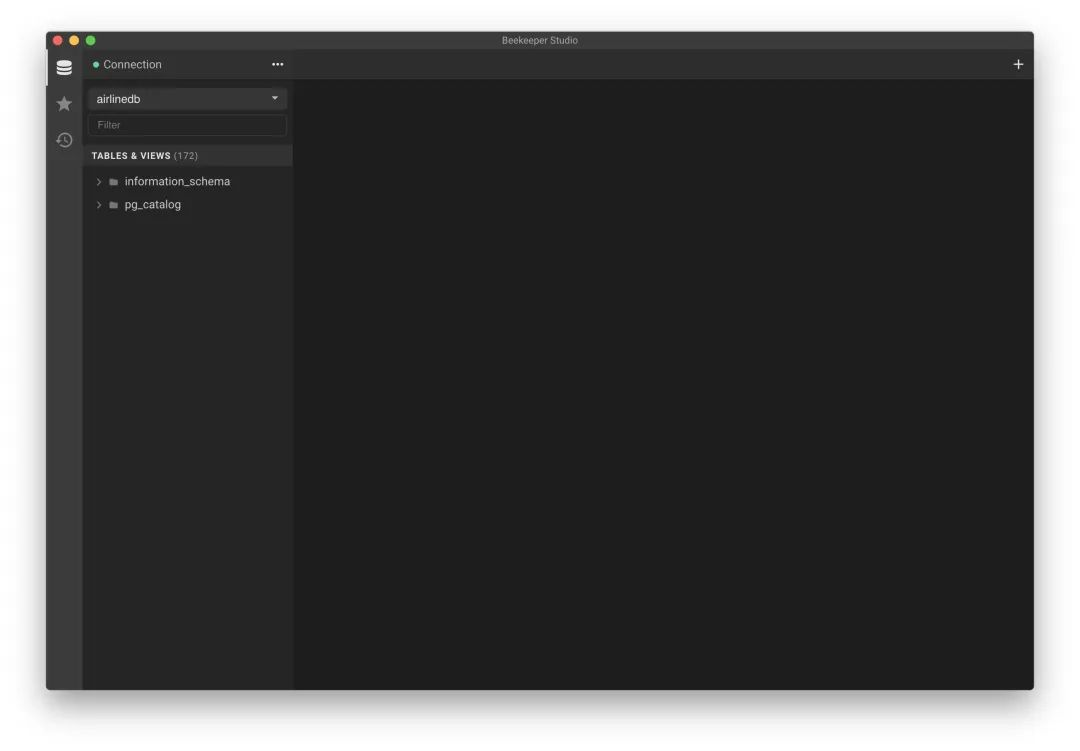
After connecting, you can see that the database is still empty now.
Now that we have SchemaHero and a PostgreSQL instance running in the cluster, we can next provide database information to SchemaHero so that we can manage that database. We can do this by using connection information to deploy custom resources to the cluster.
The database object allows SchemaHero to manage the schema of the database, which is defined in database and includes the name type and connection parameters. Here we create a file named airline-db.yaml with the following contents.
The Database defined above is a CRD object defined by Schemahero, here we are referencing an authentication data from the previous PostgreSQL deployment via a secretKeyRef, SchemaHero supports reading credentials from inline, secrets or HashiCorp Vault to read the credentials.
Just apply the resource object above directly.
Now that we can manage our PostgreSQL instance with SchemaHero, we’ll use SchemaHero to deploy a new table to this instance.
New table creation
In this step, we will deploy several tables to the airlinesdb database created earlier. While performing this operation, we will perform an approval and rejection workflow in SchemaHero to understand how to validate these changes before they are implemented.
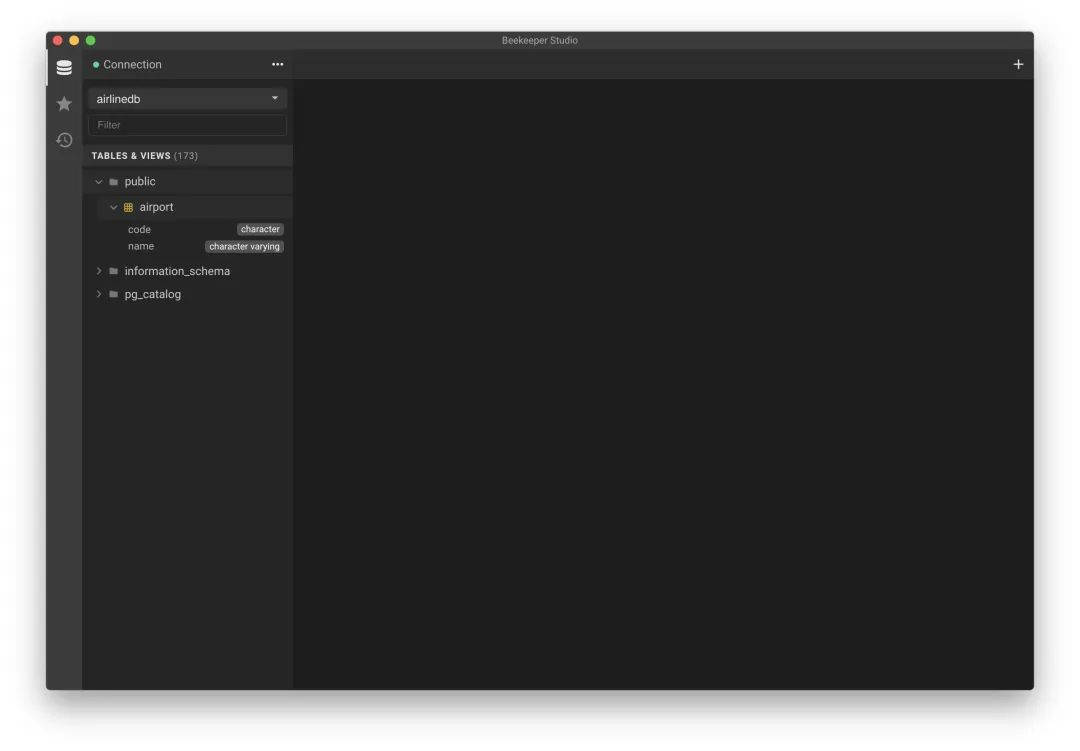
First we define a simple airports table and then use it in our data model when defining routes. In this table we define only 2 columns to represent the airport code and name.
Before using SchemaHero we may write SQL statements as shown below.
And now that we have SchemaHero, we don’t need to write SQL statements, we just need to create a Table custom object for SchemaHero.
Create a resource list file called airport-table.yaml, as follows.
|
|
where spec.database is used to associate the database object defined earlier, spec.name is the name of the real data table in the Postgres database, and then the table structure is defined in spec.schema, primaryKey can be used to specify the primary key, and columns defines the data table’s column definitions.
Again, just apply the resource object directly.
|
|
Note that although we deploy a table object, the table structure does not automatically change. Instead, a new (or edited) table object will generate a migration object that can check and then approve or reject the change. By default, SchemaHero requires an approval process because some database structure migrations can be disruptive, and immediate deployment (without approval) can be enabled by adding properties to the database object.
We can see the migrated objects in the pending state with the following command.
If no resource is found, wait a few seconds and retry. The SchemaHero Operator must complete the plan phase before migration is available.
Before approving this migration, we can look at the SQL statements generated by attaching to the migration object. Get the ID from the output of the previous command and run describe migration.
|
|
At the top of the output, the generated DDL statement is the planned migration, and this is the exact SQL statement that SchemaHero will run to apply this migration.
Later on, SchemaHero provides 3 commands for subsequent steps.
apply: Running this command will accept the SQL statement andSchemaHerowill execute it against the database.recalculate: running this command will instructSchemaHeroto discard the generated SQL statements and generate them again. This is useful if the database structure has changed and you wantSchemaHeroto re-execute the plan.reject: Running this command will reject the migration and not execute it.
For example, we can see here that the current migration is safe and meets expectations, and we can then approve the migration so that SchemaHero can execute the plan by executing the following command.
We can run get migrations again to see the status of the migration.
The message above shows that the migration was scheduled 9 minutes and 38 seconds ago, approved 52 seconds ago, and executed 38 seconds ago.
Now we click on the Refresh button on the Tables & Views heading in the left navigation in the Beekeeper Studio tool and normally we can now see the airport table under public and click on it to see the column data in the table.
Modifying a table
Next, we deploy a table object and modify the table structure.
As before, first we create a schedule table with the structure shown below.
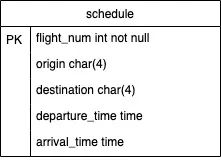
Define a corresponding Table table object as shown below.
|
|
Just apply the list of resources above directly.
When the schedule migration is ready, it will be displayed in the output.
You can also check the corresponding SQL statement after describe and approve the change if it is safe.
|
|
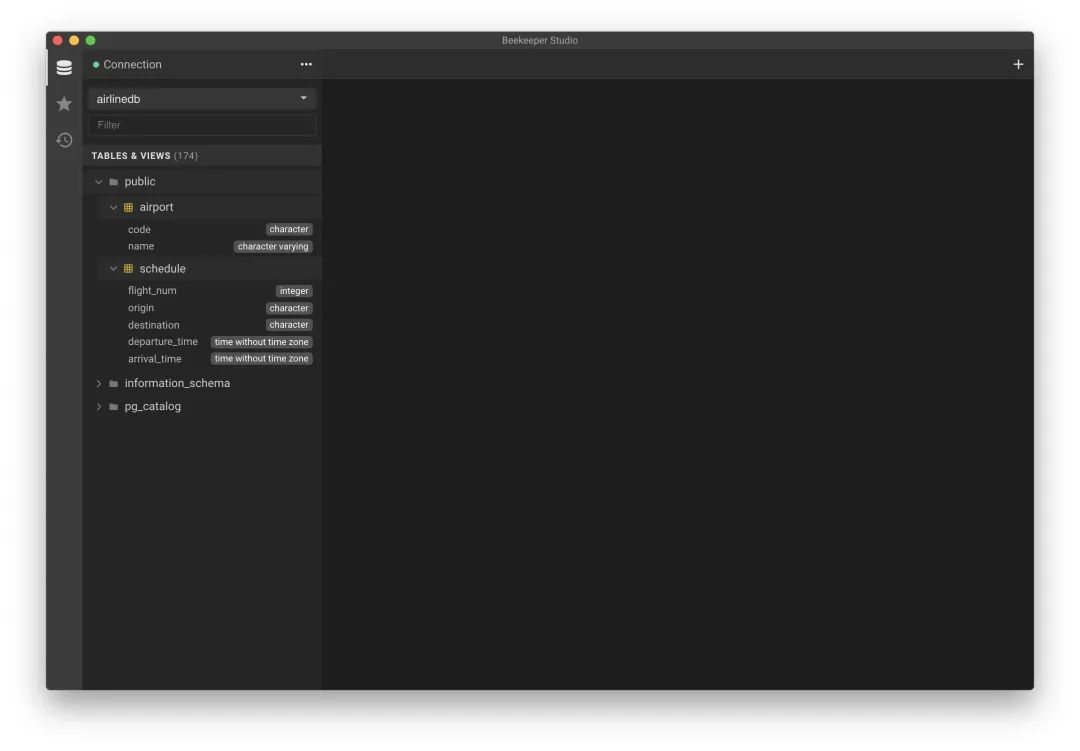
Once approved, you can check if there is a schedule table in Beekeeper Studio now.
Now let’s make some changes to this table structure.
- Make the
departure_timeandarrival_timecolumns empty - Add a new column named
duration
Modify the schedule-table.yaml file above by removing the constraints attribute from the departure_time and arrival_time columns and adding a new one named duration, of type int and without the constraints attribute. The modified file is shown below.
|
|
Re-apply the file after modifying it.
|
|
After applying, you can also view the migration object.
You can see that there is a new migration object in the pending state. Also use the describe command to see the details of the migration.
|
|
In the above message you can see that the DDL statements generated for this migration consist of 3 different statements, SchemaHero compares the YAML we just deployed with the actual database structure and generates the above command.
Again, after verifying that the migration statements are OK, we can simply approve the migration.
The table structure is changed successfully after normal approval.

Here we basically understand the basics of SchemaHero, but of course SchemaHero still needs features not introduced, you can check the official documentation https://schemahero.io/docs/ for more information about it.