Kubernetes’ Service Account is a type of account managed by Kubernetes, which is particularly convenient to manage, but it is not easy to understand the application context when you are new to this type of account. This article is a complete overview that I have read after reading many documents, and I believe it can provide a certain level of understanding of service accounts.
Account Types
There are two types of Kubernetes accounts. 1.
-
User accounts (Normal Users)
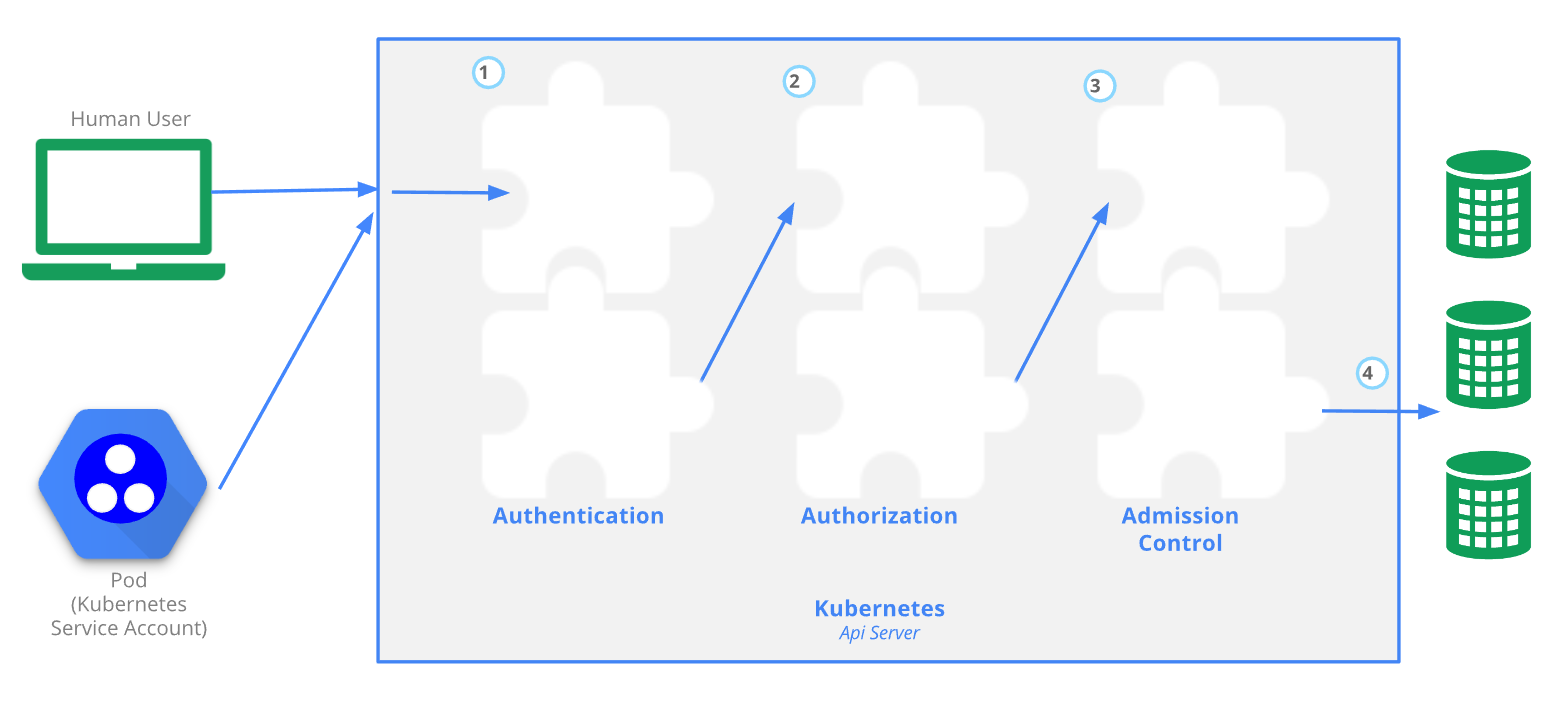
Anyone who wants to connect to and access the Kubernetes cluster needs to create a “User Account” and provide credential information to the client (e.g.,
kubectl) for authentication through the Kubernetes API server.I think the name should be better understood as
User Accounts, but the official Kubernetes website calls it Normal Users. -
Service Accounts
Any container running inside a Pod that wants to access the Kubernetes API server (
kube-apiserver) needs to have a “Service Account” bound to the Pod first in order to pass the authentication of the Kubernetes API server.
Experience the namespace default Service Account
When you create namespace, a service account called default is created for you by default.
-
Create
devnamespace -
Get the
serviceaccountsunder thedevnamespace1kubectl get serviceaccounts --namespace=dev -
Get the contents of the
defaultservice account under thedevnamespace1kubectl get serviceaccounts default -n=dev -o yaml1 2 3 4 5 6 7 8 9 10 11apiVersion: v1 kind: ServiceAccount metadata: creationTimestamp: "2022-08-23T14:55:51Z" name: default namespace: dev resourceVersion: "1434536" selfLink: /api/v1/namespaces/dev/serviceaccounts/default uid: 3b750bc5-fd6c-43b0-9c64-4a4700f522ae secrets: - name: default-token-xpqc7It will automatically bind a
secretsto keep the Token information of the service account. -
Get the
secretscontent bound by thedefaultservice account under thedevnamespace1kubectl get secrets default-token-xpqc7 -n=dev -o yaml1 2 3 4 5 6 7 8 9 10 11 12 13 14 15 16 17apiVersion: v1 data: ca.crt: DATA+OMITTED namespace: ZGV2 token: TOKEN+OMITTED kind: Secret metadata: annotations: kubernetes.io/service-account.name: default kubernetes.io/service-account.uid: 3b750bc5-fd6c-43b0-9c64-4a4700f522ae creationTimestamp: "2022-08-23T14:55:51Z" name: default-token-xpqc7 namespace: dev resourceVersion: "1434535" selfLink: /api/v1/namespaces/dev/secrets/default-token-xpqc7 uid: 868a7d4f-74b8-4be4-8c0e-b9d5a3e678b2 type: kubernetes.io/service-account-token
Experience how Pods use Service Account
-
We start by creating a Pod in the
devnamespace without specifying adefaultservice account.1kubectl run microbot --image=dontrebootme/microbot:v1 -n dev -
In fact, all Pods are added to
defaultservice accounts by defaultIf you don’t specify
spec.serviceAccountNamewhen you create a Pod innamespace, Kubernetes will also add thedefaultservice account in the same namespace by default. Therefore, every Pod must have a service account bound to it.1kubectl get microbot -n dev -o yamlAt this point you will see the following YAML file, with a
serviceAccountName: defaultthat has been automatically set in.1 2 3 4 5 6 7 8 9 10 11 12 13 14 15 16 17 18 19 20 21 22 23 24 25 26 27 28 29 30apiVersion: v1 kind: Pod metadata: labels: run: microbot name: microbot namespace: dev spec: containers: - image: dontrebootme/microbot:v1 imagePullPolicy: IfNotPresent name: microbot resources: {} terminationMessagePath: /dev/termination-log terminationMessagePolicy: File volumeMounts: - mountPath: /var/run/secrets/kubernetes.io/serviceaccount name: kube-api-access-dfs8b readOnly: true dnsPolicy: ClusterFirst enableServiceLinks: true nodeName: microk8s-vm preemptionPolicy: PreemptLowerPriority priority: 0 restartPolicy: Always schedulerName: default-scheduler securityContext: {} serviceAccount: default serviceAccountName: default ...And by default, a
/var/run/secrets/kubernetes.io/serviceaccountdirectory is mounted in the Pod! -
View the
/var/run/secrets/kubernetes.io/serviceaccountdirectory inside the Pod1kubectl exec microbot -it -n dev -- sh1ls -laF /var/run/secrets/kubernetes.io/serviceaccount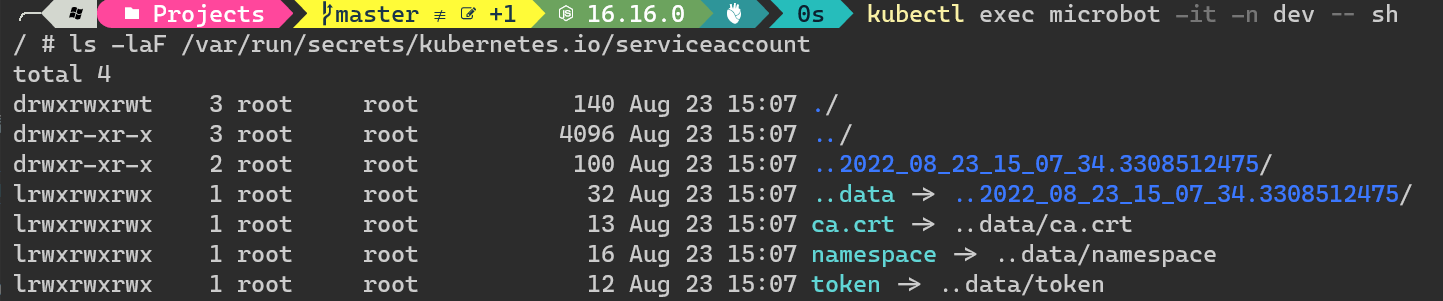
It looks like it automatically mounts all the
secretscontained inserviceaccountsto this directory! -
Send HTTP requests to
kube-apiserverin the Pod’s containerIf TOKEN is not brought in, it will be accessed as
system:anonymousfor anonymous users. -
Bring in the TOKEN of the
defaultservice account to access thekube-apiserverAt this point you will see that the API request has been validated.
This is the standard way to use Service Account in Pod! 👍
Adding Role Permissions to a Service Account
In fact, although this “authenticated” TOKEN can call part of the kube-apiserver API, the default service account does not actually have access to any resources in the K8s cluster. We have to create a Role and assign privileges to it through the RBAC mechanism, and then bind the account through RoleBinding to give it sufficient privileges to access resources.
-
Try to get the
PodListlist first1curl --cacert $CACERT -H "Authorization: Bearer $TOKEN" https://kubernetes.default.svc.cluster.local:443/api/v1/namespaces/dev/pods/You will get the following error message.
1 2 3 4 5 6 7 8 9 10 11 12{ "kind": "Status", "apiVersion": "v1", "metadata": {}, "status": "Failure", "message": "pods is forbidden: User \"system:serviceaccount:dev:default\" cannot list resource \"pods\" in API group \"\" in the namespace \"dev\"", "reason": "Forbidden", "details": { "kind": "pods" }, "code": 403 }At this point we will know that our User is
system:serviceaccount:dev:defaultand our API group is"",namespaceisdevand resource type (kind) ispods.In addition, you can also use the
kubectl auth can-icommand to quickly find out if a specific user has privileges to specific resources, which is quite useful!1kubectl auth can-i get pods -n=dev --as=system:serviceaccount:dev:defaultHe will simply reply to you
yesorno. In its current state, it should replyno! 👍 -
Create
Roleobjects1kubectl create role read-pods -n=dev --verb='get,list' --resource=podsor generate the corresponding YAML file content via the
-dry-run=client -o yamlparameter.1kubectl create role read-pods -n=dev --verb='get,list' --resource=pods --dry-run=client -o yaml -
Create
RoleBindingobjects1kubectl create rolebinding read-pods -n dev --user=system:serviceaccount:dev:default --role=read-podsor generate the corresponding YAML file content via the
-dry-run=client -o yamlparameter.1kubectl create rolebinding read-pods -n dev --user=system:serviceaccount:dev:default --role=read-pods --dry-run=client -o yaml1 2 3 4 5 6 7 8 9 10 11 12 13 14apiVersion: rbac.authorization.k8s.io/v1 kind: RoleBinding metadata: creationTimestamp: null name: read-pods namespace: dev roleRef: apiGroup: rbac.authorization.k8s.io kind: Role name: read-pods subjects: - apiGroup: rbac.authorization.k8s.io kind: User name: system:serviceaccount:dev:defaultThe above syntax can also be written in the
subjects:field, it is actually the same, ServiceAccount (kind: ServiceAccount) (name: default) is GeneralAccount (kind: User) (name: system: serviceaccount:dev:default), but the names are expressed in different ways.First check if the
system:serviceaccount:dev:defaultservice account has been grantedgetpermissions forpods. -
Get the
PodListlist again1curl --cacert $CACERT -H "Authorization: Bearer $TOKEN" https://kubernetes.default.svc.cluster.local:443/api/v1/namespaces/dev/pods/At this point, you should be able to get the complete
PodListlist with detailed information.
Experience creating a new service account
With the above understanding of default service account, I believe it is not difficult to understand the usage of custom service account. Here are the steps to experience it.
-
Create a custom service account
monitorin thedevnamespace1kubectl create serviceaccount monitor -n dev -
Set
RoleandRoleBinding -
Create the Pod using YAML and specify the
serviceAccountName: monitorservice accountA quick way to apply it with PowerShell.
-
Calling the API server from a container in Pods
1kubectl exec microbot -it -n dev -- sh
Summary
Now you should know how to access the resources in the Kubernetes cluster from your application in the Pod.
I used to think that to read ConfigMaps or Secrets from a Pod you had to mount them as volumeMounts or env, but in fact there is no way to apply RBAC licenses via volumeMounts or env. When you want to restrict application access to cluster resources, you have to change the YAML and apply updates, which is not reliable.
Furthermore, it is not very convenient to have to redeploy or restart Deployment every time you change configuration settings.
Now you can access Kubernetes resources directly from your application through a service account, and you can limit the scope of access through the RBAC mechanism, which is both flexible and secure, which I think is great! 👍
Reference
https://blog.miniasp.com/post/2022/08/24/Understanding-Service-Account-in-Kubernetes-through-MicroK8s