Docker is a groundbreaking product that has unleashed the power of computer virtualization and greatly improved the efficiency of application deployment, testing, and distribution. Although we use docker almost every day, there are still some easy to ignore docker knowledge points, today, we will focus on it.
Containers vs. traditional virtual machines
It is often said that “docker is a very good performance virtual machine”, this statement is wrong. docker is lighter than the traditional virtual machine technology, in that docker does not virtualize a set of hardware on the host and run a complete operating system, and then run the required application processes on it. Instead, the processes inside the docker container run directly in the host’s kernel. docker does file system, network, and process isolation, and the container does not have to virtualize the hardware and kernel. This makes docker “lighter, faster, and more instances can be created under the same host” compared to traditional virtual machines.
docker is not a virtual machine, the applications in the container should be executed in the foreground, not like virtual machines, physical machines, like systemd to start background services, there is no concept of background services in the container. For example, people often write this in dockerfile.
|
|
Then people find that the container executes and immediately quits, or even go to use the systemctl command inside the container to manage the service, only to find that it does not execute at all. This is the difference between containers and virtual machines, and still understand containers from the perspective of traditional virtual machines. For docker container, its startup program is the application process of the container, the container exists for the main process, the main process exits, the container loses the meaning of existence, other auxiliary processes are not something it needs to care about. The CMD command service nginx start starts the nginx service as a background daemon, and in fact, service nginx start is eventually translated by the docker engine into the [ "sh", "-c", "service nginx start"] command, so the main process is actually is actually sh. Then when the service nginx start command finishes, sh also finishes, and sh exits as the master process, which naturally causes the container to exit.
The correct way to do this is to execute the nginx executable directly and require it to be run as a foreground.
|
|
Hierarchical Storage
We know that a complete operating system consists of kernel space and user space. From a storage point of view, kernel space is mainly the kernel program that needs to be loaded and started by the bootloader, while the core of user space is rootfs. A docker container does not virtualize a new kernel, but shares the kernel of the host. So for docker images and containers, the main storage structure we are interested in is rootfs. The main difference between Linux distributions is also the rootfs. For example, Ubuntu used UpStart system management service and apt package management, while CentOS uses systemd and yum, but these are differences in the user space, not in the Linux kernel.
The docker image contains the complete rootfs of the operating system, so it is often very large, so at the beginning of the docker design, it takes full advantage of the Union FS technology and is designed as a hierarchical storage architecture. So strictly speaking, images are not packaged files like ISOs, but are actually a set of file systems united in a hierarchical structure.
So the image is built layer by layer, each layer reflects a directive in the dockerfile, and the previous layer is the basis for the next layer. After each layer is built, no further changes will occur, and any changes on the next layer will only happen on the current layer. For example, the operation of deleting a file on the previous layer does not actually delete the file on the previous layer, but only marks it as deleted on the current layer. When the final container is run, it will not see the file, but it will actually follow the image all the time. Therefore, when building the image, you need to be extra careful that each layer contains as much as possible only what needs to be added to that layer, and any extras should be cleaned up before the end of the build for that layer.
The tiered storage feature is useful in that it makes it much easier to reuse and customize images. It is even possible to use a previously built image as a base layer and then add new layers to customize it to your needs and build new images.
For example, we can see the tiered storage structure of the ubuntu:16.04 image with the following command.
|
|
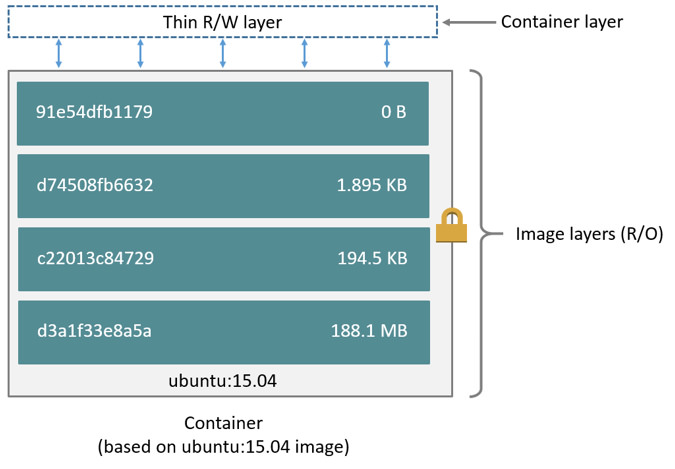
The first column of the above command output represents the layer ID, and the top layer is the ID of the ubuntu:16.04 image. The next few lines are the command stack defined in the dockerfile. As you can see, each step will create a new layer, going all the way back to the base image as the most basic layer. The <missing> part means that the layer is not on the local machine. The last column is the size of each layer, since the last layer just starts bash and no files are changed, so the size is 0. The image we create is on top of the base image, not an exact copy of the base image and then modified, but shares the contents of the base image. If we create a new image, we also share the base image. In addition, modifying the base image will not cause the already created image to be modified as well.
When a container is started based on an image, a new writable layer is added to the top layer of the image, which is usually called the “container layer”, and the layers below it are called the “image layer”. All writes, changes, and deletions that occur within the container occur at the “container layer”; the “image layer” is read-only. The entire container hierarchical storage structure is as shown below.
The size of the containers on the disk can be viewed using the docker ps -s command.
where size represents the size of each container’s writable layer; virtual size represents the total size of the read-only “image layer” plus the container’s writable layer, where multiple containers can share some or all of the read-only “image layer” data. So the total disk space used by each running container is some combination of virtual size and size. If multiple containers start with the same base image, the total size of these containers on disk is the sum of the size of all containers plus the size of one image.
Note: All image container layers are stored in the docker host local storage area and can be listed with the
ls /var/lib/docker/overlay2command.
In addition, the container image tiered storage policy is “copy-on-write” when modification occurs, please refer to the official documentation for the description of the copy-on-write policy. In a nutshell, docker uses a copy-on-modify policy to ensure the security of the base image, as well as higher performance and space utilization. docker images are tiered for resource sharing, and the write-on copy policy for file isolation. Therefore, for the problem of increasing files but not decreasing them, we should do additions and deletions on the same layer to reduce the image size.
Use docker commit with caution
Use the docker commit command to make a new image on top of the base image. Because images are stored in layers, each layer is a modification of the previous layer; containers are also stored in layers, with the image as the base layer and an additional layer on top of it as the container’s runtime storage layer.
As an example, we customize an nginx image using the docker commit command.
|
|
The above command starts an nginx container for us, and we can then request http://localhost to access the services provided by this container. If nothing else, we will see output similar to the following.
|
|
Now we want to customize the output of this image. You can do this by going into the mynginx container as an interactive terminal and starting bash.
We went into the container and modified the files, i.e. changed the storage layer of the container, and can see the exact changes with the docker diff command.
|
|
Then we can commit and save our changes just like git.
You can also use the docker history command to view the change history of a new image.
|
|
Test our new image.
After the above experiment, we can see that docker commit can help us save the container runtime and see the hierarchical storage structure of the docker image. If we look at the results of the previous docker diff mynginx command, we can see that besides our own changes, many files have also been changed, while we have simply modified one file only. When it comes to complex operations such as installing and updating packages, there are a lot of changes that are out of our control and can make the image incredibly bloated. So be careful with the docker commit command, especially in production environments.
In addition, using docker commit means that all operations on the image are black-boxed, and the resulting image is also called a black-box image, which means that no one else knows how the new image was created except the person who created it. Although the docker diff command may give some clues, it is far from being able to ensure consistent image generation, and the maintenance of such black-box images is very painful.
So to customize images, it is recommended to write a dockerfile and save it to a git repository, which is a good solution to the problem of making images that cannot be duplicated, the problem of transparency in image building, etc.
Best practices for the RUN command
The hierarchical nature of docker images dictates that each command in a dockerfile builds a separate layer, and the RUN command is no exception. Each RUN command creates a new layer, executes the commands on it, and when it’s done, commits the changes to that layer to form a new image. So we must be careful not to write multiple meaningless and related commands to different RUN commands when using RUN commands, because it will not only increase the number of image layers, but also some intermediate layers are completely unnecessary to save. In addition, there is a maximum number of layers in Union FS. The previous version of docker specified that the maximum number of layers should not exceed 42, and now the maximum number of layers should not exceed 127. The recommended practice is to use a RUN command and use && to concatenate the associated commands to create a new layer, and preferably with a cleanup at the end of the command, e.g.
|
|
Note: The related cleanup must be done at the same layer where the command is executed, because the image is stored in multiple layers, and things at each layer are not deleted at the next layer.
Image Build Context
Our common operations for building images using dockerfile are as follows.
|
|
See that at the end of the command there is a . . . means the current directory, and dockerfile is in the current directory, so many people think this . is the path to the dockerfile. This is inaccurate, because . is actually specifying the context path of the image build. What is the context?
To understand the context of image building, it is important to know the architecture of docker. docker is a typical CS(Client/Server) architecture software, where the docker engine running as a backend service is the server side, and the actual interaction with end users is the docker client. docker engine exposes a set of Rest API for clients to call to perform various practical functions. While it may appear that we are executing various docker commands locally, in reality, everything is done on the server side using remote calls.
When we build an image, not all customizations are done with the RUN command, often we need to copy some local files into the image, such as through the COPY command, ADD command, and so on. The docker build command builds the image, not locally, but in the server, i.e. the docker engine. So in this CS(Client/Server) architecture, how can we get the local files on the server side?
This introduces the concept of context. When building an image, the user needs to specify the path to build the image context. After the docker build command learns this path, it packages everything under the path and uploads it to the docker engine. Once the docker engine receives this context package, it will expand it and get all the files needed to build the image.
For example, we have a dockerfile like the following.
The COPY command above does not copy package.json from the directory where the dockerfile is located, but rather copies package.json from the context directory to the new image. The source paths in commands like COPY are relative paths. This is why COPY ... /package.json /app or COPY /opt/xxxx /app doesn’t work because those paths are out of the scope of context and the Docker engine can’t get the files in those locations, so if you really need those files, you should copy them to the context directory.
Now take a closer look at the build process and we will see that there is this process of sending context in the build process of the image.
Understanding context is important for image builds to avoid making mistakes that shouldn’t be made. For example, people often put a dockerfile in a directory on their hard drive to build an image, only to find out that docker build is sending a few dozen gigabytes after execution. It’s extremely slow and easy to fail the build. This is because it is asking docker build to pack the entire hard drive, which is clearly a misuse. The recommended practice is to put dockerfile in an empty directory, or in the root of the project. If there are no required files in that directory, then a copy of the required files should be made. If there are things in the directory that you really don’t want to pass to the docker engine at build time, then you can write a .dockerignore with the same syntax as .gitignore, which is used to exclude files or directories in the build context that you don’t want to pass to the docker engine.
Also of interest is that docker build also supports building from URLs (such as git repositories), tar files, and even reading dockerfile from standard input to build images.
COPY and ADD
The COPY command is used to copy files to a new image and is available in two formats.
Using the COPY command, various metadata about the source file is preserved, such as read, write, execute permissions, file change times, etc. This feature is useful for image customization, especially when build-related files are being managed using Git.
The ADD command has basically the same format and nature as COPY, but is a more advanced copy.
-
For example,
<source>can be a URL, in which case the docker engine will try to download the URL’s file to<destination>, and the downloaded file permissions will be automatically set to600, if this is not the desired permission, then an additional layer of RUN will be added to adjust the permissions. In addition, if the downloaded file is a compressed file and needs to be uncompressed, an additional layer of RUN command is also needed to uncompress it.So it makes more sense to just use the RUN command and then use the
wgetorcurltool to download, handle permissions, unpack, and then clean up the useless files. Therefore, this feature is not really practical and is not recommended. -
If
<source>is a tar file, the ADD command will automatically decompress it to<destination>if the compression format isgzip/bzip2/xz.
Also, note that the ADD command will invalidate the image build cache, which may make image builds slower.
So the best practice for choosing between the COPY and ADD directives is to use the COPY directive for all file copies and only use the ADD directive when automatic decompression is required.
CMD and ENTRYPOINT
The CMD command and the ENTRYPOINT command are both used to specify the default container master process startup command.
The CMD command specifies the default boot command and parameters, and at runtime you can specify a new command to replace this default command in the image settings. For example, the default CMD for the ubuntu image is /bin/bash, and if we directly docker run -it ubuntu, we will go directly to bash, or we can specify another command to run at runtime, such as docker run -it ubuntu cat /etc/os- release replaces the default /bin/bash command with cat /etc/os-release to output the system version information.
The default command specified by the ENTRYPOINT command can also be replaced at runtime, but it is slightly more cumbersome than CMD, and requires a new command to be specified via the --entrypoint argument to docker run. Also, when the ENTRYPOINT command is specified, the meaning of the CMD command changes, instead of running the command directly, the content of the CMD command is passed to the ENTRYPOINT command as an argument, in other words, the actual execution will be as follows.
|
|
The ENTRYPOINT command also serves to do some preparatory work before the program is run.
For example, a database such as MySQL may require some database configuration and initialization work to be done before the final MySQL service can be run. In addition, you may want to avoid using the root user to start the service to improve security, but you need to perform some necessary preparation work as root before starting the service, and finally switch to the service user to start the service; or other commands besides the service can still be executed as root to facilitate debugging, etc.
These preparations are independent of the content of the container CMD command, in which case a script can be written and put into the ENTRYPOINT command to be executed, and this script will take the received parameters (i.e. the CMD command) as commands to be executed at the end of the script. For example, in the official redis image, this is done as follows
You can see that the redis user and user group are created for the redis service, and the ENTRYPOINT is specified at the end as the docker-entrypoint.sh script.
The content of the script is based on the CMD content, if it is redis-server, then switch to redis user identity to start the server, otherwise still use root identity to execute, for example