SSH is probably standard on every Linux machine. After writing code for a day job, programmers rarely deploy tests directly on the local machine, and often need to log in to a remote Linux host via SSH for verification. In fact, SSH has many functions, not just remote login, so today we will discuss the SSH protocol and its advanced features in detail.
SSH Principle
SSH is a network protocol for encrypted logins between computers, which means that such logins are secure. SSH is secure because it is based on asymmetric encryption, and the basic process can be described as follows.
- The client initiates a request to log in to the remote host via
SSH user@remote-host. - the remote host receives the request and sends its public key to the client
- The client uses the public key to encrypt the login password and sends it to the remote host
- The remote host uses its own private key to decrypt the login request and obtains the login password, and if it is correct, an SSH channel is established.
Seems to be perfect, doesn’t it? Actually, there is a problem. If someone intercepts the login request and sends his forged public key to the client, the client can’t recognize the reliability of the public key because the SSH protocol is not like the HTTPS protocol where the public key is included in the certificate issued by the certificate center. So an attacker (man-in-the-middle attack) intercepts the login request from the client to the remote host and forges the public key to obtain the login password of the remote host, and the security mechanism of SSH protocol is gone.
To be honest, the SSH protocol itself cannot prevent this form of attack, and it is ultimately up to the end user to identify and avoid the risk.
For example, the first time we log in to one of the remote hosts, we get the following prompt.
This prompt means that the authenticity of the remote host cannot be determined, but only the fingerprint of its public key, and you need to confirm whether you trust the returned public key. The “fingerprint” in this case is the MD5 hash of the asymmetric encryption public key. We know that in order to ensure the security of the asymmetric encryption private key, the general asymmetric encryption public key setting is basically not less than 1024 bits, it is difficult for the end user to confirm the complete asymmetric encryption public key directly, so it is easy to identify the fingerprint by converting it into 128 bits through MD5 hash function. In fact, there are many web applications that use asymmetric encryption public key fingerprint to let end-users identify the reliability of the public key.
The exact decision depends on the end-user, so the recommended practice is to save the public key of the remote host in a suitable place for easy verification.
Next, if the user decides to accept the returned public key, the system will continue to prompt as follows.
|
|
This is followed by the user entering the password to log in to the remote host. The public key of the remote host is stored in the $HOME/.ssh/known_hosts file, so that the next time the user logs in, there is no need to check the fingerprint again. Each SSH user has their own known_hosts file, and there is also a global configuration file, usually /etc/ssh/ssh_known_hosts, that holds the public key of the remote host that can be trusted by all users.
In addition to password login, the SSH protocol also supports public key login. The public key here is no longer the public key of the remote host, but the asymmetric encryption public key of the client, and the principle is simple.
- the user saves the client’s public key on the remote host
- the client initiates a login request to the remote host
- the remote host sends a random string to the client
- The client encrypts it with its own private key and sends it to the remote host
- The remote host uses the saved public key to decrypt, if the decryption is successful, the client is trusted and can confirm the identity without the password
To generate a public-private key pair on the client side, generally use the ssh-keygen tool. For example, we want to generate 2048 bit asymmetric encryption key pair.
|
|
where -b specifies the number of key bits and -t specifies the key type: rsa/dsa/ecdsa.
If the key pair is used for SSH, it is customary to name the private key id_rsa and the corresponding public key id_rsa.pub, which can then be appended to the remote host’s trusted .ssh/authorized_key file using the ssh-copy-id command: $ ssh-copy-id user @remote-host
Sometimes after executing the above command, the client still can’t log in to the remote host, most likely the remote host has disabled the public key login, please check the /etc/ssh/sshd_config file of the remote host and make sure the comment # is removed in front of the following lines.
After saving, you need to restart the SSH service.
Port Forwarding
From the previous introduction, we know that SSH automatically encrypts and decrypts network communication data between the client and the remote host. This feature is sometimes useful for other TCP network applications to create an encrypted channel to transfer network data through SSH, and this is where SSH port forwarding comes in. In fact, upper layer applications such as Telnet, SMTP, LDAP, etc. can benefit from this. If you are working in an environment where the firewall restricts the use of some network ports but allows SSH connections, it is possible to use SSH protocol to communicate by forwarding TCP ports.
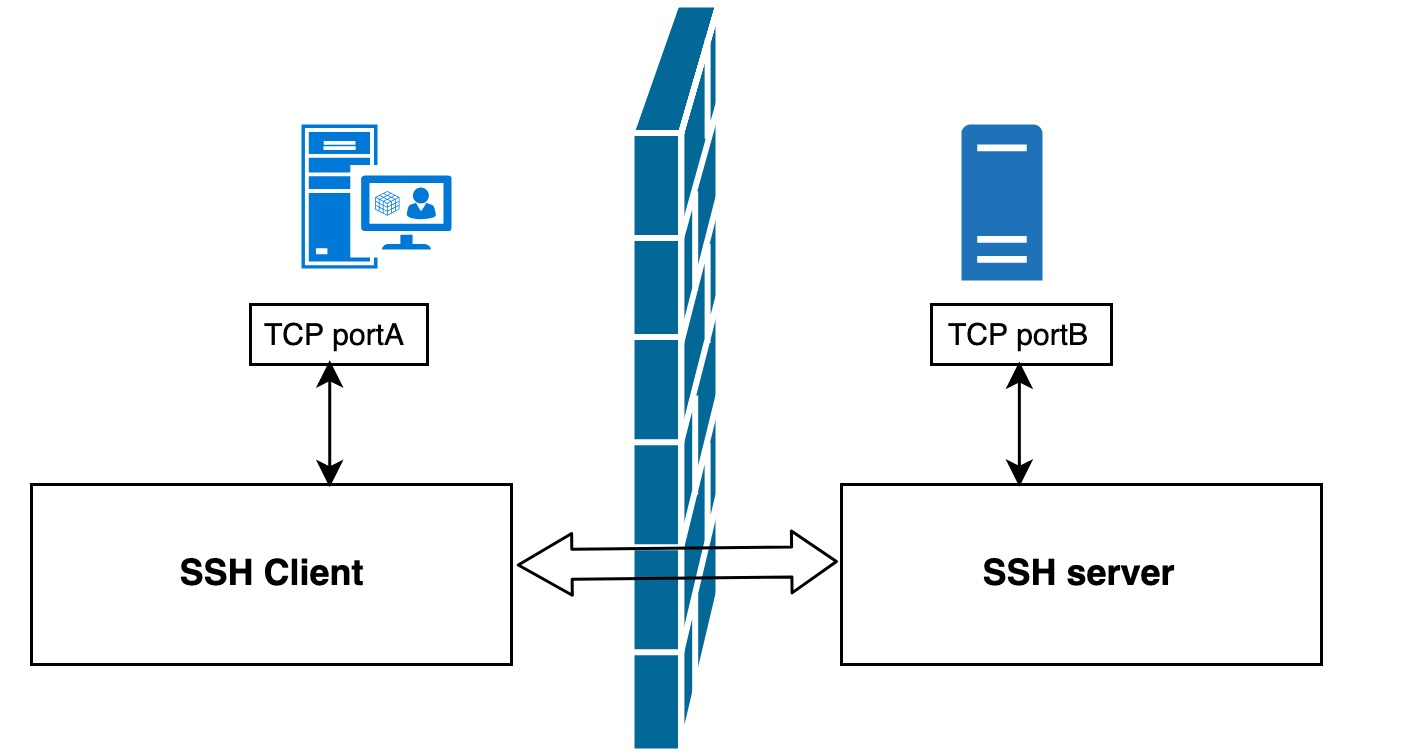
As shown above, with SSH port forwarding, instead of communicating directly between TCP ports A and B, TCP ports A and B are forwarded to SSH clients and servers for indirect communication, which automatically encrypts data and bypasses firewall restrictions at the same time.
In general, port forwarding can be classified as local forwarding, remote forwarding, and dynamic forwarding.
Local forwarding
The basic format of the SSH local forwarding command is as follows.
|
|
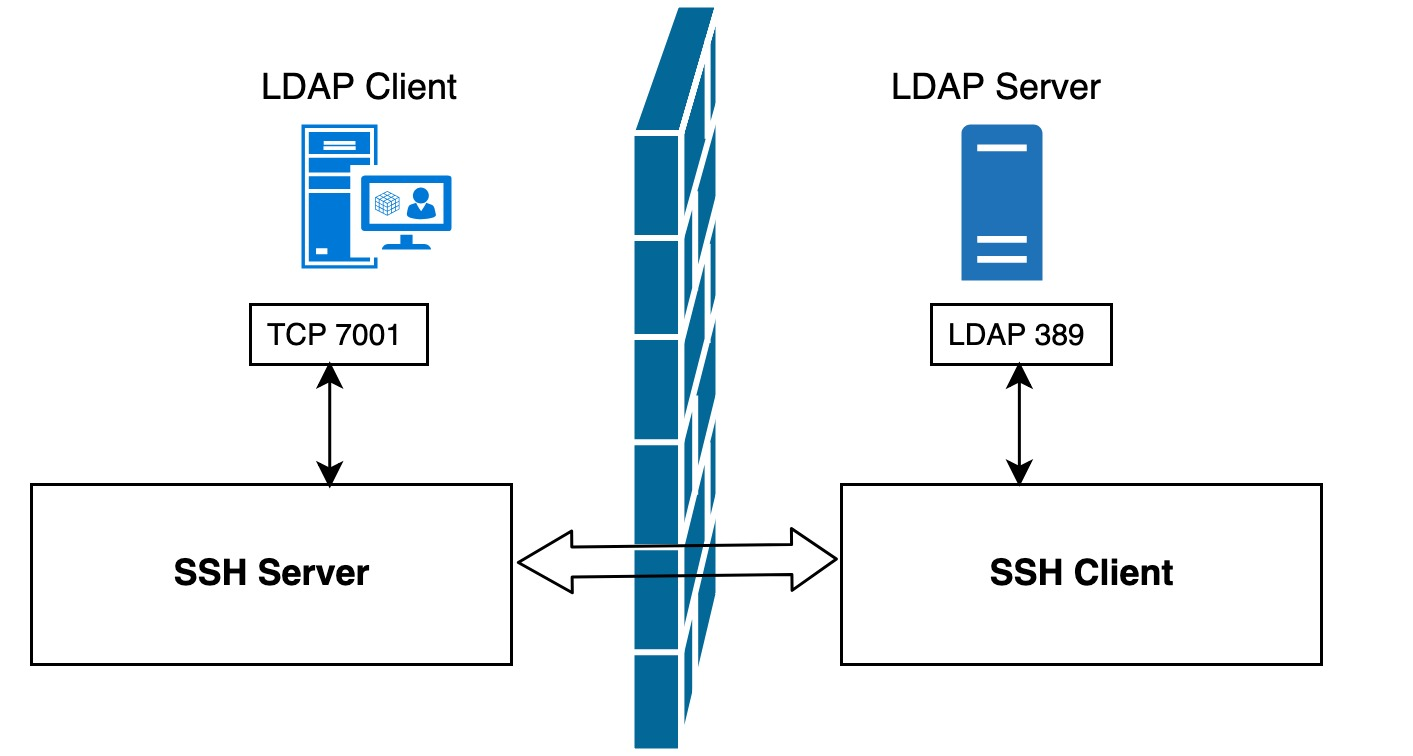
For example, there is an LDAP server in the lab, but there is a restriction that only applications deployed on the local machine can connect to this LDAP server directly. If we want to temporarily connect to this LDAP server from a remote machine for debugging or testing purposes, what is the best way to achieve this?
Using the role of local forwarding, we can execute the following command on the remote login host.
|
|

Note: In this example, we chose port
7001as the local listening port. When choosing the port number, you should note that non-administrators do not have the right to bind to ports1-1023, so it is better to choose an unoccupied port between1024-65535.
Then we can configure the application on the remote machine directly to port 7001 on the local machine (instead of port 389 on the LDAP server). The subsequent data flow transfer will look like the following.
- the application on the LDAP client host sends data to port
7001on the local machine - The local SSH client encrypts the data received on port
7001and forwards it to the SSH server port on the LDAP server side. - the SSH server will decrypt the received data and forward it to the listening LDAP service port
389. - Finally, the data returned from LDAP will be returned the same way to complete the process
As you can see, this whole process application does not connect directly to the LDAP server, but to a local listening port, and SSH port forwarding does all the rest, encryption, forwarding, decryption, etc.
There are a few more things to note here.
-
SSH port forwarding requires that the SSH connection be kept open; once this connection is closed, the corresponding port forwarding will be closed as well. Maintaining SSH connections can be done by adding the
-fparameter after executing the SSH command to keep the SSH connection open and running in the background. -
Why is the
<remote-host>in the above commandlocalhost? Which machine’s loopback interface is it pointing to? In this case, it points to the LDAP server. Why do you uselocalhostinstead of IP address or hostname? It really depends on the LDAP server settings. If the LDAP server restricts access to only the localloopbackinterface, then naturally onlylocalhostor an IP of127.0.0.1can access the LDAP server, not the real IP or hostname -
Do the
<remote-host>and<ldap-server-host>in the command have to be the same machine? Not necessarily, they can be two different hosts. We’ll elaborate on that case later in the example. -
After executing the above command, a port forwarding will be created on the LDAP client host, can this port forwarding be used by other machines? For example, can a new LDAP client host 2 be added to directly connect to port
7001of the current LDAP client host? The answer is no. In mainstream SSH implementations, local port forwarding is bound to theloopbackinterface, which means that onlylocalhostor127.0.0.1can use the local port forwarding, and connections from other machines will only get aconnection refusederror. The good thing is that SSH provides the-gparameter to allow other hosts to connect to the local forwarding port, so that other machines share this local port forwarding.1$ ssh -g -L <local-port>:<remote-host>:<remote-port> <ssh-hostname>
Remote forwarding
The basic format of the SSH remote forwarding command is as follows.
|
|
For example, suppose we cannot connect directly from the LDAP client host to the LDAP server using SSH due to network or firewall reasons, but reverse connections are allowed, then we can access the LADP server through remote port forwarding. Simply execute the following command on the LDAP server host.
|
|
As you can see, compared with local port forwarding, this time only the location of the SSH server and SSH client are switched, but the data flow transmission path is still exactly the same: the application on the LDAP client host sends the data to the local port 7001, and the local SSH server encrypts the data received on port 7001 and forwards it through the SSH tunnel to the The SSH client will decrypt the received data and forward it to the 389 port of the listening LDAP service, and finally return the reply message from LDAP to complete the whole process.
With local forwarding and remote forwarding cleared up, let’s now look at one of the remaining questions: can the <remote-host> and <ssh-hostname> in the local forwarding command be different machines?
|
|
The answer is yes! For example, we have four machines (HostA, HostB, HostC, HostD), where HostA wants to access the LDAP service on HostD, but due to network limitations, HostA can not directly access HostD, but HostA can access HostB, HostB can also SSH to HostC, HostC can directly HostC can directly connect to HostD. How to let HostA access HostD’s LDAP service through SSH port forwarding? We just need to perform local port forwarding on HostB.
|
|
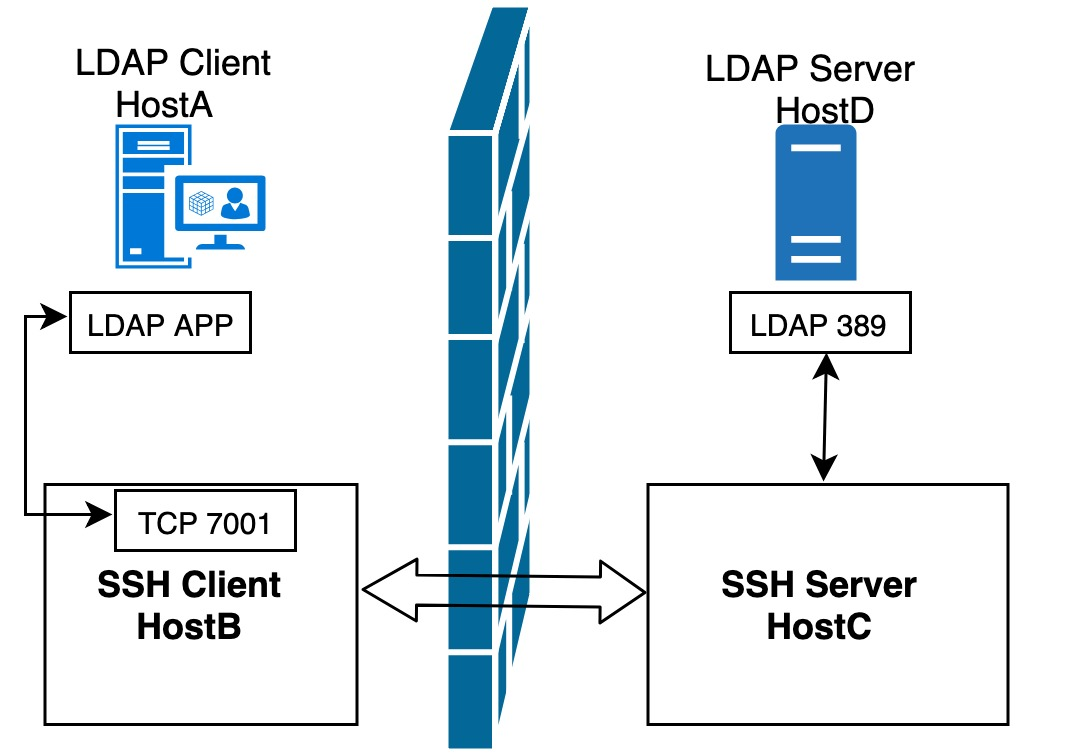
In this way, application client HostA can access the LDAP service of HostD by accessing the 7001 port of HostB. Note that we specify the -g parameter in the command to ensure that HostA can use the local port forwarding established by HostB.
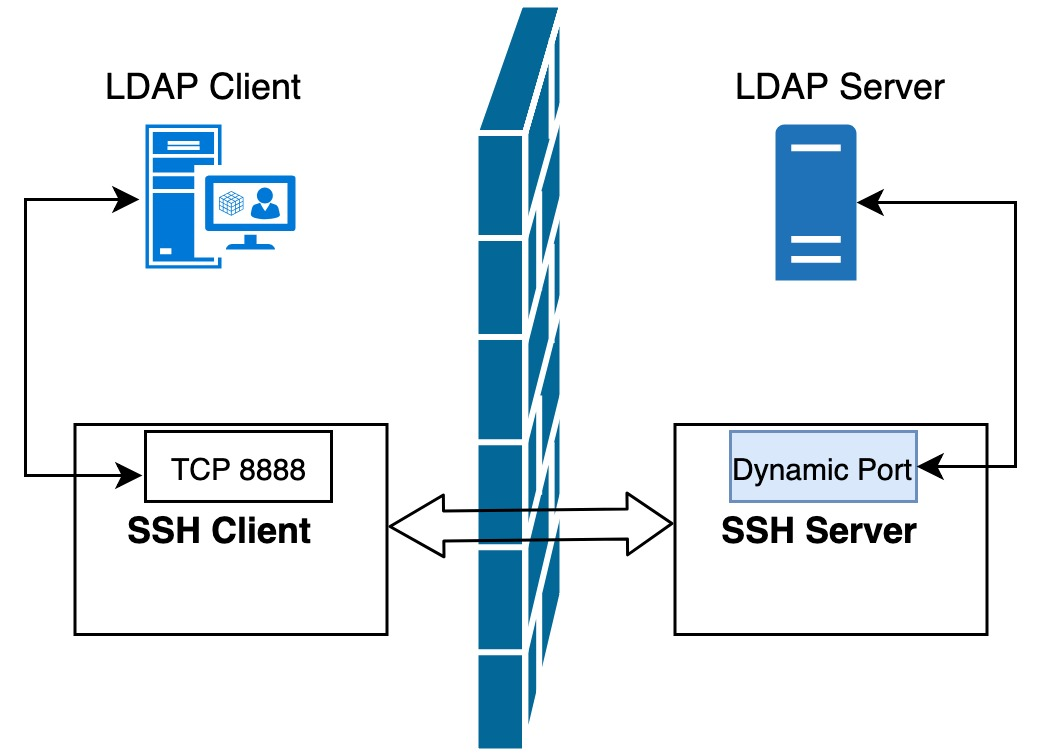
Dynamic forwarding
After the previous introduction, we found that both local forwarding and remote forwarding require a fixed port number for the application server, such as port 389 for the LDAP service in the previous example. Compared to the single port forwarding mode of local forwarding and remote forwarding, dynamic forwarding is a bit more powerful port forwarding without specifying the port of the accessed target host. This port number needs to be specified locally via a protocol that is the simple, secure and useful SOCKS protocol.
Command format for dynamic forwarding.
|
|
For example, after executing the following command on the local machine, SSH will create a SOCKS proxy server for us, and all data sent to the local 8888 port will be forwarded to the remote host. Next, we can set the SOCKS proxy directly in the browser: localhost:8888, so that websites that are not accessible on the local machine can now be accessed normally through the remote host proxy.
|
|
SSH port forwarding has some other very useful parameters.
-
-Nparameter, which means that only the remote host is connected and no remote shell is opened -
-Tparameter, which means no TTY is assigned to this connectionThese two parameters can be used together to mean that the SSH connection will only be used for data transfer and will not perform remote operations.
1$ ssh -NT -D 8888 user@remote-host -
The
-fparameter indicates that the SSH connection is running in the background after a successful connection. This allows you to perform other operations in the local shell without interrupting the SSH connection. To close this background connection, you need to use the kill command to kill the corresponding process.
In addition, SSH also supports other forms of port forwarding, such as port forwarding for GUI applications that support the X protocol, which will not be described in detail here.