For many people who are new to the cloud-native technology stack, container networking and Kubernetes networking has been a “mystery” and a bottleneck in the upward curve of many people’s container technologies, but it is also a topic that we can’t get around when we dive into the cloud-native world. To thoroughly understand container networking and Kubernetes networking, you need to understand many underlying networking concepts, such as the OSI seven-layer model, the Linux networking stack, virtual network devices, and iptables.
Kubernetes Network Model
Both container networks and Kubernetes networks need to address the following two core issues.
- management of container/Pod IP addresses
- inter-container/Pod communication
The management of container/Pod IP addresses includes the allocation and recovery of container IP addresses, while the mutual communication between containers/Pods includes two scenarios: between containers/Pods of the same host and between containers/Pods of cross-host communication. These two issues cannot be viewed completely separately, as different solutions often have to consider both of these points. While it is relatively easy to implement communication between containers/pods on the same host, the actual challenge lies in the fact that different containers/pods may be distributed on different cluster nodes, and it is not an easy task to implement communication across host nodes.
If SDN (Software define networking) is not used to modify the configuration of the underlying network devices, the mainstream solution is to build a new overlay network in the underlay network plane of the host node responsible for transporting the communication data between containers/pods. There are different implementations of this networking scheme in how to reuse the original underlay network plane.
- encapsulating the container packets into the Layer 3 or Layer 4 packets of the original host network (underlay network plane), and then transmitting them to the target host using the Layer 3 or Layer 4 protocols of the host network, and then forwarding them to the target container after the target host has unpacked them.
- adding the container network to the host routing table and treating the host network (underlay network plane) device as a container gateway, forwarding it to the specified host through routing rules to achieve three-layer intercommunication of containers.
For the sake of simplicity, we mainly implement the network model described in Scenario 2, and the packet flow of the communication network between containers/Pod is roughly shown in the figure below.
CNI Specification
The CNI specification is less constrained and more open to developers than the CNM (Container Network Model), and is not dependent on the container runtime, so it is also simpler. See the official documentation for more information about the CNI specification.
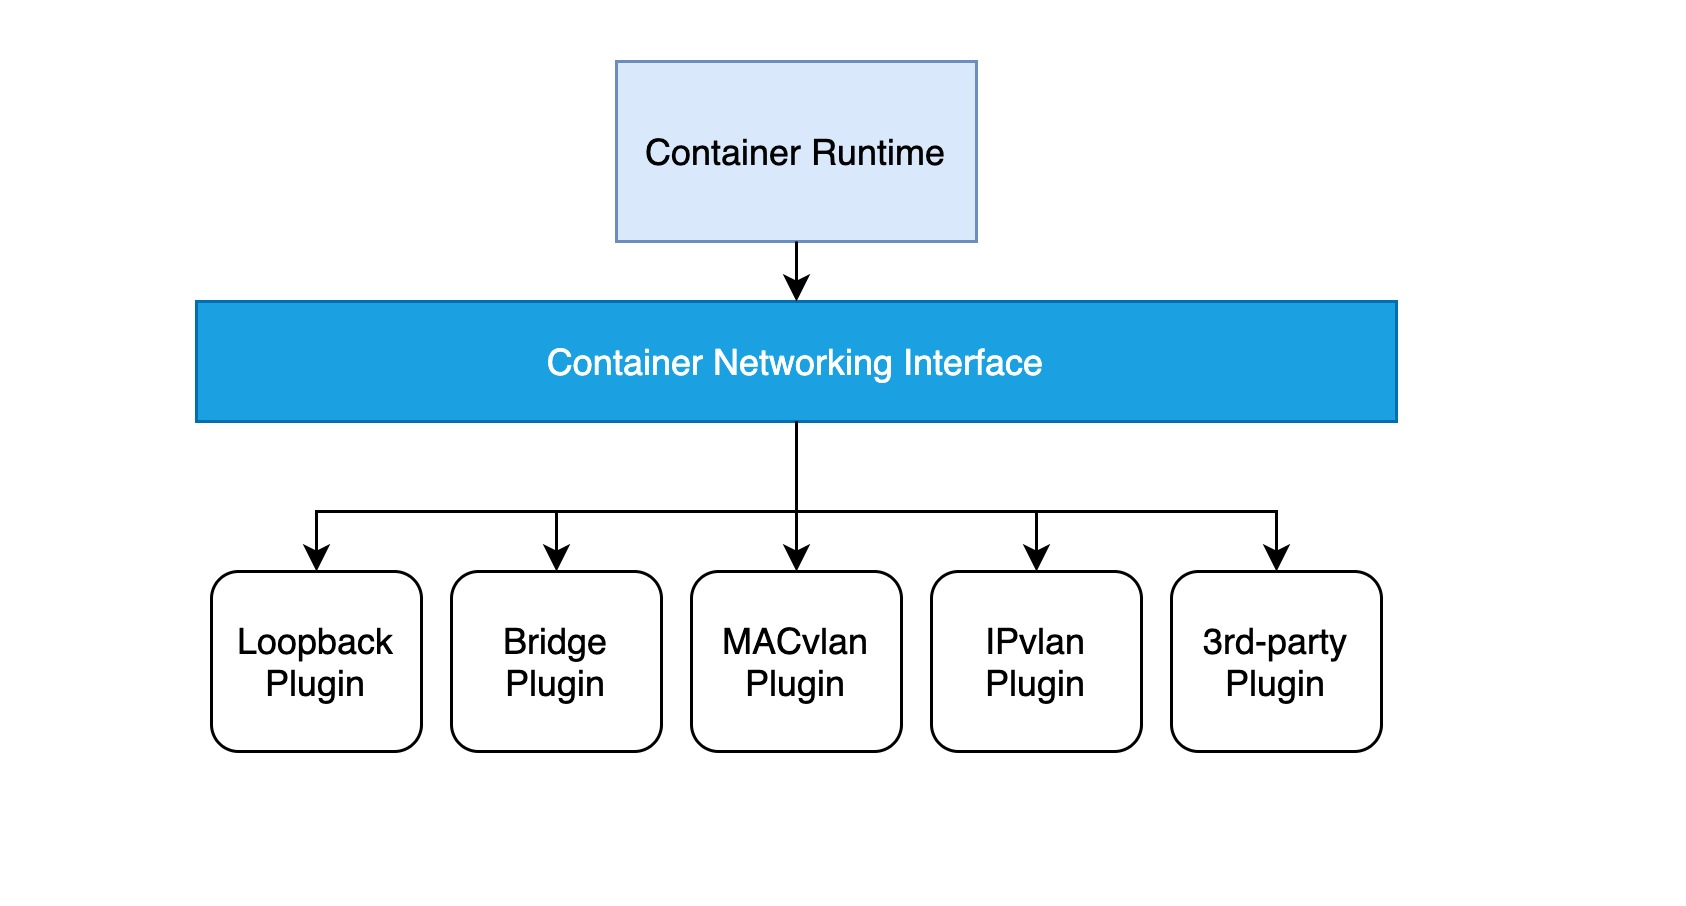
The implementation of a CNI web plugin requires only a configuration file and an executable file:
- a configuration file describing basic information such as the version, name, and description of the plug-in.
- the executable is invoked by the upper-level container management platform, and a CNI executable needs to implement ADD operations to add containers to the network and DEL operations to remove containers from the network, etc.
The basic workflow of Kubernetes using the CNI network plugin is as follows.
- the kubelet first creates the pause container to create the corresponding network namespace.
- Calling specific CNI plug-ins according to the configuration can be configured as a chain of CNI plug-ins to make chain calls.
- when the CNI plug-in is invoked, it gets the necessary information such as network namespace, container’s network device, etc. based on environment variables and command line arguments, and then performs ADD or other operations.
- the CNI plug-in configures the correct network for the pause container, and all other containers in the pod reuse the network of the pause container.
kubeadm Build Kubernetes Cluster
In order to build a development test environment for CNI, we first need a running Kubernetes cluster. In fact, there are many tools available to help us quickly create a Kubernetes cluster, but the easiest and most common way to quickly build a cluster is to use the official Kubernetes kubeadm. Another reason for choosing kubeadm is that it allows us to choose the right CNI components to install on our own, so we have the opportunity to deploy our developed CNI plugins on a pure kubernetes cluster and test if the related features work properly.
If we have installed the dependencies according to the official documentation, when initializing a cluster master node using kubeadm we need to specify the CIDR of the cluster pod network with the parameter --pod-network-cidr This is an important parameter for writing the “CNI assign pod IP address “. In fact, kubeadm usually specifies a 16-bit network when initializing the cluster, and then divides a separate 24-bit subnet for each node based on this, and the real pod IP addresses are derived from the 24-bit subnets of the nodes. Since the nodes are in different subnets, cross-node communication is essentially a three-layer communication, so we can reuse the nodes’ original networks by modifying node routes or building IPIP tunnels.
Next, we use kubeadm to initialize a master node.
|
|
Then another worker node is added to the cluster.
|
|
Next, configure kubectl on the master node to connect to the cluster created above.
Now we can view the status of the cluster nodes.
The output of the above command shows that all nodes are in the “NotReady” state, which is normal because we have not installed any CNI yet, so the kubelet on the cluster node will detect and report the status of the cluster node as “NotReady “. In fact, if we deploy a pod that is not “hostNetwork” at this time, it will be in a “pending” state because the cluster scheduler cannot find a “ready “However, for kubernetes system components such as apiserver, scheduler, controllermanager, etc., because they are “hostNetwork” pods, the system pods can be deployed even if the CNP is not installed.
CNI configuration file
Now we come to the critical part. In general, CNI plugins need to run on each node of a cluster. In the CNI specification, a CNI plugin first needs a configuration file in JSON format, which needs to be placed in the /etc/cni/net.d/ directory of each node, usually named <number>-<CNI-plugin>.conf, and the configuration file needs at least the following mandatory fields.
cniVersion: string version number of the CNI plug-in, required to conform to Semantic Version 2.0 specification.name: the network name in string form.type: the runnable file of the CNI plug-in in string form.
In addition to this, we can also add some custom configuration fields for passing parameters to the CNI plug-in, which will be passed to the CNI plug-in at runtime. In our example, the device name of each host bridge, the maximum transmission unit (MTU) of the network device, and the 24-bit subnet address assigned to each node need to be configured, so the configuration of our CNI plug-in will look like the following.
Note: Make sure the configuration file is placed in the
/etc/cni/net.d/directory, which is where kubelet looks for CNI plugin configurations by default; and, plugin configurations can be run as multiple plugin chains, but for simplicity, in our case, only a single standalone CNI plugin is configured, as the configuration file has the.confsuffix.
Core implementation of the CNI plugin
Let’s start looking at how to implement the CNI plugin to manage pod IP addresses and configure container network devices. Before we do this, we need to make it clear that the CNI intervention occurs after the kubelet creates the pause container with the corresponding network namespace, and that when the CNI plug-in is invoked, the kubelet will pass the relevant commands and parameters to it in the form of environment variables. These environment variables include
CNI_COMMAND: CNI operation commands, including ADD, DEL, CHECK and VERSIONCNI_CONTAINERID: container IDCNI_NETNS: pod network namespaceCNI_IFNAME: pod network device nameCNI_PATH: path to search for CNI plug-in executablesCNI_ARGS: optional additional parameters, similar tokey1=value1,key2=value2...
At runtime, the kubelet looks for the CNI executable through the CNI configuration file and then performs the relevant operations based on the above-mentioned environment variables. operations that must be supported by the CNI plugin include
- ADD: adds the pod to the pod network
- DEL: removes the pod from the pod network
- CHECK: Check that the pod network is configured properly
- VERSION: Returns the version information of the optional CNI plugin
Let’s jump directly to the entry function of the CNI plug-in.
|
|
As you can see, we first call the GetArgsFromEnv() function to read in the CNI plug-in’s operation commands and related parameters via environment variables, and get the CNI plug-in’s JSON configuration from the standard input, and then execute different processing functions based on different CNI operation commands.
Note that we implement the set of handler functions as an interface so that it is easy to extend the different interface implementations. In the most basic version of the implementation, we base the IP information allocated by the file store. However, there are many problems with this implementation, such as unreliable file storage and possible conflicts between reads and writes. In subsequent versions, we will implement an interface implementation based on kubernetes storage, which stores subnet information and IP information in the apiserver, thus enabling reliable storage.
Next, let’s see how the file-based interface implementation handles these CNI operation commands.
For the ADD command.
- obtain the configuration information of the CNI plug-in from the standard input, most importantly the device name of the current host bridge, the maximum transmission unit (MTU) of the network device, and the 24-bit subnet address assigned to the current node.
- then find the corresponding CNI operational parameters from the environment variables, including the pod container network namespace and the pod network device name, etc.
- next create or update the node host bridge by extracting the gateway address of the subnet from the 24-bit subnet address assigned to the current node, ready to be assigned to the node host bridge.
- Next, read the list of assigned IP addresses from the file, iterate through the 24-bit subnet addresses and extract the first unassigned IP address information from it, ready to assign to the pod network device; the pod network device is a veth device pair, with one end in the pod network namespace and the other end connected to the bridge device on the host, while all the pod network devices treat the bridge device on the host as the default gateway. bridge device on the host as the default gateway.
- After the final success, you need to write the new pod IP to the file.
Seems simple enough, right? Actually, as the simplest way, this solution allows for the most basic ADD functionality.
|
|
A key question is how to choose the right Go language library functions to manipulate Linux network devices, such as creating bridge devices, network namespaces, and connecting veth device pairs. In our case, the more mature netlink was chosen. In fact, all commands based on the iproute2 toolkit have corresponding APIs in the netlink library, for example ip link add can be implemented by calling the AddLink() function.
One other issue that requires extra care is dealing with network namespace switching, Go goroutine and thread scheduling. In Linux, different OS threads may set up different network namespaces, and the Go goroutine dynamically switches between OS threads based on the load of the OS threads and other information, which may cause the Go goroutine to switch to a different network namespace in unexpected situations.
It is safer to use the runtime.LockOSThread() function provided by the Go language to ensure that a specific Go goroutine is bound to the current OS thread.
For the return of an ADD operation, ensure that the return information of the ADD operation is written to the standard output after the operation succeeds.
|
|
The other three CNI operations are much simpler to handle. the DEL operation simply recalls the assigned IP address and removes the corresponding entry from the file. we do not need to handle the deletion of pod network devices because they are automatically deleted after the kubelet deletes the pod network namespace. the CHECK command checks the previously created network devices against the configuration, which is optional for now. The VERSION command outputs the CNI version information as JSON to the standard output.
|
|
CNI Installation Tool
The CNI plugin needs to run on each node in the cluster, and the CNI plugin configuration information and runnable files must be in a special directory on each node, so installing the CNI plugin is ideal for using DaemonSet and mounting the CNI plugin directory. To avoid the installation of the CNI tools not being scheduled properly, we need to use hostNetwork to use the network of the host. Also, mount the CNI plug-in configuration as ConfigMap so that it is easy for end-users to configure the CNI plug-in. For more detailed information, please see Installing Tool Deployment Files.
It is also important to note that in the script that installs the CNI plugin, we get the 24 subnet information from each node segmentation, check if it is legal and then write it to the CNI configuration information.
|
|
Deployment Testing CNI
-
Deployment
With the deployment tools in the previous section, installing and deploying CNI is as simple as running a command on a machine that can connect to the cluster.
1kubectl apply -f deployments/manifests/minicni.yamlTo ensure a successful CNI deployment.
-
Testing
Deploy netshoot and httpbin on the master and worker nodes respectively.
Ensure that all pods are up and running.
1 2 3 4 5 6# kubectl get pod -owide NAME READY STATUS RESTARTS AGE IP NODE NOMINATED NODE READINESS GATES httpbin-master 1/1 Running 0 2m3s 172.18.0.3 k8s-master <none> <none> httpbin-worker 1/1 Running 0 2m3s 172.18.1.3 k8s-worker <none> <none> netshoot-master 1/1 Running 0 2m3s 172.18.0.2 k8s-master <none> <none> netshoot-worker 1/1 Running 0 2m3s 172.18.1.2 k8s-worker <none> <none>After that, test the following four types of network communication to see if they work.
-
pod to host communication
1 2 3 4 5 6 7 8 9# kubectl exec -it netshoot-master -- bash bash-5.1# ping 10.11.82.197 PING 10.11.82.197 (10.11.82.197) 56(84) bytes of data. 64 bytes from 10.11.82.197: icmp_seq=1 ttl=64 time=0.179 ms 64 bytes from 10.11.82.197: icmp_seq=2 ttl=64 time=0.092 ms ^C --- 10.11.82.197 ping statistics --- 2 packets transmitted, 2 received, 0% packet loss, time 1019ms rtt min/avg/max/mdev = 0.092/0.135/0.179/0.043 ms -
pod communication to other hosts
1 2 3 4 5 6 7 8 9# kubectl exec -it netshoot-master -- bash bash-5.1# ping 10.11.82.113 PING 10.11.83.113 (10.11.82.113) 56(84) bytes of data. 64 bytes from 10.11.82.113: icmp_seq=1 ttl=63 time=0.313 ms 64 bytes from 10.11.82.113: icmp_seq=2 ttl=63 time=0.359 ms ^C --- 10.11.82.113 ping statistics --- 2 packets transmitted, 2 received, 0% packet loss, time 1030ms rtt min/avg/max/mdev = 0.313/0.336/0.359/0.023 ms -
Same node pod-to-pod communication
1 2 3 4 5 6 7 8 9# kubectl exec -it netshoot-master -- bash bash-5.1# ping 172.18.0.3 PING 172.18.0.3 (172.18.0.3) 56(84) bytes of data. 64 bytes from 172.18.0.3: icmp_seq=1 ttl=64 time=0.260 ms 64 bytes from 172.18.0.3: icmp_seq=2 ttl=64 time=0.094 ms ^C --- 172.18.0.3 ping statistics --- 2 packets transmitted, 2 received, 0% packet loss, time 1018ms rtt min/avg/max/mdev = 0.094/0.177/0.260/0.083 ms -
Cross a node, pod-to-pod communication
1 2 3 4 5 6 7 8 9# kubectl exec -it netshoot-master -- bash bash-5.1# ping 172.18.1.3 PING 172.18.1.3 (172.18.1.3) 56(84) bytes of data. 64 bytes from 172.18.1.3: icmp_seq=1 ttl=62 time=0.531 ms 64 bytes from 172.18.1.3: icmp_seq=2 ttl=62 time=0.462 ms ^C --- 172.18.1.3 ping statistics --- 2 packets transmitted, 2 received, 0% packet loss, time 1001ms rtt min/avg/max/mdev = 0.462/0.496/0.531/0.034 ms
-
Potential Problems and Future Outlook
-
By default, pod-to-pod network packets on the same host are dropped by the Linux kernel by default, because Linux treats network packets in non-default network namespaces as external packets by default; see the discussion on stackoverflow for more details on this issue. For now, we need to manually add the following iptables rule on each cluster node to allow pod-to-pod network packets to be forwarded smoothly using the following command.
-
For cross-node pod-to-pod network packets, you need to add the host’s routing table like Calico to ensure that pod traffic destined for each node is forwarded through the node. Currently these routing tables need to be added manually.
Note:
172.18.1.0/24in the above command is the 24-bit subnet address of the worker node and10.11.82.197is the IP address of the worker node; correspondingly,172.18.0.0/24is the 24-bit subnet address of the master node and10.11.82.113is the IP address of the is the IP address of the worker node.
In addition, as mentioned before, using file storage to distribute IP address information is unreliable and prone to conflicts. A more reliable approach is to use kube-apiserver to store this information and connect to kube-apiserver directly from the CNI plugin, so that dynamic expansion of cluster node information and dynamic addition of node routes can also be handled well.
Ref
https://morven.life/posts/create-your-own-cni-with-golang/