Write a Java HTTP application that starts listening on port 8000 and returns hello world after executing curl localhost:8000/hello, which can be packaged into an executable jar and then imaged using the following Dockerfile.
Place app.jar and Dockerfile in a separate folder and execute the docker image build command.
|
|
I’ve pushed oci-demo-app:v0 to Dockerhub, you can pull the image via docker pull zengxu/oci-demo-app:v0 and reproduce the results posted in this article on your own computer.
Run the container with docker run and you can then access the service via HTTP requests.
|
|
The Docker commands used above demonstrate the following functionality.
docker build, the image build functiondocker push/pull, image storagedocker run -p, image decompression, container run and container network setup (run container based on image file and map container network port 8000 to host network port 8000)
The advent of OCI
Docker is too much for Kubernetes, especially as Kubernetes matures and becomes the de facto standard for container orchestration
- Kubernetes doesn’t need image build functionality
- Kubernetes only needs image pulling
- Kubernetes has its own CNI networking plugin, so it doesn’t need Docker’s networking capabilities either
- …
So in 2015, with the support of the Linux Foundation, there was the Open Container Initiative (OCI) (which is functionally the organisation responsible for developing the Open Community Container Standard).
The Open Container Initiative (OCI) is a lightweight, open governance structure (project), formed under the auspices of the Linux Foundation, for the express purpose of creating open industry standards around container formats and runtime. The OCI was launched on June 22nd 2015 by Docker, CoreOS and other leaders in the container industry.
Docker has donated its container format and runtime runC to OCI, which has developed 2 standards based on it: the runtime standard Runtime Specification (runtime-spec) and the image standard Image Specification (image-spec).
The runtime-spec is simply a specification of how to get the container running once you have the folder and configuration file (we’ll show how simple it is below!).
The Runtime Specification outlines how to run a “filesystem bundle” that is unpacked on disk.
image-spec is so verbose that OCI doesn’t post what it does in the introduction to the front page. It actually specifies the format in which images should be organised into file layers and how image configuration files should be written. You can ignore it for now, as the following section will show you what an OCI image really is.
This specification defines how to create an OCI Image, which will generally be done by a build system, and output an image manifest, a filesystem (layer) serialization, and an image configuration. At a high level the image manifest contains metadata about the contents and dependencies of the image including the content-addressable identity of one or more filesystem serialization archives that will be unpacked to make up the final runnable filesystem. The image configuration includes information such as application arguments, environments, etc. The combination of the image manifest, image configuration, and one or more filesystem serializations is called the OCI Image.
What is an image
Why is it necessary to understand what an image is in order to understand the specification?
What’s in a Docker image
Export the image with the docker image save command, unpack it with the tar command, and use the tree command to get the image file structure. Yes, the image is a tar archive and contains multiple layer.tar archives.
|
|
manifest.json declares the image’s configuration, tag and the layers it contains, while each layer folder contains a json file declaring the current layer’s configuration and its own parent layer, in fact each layer is an image that is then combined to form a new image. This layering of images allows the storage implementation to handle Push and Pull by simply transferring the non-existent layers. The oci-demo-app:v0 hierarchy is as follows.
|
|
If you look at the json config file, you will find the EntryPoint previously declared in the Dockerfile, which also contains the Linux std, tty and the familiar Java environment variables.
|
|
If we follow the relationship of the layers in the archive, starting at the top level and unpacking the files one by one and then merging them into a directory tree, we get the container runtime filesystem.
|
|
In fact, if you export the container filesystem via the docker export command, you will also get that file structure.
|
|
Converting a Docker image to an OCI image
Use skopeo to copy the remote image copy locally in OCI format.
|
|
The resulting OCI format image consists of the following parts
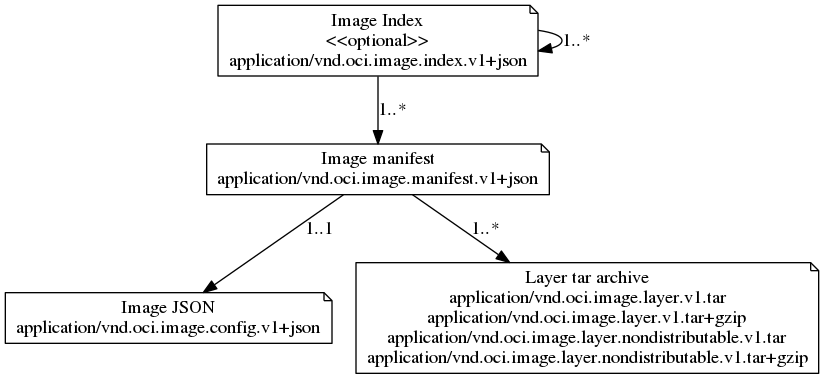
- index.json, as the name suggests, an index file that points to a list of manifest files for the image, one for each version if the image contains multiple versions of the package for different platforms
- oci-layout, a json file with a single field
imageLayoutVersion, which specifies the current version of the image organization, currently1.0.0. - blobs/sha256, sh256 indicates the algorithm used for each file signature (i.e. filename) and contains the image mafifest file, the image config file and a series of layer compression files, which are in .tar.gz format, unlike those exported by the docker client
|
|
The image manifest file can be found immediately based on index.json, and the OCI format is more descriptive than the direct docker export.
application/vnd.oci.image.config.v1+json, the configuration file in json format, the same as exported by docker above.application/vnd.oci.image.layer.v1.tar+gzip, the image layer, the same as the docker direct export one, with 4.
|
|
OCI V1 and Docker Image Manifest V2
Use the following command to get the Docker Image manifest V2 of the image zengxu/oci-demo-app:v0 from the docker registry, and you can see that the layer compression file of the OCI V1 Image manifest is exactly the same as the Docker Image manifest V2 sha256 values are exactly the same, except that the OCI V1 Image config file is smaller (because the docker Image Config contains additional container configuration and Docker-related information).
|
|
In fact, OCI Image Spec V1 is based on Docker Image Manifest V2 and is almost identical to both. The correspondence of MediaType can be found here (https://github.com/opencontainers/image-spec/blob/master/manifest.md).
If we use the Docker Registry V2 api GET /v2/<name>/blobs/<digest> (e.g. https://registry-1.docker.io/v2/zengxu/oci-demo-app/blobs/sha256:e4d6c83503a9bf0b4922dd67e42b92eb8c3d5a59322585570c6c6f91b1cbd924) we download the blob by blob and organise it according to the OCI layout, we get the same result as the skopeo copy.
Here the tool oci-image-tool is used directly to convert the downloaded archive into a file system, with the same result.
Understanding definitions
After the hands-on tossing above, come back to understanding the passage.
At a high level the image manifest contains metadata about the contents and dependencies of the image including the content-addressable identity of one or more filesystem serialization archives that will be unpacked to make up the final runnable filesystem. The image configuration includes information such as application arguments, environments, etc.
The combination of the image manifest, image configuration, and one or more filesystem serializations is called the OCI Image.
In straightforward terms
image = a manifest + one or more layers + a config file
The File List lists the file compression packages required for the image, indicating the compression algorithm, hash and file size (in bytes) used for each package. Configuration files contain the hardware architecture, operating system, system environment variables, boot commands, boot parameters, working directory, etc. required for the program to run.
By taking advantage of the uniqueness of the hash value of the file archive, the mirror storage facility only needs to check local storage against the file list when interacting, and only one copy of the same archive needs to be stored, dramatically improving the efficiency of mirror distribution. On a well warmed up machine, transferring the image is equivalent to transferring only the package.
The user only needs to provide the package, the program configuration and declare program dependencies to organise the image via the build tool.

Resource: github opencontainers/image-spec
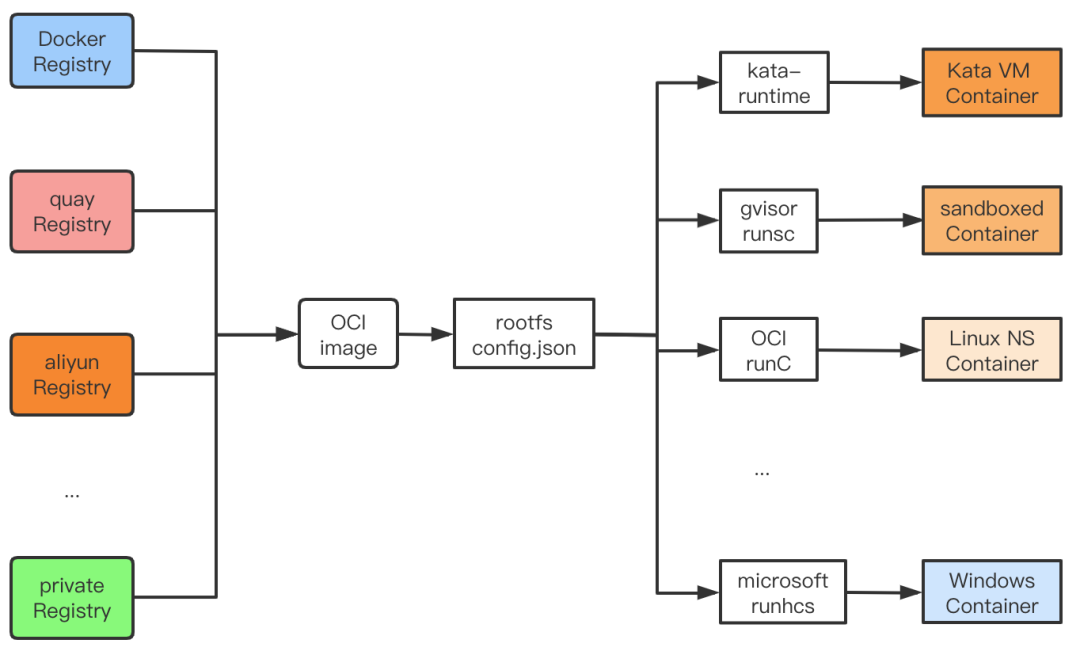
Combining and unpacking these packages according to the OCI specification results in a runnable filesystem containing packages and dependencies. As soon as this filesystem (called rootfs in the OCI specification) and the json configuration files are given to the OCI container runtime, the container runtime is able to run the target application as expected by the user.
runC
runC is the standard implementation of runtime-spec provided by OCI and can be used to run containers directly.
Simple runC containers
After the above, it is time to use OCI runC to create a container from the bundle folder. First create a new rootfs directory and copy all the files to the rootfs directory.
Use the runC spec to generate the OCI container run configuration file config.json and modify it slightly to match the image configuration.
The modified config.json looks like this.
Use runc run to run the container in detach mode and view the container running via the runc list.
|
|
If you enter the container shell console via runC exec and run ifconfig, you will find that by default the runC container has only one loop NIC, with a single address of 127.0.0.1.
|
|
That is, containers run in this way are isolated in the network namespace of a separate cgroup and cannot be accessed directly from the host.
Bind a virtual NIC to the runC container
Stop and remove the container first.
Note: brctl may need to be installed by yourself, CentOS can be accessed with the following command.
|
|
Using brctl to generate the bridge runc0 on the host and attach a virtual NIC to runc0, one end of the NIC veth-host will be bound to the host and the other end of the NIC veth-guest will be bound to the container (i.e. eth0 in the container).
Also using ip netns for the namespace, we give the container NIC (at /var/run/netns/runc-demo-contaienr) an IP address of 10.200.0.2 to access the container.
|
|
Modify the network section of config.json .linux.namespaces (note: the final full version of the configuration is placed here).
Run the container and use curl to access the container service, the network is up.
If you go into the container, you can find an additional eth0 NIC.
|
|
Again, you will see the runc0 bridge and the veth-host NIC on the host machine, which is not shown here.
The Docker networking principle is similar, you will find a bridge named docker0 and several virtual NICs named veth-xxxx on your own machine.
It’s worth noting that if multiple containers can share the same namespace NIC, the network is also connected between containers in the same space, which is how k8s Pod networking works.
The significance of the OCI standard
Before OCI, the container ecosystem was blossoming, with Docker riding high, but with separate communities, developers were tired of compatibility and users were miserable.
With the OCI mirroring standard, different platforms can optimize the storage and transfer of mirrors along their own directions, while also being able to use the same set of standards for interoperability, allowing users to migrate freely across platforms.
With the OCI Runtime standard, clients only need to provide rootfs and config.json declarations to run applications on different operating systems with different isolation effects, using different OCI Runtime implementations. If you only need namespace level isolation, Linux uses runC and Windows uses runhcs, which is the traditional container isolation level, isolating resources but not the kernel. If you need strong VM-level isolation, you can use gVisor runsc for user-state kernel isolation or kata-runtime for hypervisor VM-level isolation.
OCI does not set standards for either networking or storage, as these are platform implementation dependent. However, as the runC summary shows, the user can mount the network and storage as long as they use platform related technologies (Linux namespace network for example).
The OCI Runtime implementation supports the use of 2 phases for starting containers, create and start, where the user can prepare resources such as network and storage between create and start.
A popular container network interface standard today is CNCF CNI and a popular container storage standard is container-storage-interface-community CSI.
In fact, it was OCI’s ability to set standards at a low enough generic level that made it a huge success.
Today, it is available across cloud platforms, across operating systems, across hardware platforms and supports a wide range of isolation …
Ref
https://www.zeng.dev/post/20200510-container-oci/