Why do I need to create a virtual environment?
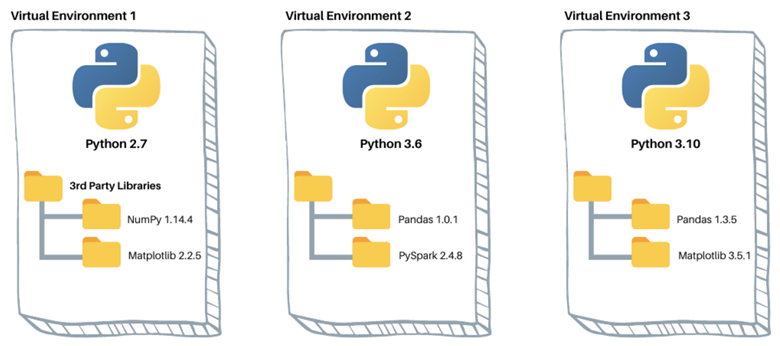
Virtual environments are created to use different versions of the Python interpreter, third-party libraries, and dependencies required by different Python projects on the same computer to avoid version conflicts and issues that affect each other. A virtual environment is a separate Python runtime environment in which you can install and manage project-specific dependencies that do not affect other projects. This means you can develop multiple Python projects in parallel on the same computer with different dependencies and versions without worrying about conflicts between them. Virtual environments also help you manage dependencies more easily and ensure that your projects are portable and repeatable. For example, you can package a project and its dependencies into a virtual environment and pass it on to others or deploy it to different computers without worrying about versions of dependencies or other issues.
In addition, to develop a new project, create a virtual Python environment that applies only to that project. This helps with package management and also provides a very clear list of all packages used for project development, generating a one-click installation list for easy deployment later.
There are many tools for creating virtual environments in Python, such as venv, conda, etc. These tools can help you easily create, manage and use virtual environments.
venv
Python2 versions often use a third-party package called virtualenv to create virtual environments. From Python 3.3 onwards, the standard library has a built-in module called venv that we can use to create virtual environments, replacing virtualenv entirely.
Create the environment
|
|
ENV_DIR specifies the directory where the environment is stored, generally using venv, which is an unwritten rule.
The directory tree structure of the virtual environment is as follows (Windows).
|
|
pyvenv.cfg is a configuration file that contains three parameters.
- home: points to the Python installation directory where the command is run.
- include-system-site-packages: whether to use packages installed in the system Python environment. The default is false, i.e. not used.
- version: Python version number.
Activation environment
Exit Environment
|
|
Delete the environment
Just delete the entire environment installation directory.
How do I specify the Python version when using venv?
To create a virtual environment named myenv with Python version 3.9 when creating a virtual environment with venv, you can use the following command.
|
|
where python3.9 is the path to the Python 3.9 interpreter. If Python 3.9 is already installed in the system path, you can use the python3.9 command directly, otherwise you need to specify the full path.
On Windows systems, you can specify the Python interpreter version with the following command.
|
|
where C:\Python39\python.exe is the path to the Python 3.9 interpreter.
After creating a virtual environment with the specified version of the Python interpreter, the virtual environment will use that version of the Python interpreter by default. After activating the virtual environment, you can use the python command to start that version of the Python interpreter.
pipenv
Pipenv is a virtual environment management tool used by Python developers. It is a pip-based tool that manages not only virtual environments, but also dependencies, environment variables, etc., making it easier to develop, deploy, and maintain Python applications.
The following are some of the features of Pipenv and how to use them.
Features
- Manage virtual environments and dependencies
- Automatically create virtual environments and install dependencies
- Automatically update dependencies
- Manage environment variables
- Automatic Lockfile generation to ensure version stability of project dependencies
- Reproducibility through lock files
- Support for multiple Python versions and multiple dependency sources
- Support for automatic installation of Python dependencies and system dependencies
Installation
|
|
Environment management
- Create environment: pipenv install
- Activate environment: pipenv shell
- Quit environment: exit
- Delete an environment: pipenv -rm
The pipenv install command creates a virtual environment based on the default Python version and generates Pipfile and Pipfile.lock files for dependency package management. When you share your project with others, the pipenv install command creates a virtual environment and automatically installs the dependency packages specified in the Pipfile.
When creating a virtual environment with Pipenv, you can specify the version of Python to use using the -python option. For example, to create a virtual environment named myenv with Python version 3.9, you can use the following command.
|
|
If more than one version of Python is installed on the local system, you can use this command to specify which version to use. If the required Python version is not installed, you need to install the required Python version first, and then execute the above command.
It is also possible to specify the Python version in Pipfile by simply adding the following.
This will automatically install the specified version of Python for the virtual environment when running pipenv install. If the Python version specified in the Pipfile is different from the Python version on the local system, Pipenv will automatically install the required Python version.
Package Management
Installing packages.
- Install and write to Pipfile’s production environment with the package name: pipenv install requests
- Install and write to Pipfile’s development environment using the package name: pipenv install pytest -dev
- Install all the production environment packages listed in Pipfile: pipenv install
- Install all the development environment packages listed in Pipfile: pipenv install -dev
To uninstall a package.
- Uninstall the specified package and remove it from Pipfile: pipenv uninstall requests
- Uninstall all production packages (not removed from Pipfile): pipenv uninstall -all
- Uninstall all development environment packages and remove them from Pipfile: pipenv uninstall -all-dev
pipenv -dev is the command used to install dependencies in development mode. When installing dependencies with the pipenv install command, the -dev option installs the development dependencies into the virtual environment. Development dependencies typically include testing frameworks, code quality tools, etc. These dependencies are only needed in the development environment and are not required in the production environment.
For example, suppose the project needs to use pytest and coverage as test frameworks and code coverage tools, the following commands can be used when installing these dependencies.
|
|
This will install the pytest and coverage dependencies and add them to the [dev-packages] section of Pipfile.
When installing dependencies with the pipenv install command, if the -dev option is not specified, all dependencies are considered production dependencies by default and will be installed into the [packages] section. If both the -dev option and the -pre option are specified, the pre-release version of the dependency is installed.
Configure pypi mirror
Changing the corresponding pypi source (https://pypi.org/simple) in Pipfile and Pipfile.lock to the specified mirror source can solve the problem of slow package download.
If the network in your region (e.g. China) is restricted, consider using the following mirror.
- Tsinghua University:
https://pypi.tuna.tsinghua.edu.cn/simple- Aliyun:
http://mirrors.aliyun.com/pypi/simple/- University of Science and Technology of China
https://pypi.mirrors.ustc.edu.cn/simple/- Douban:
http://pypi.douban.com/simple/
poetry
Poetry is a Python package management tool that helps developers manage project dependencies, virtual environments, builds, and releases. It provides a simple, consistent, and reliable workflow that makes developing Python applications easier and more enjoyable. poetry is similar to pipenv, which is also a dependency package management tool. A few improvements on pipenv simplify the Python development workflow. And of course, the ability to create virtual environments.
The following are some of the key features of Poetry.
- Automatic creation and management of virtual environments: Poetry creates and manages virtual environments in each project, ensuring that dependencies are isolated between projects and making the versions of Python used between projects independent of each other.
- Manage dependencies: Poetry uses toml files to manage the project’s dependencies and automatically resolves version conflicts between dependencies to ensure that all dependencies are working properly.
- Build and Publish: Poetry provides an easy way to build and publish Python packages, either packaged in Wheel or sdist format and uploaded to PyPI or other supported package repositories.
- Plugin support: Poetry has a rich plugin system that can be extended with features such as adding support for other package management tools, enhanced dependency resolvers, etc.
The basic workflow for managing Python projects using Poetry is as follows.
- Create a new project: Use the poetry new command to create a new Python project.
- Add dependencies: Use poetry add command to add dependencies, Poetry will automatically write the dependencies to the toml file.
- Install dependencies: Use the poetry install command to install all dependencies of the project.
- Run the application: use poetry run command to run the Python application, Poetry will automatically activate the virtual environment and run the application.
- Build and publish: Use the poetry build and poetry publish commands to build and publish Python packages.
A distinguishing feature of Poetry is that it is not just a package management tool, but also a complete Python project management tool that helps developers manage project dependencies, virtual environments, builds, and releases, making developing Python applications more efficient, simple, and reliable.
Installation
|
|
Usage
- Create environment: first execute
poetry init, then just press enter to confirm the subsequent steps. Then use the poetry shell to create the environment - Activate environment:
pipenv shell(create environment and activate it if you don’t have one, activate it directly if you have one) - Quit environment: exit
- Remove environment:
pipenv env remove <ENV_NAME>(ENV_NAME can be viewed viapoetry env list)
conda
Anaconda is a large environment management system that supports multiple languages including Python/R. Once you install Anaconda or Miniconda (lite) you can use the conda command to create and manage Python environments.
Conda is a popular package management tool that can be used to manage Python virtual environments. Using Conda, you can install multiple Python environments on the same computer, which can contain different versions of the Python interpreter and different Python packages. The following are some basic steps for managing virtual environments with Conda.
Installation
Before installing Conda, you need to confirm the version of your operating system and whether Python is already installed. here are some basic steps to install Conda.
- Download Conda: Download the Conda installation package suitable for your operating system from the official website (https://www.anaconda.com/products/distribution), and select the Conda corresponding to the Python version.
- Install Conda: Run the downloaded Conda installation package and follow the prompts to install it. During the installation process, you can choose to add Conda to the system path, so that you can use Conda commands anywhere.
- Configure Conda: After the installation is complete, you can use the conda info command to check the configuration of Conda. By default, Conda will use the official mirror site for package downloads and updates. If you want to change the mirror site, you can use the conda config command to configure it.
Miniconda is a lightweight version of Conda that contains only the most basic components and dependencies, allowing the user to select and install them according to their needs. The following are the basic steps for installing Miniconda on Windows systems.
- Download the installer: Download the Miniconda installer for the corresponding operating system from the official website (https://docs.conda.io/en/latest/miniconda.html), and you can choose either Python 2.x or Python 3.x version.
- Run the installer: Double-click the downloaded installer and follow the prompts to install it. The installer will prompt you for options to choose the installation path, add environment variables, and register an Anaconda account, which you can select as needed.
- Open Anaconda Prompt: After the installation is complete, search for and open Anaconda Prompt in the Start menu. if this is the first time you use Anaconda Prompt, you need to run the conda init command first, which will add Conda-related environment variables to the system environment variables for subsequent use.
- Create a virtual environment: Use the conda create command in Anaconda Prompt to create a new virtual environment, for example: conda create -name myenv python=3.8
- Activate the virtual environment: After creating the virtual environment, use the conda activate command to activate the environment, for example: conda activate myenv
- Install dependencies: After activating the virtual environment, you can use the conda install command to install the required dependencies, for example: conda install numpy
Once Miniconda is installed, you can use Anaconda Prompt to run Python programs, manage the virtual environment and install Python packages, etc. If you need to update Miniconda or remove the virtual environment, you can use the conda update and conda remove commands to do so.
Usage
- Create environment
conda create -n ENV_NAME python=3.9 - activate environment
conda activate ENV_NAME - exit environment
conda deactivate - remove environment
conda env remove -n ENV_NAME
Summary
Each of the ways of managing virtual environments has its own applicable scenarios and advantages and disadvantages. Here are some common virtual environment management methods and their features.
- venv: The built-in virtual environment management tool for Python 3.3 and above is easy to use and easy to get started, suitable for small projects and individual developers. However, it can only manage Python environments, and does not support multi-language and multi-version environment management.
- pipenv: a virtual environment management tool based on pip and virtualenv, easy to use, can automatically manage dependencies, suitable for small and medium-sized projects. However, it is relatively slow to install and use, and may require manual configuration file tuning for complex projects.
- poetry: A new type of Python package management and virtual environment management tool, easy to use, can automatically manage dependencies and version control, suitable for small and medium-sized projects and individual developers. However, its ecology is relatively new and may have compatibility and stability issues.
- Conda: A general package management and virtual environment management tool, supporting multi-language and multi-version environment management, suitable for large projects and team collaboration. However, it has a large installation package and is relatively complex to use.
Ref
https://www.biaodianfu.com/python-virtual-environment.html