Authentication is a very common feature in everyday life.
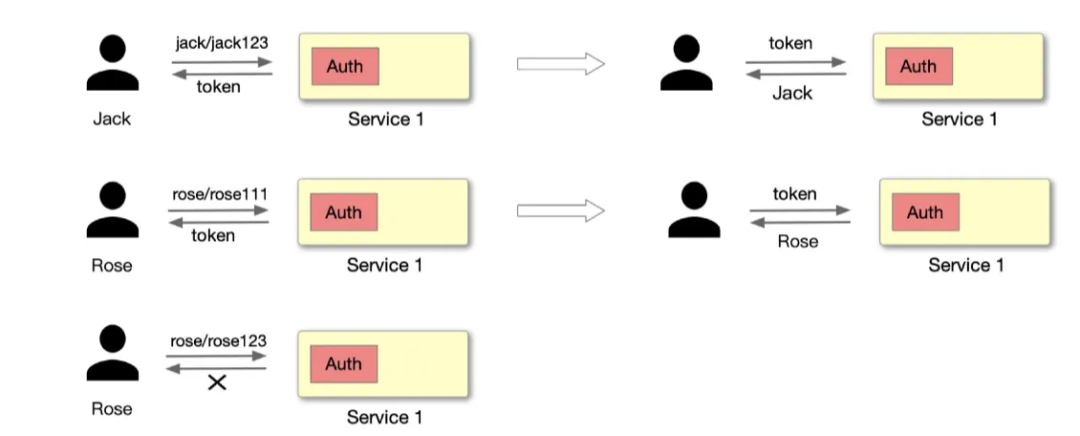
As shown above, Jack requests the server-side application with an account password and the server-side application needs a module dedicated to authentication to handle this part of the logic. After the request is processed, if JWT Token authentication is used, the server will provide a Token to identify the user as Jack, and if the password is entered incorrectly during the login process, the authentication will fail.
However, if each application service module develops a separate authentication module to support a set of processes for authentication, the amount of work required to develop these modules will become very large and repetitive as the volume of services increases. This can be unified and reduced by placing this development logic in the Apache APISIX gateway layer.
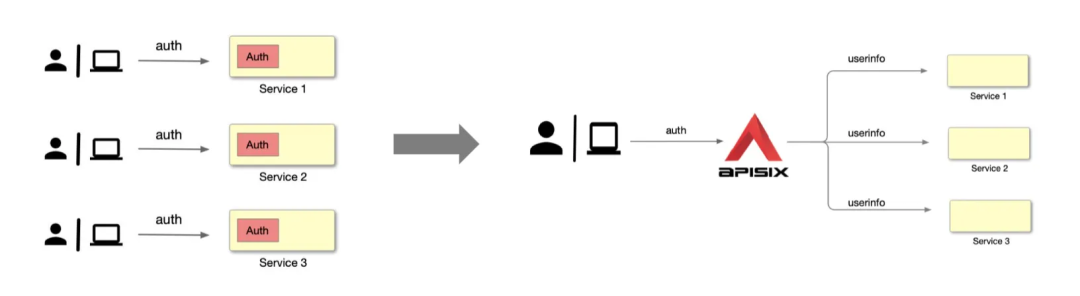
As shown in the above diagram, the user or application directly requests Apache APISIX, which then identifies and authenticates the user and passes the identified identity information to the upstream application service, which can then read this information from the request header and perform subsequent logical processing.
Apache APISIX, as an API gateway, has already been adapted to work with various plug-ins and has a rich library of plug-ins. A large number of authentication-related plugins are available for processing, as shown in the diagram below.
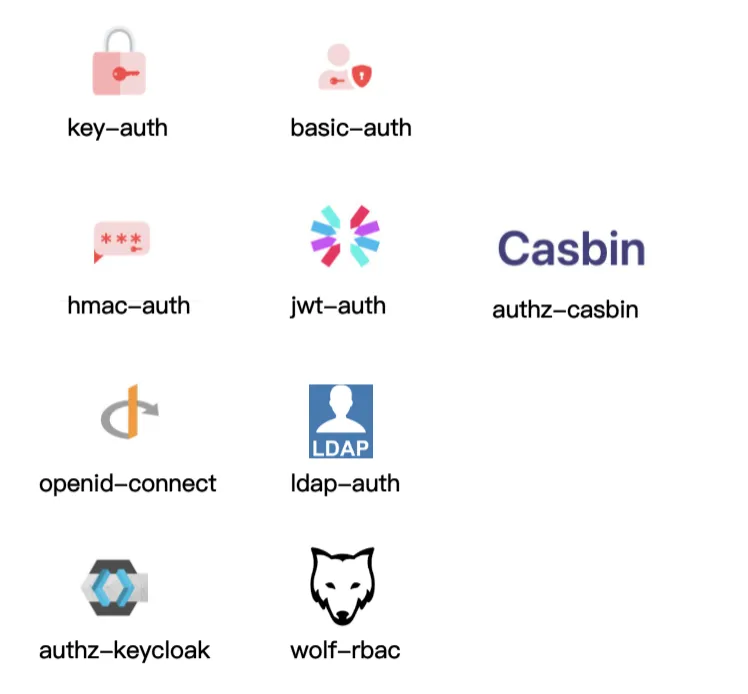
Basic authentication plugins such as Key-Auth, Basic-Auth, which authenticate by means of an account password. More complex authentication plugins such as Hmac-Auth, JWT-Auth. Hmac-Auth generates a signature by doing some encryption of the request information, and when the API caller carries this signature to Apache APISIX, Apache APISIX calculates the signature using the same algorithm and only passes it if the signer and the application caller are authenticated.
Others are generic authentication protocols and authentication protocols that combine third-party components for cooperation, such as the OpenID-Connect authentication mechanism, and LDAP authentication.
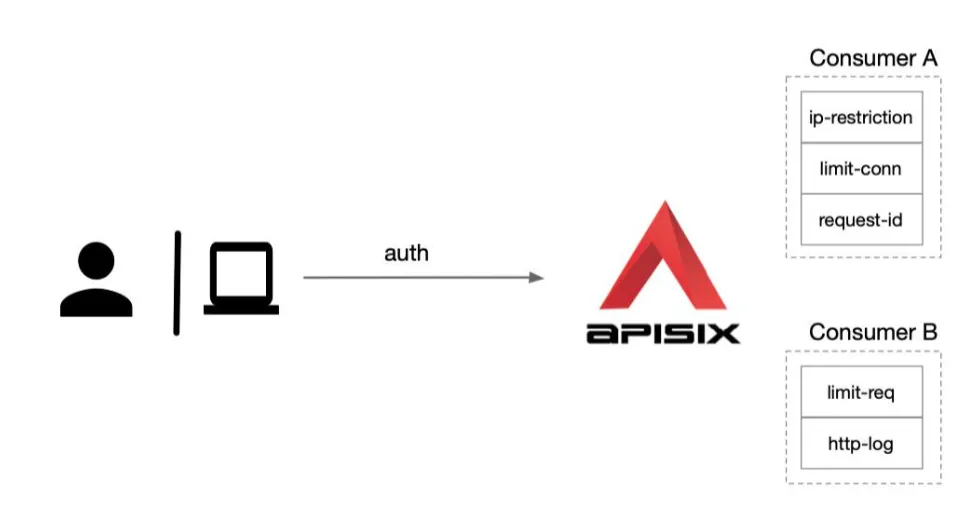
Apache APISIX can also do different levels of plugin configuration for each Consumer (i.e. caller application). As shown below, we have created two consumers Consumer A and Consumer B. If we apply Consumer A to application 1, subsequent accesses to application 1 will enable this part of Consumer A’s plugins, such as IP blacklisting, limiting the number of concurrent sessions, etc. If we apply Consumer B to Application 2, the access logs of Application 2 will be sent to the logging system for collection via HTTP, as the http-log plugin is enabled.
In general, the APISIX authentication system is very powerful and it is important to get to grips with it.
basic-auth
Let’s start by understanding how basic authentication in its simplest form is used in APISIX. basic-auth is an authentication plugin that needs to work with a Consumer to work. Add Basic Auth to a Service or Route, then the Consumer adds its username and password to the request header to authenticate its request.
First we need to add the basic auth authentication configuration to the APISIX Consumer consumer, specifying a username and password for it, which we can do here in APISIX Ingress via the ApisixConsumer resource object, for example here we add a basic authentication for the previous nexus instance application as follows:
The ApisixConsumer resource object only needs to be configured with the authParameter authentication parameters, and currently supports basicAuth, hmacAuth, jwtAuth, keyAuth, wolfRBAC and other authentication types. Under basicAuth you can configure the username and password directly via value, or you can use the Secret resource object to configure it directly, which is more secure than plaintext.
Then add authentication to ApisixRoute, turn it on and specify the authentication type to enable the use of Consumer to complete the relevant configuration authentication as follows:
|
|
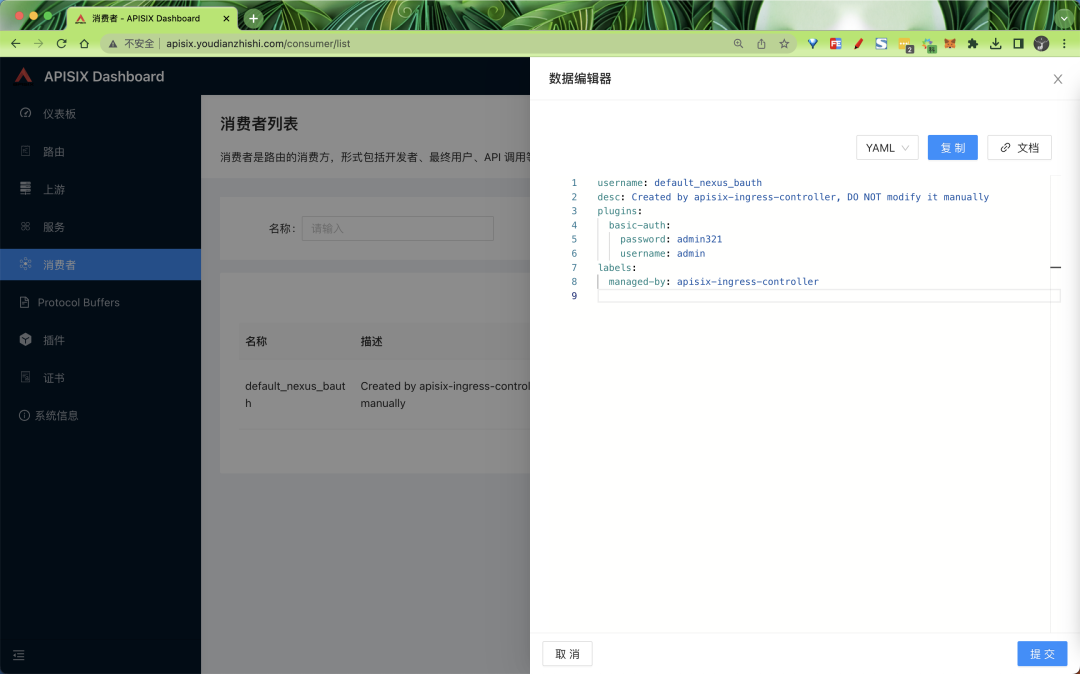
The basic auth authentication is now enabled by updating the above resource directly, and you can also see in the Dashboard that a Consumer has been created:
We can then carry out the following tests to verify this.
|
|
consumer-restriction
But here you may have a question, we don’t specify a specific Consumer in the Route, and then we can authenticate with Basic Auth, so if we have multiple Consumers with Basic Auth defined, won’t they all take effect? This is indeed the case, this is how APISIX is implemented, all the Consumers will take effect for the corresponding plug-in enabled Route, what if we only want Consumer A to apply to Route A and Consumer B to apply to Route B? To do this, we need another plugin: consumer-restriction.
The consumer-restriction plug-in can restrict access to different objects according to their selection:
| Name | Type | Required | Default | Valid values | Description |
|---|---|---|---|---|---|
| type | string | False | consumer_name | [“consumer_name”, “consumer_group_id”, “service_id”, “route_id”] | Type of object to base the restriction on. |
| whitelist | array[string] | True | List of objects to whitelist. Has a higher priority than allowed_by_methods. |
||
| blacklist | array[string] | True | List of objects to blacklist. Has a higher priority than whitelist. |
||
| rejected_code | integer | False | 403 | [200,…] | HTTP status code returned when the request is rejected. |
| rejected_msg | string | False | Message returned when the request is rejected. | ||
| allowed_by_methods | array[object] | False | [“GET”, “POST”, “PUT”, “DELETE”, “PATCH”, “HEAD”, “OPTIONS”, “CONNECT”, “TRACE”, “PURGE”] | List of allowed HTTP methods for a Consumer. |
The type field is an enumerated type that can be set to the following values:
consumer_name: whitelist or blacklist the Consumer’s username to restrict the Consumer’s access to the Route or Service.consumer_group_id: whitelist or blacklist the Consumer Group’s id to restrict the Consumer’s access to the Route or Service.service_id: whitelist or blacklist the id of a Service to restrict Consumer access to the Service, used in conjunction with the authorization plugin.route_id: whitelist or blacklist the id of the Route to restrict Consumer access to the Route.
For example, we now have two Consumers: jack1 and jack2, both of which are configured with Basic Auth authentication, as follows:
Execute the command
kubectl port-forward --address 0.0.0.0 svc/apisix-admin 9180:9180 -n apisixto expose the admin endpoint.
Authentication configuration for Conumer jack1:
Authentication configuration for Conumer jack2:
Now, if we want to enable the consumer authentication configuration of jack1 for only one Route route object, then in addition to enabling the basic-auth plugin, we need to configure a whitelist whitelist in the consumer-restriction plugin (blacklisting is also possible), as follows:
|
|
We then use jack1 to access our route to verify:
Normal access using jack2 will fail.
So remember to use the consumer-restriction plugin when you only want a Route object to be associated with a given Consumer.
jwt-auth
In normal applications, jwt authentication is probably the most used scenario. Again, the jwt-auth plugin is available in APISIX, and it also needs to work with the Consumer. We just need to add JWT Auth to a Service or Route, and then the Consumer adds its key to the query string parameter, request header or cookie to authenticate its request.
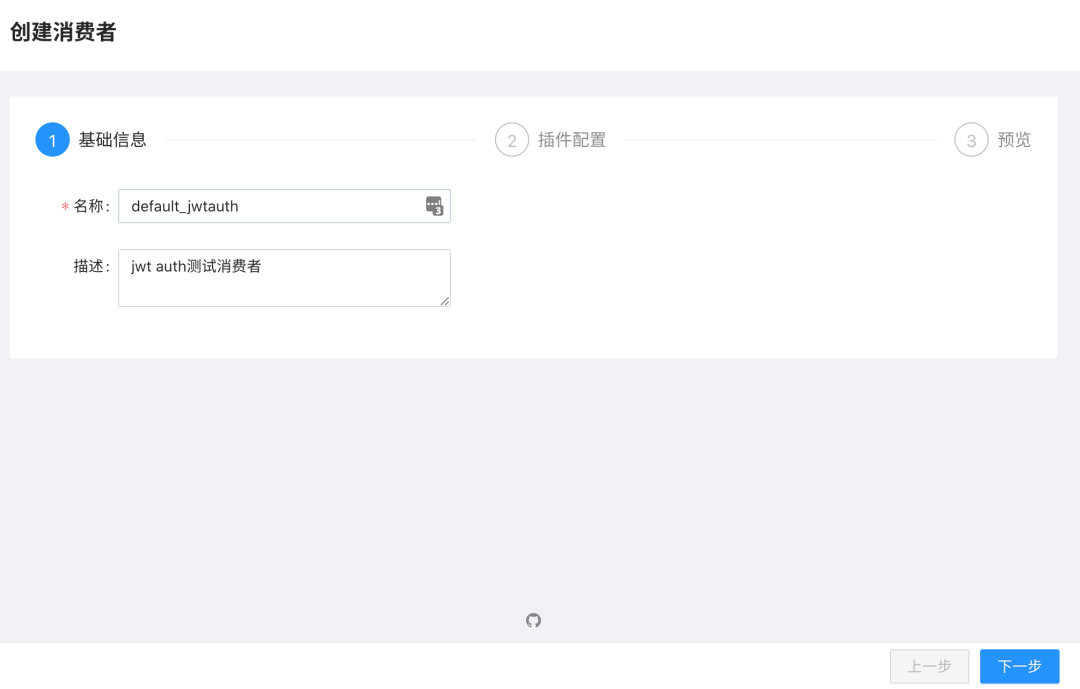
Of course, in addition to configuring this via the ApisixConsumer CRD, we can also do this directly from the Dashboard page. From the Dashboard consumer page, click on Create Consumer:
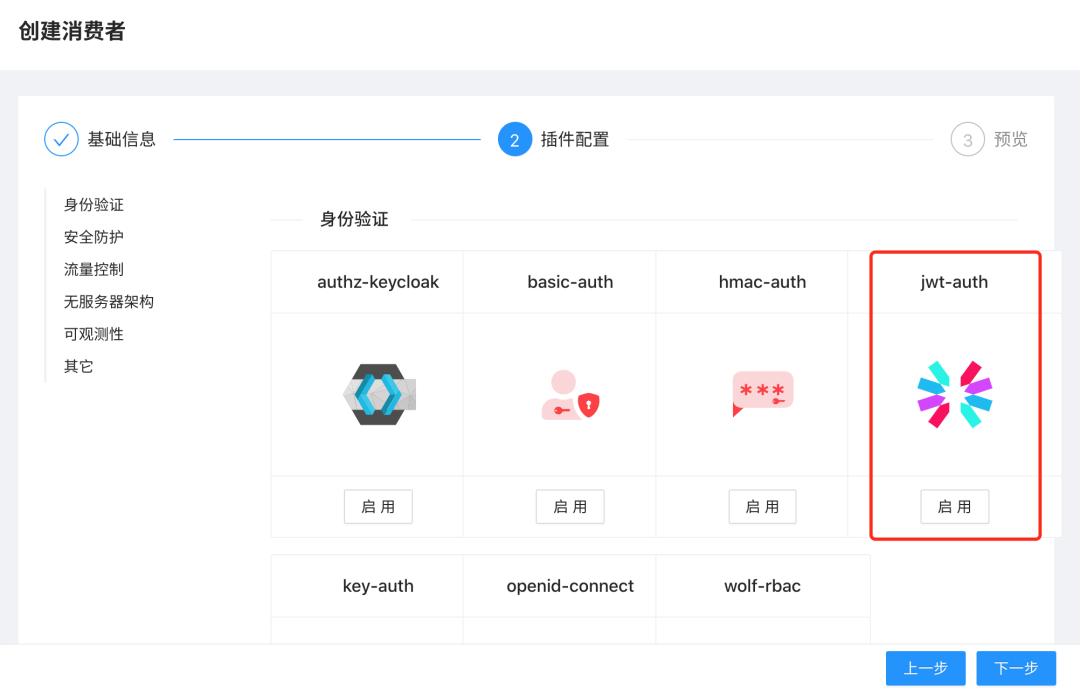
Click Next to go to the plugin configuration page, where we need to enable the plugin jwt-auth:
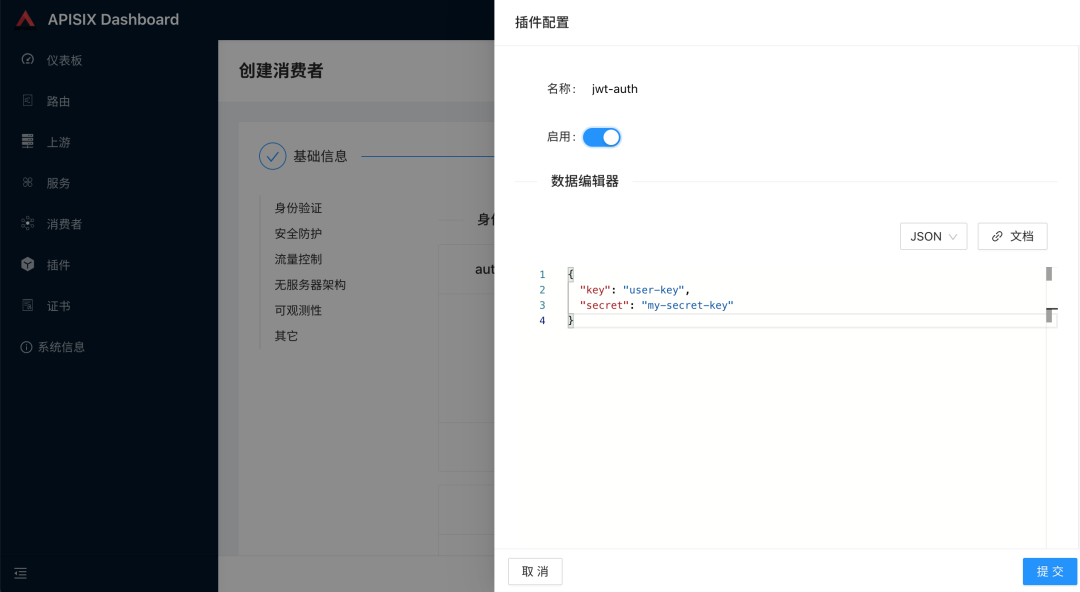
Configure the jwt-auth related properties in the plugin configuration page, available in the plugin documentation at https://apisix.apache.org/zh/docs/apisix/plugins/jwt-auth/.
| Name | Type | Required | Default | Valid values | Description |
|---|---|---|---|---|---|
| key | string | True | Unique key for a Consumer. | ||
| secret | string | False | The encryption key. If unspecified, auto generated in the background. This field supports saving the value in Secret Manager using the APISIX Secret resource. | ||
| public_key | string | True if RS256 or ES256 is set for the algorithm attribute. | RSA or ECDSA public key. This field supports saving the value in Secret Manager using the APISIX Secret resource. | ||
| private_key | string | True if RS256 or ES256 is set for the algorithm attribute. | RSA or ECDSA private key. This field supports saving the value in Secret Manager using the APISIX Secret resource. | ||
| algorithm | string | False | HS256 | [HS256, HS512, RS256, ES256] | Encryption algorithm. |
| exp | integer | False | 86400 | [1,…] | Expiry time of the token in seconds. |
| base64_secret | boolean | False | false | Set to true if the secret is base64 encoded. | |
| lifetime_grace_period | integer | False | 0 | [0,…] | Define the leeway in seconds to account for clock skew between the server that generated the jwt and the server validating it. Value should be zero (0) or a positive integer. |
The Consumer is created by committing it.
Then we just need to enable jwt-auth on the Service or Route we need, for example, again for the nexus application above, we just need to enable a jwt-auth plugin in the ApisixRoute object.
|
|
Let’s test the same after updating the above object.
To access our service properly you need to log in to get the token for jwt-auth, first you need to configure a Route for the API that issues the token, this route will use the public-api plugin.
The public-api plugin is not recognised after executing the above command. This is because it is not installed by default in APISIX installed as Helm Chart, so we need to add it to the values.yaml file of Helm Chart under the plugins attribute, and then re-update APISIX again.
|
|
Re-execute the command after the update.
Then you can call it to get the token.
|
|
Note that when we get the token above we need to pass the consumer creation identifier key, as there may be multiple different Consumer consumers, and then we put the token we got above into the Header header for access.
|
|
You can see that it can be accessed normally. Putting in the request parameters for verification gives the same result.
It can also be placed in a cookie for validation.
Custom Plugins
In addition to the official APISIX plugins, we can also customize plugins according to our needs. To customize plugins, we need to use the Runner provided by APISIX, which currently supports Java, Go, Node and Python languages; this Runner acts as a bridge between APISIX and custom plugins. For example, the apache-apisix-python-runner project uses the Python Runner to apply Python directly to APISIX plugin development, and the overall architecture is shown below.
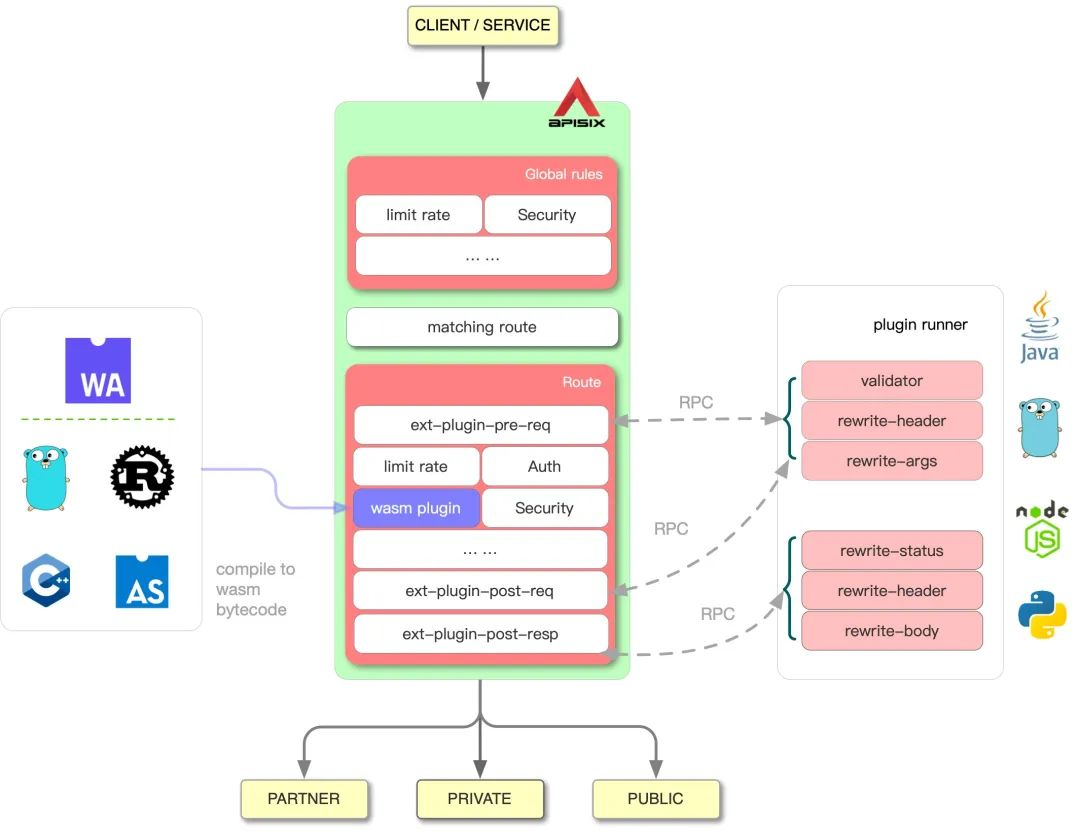
On the left is the workflow of APISIX, on the right Plugin Runner is the Plugin Runner for each language. When a Plugin Runner is configured in APISIX, APISIX will start a child process to run the Plugin Runner, which belongs to the same user as the APISIX process, and when we restart or reload When we restart or reload APISIX, the Plugin Runner will also be restarted.
If you have configured the ext-plugin-* plugin for a given route, a request to hit that route will trigger an RPC call from APISIX to Plugin Runner via the Unix Socket. The call is split into two phases:
ext-plugin-pre-req: before executing the APISIX built-in plug-inext-plugin-post-req: will be executed after the execution of the APISIX built-in pluginext-plugin-post-resp: will be executed after the request has fetched an upstream response.
Next we’ll use Python as an example to illustrate how to customize the plugin, starting by getting the apache-apisix-python-runner project:
If we are in development mode, then we can start Python Runner directly with the following command:
|
|
Once started, a new external plugin configuration needs to be added to the APISIX configuration file as follows:
Specify the path to the Python Runner’s unix socket file with ext-plugin.path_for_test, or in the case of a production environment, specify the Runner’s startup command with ext-plugin.cmd:
Our APISIX is running in a Kubernetes cluster, so to execute the Python Runner code in the APISIX Pod, we naturally need to put our Python code into the APISIX container and install the dependencies for the custom plugin by adding the above to the APISIX configuration file. So we’ll recreate the image with the plugin based on the APISIX image by adding a new Dockerfile to the root of the apisix-python-plugin-runner project as follows:
Build a new image based on the above Dockerfile and push it to Docker Hub:
Next we need to install APISIX using the image we built above, we are using Helm Chart for this installation so it needs to be overwritten with a Values file as follows:
|
|
Note that here you need to turn on the custom plugin and configure extPlugin.cmd to ["/apisix-python/bin/py-runner", "start"], because we installed Python Runner in the APISIX image, so you need to specify the Python Runner start command.
You can then redeploy APISIX as follows:
|
|
When the deployment is complete, you can see in the APISIX Pod that a child process of Python Runner is started:

The .py files in the plugins directory /apisix-python/apisix/plugins are automatically loaded. The above example has two plugins stop.py and rewrite.py, we will take stop.py as an example, the code of the plugin is shown as follows:
|
|
The plug-in must first inherit from the PluginBase class and must implement the filter function. The core business logic of the plug-in implementation is in the filter function, which contains only Request and Response class objects as arguments. The Request object parameter gets the request information. The Response object parameter sets the response message and conf gets the plugin configuration information.
We then add a new route to the previous Nexus application to test our stop plugin above by adding a new routing rule to the ApisixRoute object, as follows:
|
|
Just create the above route directly. The core configuration is to enable the ext-plugin-pre-req plugin (provided it is enabled in the configuration file, added in the Values of the Helm Chart) and then configured under config using the conf attribute, conf is an array format that allows multiple plugins to be set at the same time, the plugin configuration object name is the name of the plugin, which needs to match the plugin code file and object name, and value is the plugin configuration, which can be a JSON string.
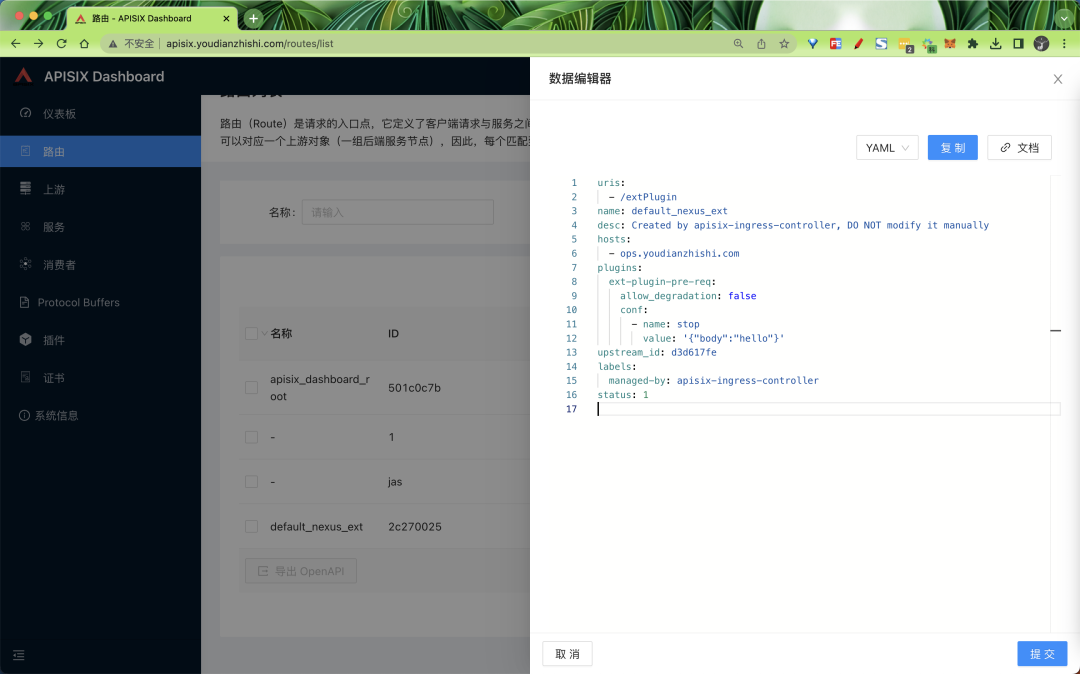
Once created, you can also see the routing configuration format in APISIX in the Dashboard:
We can then verify our custom plugin by visiting the path http://ops.youdianzhishi.com/extPlugin:
As you can see, the results and response codes match what we have defined in the plugin. This completes the APISIX custom plugin using Python, so if we have any business logic that needs to be processed, we can simply define a corresponding plugin.