Apache APISIX is a cloud-native API gateway under the Apache Software Foundation that is dynamic, real-time, and high-performance, providing rich traffic management features such as load balancing, dynamic upstream, grayscale release (canary release), service circuit break, speed limit, defense against malicious attacks, authentication, observability, and more. We can use Apache APISIX to handle traditional north-south traffic, as well as east-west traffic between services. It also supports use as a Kubernetes Ingress Controller.
APISIX is based on Nginx and etcd. Compared with traditional API gateways, APISIX features dynamic routing and hot-loading plug-ins to avoid reload operations after configuration, while APISIX supports more protocols such as HTTP(S), HTTP2, Dubbo, QUIC, MQTT, TCP/UDP, and more. It also has a built-in Dashboard, which provides a powerful and flexible interface. It also provides rich plug-in support features and also allows users to customize plug-ins.
It has the following main features.
- Multi-platform support: APISIX provides a multi-platform solution that supports not only running bare metal, but also in Kubernetes, as well as integration with cloud services such as AWS Lambda, Azure Function, Lua function and Apache OpenWhisk.
- Full Dynamic Capability: APISIX supports hot-loading, which means you don’t need to restart the service to update APISIX’s configuration.
- Fine Routing: APISIX supports using NGINX built-in variables as matching criteria for routes, and you can customize matching functions to filter requests and match routes.
- Ops friendly: APISIX supports integration with the following tools and platforms: HashiCorp Vault, Zipkin, Apache SkyWalking, Consul, Nacos, Eureka, etc. With the APISIX Dashboard, Ops can configure APISIX through a friendly and intuitive UI. .
- Multi-Language Plugin Support: APISIX supports multiple development languages for plug-in development, and developers can choose the SDK of the language they specialize in to develop custom plug-ins.
Install APISIX
For simplicity, we can start APISIX directly locally using docker by first cloning the official apisix-docker repository.
There is a docker-compose configuration file for starting APISIX in the example directory under the project root directory, as shown below.
|
|
The compose contains three main APISIX containers: apisix, etcd and apisix-dashboard, which we can now start with a single click using docker-compose.
|
|
The other two nginx containers are used for testing.

Make sure that no other system processes are occupying ports 9000, 9080, 9091, 9092, 9180, 9443, and 2379. If there is a boot error, try setting the examples directory to 777 permissions to ensure that etcd data has permission to be written.
Once APISIX is up and running we can access the running APISIX instance via curl. For example, you can send a simple HTTP request to verify that APISIX is running correctly.
Now you have APISIX successfully installed and running!
Functionality Testing
Next, we’ll take a look at some of the features of APISIX. Before we do so, we need to have a brief understanding of a few of the main concepts and components of APISIX.
-
Upstream
Also known as upstream, upstream is an abstraction of a virtual host, i.e., an application layer service or node.
The role of upstream is to load balance service nodes according to configuration rules, and its address information can be configured directly to a route or service. When multiple routes or services refer to the same upstream, you can reduce the maintenance pressure by creating an upstream object and referencing the upstream in the route or service by using the upstream ID.
-
Route
Routing, the most basic and core resource object in APISIX.
APISIX can define rules through routes to match client requests, load and execute the corresponding plug-ins based on the matching results, and finally forward the requests to the specified upstream services. Routing contains three main parts: matching rules, plug-in configuration and upstream information.
-
Service
A Service, is an abstraction of some type of API (also understood as an abstraction of a set of Routes). It usually corresponds one-to-one with the upstream service abstraction, and between Route and Service, there is usually an
N:1relationship. -
Consumer
Consumer is a consumer of a certain type of service and needs to work with user authentication to be used. When different consumers request the same API, APISIX will correspond to different Plugin or Upstream configurations based on the current requested user information. If Route, Service, Consumer and Plugin Config all bind the same plugin, only the consumer’s plugin configuration will take effect. The priority of the plug-in configurations in descending order is: Consumer > Route > Plugin Config > Service.
For API gateways, it is generally possible to identify certain types of requestors by fields such as request domain name and client IP address, and then perform plug-in filtering and forward the request to the specified upstream. However, sometimes this approach does not meet user requirements, so APISIX supports the Consumer object.
-
Plugins
Plugins, which are the key mechanism for extending the capabilities of the APISIX application layer, are the most commonly used resource objects when using APISIX. Plugins are primarily request-specific, personalized policies that are executed during the HTTP request or response lifecycle. Plug-ins can be bound to routes, services, or consumers.
If the route, service, plug-in configuration or consumer are bound to the same plug-in, only one plug-in configuration will take effect, and the priority of the plug-in configuration from highest to lowest is: consumer > route > plug-in configuration > service. There are also 6 phases involved in the execution of the plug-in, namely
rewrite,access,before_proxy,header_filter,body_filterandlog. -
Admin API
APISIX provides a powerful Admin API and Dashboard for users to use. The Admin API is a set of RESTful APIs for configuring Apache APISIX routing, upstream, services, SSL certificates and other functions.
We can get, create, update and delete resources through Admin API. Also, thanks to APISIX hot-loading capability, APISIX will automatically update the configuration after the resources are configured, without restarting the service. The detailed architecture can be seen in the following diagram.
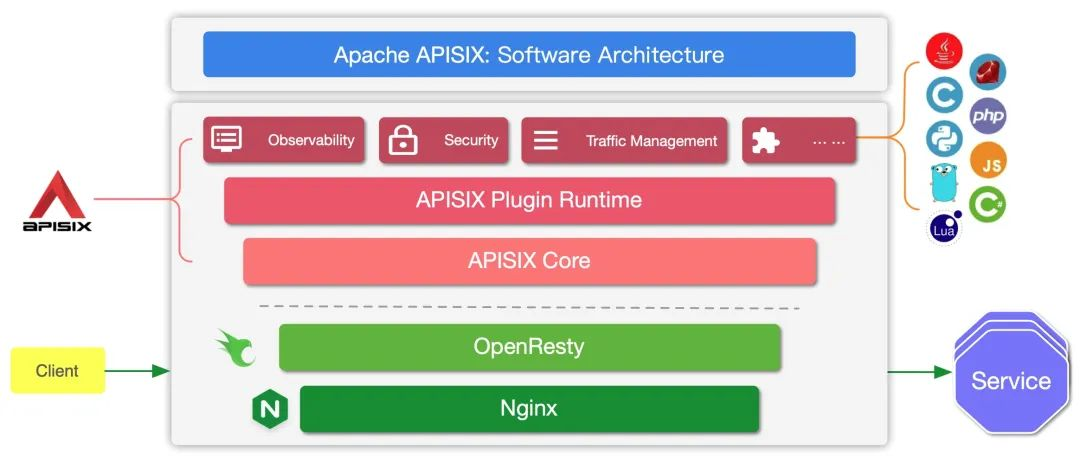
There are two main sections.
- APISIX core: including Lua plug-ins, multilingual Plugin Runner, Wasm plug-in runner, etc.
- A variety of feature-rich built-in plug-ins: including observability, security, traffic control, etc.
APISIX provides important functions such as route matching, load balancing, service discovery, API management, and basic modules such as configuration management in its core. In addition, the APISIX plug-in runtime is also included, providing a native Lua plug-in runtime framework and a multilingual plug-in runtime framework, as well as an experimental Wasm plug-in runtime, etc. The APISIX multilingual plug-in runtime provides support for multiple development languages, such as Golang, Java, Python, JS, etc.
APISIX currently has various built-in plug-ins covering various areas of API gateways, such as authentication and authentication, security, observability, traffic management, multi-protocol access, and so on. The plug-ins currently built into APISIX are implemented using native Lua, and we will introduce the introduction and usage of each plug-in later.
Creating a Route
In the following example we will first use the Admin API to create a Route and bind it to Upstream, so that when a request arrives at APISIX, APISIX will forward the request to the specified upstream service.
In the following example code, we will configure matching rules for the route so that APISIX can forward the request to the corresponding upstream service.
|
|
The value of X-API-KEY is configured in the APISIX configuration file apisix_config.yaml, under deployment.admin.admin_key.
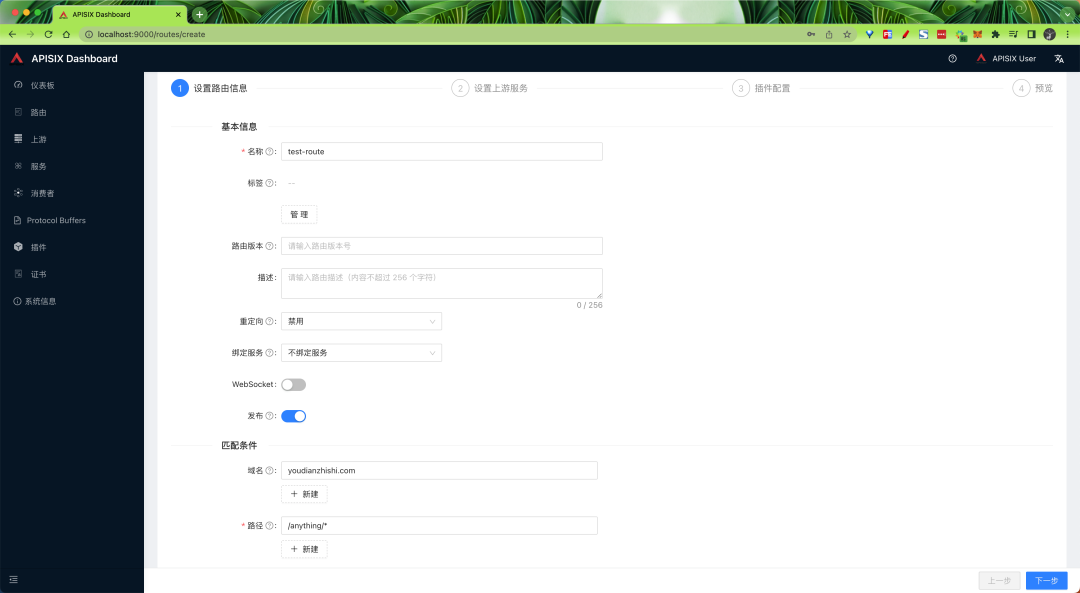
This configuration means that the request will be forwarded to the upstream service (httpbin.org:80) when the request meets all of the following rules.
- The HTTP method of the request is GET.
- The request header contains the host field and its value is
youdianzhishi.com. - The request path matches
/anything/*, where*means any subpath, for example/anything/foo?arg=10.
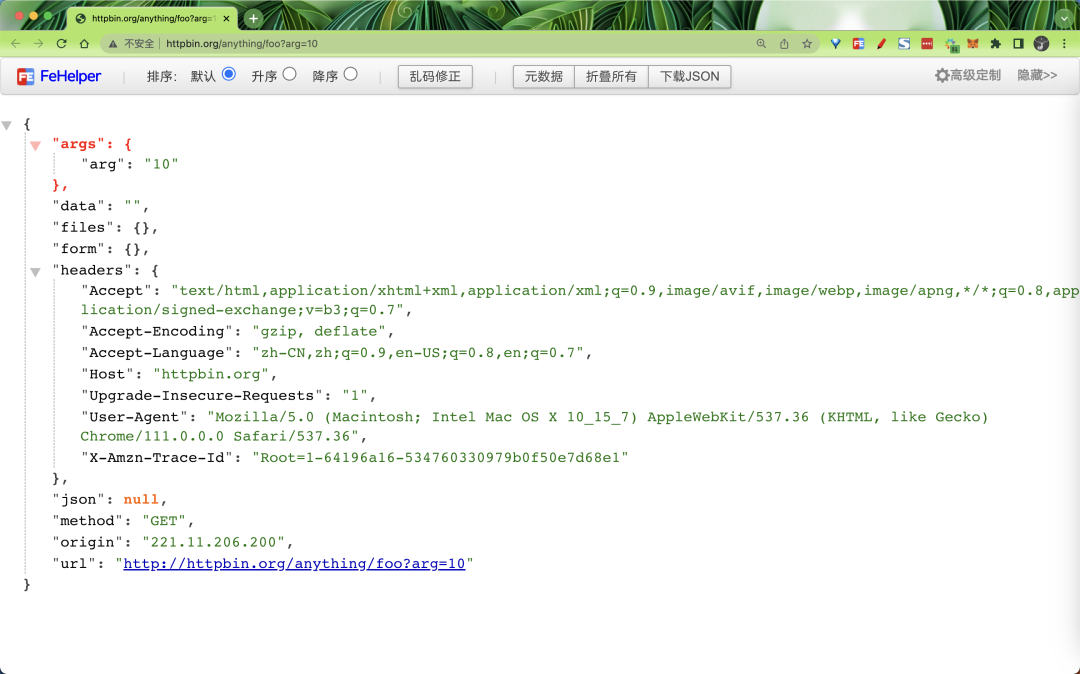
Once the route has been created, we can now access the upstream service with the following command.
|
|
The request will be forwarded by APISIX to http://httpbin.org:80/anything/foo?arg=10, which we can compare with direct access to upstream data.
Creating a route using an upstream service
We can also create an upstream with the following command and use it in a route instead of configuring it directly in the route.
|
|
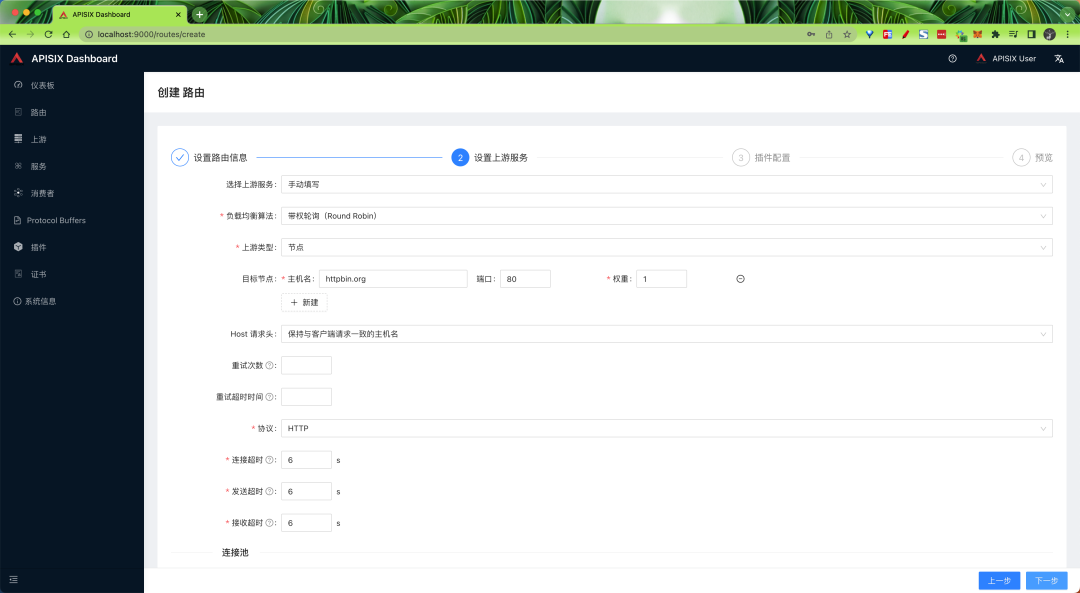
This upstream configuration is the same as the upstream configured in the previous section in Routing. Again, roundrobin is used as the load balancing mechanism and httpbin.org:80 is set as the upstream service. In order to bind this upstream to the route, upstream_id needs to be set to “1” here.
After the upstream service is created, we can now bind it to the specified /get route with the following command.
|
|
We have created the route with the upstream service and can now access the upstream service with the following command.
|
|
The request will also be forwarded by APISIX to http://httpbin.org:80/anything/foo?arg=10.
Using Dashboard
We can also use APISIX Dashboard to create and configure routes similar to the ones created in the above steps.
If you have completed the above steps, we can now access the APISIX Dashboard via localhost:9000.
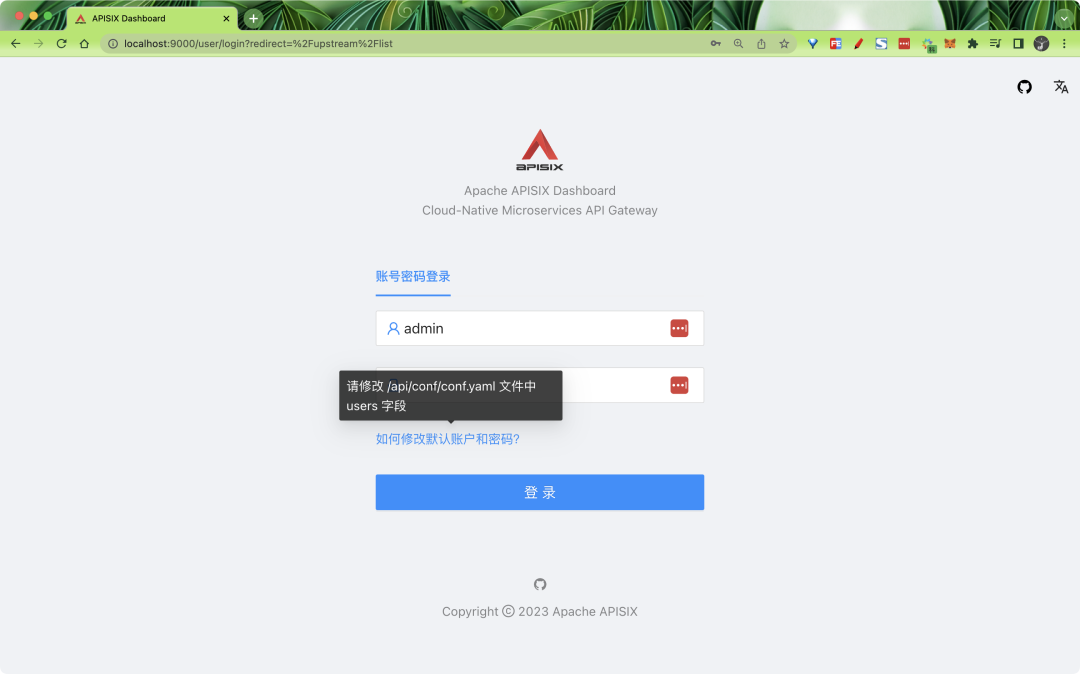
The default username and password are admin, which is configured in conf.yaml under dashboard_conf in the examples directory.
We have also started Grafana in our docker-compose above, so after logging in we can also configure Grafana on the home dashboard at http://localhost:3000.
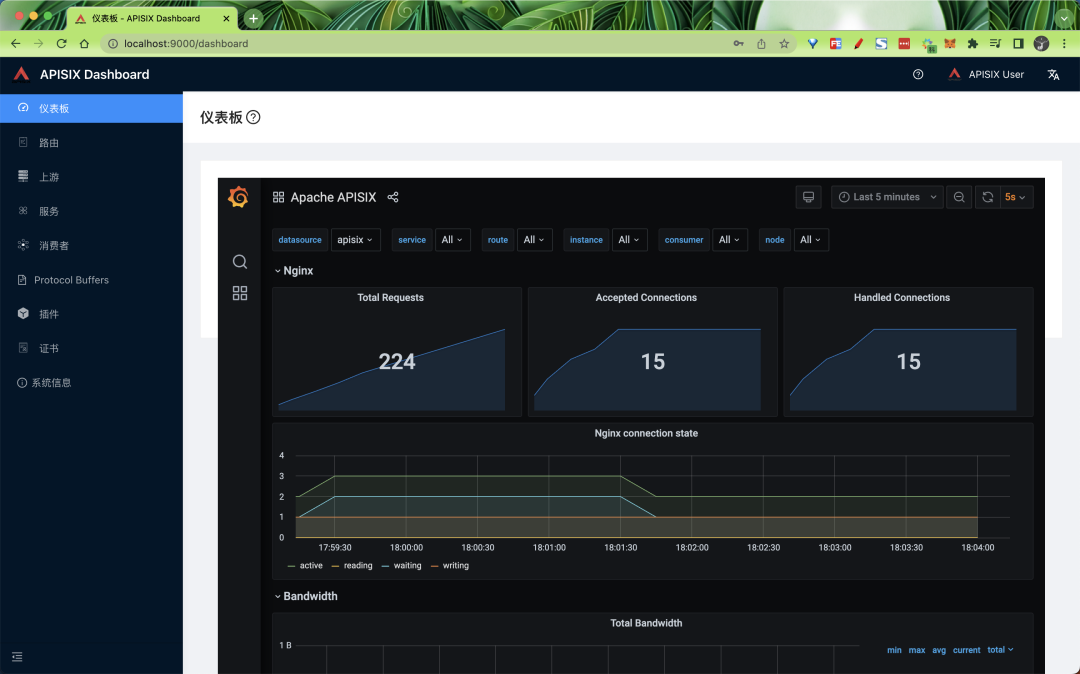
Click Routes in the sidebar after logging in to see a list of routes that have been configured, and you can see the routes that were created using the Admin API in the above steps.
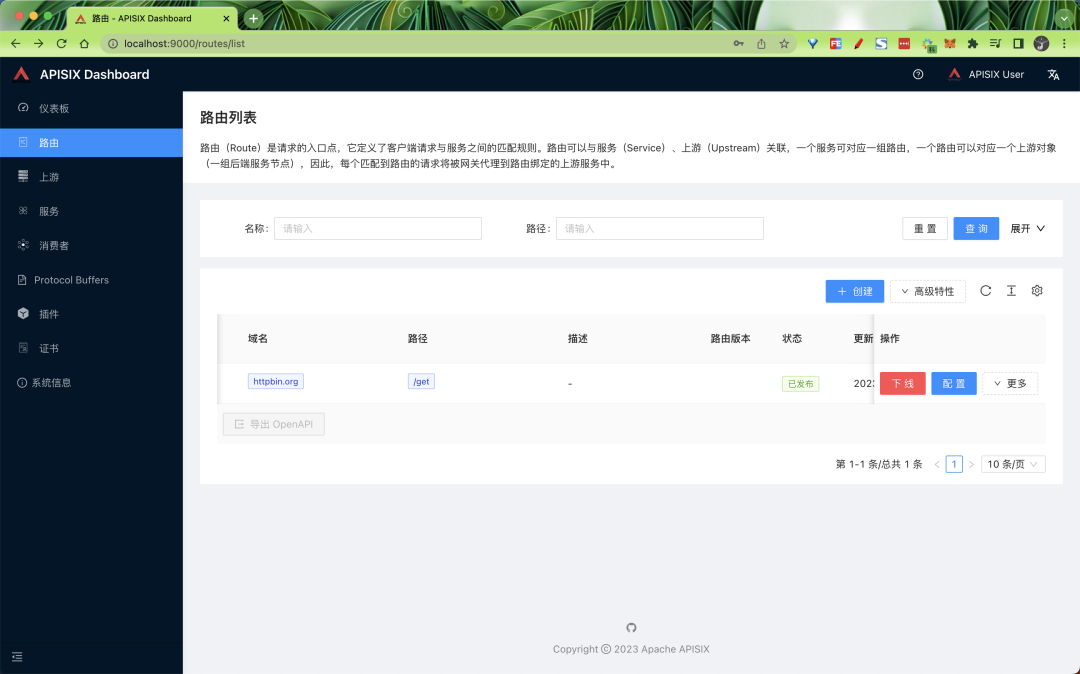
You can also create a new route by clicking the Create button and following the prompts.
If you want to use APISIX to implement features such as authentication, security, flow and speed limits, and observability, you can do so by adding plug-ins.
Rate limiting and security plugins
In many cases, our API is not in a very safe state, it can receive abnormal access at any time, once the access traffic surges, it may cause your API to fail, this time we can protect the API service by rate limiting to limit abnormal access requests. For this, we can use the following.
- limiting the request rate.
- limiting the number of requests per unit of time.
- Delaying requests.
- denying client requests.
- limiting the rate of response data.
APISIX provides several built-in plugins for limiting the flow and speed, including limit-conn, limit-count and limit-req.
- The
limit-connplugin is mainly used to limit the number of concurrent requests from clients to the service. - The
limit-reqplugin uses a leaky bucket algorithm to limit the rate of requests to user services. limit-countplugin is used to limit the total number of requests per client within a specified time frame.
Here we will use the limit-count plugin as an example to illustrate how to protect our API services with the Limit-Count plugin. This is shown below.
First create a route using the following command.
|
|
Here we directly create/update a route using the upstream (ID 1) already created, and enable the limit-count plugin in plugins, which only allows the client to access the upstream service 2 times within 60 seconds, more than twice, it will return a 503 error code.
After the above command is executed successfully, we will get the following error after three consecutive accesses with the following command.
Under normal circumstances a 503 error as shown below will appear, indicating that the limit-count plugin has been configured successfully.
Caching responses
When we are building an API, we definitely want him to keep it as simple and fast as possible, once the concurrent demand for reading the same data increases, we may face some problems, generally our direct approach is to introduce caching, which of course we can go for at different levels.
- Edge caching or CDN
- Database caching
- Server caching (API caching)
- Browser caching
Reverse proxy caching is another caching mechanism that is typically implemented within API gateways. It reduces the number of calls to your endpoints and also improves the latency of API requests to you by caching responses upstream. If the API Gateway has a fresh copy of the requested resource in its cache, it uses that copy to satisfy the request directly, rather than making a request to the endpoint. If no cached data is found, the request goes to the intended upstream service (back-end service).
Our main focus here is on the API gateway layer cache, the API cache provided by APISIX, which can also be used with other plugins and currently supports disk-based caching, as well as the ability to specify cache expiration times or memory capacity, etc. in the plugin configuration.
For example, we now have an /products API interface that is usually updated only once a day, and that endpoint receives billions of repeated requests for product list data every day, so now we can use a plugin provided by APISIX called proxy-cache to cache the responses for that interface.
Here we are still using the upstream object with ID 1 in front of us, using /anything/products to emulate the product interface, and execute the following command directly to update the plugin for the route.
|
|
After the update is complete now let’s make a few requests to the interface.
|
|
Normally you should receive an HTTP 200 OK response every time, but the Apisix-Cache-Status in the first response shows MISS, which means that when the request first enters the route, the response has not been cached. The next few requests will get a cached response and the cache indicator changes to HIT, indicating that our response was successfully cached.