Redis Cluster and Docker
Currently, Redis Cluster does not support NATted environments and in eneral environments where IP addresses or TCP ports are remapped.
Docker uses a technique called port mapping: programs running inside Docker containers may be exposed with a different port compared to the one the program believes to be using. This is useful for running multiple containers using the same ports, at the same time, in the same server.
To make Docker compatible with Redis Cluster, you need to use Docker’s host networking mode. Please see the –net=host option in the Docker documentation for more information.
About Redis Highly Available Architectures
When it comes to Redis high availability architectures, there are many different architectures and practices in the industry. A few different approaches are briefly described.
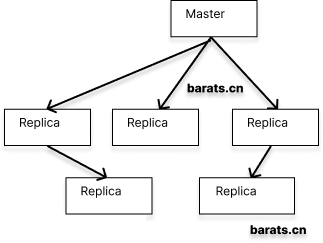
Redis Master-Slave Replication
Master-slave mode: After the application side writes data to the Master node, all data is replicated to the Replica node, and data may be synchronized to multiple Replica nodes (to achieve separation). To avoid single node failures, it is common practice to deploy multiple Redis on different servers and cluster them with the above-mentioned pattern components. Such an architecture is a good guarantee of data reliability, and if one of the machines becomes inaccessible, the data in Redis can be retrieved from the other nodes without being lost and causing irreversible damage (disaster recovery). However, there is a serious problem with this model: when any master or slave node fails, the cluster will fail to read and write requests, requiring manual intervention to switch read and write nodes to ensure service recovery.
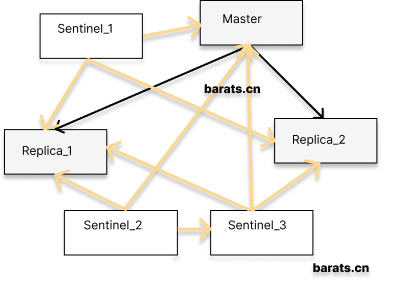
Redis Sentinel Mode
Sentinel mode: Sentinel sentry runs as a standalone process that sends commands to all Redis nodes in the cluster at regular intervals and waits for responses, thus enabling the purpose of monitoring Redis nodes. In order to ensure service availability, several Sentinels are designed to jointly monitor the Redis nodes in the cluster. When only one Sentinel in the cluster thinks that the cluster Master node is unavailable, it is called “subjective offline”. When the following Sentinel also detects that the Master node is unavailable and the number reaches a certain value, a vote is taken among the Sentinels, and the result of the vote is initiated by a Sentinel to perform a failover operation. After a successful switchover, each sentinel will switch the Replica server it monitors through a publish-and-subscribe mode, a process called “objective offline”. In this way, everything is transparent to the client. In this mode, node switching in the cluster can be guaranteed without the intervention of operation and maintenance personnel. However, when the number of clusters grows to a certain level, it will be a huge disaster to maintain. The various arrows and squares in the above diagram can already be very offensive, so I won’t go on.
To summarize: master-slave and sentinel modes, both implement read-write separation and do guarantee highly available services to some extent. However, the data on all nodes in a Redis cluster in both modes is identical, and the same data is replicated to all nodes. This is a waste of valuable memory resources. So starting with Redis 3.0, the official website provides Redis Cluster support to achieve true sharding and high availability.
Redis Cluster
The main advantages of the Cluster solution provided by the Redis website are as follows.
- pure native support, no need for any third-party support
- the ability to automatically partition data to individual nodes, so there is no concentration of data on a single node
- the failure of some nodes in the cluster will not cause service interruption, and data can be automatically transferred
How does it do it?
TCP communication between nodes
Each Redis node typically requires two TCP ports to run simultaneously. One of the ports (default port 6379) is used to interact with the client, which is the port number we commonly use. The other port, called bus port (16379, i.e., the port number that interacts with the client plus 1000), is responsible for interacting with the other Redis nodes in the cluster via a binary protocol. Communication between nodes includes node status detection, configuration updates, data migration, and so on. Therefore, when building a Redis Cluster cluster, each Redis node must have both TCP ports open, otherwise the Redis Cluster cluster will not work properly.
Data Sharding
When a client writes data to Redis, how does Redis spread the data among the nodes in the cluster?
A typical Redis Cluster cluster has 16384 hash slots, and each key is modulo 16384 by CRC16 checksum to determine which slot to place. Each node in the cluster is responsible for a portion of the hash slot. For example, if there are currently three nodes in the cluster, then:
- node A contains
hash slotsfrom 0 to 5500. - node B contains 5501 to 11000
hash slots. - node C contains
hash slotfrom 11001 to 16383.
Data backup between nodes
In terms of ensuring high availability, Redis Cluster clusters use the master-slave architecture described above to solve the problem. That is, for each master node, a slave node can be configured. However, don’t forget that Redis will shard writes to any node it can. For example, for the three nodes A, B, and C mentioned above, we can configure A1, B1, and C1 as three slave nodes. If the master node is not accessible, the cluster will promote the use of the slave nodes. The data between the master and slave nodes is identical.
Redis Cluster Configuration Parameters
In order to be able to set up Redis Cluster, a part of the necessary parameters for the configuration file that is created at Redis startup are as follows:
cluster-enabledWhether to enable clustering.cluster-config-fileThis file is not editable. The purpose of this parameter is that Redis writes the current node’s configuration information to this file for reference.cluster-node-timeoutThe maximum time that a node in the cluster is unavailable. If a node in the cluster is still unavailable beyond this time threshold, it is considered offline.
Redis Cluster Creation Steps
Based on the above foundation combined with the practice scenarios provided by the Redis website, the following steps are required to create a Redis Cluster:
- Start Redis with the cluster configuration file
cluster-enabled yesparameter (each node should be started this way). - Use
redis-cli --cluster create [ip:port,ip:port,...] --cluster-replicas 1command to connect all nodes (specify the ip:port form). - Allocate
hash slotin the above process according to the actual situation (eg: some machines have more memory, you can consider allocating more slots). - Connect to the cluster via
redis-cli -c -p 6379on any node and operate it (note that the-cparameter indicates that the connection is to the cluster).
Keeping the above four points in mind, these are the steps to build a Redis Cluster. When using Docker to implement containerization, the main idea is to implement each of these four steps in Docker.
Problems with Docker container fixed IP
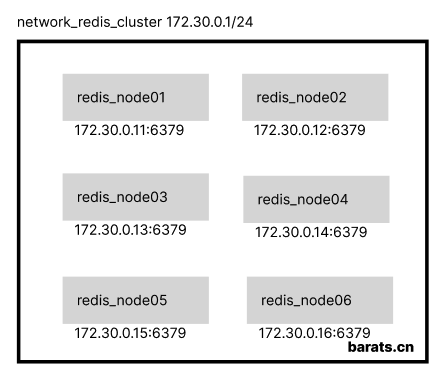
Suppose there are 6 in-memory servers with IP segments from 172.30.0.11 ~ 172.30.0.16, designed as a 3-master-3-slave Redis Cluster implementation.
- Provide stable and efficient Redis read and write services, and expand and trim Redis nodes at any time
- Each Redis node can provide read and write services, i.e., clients do not need to distinguish between Master or Replica nodes when writing or reading data.
- Each Redis node cannot lose data and requires master-slave support.
- Automatic failover and recovery without human intervention if a Redis node is unreachable
As you can see from the above, the process of creating a Redis Cluster requires the use of redis-cli --cluster create to create the cluster. You need to know the IPs and communication ports of these machines to complete the process. However, Docker containers cannot predict the IP address until they are started.
However, there is no way around it.
With the bridged network solution provided by Docker, we can create a dedicated network group, deploy each of the above six machines to the network, and specify a fixed intranet address for each node in the configuration file. The general network structure is as follows:
In the docker-compse process, IP segments and subnets can be specified by the following configuration:
After specifying the IP segment of network_redis_cluster, you can specify a fixed IP address in the networks configuration of each container, as follows.
|
|
Redis Cluster Create Process
Following the above configuration, you can easily create the required number of Redis Cluster nodes. However, how to use redis-cli --cluster create [ip:port,ip:port,...] in the Docker container --cluster-replicas 1 to connect individual Redis nodes to form a cluster?
The process of creating containers via docker-compse requires manually assigning Redis hash slots in order to do this. If we look up the redis-cli --cluster create command, we can see that it comes with an additional --cluster-yes parameter to skip the manual allocation of hash slots. In fact, the real purpose of this parameter is to let Redis automatically assign slots to the specified machines. So, the complete cluster creation command is as follows:
|
|
In addition, we can specify six Redis containers in the yaml file and also need a seventh container to execute the above commands, so a new cluster_helper node is added to the yaml file, which is configured as follows:
|
|
Redis Image Shared Volumes
With hub.docker.com we select any image from version 3.0 onwards, noting that there are two shared volumes to configure:
- -v
/data, Redis data - -v
/usr/local/etc/redis/redis.conf, Redis configuration file
Define the necessary variables in the env-file to facilitate subsequent operations:
The complete Redis node configuration in the yaml file:
|
|
Creating a Redis Cluster containerized cluster
After writing the complete yaml file and the env-file, start the build with docker-compose:
|
|
Execution will see the following:
|
|
View the running containers via docker ps.
|
|
We can go into any container via docker exec and then execute redis-cli -c to connect to the machines in the cluster.
|
|
After entering the rc_node5 container, let’s check the current cluster status (note that redis-cli -a xxx specifies the password, if you set it), and not much more about the redis-cli command.
|
|
View the nodes in the cluster.
|
|
In the rc_node5 node, log in to Redis and try writing data to it.
|
|