Service Worker is a script that the browser runs in the background independent of the web page. A PWA (Progressive Web App) is a web application, but similar in look and feel to a native app. Before we talk about Service Worker and PWA, let’s take a brief look at what Web Worker is.
Web Worker
What is Web Worker?
The Web Worker is a built-in thread in the browser so it can be used to execute non-blocking event loop JavaScript code. js is single-threaded and can only do one thing at a time. If there is a complex task, the thread will be blocked, which will seriously affect the user experience, Web Worker is used to allow the main thread to create worker threads that will work simultaneously with the main thread. The worker thread is only responsible for complex calculations, and then returns the results to the main thread. The simple understanding is that the worker thread performs complex calculations and the page (main thread) ui is smooth and does not block.
Type
- Dedicated Workers: [Dedicated
Worker] are instantiated by the main process and can only communicate with the main thread. - Shared Workers: can be accessed by all processes running in the same source.
- Service workers: [Service
Worker] can control the web pages it is associated with, interpret and modify navigation, resource requests, and cache resources to give you great flexibility in controlling the behavior of the program in certain situations.
Restrictions
Homologous restrictions
The script file assigned to the Worker thread to run must be the same source as the main thread’s script file, which is usually placed under the project.
DOM restrictions
Web Workers cannot access some very critical JavaScript features
DOM(it causes thread insecurity)windowobjectdocumentobjectparentobject
File Restrictions
For security reasons, the worker thread cannot read local files; the scripts it loads must come from the network and need to be the same source as the main thread’s scripts.
Service Worker
What is Service Worker?
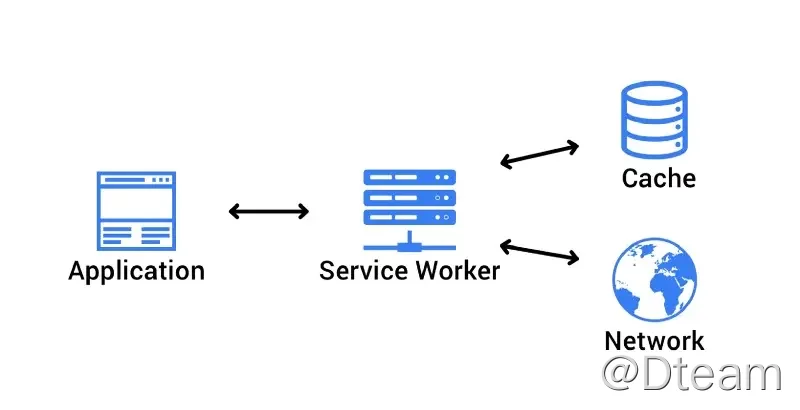
Introduction to MDN: Service workers essentially acts as a proxy server between the Web application, the browser and the network (when available). This API is designed to create an effective offline experience by intercepting network requests and taking appropriate actions to update resources from the server based on network availability. It also provides a portal to push notifications and access to the backend synchronization API.
Advantages / Disadvantages
优点
- Intercept network requests
- Return cached content when cache is available
- Manage cached content
- Push information to clients
- Backend data synchronization
- Resource prefetching
Disadvantages
- Limitations of Web Worker
Life Cycle
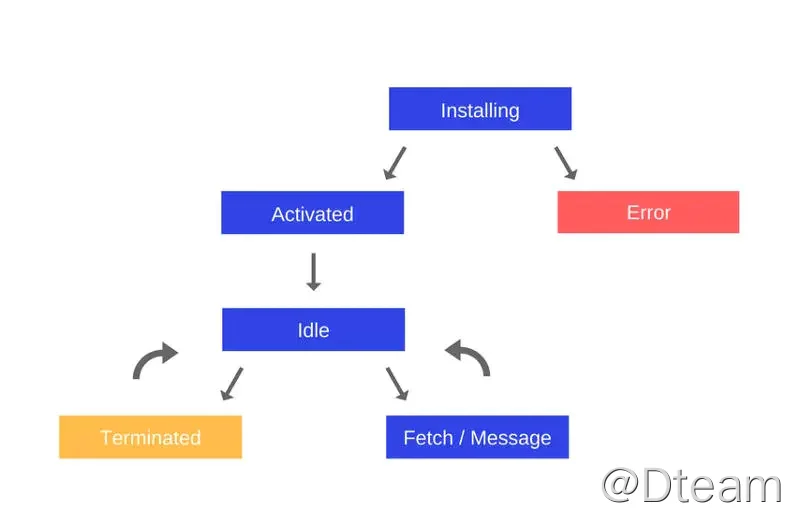
The lifecycle of the Service Worker is completely separate from the web page. It consists of the following phases:
- Download
- Install
- Activate
Download
The first time a user visits a website or page controlled by a service worker, the service worker is immediately downloaded. The browser will download the .js file containing the Service Worker.
Install
You need to register on the web page to install it. Before installation, you need to check if serviceWorker is supported, if it is, call register() every time the page is loaded and the browser will determine if it is registered. An important detail of the register() method is the location of the Service Worker file. In this case, you can see that the Service Worker file is located at the root of the domain, which means that the Service Worker scope will be under this domain. In other words, this Service Worker will receive fetch events for everything in this domain. If we register the Service Worker file with /example/sw/sw.js, then the Service Worker will only see fetch events for pages starting with /example/ (e.g. /example/page1/, / example/page2/).
|
|
After successful registration, the install event will be triggered, which will call caches.open() with the cache name we want, followed by cache.addAll() and pass in an array of files. This is a promise chain (caches.open() and cache.addAll()). The event.waitUntil() method takes a promise and uses it to know how long the installation will take and whether it succeeded. If all files are successfully cached, then Service Worker will be installed. If one of the files fails to download, then the installation step will fail. If the list of cached files is too long, it will increase the chances of failure.
|
|
Activate
The next step is to enter the activation state: Activate. In this state, you can update the Service Worker.
- When the user navigates to the site, the browser tries to re-download the script file that defines the
Service Workerin the background. If there is a byte difference between theService Workerfile and the file it is currently using, it is treated as a newService Worker. - The new
Service Workerwill start and theinstallevent will be fired. - The old
Service Workeris still in control of the current page, so the newService Worker will enter the waitingstate. - When the currently open page on the site is closed, the old
Service Workerwill be terminated and the newService Workerwill take control. - When the new
Service Workertakes control, it will trigger itsactivateevent.
|
|
Caching and return requests
Strategies
- Cache Priority
- Network First
- Cache Only
- Network Only
- Speed Priority
After the Service Worker is installed and the user goes to another page or refreshes the current page, the Service Worker will start receiving fetch events. Here is the cache-first strategy: first listen to the browser fetch event and intercept the original request. Check if the requested resource exists in the cache, and return it to the cache if it does. Then the resource is requested remotely, cached, and returned.
|
|
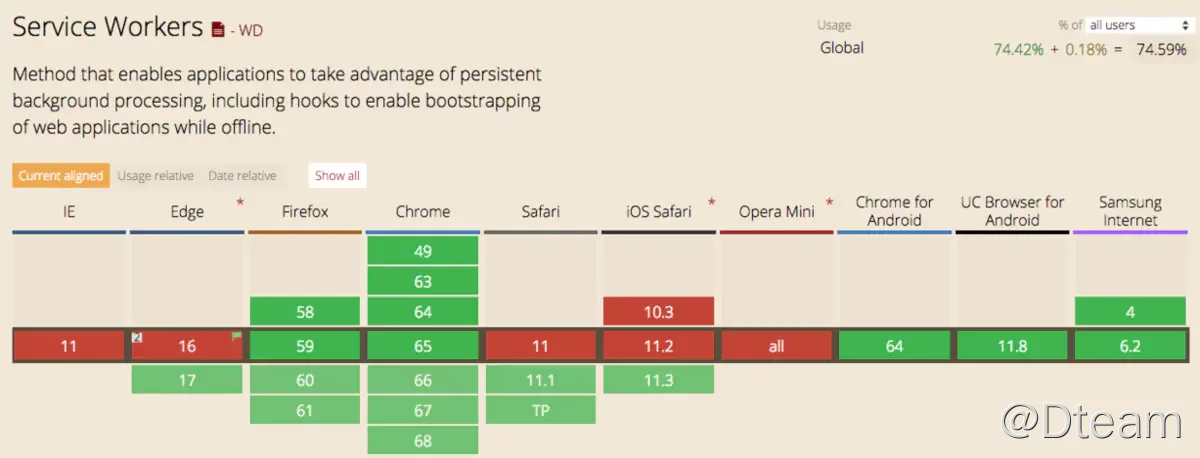
Browser Compatibility
PWA
What is a PWA?
PWA (Progressive Web Apps) uses modern Web API and traditional progressive enhancement strategies to create cross-platform Web applications.
Advantages / Disadvantages
Advantages
Discoverable, easy to install, linkable, network independent, progressive, reusable, responsive and secure.
- Progressive - works with all browsers, as it was developed with progressive enhancement in mind
- Connection-agnostic - able to be accessed offline or in poor network conditions with the help of
Service Worker. - Native-like - Since it is developed on the
App Shellmodel, it should have the interaction of aNative Appand give the user aNative Appexperience - Continuous updates - always up-to-date, no versioning and updating issues
- Secure - Served over the
HTTPSprotocol to prevent snooping and ensure that content is not tampered with - Indexable -
manifestfiles andService Workercan be indexed by search engines to identify them asapps - Sticky - users can be brought back by pushing offline notifications, etc.
- Installable - users can add popular
Web Appsto their desktops, eliminating the need to go to an app store to download them - Linkable - content can be shared through links without downloading and installing
Disadvantages
- Low access to system functions
- No review criteria
Core Technology
-
Web App Manifest Web App Manifestin a nutshell, a file that centrally writes page related information and configuration in the form ofJSON.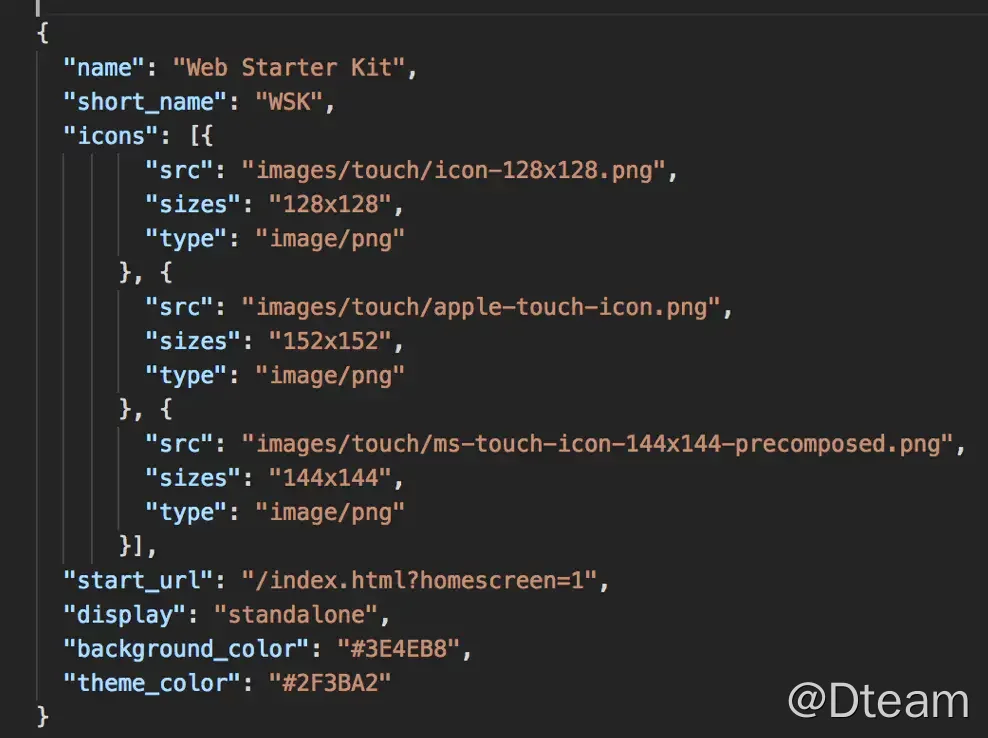
start_urlcan set the start URLiconswill help me set the page icons for each resolutionbackground_colorwill set the background color,Chromewill use this color immediately after the web application is launched, and this color will remain on the screen until the web application is first presentedtheme_colorsets the theme colordisplaysets the startup style
-
Service Worker
-
Notifications API
-
Push API, The Push API can be used to push new content from the server without client intervention, and is implemented by the application’s Service Worker; the notifications can be sent to the client via the
Service Workerto show the user some new information, or at least to alert the user that the application has been updated with some features.
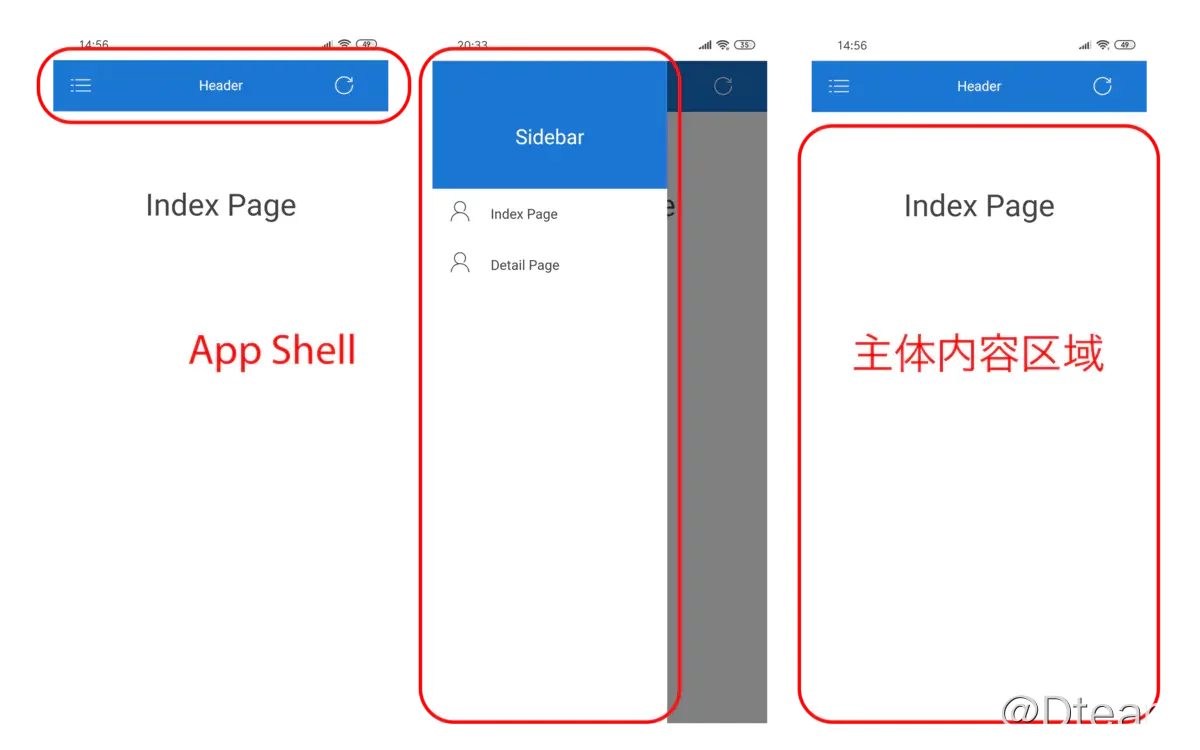
App Shell
An App Shell is the smallest collection of resources required for a page to be presented, i.e. the smallest collection of static resources such as HTML, CSS and JavaScript needed to support the user interface. The App Shell architecture is a way to build a PWA that loads reliably and instantly onto your user’s screen, similar to a native app. Most PWAs are written as Single Page Application, which reduces the overhead of page bounces and allows developers to add transition animations on page transitions to avoid white screens on loading. The content on the page that is fixed during the page switch is then part of the App Shell. The application can be roughly divided into a content part and a shell part in terms of display content. The App Shell is the shell part, that is, the basic structure of the page. For example, header, sidebar.
Main functions - all depend on Service Worker
Offline
- Instead of displaying a “no network connection” error page, we can make our
Web Appaccessible and even use some of its features without a network (offline). - In normal network conditions, it is also possible to save some of the requested bandwidth through various spontaneous and controlled caching methods
- When the network is bad, we can use caching to access our application quickly and improve the experience.
Back-office synchronization
Background sync allows you to perform some interrupted requests or operations after closing the website. You need to listen to the sync event in the Service Worker. Launching a background sync sync in the browser will trigger the sync event in the Service Worker.
|
|
Message push/notification
The Push API and the Notification API are different but complementary functions, the Push API is used to subscribe and push messages to the Service Worker, while the Notification API is used to send messages from the Service Worker to the user.
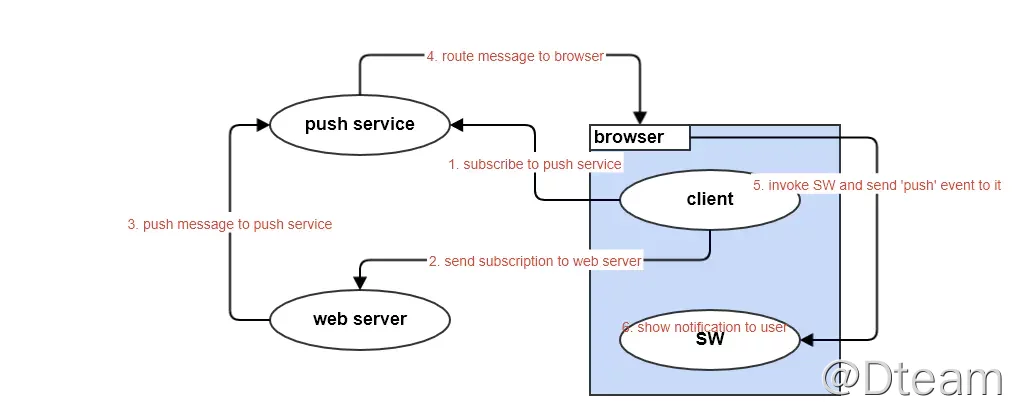
To complete a message push and display it, the following steps are required.
- web client registers SW and initiates a message subscription request to the push service, and saves the subscription information (subscription)
- web server gets the subscription from the web client
- web server sends a message to the destination in the subscription (endpoint, which contains the address of the push service)
- push service receives the message and forwards it to browser
- browser wakes up SW and sends the message to it
- SW receives the message and displays it
push service
A service associated with browser that is dedicated to handling notifications and is used to receive push messages from the web server. Each browser has its own push service.
Angular-based PWA message notifications
Use web-push to complete subscriptions and pushes.
In the first step, the client requests a subscriber.
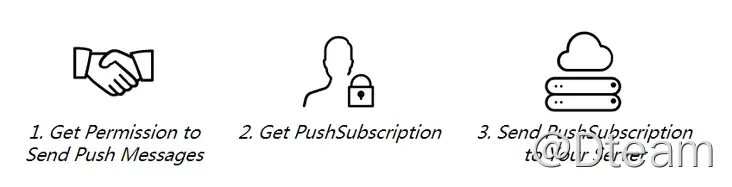
Once the user authorizes, the browser generates a PushScription, pushSubscription containing the public key and endpointURL, which can be used by the application server to encrypt the message when pushing, and endpointURL is a URL containing a unique identifier generated by the push server, which the push server The push server uses it to determine which client to send the message to.
In the second step, the application server sends the api of the web push protocol standard, which triggers the push server to push the message.
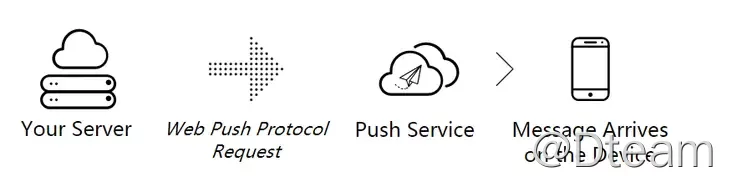
The application server sends a message push request (for the purpose of pushing updates to the user’s browser), and in order to send a request to the push server, it needs to look at the PushScription previously obtained and take out the endpoint in it, which is the access point configured by the push server for that user.
A PushScription object is as follows
The endpoint is the destination of the message sent by the web server.
You can see that chrome’s push service is running at https://fcm.googleapis.com, which is different for each browser, firefox is at https://updates.push.services.mozilla.com and edge is https://sg2p.notify.windows.com.
In the third step, the browser side receives the message push, triggers the push event and displays it:
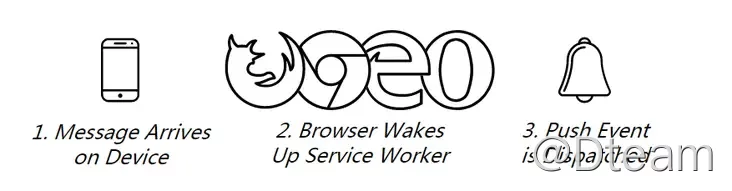
When the push service receives the message, it will notify the browser (if the browser is currently closed, it will receive a notification when it is opened next time), and the browser will wake up the corresponding SW, specifically by sending a push event to SW, which will handle the push event and pop up a small box to display the The message will be displayed.
Main Code
The user is first asked if subscription is turned on: requestSubscription, and if so, a PushScription object is obtained. When subscribe is called to generate PushScription, the browser sends a request to the staging server it specifies to generate the endpoint and the rest. After getting the PushScription object, it sends it to the application server for storage.
|
|
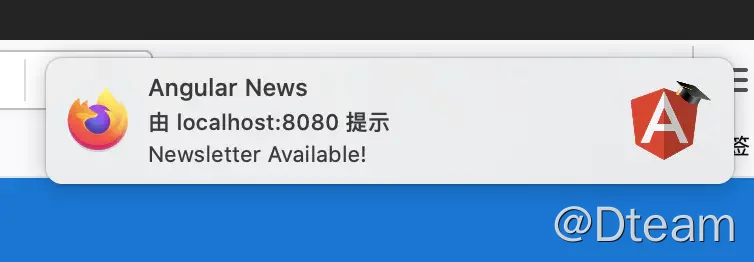
The application server sends a message, the push service receives the message and notifies the browser (if the browser is currently closed, it will receive a notification when it is opened next time), the browser wakes up the corresponding SW, specifically by sending a push event to the SW, the SW handles the push event, and pop up a small box to display the message. You can also set action or handle user clicks.
|
|
VAPID
VAPID is used to distinguish the legitimate pushers. In short, we generate a key pair for the web server, including public and private keys, and add an email address so that the push service can contact the pusher in case of problems. Just add the vapidKeys before using them. Use web-push generate-vapid-keys --json to get the vapidKeys.
|
|
Summary
Service Worker and PWA are very powerful. If you are interested, you can try the offline and background synchronization function by yourself.
Reference https://blog.dteam.top/posts/2021-05/service-worker-and-pwa.html