I’ve been using kubeadm to deploy kubernetes clusters for the last two years, and it’s generally convenient to work with some of my own small scripts and some automation tools; however, I’m really worried about the stability of full containerization, and I’ve encountered inexplicable certificate expiration errors, and finally rebooted to solve such problems; so I’m also exploring more convenient binary deployment methods, such as this k0s.
1. k0s Introduction
The Simple, Solid & Certified Kubernetes Distribution.
k0s can be thought of as a downstream Kubernetes distribution. Compared to native Kubernetes, k0s does not neuter a lot of Kubernetes functionality; the only major part of k0s that is neutered is basically the in-tree Cloud provider, the rest is the same as native Kubernetes.
k0s compiles its own Kubernetes source code to generate Kubernetes binaries, and then releases the binaries to the host after installation before starting; in this case, all features are almost identical to native Kubernetes.
2. use k0sctl
k0sctl is a tool provided by k0s to facilitate quick deployment of clusters, somewhat similar to kubeadm, but much more scalable than kubeadm. In a multi-node scenario, k0sctl initializes the cluster by linking the target host via ssh and then following the steps to release files and start Kubernetes-related services.
2.1. k0sctl install cluster
The installation process will automatically download the relevant image, how to install offline is explained later. Before installation, make sure the hostname of the target machine is in non-domain name form, otherwise some problems may occur. The following is a simple example of starting a cluster:
First install k0sctl
1
2
3
4
|
# install k0sctl
wget https://github.com/k0sproject/k0sctl/releases/download/v0.9.0/k0sctl-linux-x64
chmod +x k0sctl-linux-x64
mv k0sctl-linux-x64 /usr/local/bin/k0sctl
|
Then write the k0sctl.yaml configuration file
 1
 2
 3
 4
 5
 6
 7
 8
 9
10
11
12
13
14
15
16
17
18
19
20
21
22
23
24
25
26
27
28
29
30
31
32
33
34
35
36
37
38
39
40
41
42
43
44
45
46
47
48
49
50
51
52
53
54
55
56
57
58
59
60
|
apiVersion: k0sctl.k0sproject.io/v1beta1
kind: Cluster
metadata:
  name: k0s-cluster
spec:
  hosts:
  - ssh:
      address: 10.0.0.11
      user: root
      port: 22
      keyPath: /Users/bleem/.ssh/id_rsa
    role: controller+worker
  - ssh:
      address: 10.0.0.12
      user: root
      port: 22
      keyPath: /Users/bleem/.ssh/id_rsa
    role: controller+worker
  - ssh:
      address: 10.0.0.13
      user: root
      port: 22
      keyPath: /Users/bleem/.ssh/id_rsa
    role: controller+worker
  - ssh:
      address: 10.0.0.14
      user: root
      port: 22
      keyPath: /Users/bleem/.ssh/id_rsa
    role: worker
  - ssh:
      address: 10.0.0.15
      user: root
      port: 22
      keyPath: /Users/bleem/.ssh/id_rsa
    role: worker
  k0s:
    version: 1.21.2+k0s.1
    config:
      apiVersion: k0s.k0sproject.io/v1beta1
      kind: Cluster
      metadata:
        name: k0s
      spec:
        api:
          address: 10.0.0.11
          port: 6443
          k0sApiPort: 9443
          sans:
          - 10.0.0.11
          - 10.0.0.12
          - 10.0.0.13
        storage:
          type: etcd
          etcd:
            peerAddress: 10.0.0.11
        network:
          kubeProxy:
            disabled: false
            mode: ipvs
|
Finally, execute the apply command to install, and make sure your operating machine can ssh securely log in to all target machines before installing:
 1
 2
 3
 4
 5
 6
 7
 8
 9
10
11
12
13
14
15
16
17
18
19
20
21
22
23
24
25
26
27
28
29
30
31
32
33
34
35
36
|
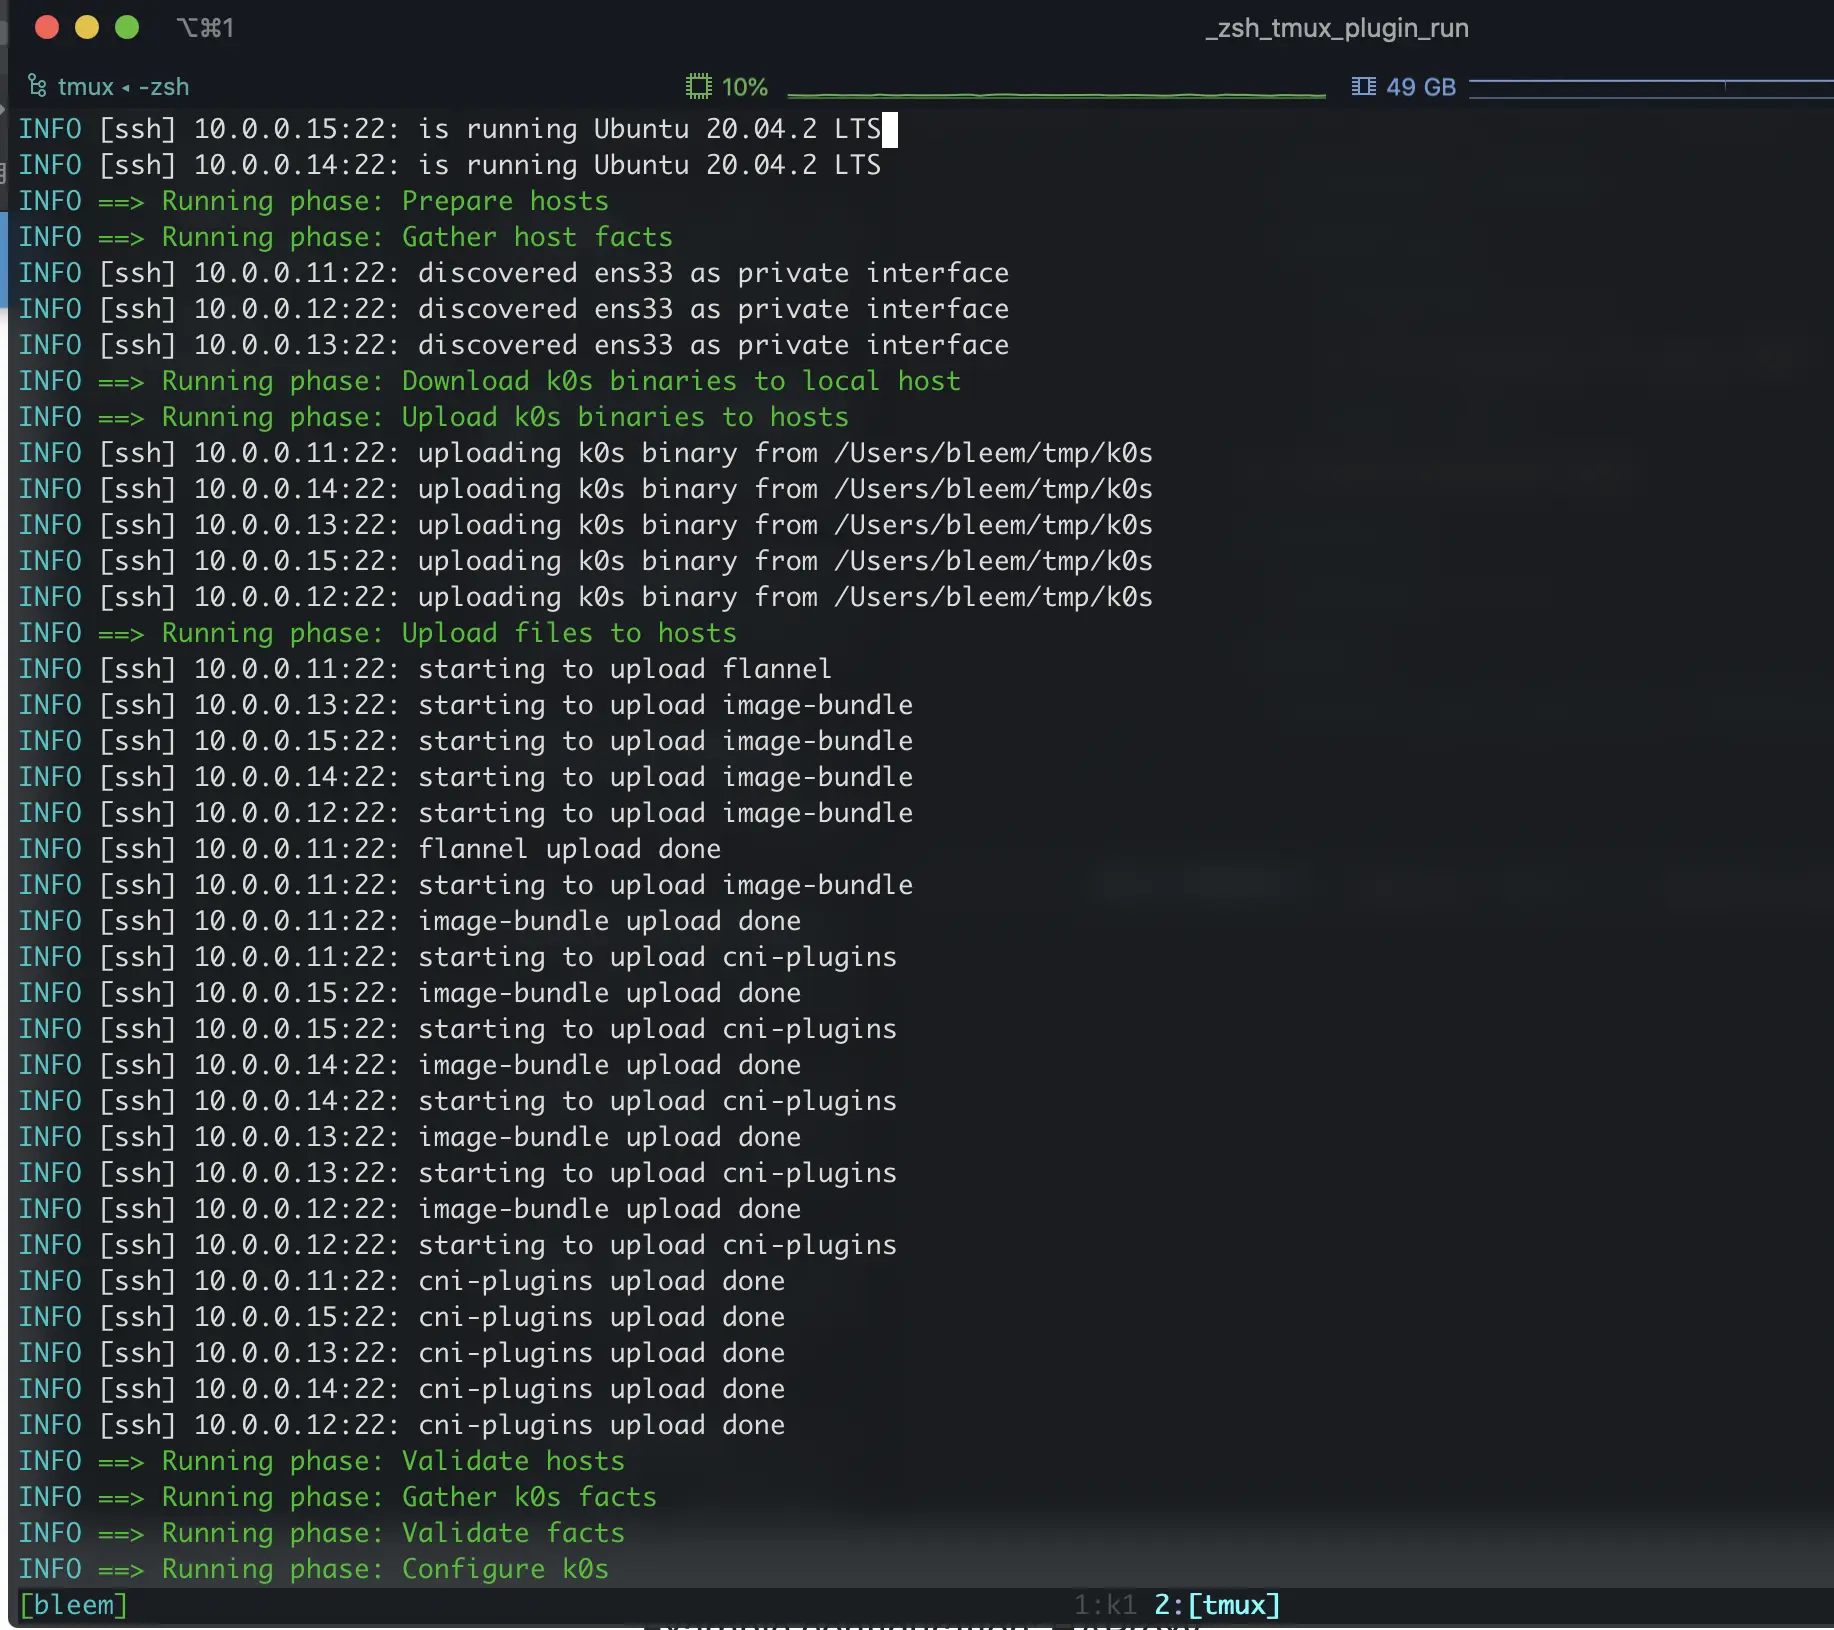
➜  tmp k0sctl apply -c bak.yaml

⠀⣿⣿⡇⠀⠀⢀⣴⣾⣿⠟⠁⢸⣿⣿⣿⣿⣿⣿⣿⡿⠛⠁⠀⢸⣿⣿⣿⣿⣿⣿⣿⣿⣿⣿⣿⠀█████████ █████████ ███
⠀⣿⣿⡇⣠⣶⣿⡿⠋⠀⠀⠀⢸⣿⡇⠀⠀⠀⣠⠀⠀⢀⣠⡆⢸⣿⣿⠀⠀⠀⠀⠀⠀⠀⠀⠀⠀███          ███    ███
⠀⣿⣿⣿⣿⣟⠋⠀⠀⠀⠀⠀⢸⣿⡇⠀⢰⣾⣿⠀⠀⣿⣿⡇⢸⣿⣿⣿⣿⣿⣿⣿⣿⣿⣿⣿⠀███          ███    ███
⠀⣿⣿⡏⠻⣿⣷⣤⡀⠀⠀⠀⠸⠛⠁⠀⠸⠋⠁⠀⠀⣿⣿⡇⠈⠉⠉⠉⠉⠉⠉⠉⠉⢹⣿⣿⠀███          ███    ███
⠀⣿⣿⡇⠀⠀⠙⢿⣿⣦⣀⠀⠀⠀⣠⣶⣶⣶⣶⣶⣶⣿⣿⡇⢰⣶⣶⣶⣶⣶⣶⣶⣶⣾⣿⣿⠀█████████    ███    ██████████

k0sctl 0.0.0 Copyright 2021, k0sctl authors.
Anonymized telemetry of usage will be sent to the authors.
By continuing to use k0sctl you agree to these terms:
https://k0sproject.io/licenses/eula
INFO ==> Running phase: Connect to hosts
INFO [ssh] 10.0.0.15:22: connected
INFO [ssh] 10.0.0.11:22: connected
INFO [ssh] 10.0.0.12:22: connected
INFO [ssh] 10.0.0.14:22: connected
INFO [ssh] 10.0.0.13:22: connected
INFO ==> Running phase: Detect host operating systems
INFO [ssh] 10.0.0.11:22: is running Ubuntu 20.04.2 LTS
INFO [ssh] 10.0.0.12:22: is running Ubuntu 20.04.2 LTS
INFO [ssh] 10.0.0.14:22: is running Ubuntu 20.04.2 LTS
INFO [ssh] 10.0.0.13:22: is running Ubuntu 20.04.2 LTS
INFO [ssh] 10.0.0.15:22: is running Ubuntu 20.04.2 LTS
INFO ==> Running phase: Prepare hosts
INFO ==> Running phase: Gather host facts
INFO [ssh] 10.0.0.11:22: discovered ens33 as private interface
INFO [ssh] 10.0.0.13:22: discovered ens33 as private interface
INFO [ssh] 10.0.0.12:22: discovered ens33 as private interface
INFO ==> Running phase: Download k0s on hosts
INFO [ssh] 10.0.0.11:22: downloading k0s 1.21.2+k0s.1
INFO [ssh] 10.0.0.13:22: downloading k0s 1.21.2+k0s.1
INFO [ssh] 10.0.0.12:22: downloading k0s 1.21.2+k0s.1
INFO [ssh] 10.0.0.15:22: downloading k0s 1.21.2+k0s.1
INFO [ssh] 10.0.0.14:22: downloading k0s 1.21.2+k0s.1
......
|
After a few moments the cluster with three Masters and two Nodes will be installed:
1
2
3
4
5
6
7
8
|
# Note: The target machine hostname should not be in the form of a domain name, the sample here is a fix for this problem
k1.node ➜ ~ k0s kubectl get node -o wide
NAME      STATUS   ROLES    AGE   VERSION       INTERNAL-IP   EXTERNAL-IP   OS-IMAGE             KERNEL-VERSION     CONTAINER-RUNTIME
k1.node   Ready    <none>   10m   v1.21.2+k0s   10.0.0.11     <none>        Ubuntu 20.04.2 LTS   5.4.0-77-generic   containerd://1.4.6
k2.node   Ready    <none>   10m   v1.21.2+k0s   10.0.0.12     <none>        Ubuntu 20.04.2 LTS   5.4.0-77-generic   containerd://1.4.6
k3.node   Ready    <none>   10m   v1.21.2+k0s   10.0.0.13     <none>        Ubuntu 20.04.2 LTS   5.4.0-77-generic   containerd://1.4.6
k4.node   Ready    <none>   10m   v1.21.2+k0s   10.0.0.14     <none>        Ubuntu 20.04.2 LTS   5.4.0-77-generic   containerd://1.4.6
k5.node   Ready    <none>   10m   v1.21.2+k0s   10.0.0.15     <none>        Ubuntu 20.04.2 LTS   5.4.0-77-generic   containerd://1.4.6
|
2.2. The way k0sctl is extended
Unlike kubeadm, k0sctl provides customizable options for almost all installation details, which are extended by three behaviors:
- File Uploads: k0sctl allows to define file uploads before installation. k0sctl will upload all relevant files already defined to the target host before installation, including but not limited to k0s own binaries, offline image packages, other installation files, other helper scripts, etc.
- Manifests and Helm: When specific files are uploaded to the
/var/lib/k0s/manifests directory of the master node, k0s automatically applies these configurations during installation, similar to the static pod of a kubelet, except that k0s allows all resources (including but not limited to deployment, daemonset, namespace, etc.); you can also add Helm configuration directly to k0sctl.yaml and k0s will manage it for you in the same way.
- Assistant scripts: You can configure the
hooks option under each host to execute some specific scripts (not in the documentation, you need to see the source code) to do some trolling in specific situations.
2.3. k0sctl using offline image package
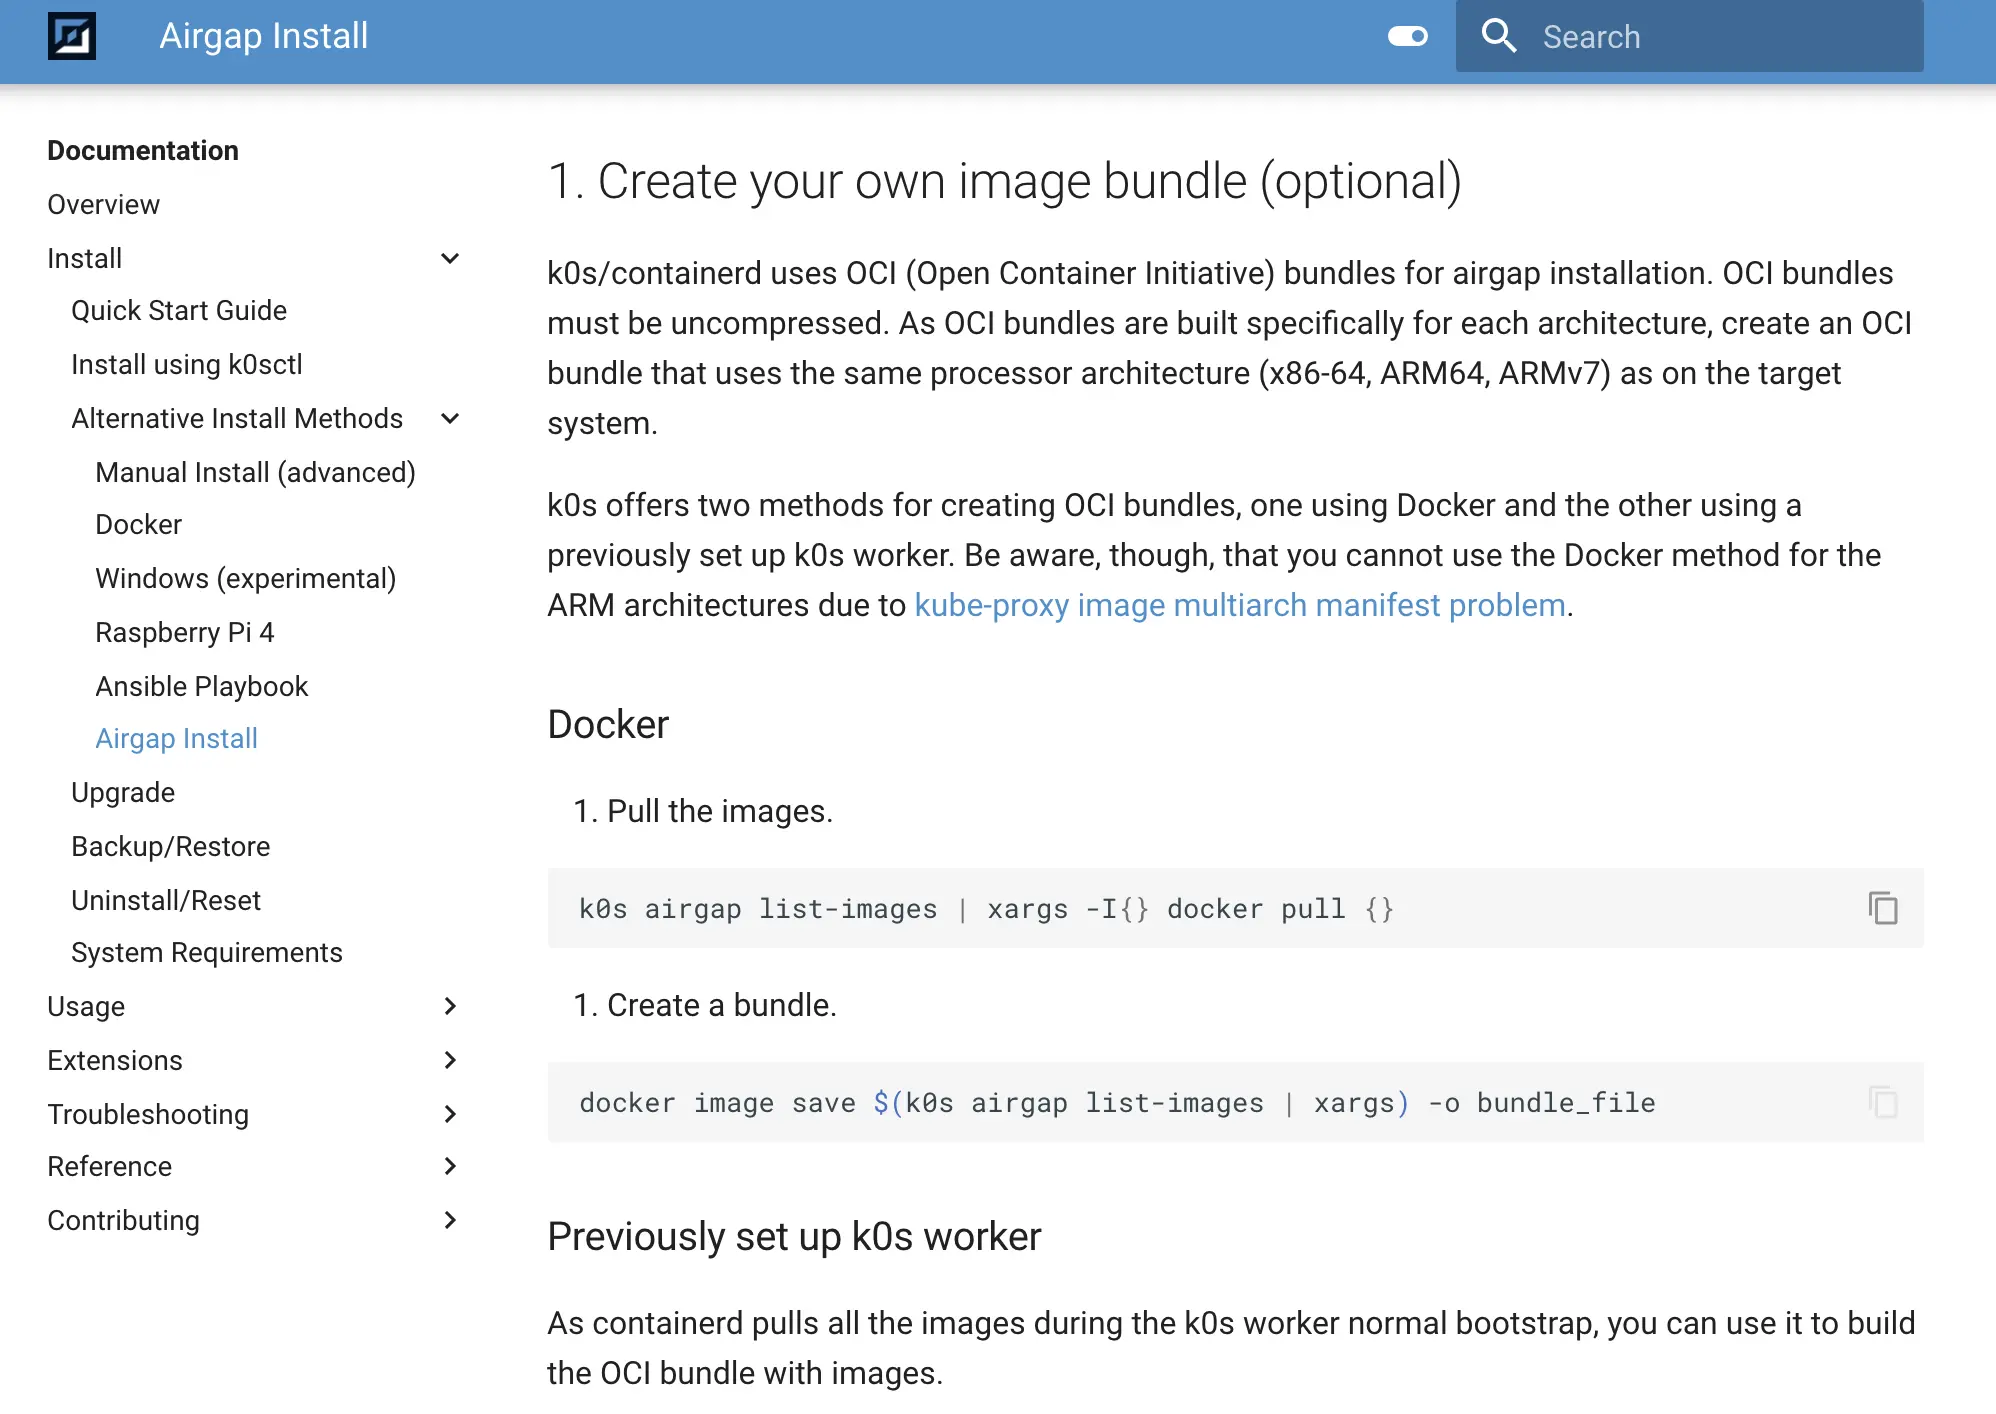
Based on the above extensions, k0s also conveniently integrates automatic import of offline image packages for us. We just need to define a file upload, upload the image package to the /var/lib/k0s/images/ directory and k0s will automatically dump it into containerd without our manual intervention:
 1
 2
 3
 4
 5
 6
 7
 8
 9
10
11
12
13
14
15
16
17
18
19
20
|
apiVersion: k0sctl.k0sproject.io/v1beta1
kind: Cluster
metadata:
  name: k0s-cluster
spec:
  hosts:
  - ssh:
      address: 10.0.0.11
      user: root
      port: 22
      keyPath: /Users/bleem/.ssh/id_rsa
    role: controller+worker
    # The files configuration will upload the relevant files to the target host before installation
    files:
    - name: image-bundle
      src: /Users/bleem/tmp/bundle_file
      # The image archive in this directory will be automatically imported into containerd
      dstDir: /var/lib/k0s/images/
      perm: 0755
......
|
Please refer to the official Airgap install documentation on how to download the image archive (bundle_file) and customize it yourself.
2.4. Switching CNI plug-ins
By default k0s integrates two CNI plugins: calico and kube-router; if we use other CNI plugins like flannel, we just need to set the default CNI plugin to custom and upload the flannel deployment yaml to a master’s /var/lib/ k0s/manifests directory of a master, and k0s will automatically perform the apply -f xxxx.yaml operation for us.
The following is a sample of switching to flannel. Note that the official flannel image will not install the CNI binaries for you, we need to install them ourselves with the help of a file upload (CNI GitHub plugin download address):
 1
 2
 3
 4
 5
 6
 7
 8
 9
10
11
12
13
14
15
16
17
18
19
20
21
22
23
24
25
26
27
28
29
30
31
32
33
34
35
36
37
38
39
40
41
42
43
44
45
46
|
apiVersion: k0sctl.k0sproject.io/v1beta1
kind: Cluster
metadata:
  name: k0s-cluster
spec:
  hosts:
  - ssh:
      address: 10.0.0.11
      user: root
      port: 22
      keyPath: /Users/bleem/.ssh/id_rsa
    role: controller+worker
    files:
    # Put the flannel yaml in manifests (you need to create a separate directory)
    - name: flannel
      src: /Users/bleem/tmp/kube-flannel.yaml
      dstDir: /var/lib/k0s/manifests/flannel
      perm: 0644
    # Install the CNI plug-in yourself
    - name: cni-plugins
      src: /Users/bleem/tmp/cni-plugins/*
      dstDir: /opt/cni/bin/
      perm: 0755
  k0s:
    version: v1.21.2+k0s.1
    config:
      apiVersion: k0s.k0sproject.io/v1beta1
      kind: Cluster
      metadata:
        name: k0s
      spec:
        api:
          address: 10.0.0.11
          port: 6443
          k0sApiPort: 9443
          sans:
          - 10.0.0.11
          - 10.0.0.12
          - 10.0.0.13
        storage:
          type: etcd
        network:
          podCIDR: 10.244.0.0/16
          serviceCIDR: 10.96.0.0/12
          # Specify CNI as custom so that k0s does not install calico/kube-router
          provider: custom
|
2.5. Upload k0s binary file
By default k0sctl will download the k0s binaries on the target machine when installing the cluster, in addition to normal files, image archives, etc.; of course in an offline environment this step can also be uploaded offline with a simple configuration:
 1
 2
 3
 4
 5
 6
 7
 8
 9
10
11
12
13
14
15
16
17
18
19
20
21
22
|
apiVersion: k0sctl.k0sproject.io/v1beta1
kind: Cluster
metadata:
  name: k0s-cluster
spec:
  hosts:
  - ssh:
      address: 10.0.0.11
      user: root
      port: 22
      keyPath: /Users/bleem/.ssh/id_rsa
    role: controller+worker
    # Declare that you need to upload a binary file
    uploadBinary: true
    # Specify the binary file location
    k0sBinaryPath: /Users/bleem/tmp/k0s
    files:
    - name: flannel
      src: /Users/bleem/tmp/kube-flannel.yaml
      dstDir: /var/lib/k0s/manifests/flannel
      perm: 0644
......
|
2.6. Replace mirror version
By default, k0s version numbers are consistent with Kubernetes, but if you expect a component to use a specific version, you can directly configure the image names of these built-in components:
 1
 2
 3
 4
 5
 6
 7
 8
 9
10
11
12
13
14
15
16
17
18
19
20
21
22
23
24
25
26
27
28
29
30
31
32
33
34
35
36
37
38
39
40
41
42
43
44
45
46
47
48
49
50
51
52
53
54
55
56
57
58
59
60
61
62
63
64
65
66
67
68
69
|
apiVersion: k0sctl.k0sproject.io/v1beta1
kind: Cluster
metadata:
  name: k0s-cluster
spec:
  hosts:
  - ssh:
      address: 10.0.0.11
      user: root
      port: 22
      keyPath: /Users/bleem/.ssh/id_rsa
    role: controller+worker
    uploadBinary: true
    k0sBinaryPath: /Users/bleem/tmp/k0s
    files:
    - name: flannel
      src: /Users/bleem/tmp/kube-flannel.yaml
      dstDir: /var/lib/k0s/manifests/flannel
      perm: 0644
......
  k0s:
    version: v1.21.2+k0s.1
    config:
      apiVersion: k0s.k0sproject.io/v1beta1
      kind: Cluster
      metadata:
        name: k0s
      spec:
        api:
          address: 10.0.0.11
          port: 6443
          k0sApiPort: 9443
          sans:
          - 10.0.0.11
          - 10.0.0.12
          - 10.0.0.13
        # Specify the version of the image used for internal components
        images:
          #konnectivity:
          #  image: us.gcr.io/k8s-artifacts-prod/kas-network-proxy/proxy-agent
          #  version: v0.0.21
          #metricsserver:
          #  image: gcr.io/k8s-staging-metrics-server/metrics-server
          #  version: v0.3.7
          kubeproxy:
            image: k8s.gcr.io/kube-proxy
            version: v1.21.3
          #coredns:
          #  image: docker.io/coredns/coredns
          #  version: 1.7.0
          #calico:
          #  cni:
          #    image: docker.io/calico/cni
          #    version: v3.18.1
          #  node:
          #    image: docker.io/calico/node
          #    version: v3.18.1
          #  kubecontrollers:
          #    image: docker.io/calico/kube-controllers
          #    version: v3.18.1
          #kuberouter:
          #  cni:
          #    image: docker.io/cloudnativelabs/kube-router
          #    version: v1.2.1
          #  cniInstaller:
          #    image: quay.io/k0sproject/cni-node
          #    version: 0.1.0
          default_pull_policy: IfNotPresent
          #default_pull_policy: Never
|
2.7. Adjusting master component parameters
If you are familiar with Kubernetes, you should know that the three main components on the master: apiserver, controller, and scheduler control the whole cluster; the k0sctl installation of the cluster also allows you to customize the parameters of these components, which is done by modifying the k0sctl.yaml configuration file used.
spec.api.extraArgs : custom parameters (kv map) for customizing the kube-apiserverspec.scheduler.extraArgs : custom parameters (kv map) for custom kube-schedulerspec.controllerManager.extraArgs : custom arguments for kube-controller-manager (kv map)spec.workerProfiles : used to override the configuration in kubelet-config.yaml, which will eventually be merged with the default kubelet-config.yaml
There is also an InstallFlags configuration in the Host configuration to pass additional configuration options for the k0s installation.
3. k0s HA build
In fact, the second part above is mainly to introduce some basic functions of k0sctl, in order to pave the way for the following part of HA production level deployment.
For now, k0s HA only supports a standalone load balancer HA architecture; that is, there needs to be a highly available Layer 4 load balancer externally, and all other Node nodes link to this load balancer to achieve high availability of the master. Building an HA cluster is as simple as adding an external load balancer address using the k0sctl command; here is a complete, fully offline HA cluster build configuration.
3.1. External Load Balancer
Before we build it we assume that there is already an external highly available Layer 4 load balancer and that the load balancer is already loaded with the following ports:
6443 (for Kubernetes API) : load balancer 6443 Load 6443 of all master nodes9443 (for controller join API) : load balancer 9443 load all master nodes 94438132 (for Konnectivity agent) : load balancer 8132 load all master nodes of 81328133 (for Konnectivity server) : load balancer 8133 load all master nodes 8133
The following is a sample nginx 4-tier proxy:
 1
 2
 3
 4
 5
 6
 7
 8
 9
10
11
12
13
14
15
16
17
18
19
20
21
22
23
24
25
26
27
28
29
30
31
32
33
34
35
36
37
38
39
40
41
42
43
44
45
46
47
48
49
50
51
52
53
54
55
56
57
58
59
60
|
error_log syslog:server=unix:/dev/log notice;

worker_processes auto;
events {
	multi_accept on;
	use epoll;
	worker_connections 1024;
}

stream {
    upstream kube_apiserver {
        least_conn;
        server 10.0.0.11:6443;
        server 10.0.0.12:6443;
        server 10.0.0.13:6443;
    }
    upstream konnectivity_agent {
        least_conn;
        server 10.0.0.11:8132;
        server 10.0.0.12:8132;
        server 10.0.0.13:8132;
    }
    upstream konnectivity_server {
        least_conn;
        server 10.0.0.11:8133;
        server 10.0.0.12:8133;
        server 10.0.0.13:8133;
    }
    upstream controller_join_api {
        least_conn;
        server 10.0.0.11:9443;
        server 10.0.0.12:9443;
        server 10.0.0.13:9443;
    }

    server {
        listen        0.0.0.0:6443;
        proxy_pass    kube_apiserver;
        proxy_timeout 10m;
        proxy_connect_timeout 1s;
    }
    server {
        listen        0.0.0.0:8132;
        proxy_pass    konnectivity_agent;
        proxy_timeout 10m;
        proxy_connect_timeout 1s;
    }
    server {
        listen        0.0.0.0:8133;
        proxy_pass    konnectivity_server;
        proxy_timeout 10m;
        proxy_connect_timeout 1s;
    }
    server {
        listen        0.0.0.0:9443;
        proxy_pass    controller_join_api;
        proxy_timeout 10m;
        proxy_connect_timeout 1s;
    }
}
|
3.2. Build an HA cluster
The following is a sample HA + offline deployment configuration for k0sctl:
  1
  2
  3
  4
  5
  6
  7
  8
  9
 10
 11
 12
 13
 14
 15
 16
 17
 18
 19
 20
 21
 22
 23
 24
 25
 26
 27
 28
 29
 30
 31
 32
 33
 34
 35
 36
 37
 38
 39
 40
 41
 42
 43
 44
 45
 46
 47
 48
 49
 50
 51
 52
 53
 54
 55
 56
 57
 58
 59
 60
 61
 62
 63
 64
 65
 66
 67
 68
 69
 70
 71
 72
 73
 74
 75
 76
 77
 78
 79
 80
 81
 82
 83
 84
 85
 86
 87
 88
 89
 90
 91
 92
 93
 94
 95
 96
 97
 98
 99
100
101
102
103
104
105
106
107
108
109
110
111
112
113
114
115
116
117
118
119
120
121
122
123
124
125
126
127
128
129
130
131
132
133
134
135
136
137
138
139
140
141
142
|
apiVersion: k0sctl.k0sproject.io/v1beta1
kind: Cluster
metadata:
  name: k0s-cluster
spec:
  hosts:
  - ssh:
      address: 10.0.0.11
      user: root
      port: 22
      keyPath: /Users/bleem/.ssh/id_rsa
    # role 支持的值
    # 'controller' 单 master
    # 'worker' 单 worker
    # 'controller+worker' master 和 worker 都运行
    role: controller+worker

    # 从本地 上传 k0s bin 文件,不要在目标机器下载
    uploadBinary: true
    k0sBinaryPath: /Users/bleem/tmp/k0s

    # 上传其他文件
    files:
    # 上传 flannel 配置,使用自定的 flannel 替换内置的 calico
    - name: flannel
      src: /Users/bleem/tmp/kube-flannel.yaml
      dstDir: /var/lib/k0s/manifests/flannel
      perm: 0644

    # 上传打包好的 image 镜像包,k0s 会自动导入到 containerd
    - name: image-bundle
      src: /Users/bleem/tmp/bundle_file
      dstDir: /var/lib/k0s/images/
      perm: 0755

    # 使用 flannel 后每个机器要上传对应的 CNI 插件
    - name: cni-plugins
      src: /Users/bleem/tmp/cni-plugins/*
      dstDir: /opt/cni/bin/
      perm: 0755
  - ssh:
      address: 10.0.0.12
      user: root
      port: 22
      keyPath: /Users/bleem/.ssh/id_rsa
    role: controller+worker
    uploadBinary: true
    k0sBinaryPath: /Users/bleem/tmp/k0s
    files:
    - name: image-bundle
      src: /Users/bleem/tmp/bundle_file
      dstDir: /var/lib/k0s/images/
      perm: 0755
    - name: cni-plugins
      src: /Users/bleem/tmp/cni-plugins/*
      dstDir: /opt/cni/bin/
      perm: 0755
  - ssh:
      address: 10.0.0.13
      user: root
      port: 22
      keyPath: /Users/bleem/.ssh/id_rsa
    role: controller+worker
    uploadBinary: true
    k0sBinaryPath: /Users/bleem/tmp/k0s
    files:
    - name: image-bundle
      src: /Users/bleem/tmp/bundle_file
      dstDir: /var/lib/k0s/images/
      perm: 0755
    - name: cni-plugins
      src: /Users/bleem/tmp/cni-plugins/*
      dstDir: /opt/cni/bin/
      perm: 0755
  - ssh:
      address: 10.0.0.14
      user: root
      port: 22
      keyPath: /Users/bleem/.ssh/id_rsa
    role: worker
    uploadBinary: true
    k0sBinaryPath: /Users/bleem/tmp/k0s
    files:
    - name: image-bundle
      src: /Users/bleem/tmp/bundle_file
      dstDir: /var/lib/k0s/images/
      perm: 0755
    - name: cni-plugins
      src: /Users/bleem/tmp/cni-plugins/*
      dstDir: /opt/cni/bin/
      perm: 0755
  - ssh:
      address: 10.0.0.15
      user: root
      port: 22
      keyPath: /Users/bleem/.ssh/id_rsa
    role: worker
    uploadBinary: true
    k0sBinaryPath: /Users/bleem/tmp/k0s
    files:
    - name: image-bundle
      src: /Users/bleem/tmp/bundle_file
      dstDir: /var/lib/k0s/images/
      perm: 0755
    - name: cni-plugins
      src: /Users/bleem/tmp/cni-plugins/*
      dstDir: /opt/cni/bin/
      perm: 0755
  k0s:
    version: v1.21.2+k0s.1
    config:
      apiVersion: k0s.k0sproject.io/v1beta1
      kind: Cluster
      metadata:
        name: k0s
      spec:
        api:
          # This is the address of the external load balancer to which all kubelets will link
          externalAddress: 10.0.0.20
          # Don't forget to add the SAN of api certificate for external load balancer
          sans:
          - 10.0.0.11
          - 10.0.0.12
          - 10.0.0.13
          - 10.0.0.20
        # Storage type uses etcd, etcd clusters are automatically managed by k0s
        storage:
          type: etcd
        network:
          podCIDR: 10.244.0.0/16
          serviceCIDR: 10.96.0.0/12
          # The network plugin uses custom and then lets the flannel take over
          provider: custom
          kubeProxy:
            disabled: false
            # Turn on ipvs mode for kubelet
            mode: ipvs
        # Do not send any anonymous statistical information
        telemetry:
          enabled: false
        images:
          default_pull_policy: IfNotPresent
|
Finally, you only need to execute k0sctl apply -c k0sctl.yaml and wait a few minutes for the cluster to be set up, and you can see the upload process of the relevant files during the installation:
3.3. Certificate renewal and management
The default certificate validity of kubeadm cluster is one year, and it has to be re-signed by kubeadm when it expires; k0s cluster is almost the same, but the difference is that k0s cluster is more violent; As long as the CA (default 10 years) is not lost, k0s will force to regenerate the certificate with one year validity every time it restarts, so in HA environment, just restart the k0s service when it is about to expire.
k0sctl installed cluster has only one k0scontroller.service service by default, all services on master and node are started by this service, so just systemctl restart k0scontroller.service before expiration.
4. Cluster Backup and Recovery
k0sctl provides cluster backup and recovery functions. By default, you only need to execute k0sctl backup to complete the cluster backup, which will generate a k0s_backup_TIMESTAMP.tar.gz backup file in the current directory.
When you need to restore the cluster, use k0sctl apply --restore-from k0s_backup_TIMESTAMP.tar.gz to restore it; note that the restore command is equivalent to reinstalling the cluster on a new machine, so there is some risk.
After two days of testing, I feel that this backup and recovery function is not reliable, and I recommend using Velero to backup the cluster
5. Other advanced features
5.1. Etcd Replacement
In small-scale clustering scenarios, Etcd may not be needed as storage. k0s can use traditional databases such as SQLite or MySQL as cluster storage with the help of the kine library; if you want to switch storage, just adjust the k0sctl.yaml configuration:
1
2
3
4
5
6
7
8
9
|
apiVersion: k0s.k0sproject.io/v1beta1
kind: Cluster
metadata:
  name: k0s
spec:
  storage:
    type: kine
    kine:
      dataSource: "sqlite:///var/lib/k0s/db/state.db?more=rwc&_journal=WAL&cache=shared"
|
5.2. Cluster user management
A cluster built with k0sctl can easily add users to the cluster with the k0s command:
1
|
k0s kubeconfig create --groups "system:masters" testUser > k0s.config
|
5.3. Containerd Placement
If you need to define your own special configuration, you can upload the Containerd configuration file to /etc/k0s/containerd.toml during installation, which will be read and used by the k0s startup Containerd. The configuration will be read and used by the k0s-started Containerd.
6. Summary
k0s is a good project for binary hosts to deploy Kubernetes clusters is very convenient, because its direct use of Kubernetes binaries to start, so basically no feature neutering, and k0sctl for automated installation provides a good scalability, so it is worth a try. However, k0s still has some flaws in the details, such as the konnectivity service cannot be optionally closed during installation, etc. k0s is a good tool overall, and it is also recommended to look at the source code, which has a lot of novel designs and is good for understanding the cluster boot process.
Reference https://mritd.com/2021/07/29/test-the-k0s-cluster/