While the cloud-native era has seen up-and-comers like JenkinsX, Drone, and Tekton, an old-school CI/CD tool like Jenkins is still the dominant solution used by major companies. CD tool is still the mainstream solution used by major companies. For example, our private cloud product packaging and release is done with this old guy. However, the traditional Jenkins Slave master-multiple-slave approach has some pain points, such as.
- Each Slave has a different configuration environment to complete the compilation and packaging operations in different languages, but these differential configurations lead to very inconvenient management and maintenance is also relatively laborious
- Unbalanced resource allocation, some Slave to run the job queue, while some Slave in the idle state
- Resources are wasted, each Slave may be a physical or virtual machine, and when the Slave is idle, it does not completely release its resources.
Because of these pain points in the Jenkins slave, we desire a more efficient and reliable way to complete the CI/CD process, and Docker virtualized container technology can be a good solution to this pain point, especially in the Kubernetes cluster environment to better solve the above problems, the following figure is based on Kubernetes The following diagram is a simple diagram of building a Jenkins slave cluster based on Kubernetes.
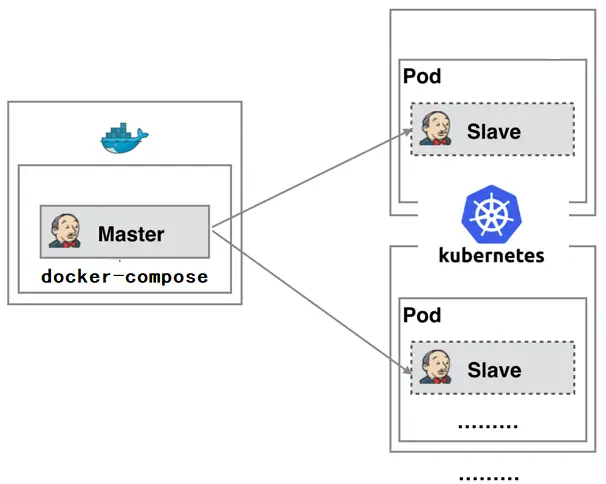
The Jenkins Master runs as a docker-compose on a node, and the Jenkins Slave runs as a Pod on the Node of the Kubernetes cluster, and it is not always running; it is dynamically created and automatically deleted on demand. The workflow of this approach is roughly as follows: when the Jenkins Master receives a Build request, it dynamically creates a Jenkins Slave running in a Pod and registers it with the Master based on the configured Label, and when the Job is finished running, the Slave is logged out and the Pod is automatically deleted and restored to its original state.
So we have the following benefits from using this approach.
- Dynamic Scaling, which uses resources wisely, automatically creates a Jenkins Slave each time a Job is run, and when the Job is finished, the Slave is automatically logged out and the container is deleted, and resources are automatically released. And Kubernetes dynamically assigns Slave to a free node based on the usage of each resource, reducing the situation where a node has high resource utilization and is still waiting in line for that node.
- Good scalability When a Kubernetes cluster is severely under-resourced and a Job is queued up, it is easy to add a Kubernetes Node to the cluster, thus enabling scalability.
kubernetes Clustering
For kubernetes cluster deployment, using kubeadm deployment is the most convenient.
- Use kubeadm to create a cluster of kubernets with a single master node
|
|
- The following prompt will be displayed after the cluster has been successfully deployed.
- Check that the node status and pods are up and running
|
|
- Remove the taint from the master node and allow other pods to be scheduled on the master node, otherwise pods created by Jenkins later will not be scheduled on that node.
|
|
Jenkins master
As for the Jenkins master deployment method, I personally recommend using docker-compose to deploy it. There’s nothing wrong with running it in a kubernetes cluster, but from personal experience, it’s easier to deploy Jenkins master independently of a kubernetes cluster 😂.
- docker-compose.yaml
- Use docker-compose up to start, and after a successful start you will be prompted as follows. The log output key is the default password for the admin user, use it to log in to Jenkins for the first time.
|
|
- After logging on, it is recommended to select “Select plugins to install” to install as few plugins as possible and install them on demand.
-
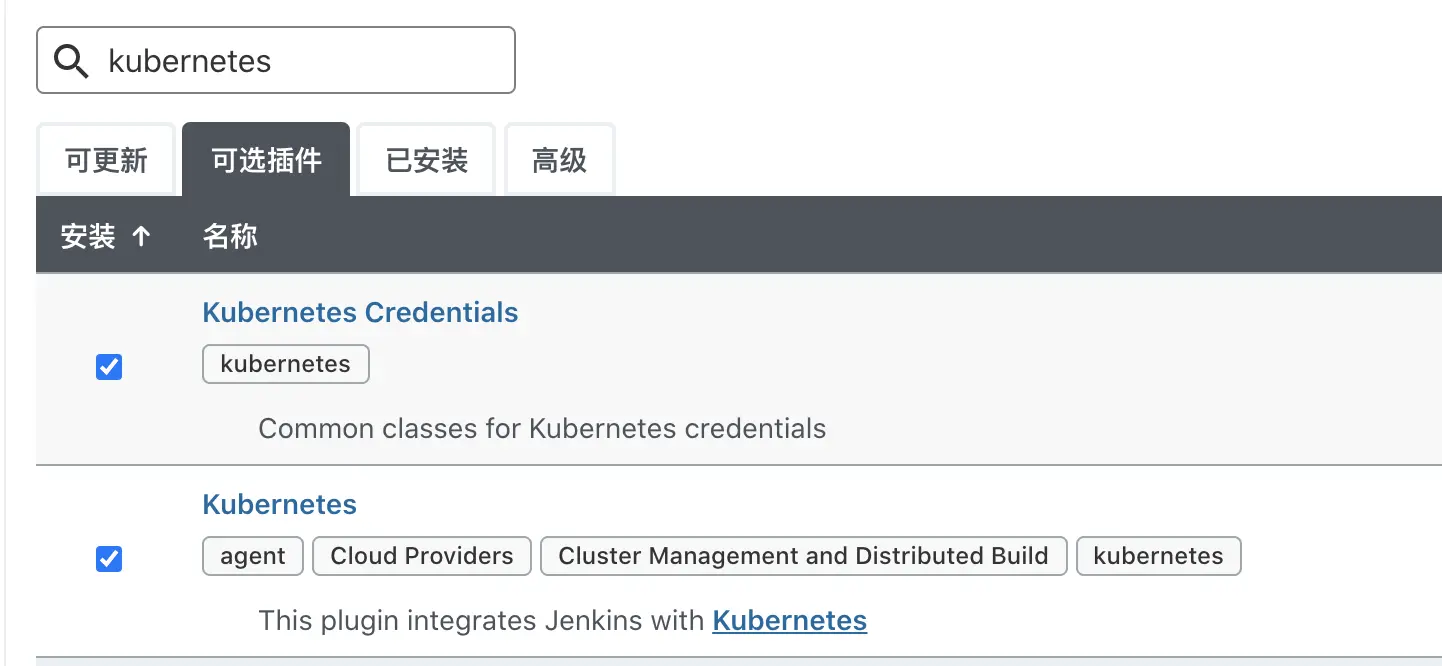
Install the kubernetes plugin in the Jenkins plugin manager
-
-
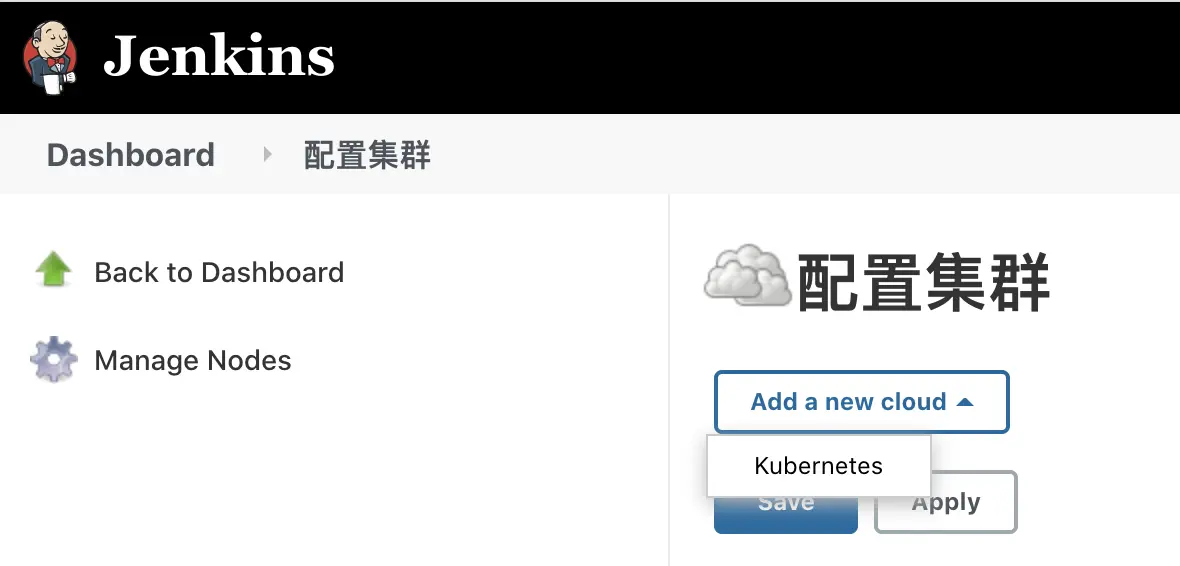
Next, start configuring how Uncle Jenkins will hold hands with the kubernetes captain 🧑🤝🧑 :-). The place to configure kubernets is under System Administration > Node Management > Configure Clouds. click Add a new cloud to add a kubernetes cluster.
- Configure connection parameters
| Parameters | value | Description |
|---|---|---|
| name | kubernetes | It is also the value of the cloud in the pod template that follows |
| Credentials | kubeconfig Credentials id | Use the kubeconfig file to connect to the cluster |
| Kubernetes address | Default is fine | |
| Use Jenkins Proxy | Default is fine | |
| Kubernetes Service Certificate key | Default is fine | |
| Disable HTTPS certificate checking | Default is fine | |
| Kubernetes 命名空间 | Default is fine | |
| WebSocket | Default is fine | |
| Direct Connection | Default is fine | |
| Jenkins address | http://jenkins.k8s.li:8080 | Jenkins pod 连接 Jenkins master 的 URL |
| Jenkins channel | 50000 | The port for Jenkins JNLP, default is 50000 |
| Connection Timeout | Default is fine | Jenkins timeout for connecting to kubernetes |
| Read Timeout | Default is fine | |
| Number of containers | Default is fine | Maximum number of Jenkins pods to create |
| Pod Labels | Default is fine | Jenkins pod 的 lables |
| Maximum number of connections to the Kubernetes API | Default is fine | |
| Seconds to wait for pod to be running | Default is fine | Time to wait for the pod to run normally |
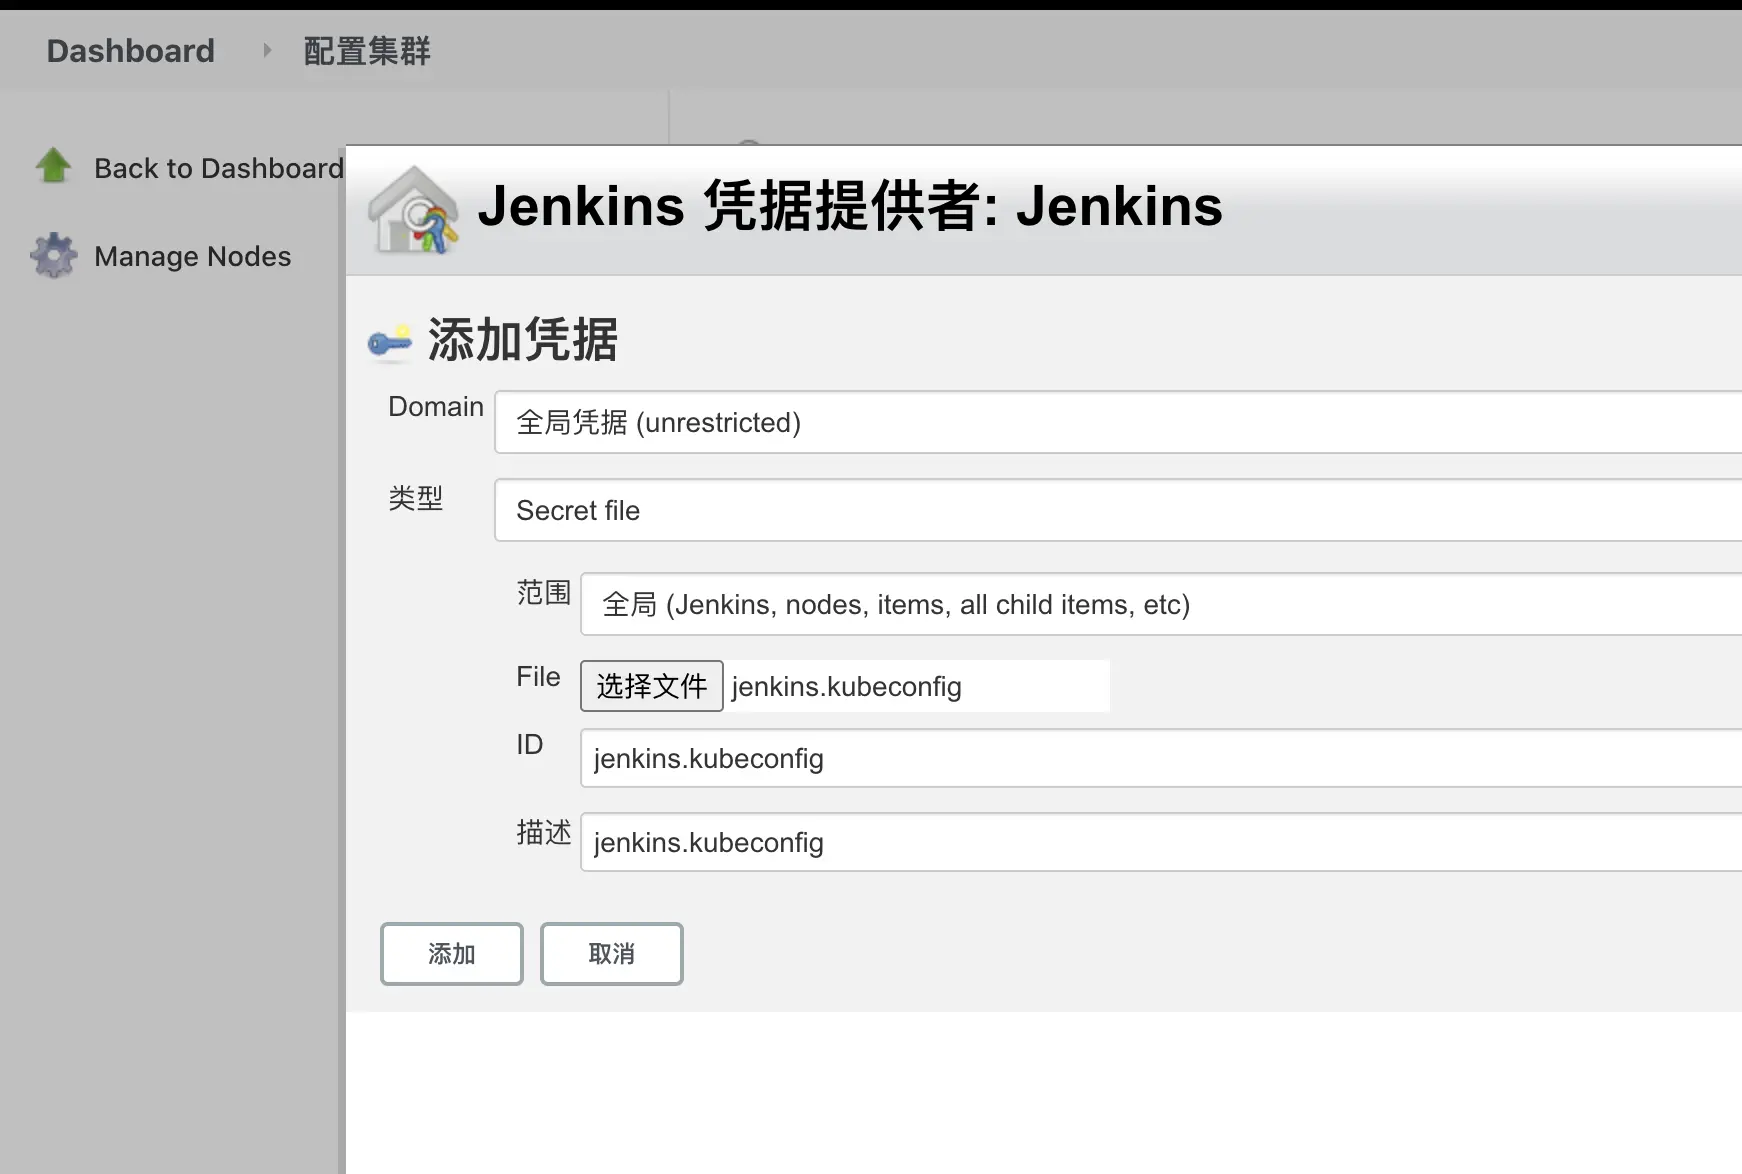
- Add the kubeconfig file to the Jenkins credentials, select
Secret fileas the credential type, and upload the kubeconfig generated using the kubeadm deployment above to it.
- Click Connect to test and if it says Connected to Kubernetes v1.19.8, you have successfully connected to the kubernetes cluster.

- About pod templates
It is not recommended to use the templates in the plug-in to configure the pods. It is recommended to put the pod templates in the Jenkinsfile, because these configurations are closely related to our pipeline, and it is not very convenient to store the pod configurations in the Jenkins plug-in; it is not convenient for subsequent migration and backup, etc. It is not convenient for subsequent migrations and backups, and these configurations may be lost after subsequent plugin upgrades. Therefore, it is recommended that the configuration of the pod template be defined directly in the Jenkinsfile, which is more flexible and will not be affected by upgrades to the Jenkins plugin. In short, it will be much less expensive to manage these pod configurations with code.
Jenkinsfile
- Streaming Jenkinsfile, here is a simple task for building a docker image of the webp-server-go project.
|
|
- The pod template is as follows, copy and paste the contents of the template into the Jenkinsfile above. To build the image in the container, we use the dind solution: mount the docker sock file of the pod’s host into the pod’s container, and the pod container can use docker directly like the host as long as the docker-cli tool is installed.
|
|
- Build the debian:cluster-docker image and use it to build the docker image inside the pod’s container, using the following Dockerfile.
|
|
After defining the jenkinsfile file and building the image in the pod template, we start using it to create pipeline tasks.
Pipeline
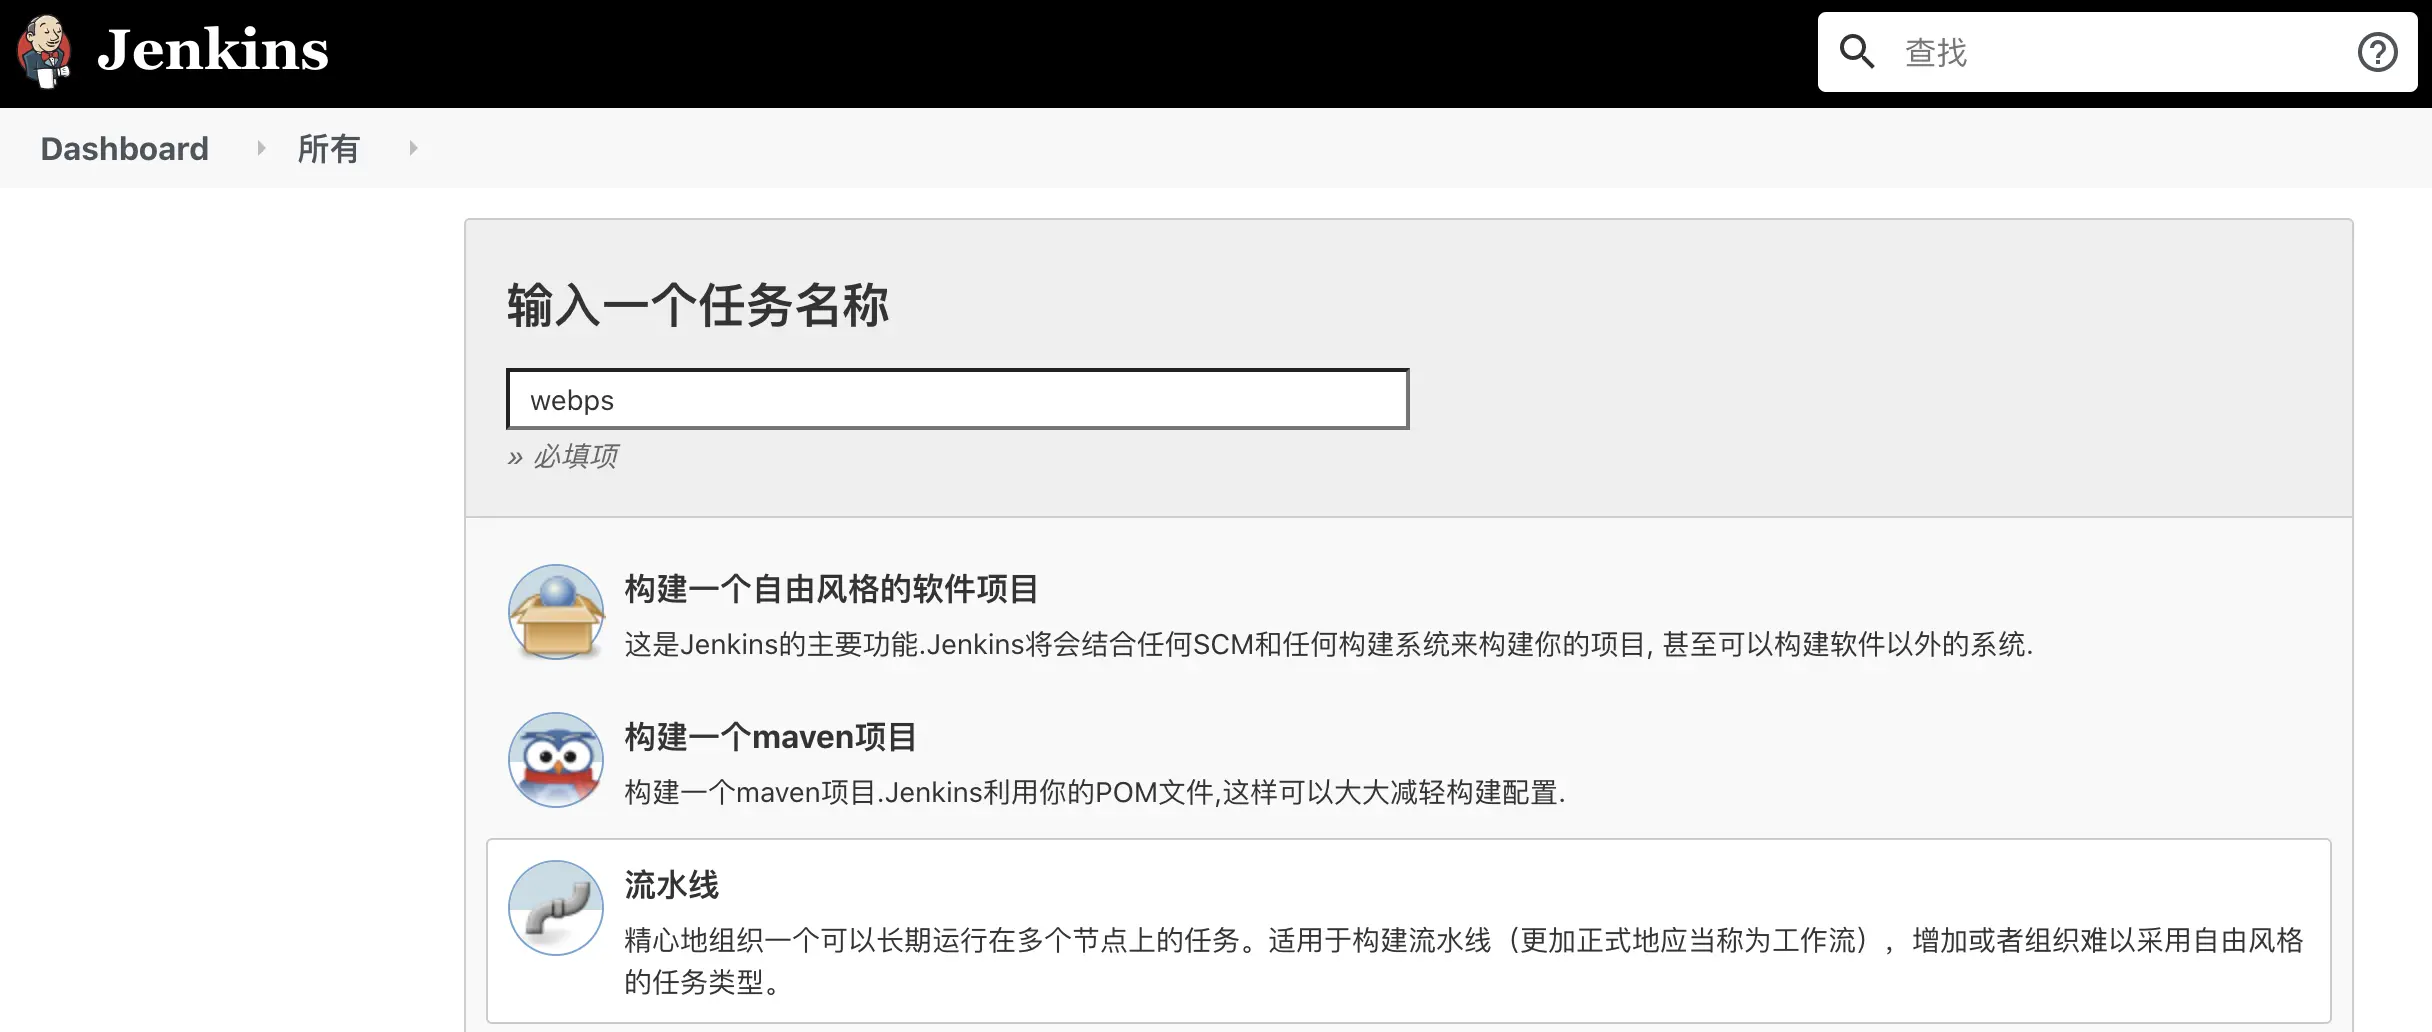
- Create a new task on Jenkins and select the task type as pipeline
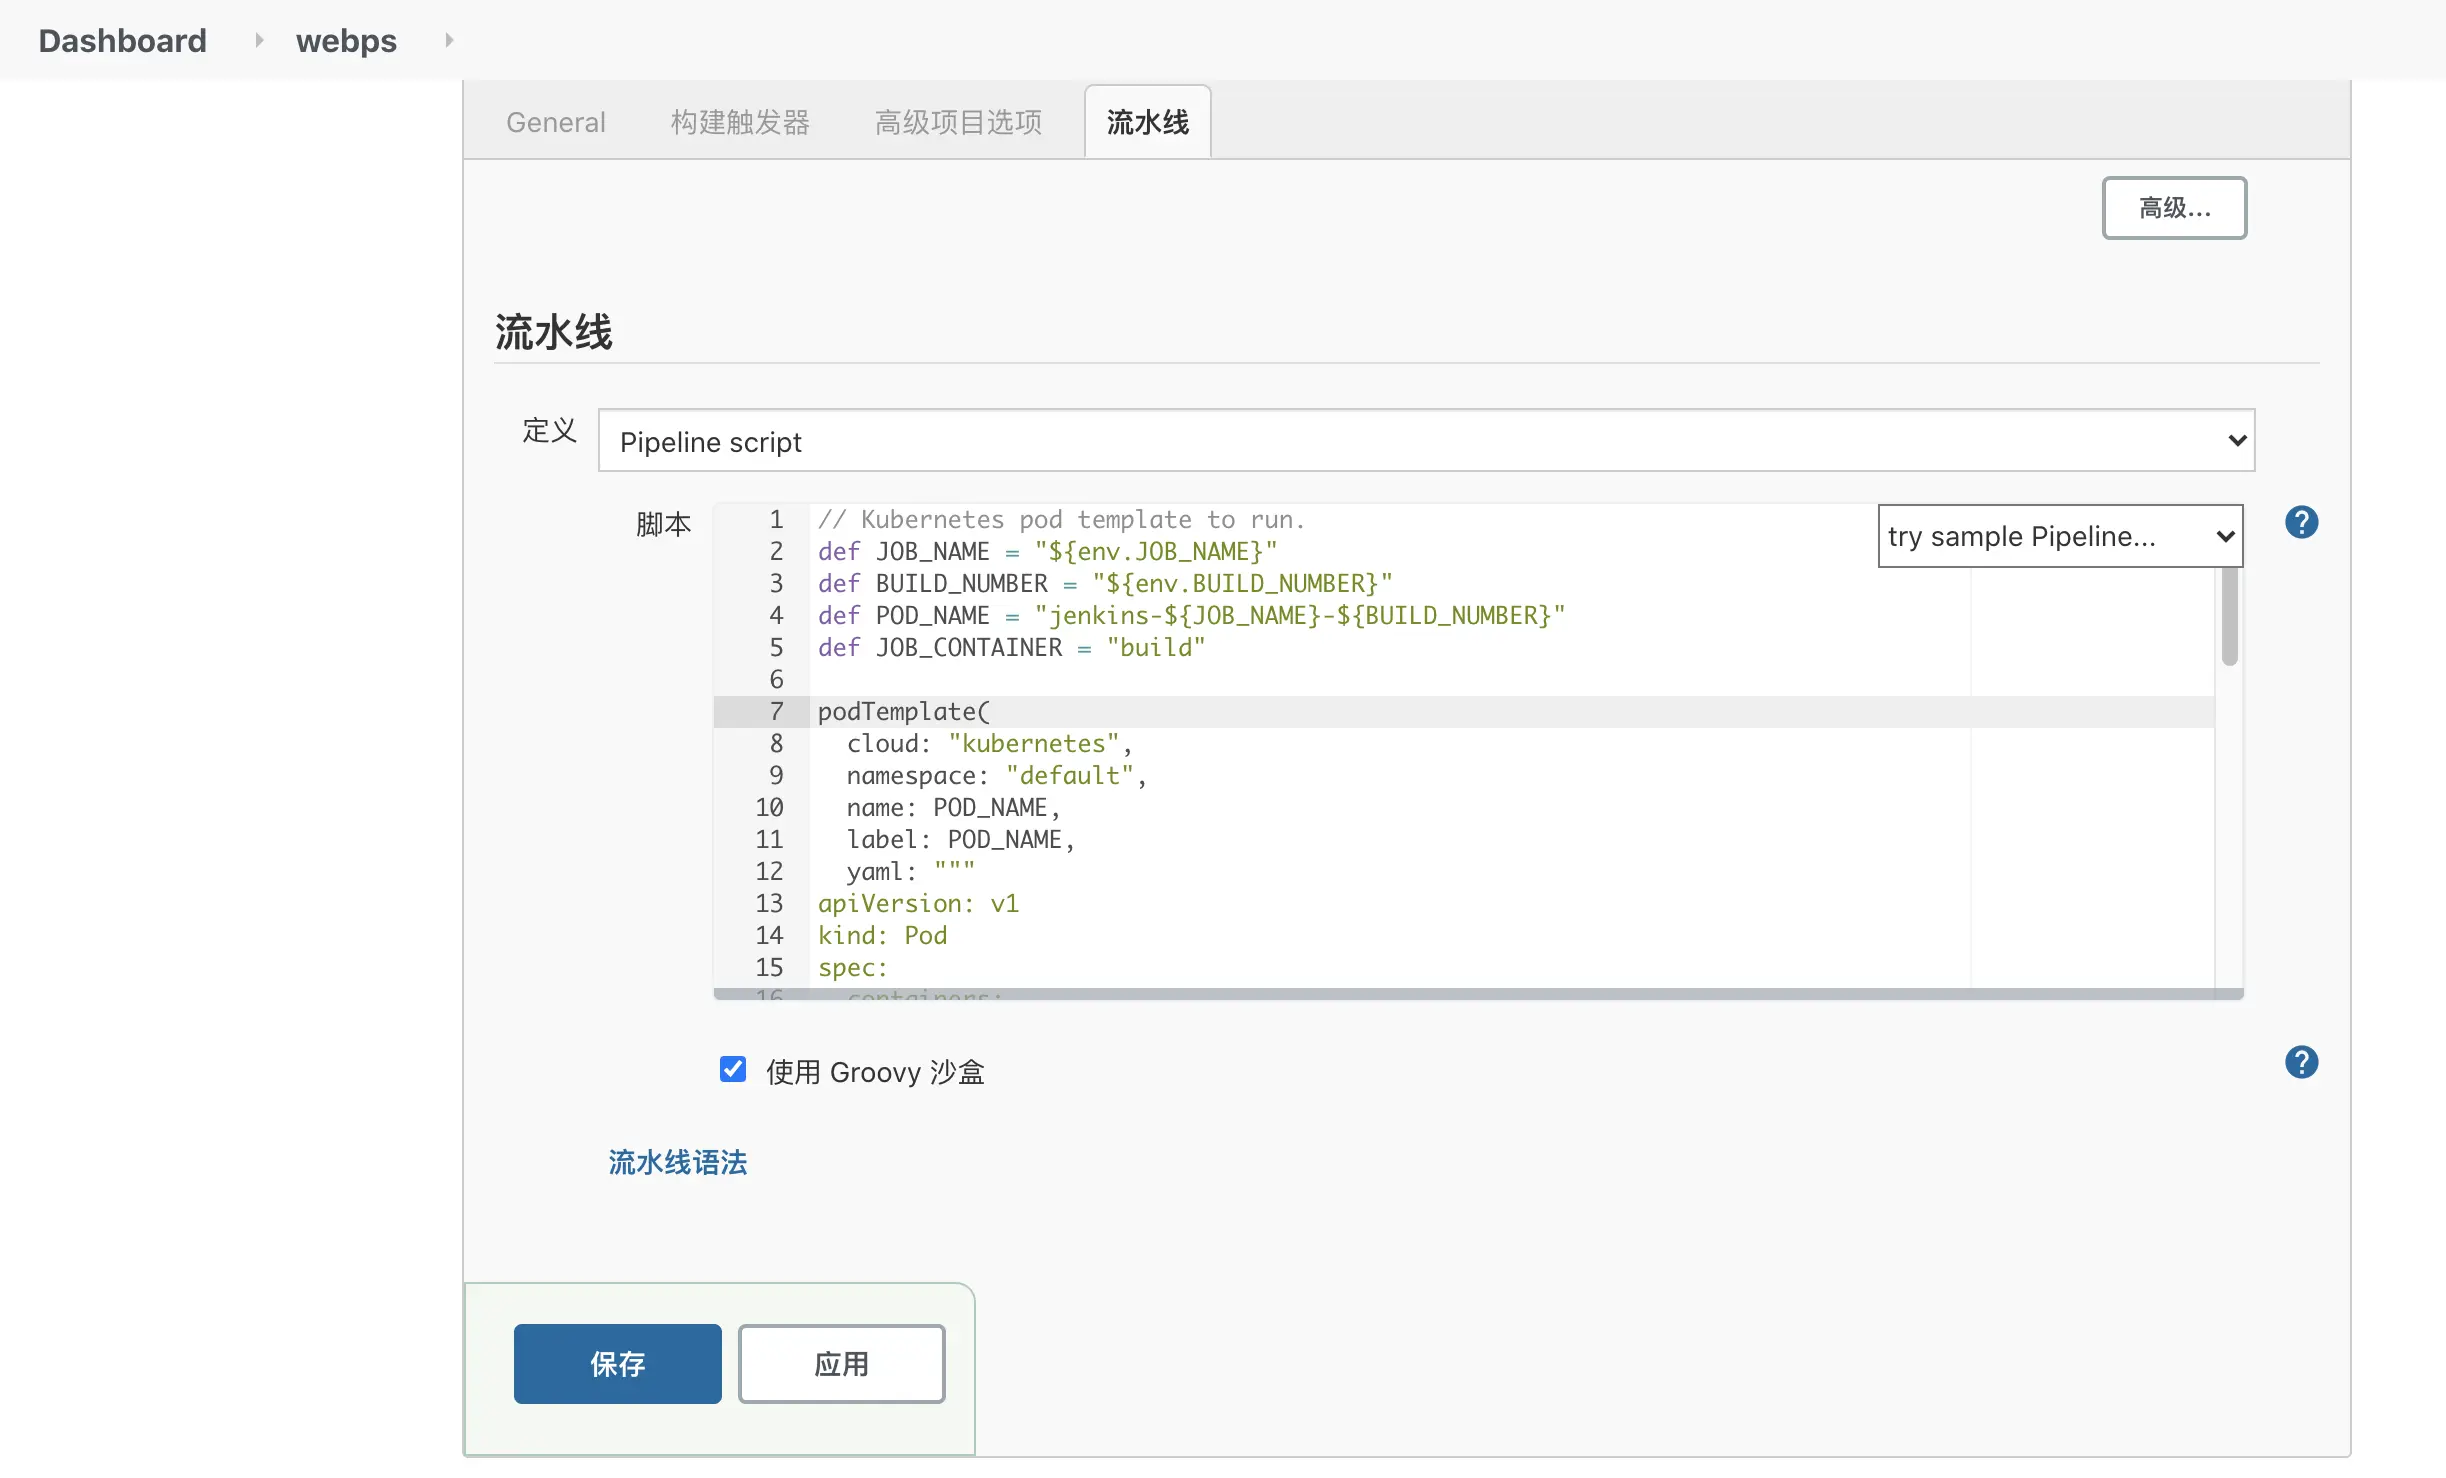
- Copy and paste the contents of the defined Jenkinsfile into the pipeline definition Pipeline script and click Save. Click Build Now on the newly created Job page to run the pipeline task.
- Use the kubectl command on the machine in the kubernetes cluster to see if the pod is running properly
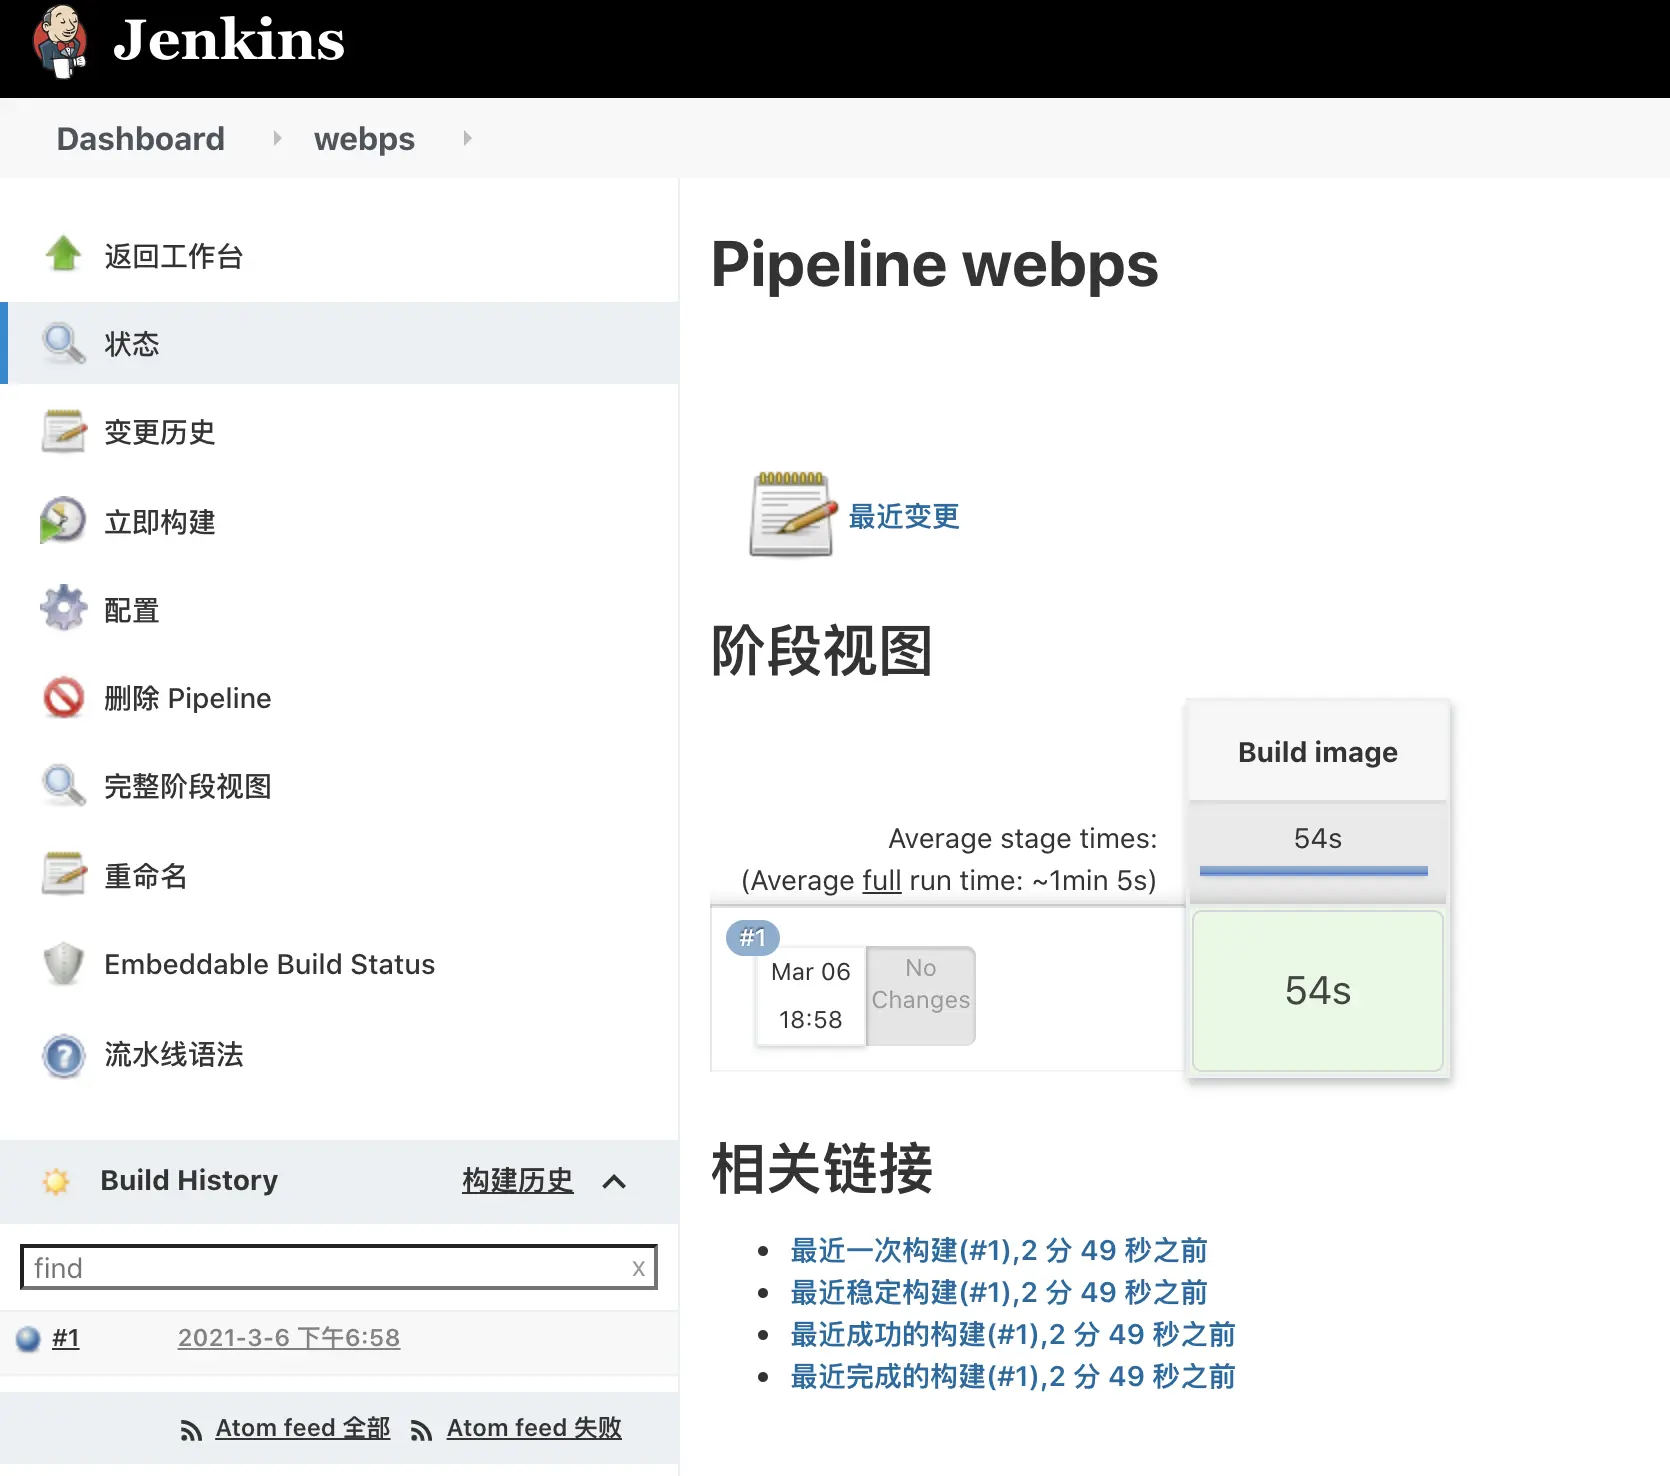
- The job is running normally and the status is green indicating that the job has been executed successfully.
- Check if the docker image was built successfully on the kubernetes cluster machine
Traps
- The pod is not running properly.
|
|
Check that the Jenkins address and Jenkins channel parameters in System Management > Node Management > Configure Clouds on the Jenkins master are configured correctly.
End
At this point, we’re done making Uncle Jenkins and Captain kubernetes go hand in hand 🧑🤝🧑🧑! The above uses a simple example to show how to run a Jenkins Job task on a kubernetes cluster, but the scenarios encountered in practice can be a bit more complex than that, and the pipeline requires a bit more parameters to be configured.