kube-vip can provide a Kubernetes native HA load balancing on your control plane nodes, we don’t need to set up HAProxy and Keepalived externally to achieve high availability of the cluster anymore.
kube-vip is an open source project that provides high availability and load balancing for Kubernetes clusters both internally and externally, and has been used in Vmware’s Tanzu project to replace the HAProxy load balancer for vSphere deployments with kube-vip, in this article we will first understand how kube-vip can be used for Kubernetes control plane high availability and load balancing. and load balancing features of the Kubernetes control plane.
Features
Originally created to provide an HA solution for the Kubernetes control plane, Kube-Vip has evolved over time to consolidate the same functionality into a LoadBalancer-type service for Kubernetes.
- VIP addresses can be IPv4 or IPv6
- Control plane with ARP (layer 2) or BGP (layer 3)
- Use leader election or raft control plane
- Control plane HA with kubeadm (static Pod)
- Control plane HA with K3s/and others (DaemonSets)
- Service LoadBalancer with ARP leader election (layer 2)
- Service LoadBalancer using multiple nodes via BGP
- Service LoadBalancer address pool per namespace or globally
- Service LoadBalancer addresses exposed to the gateway via UPNP
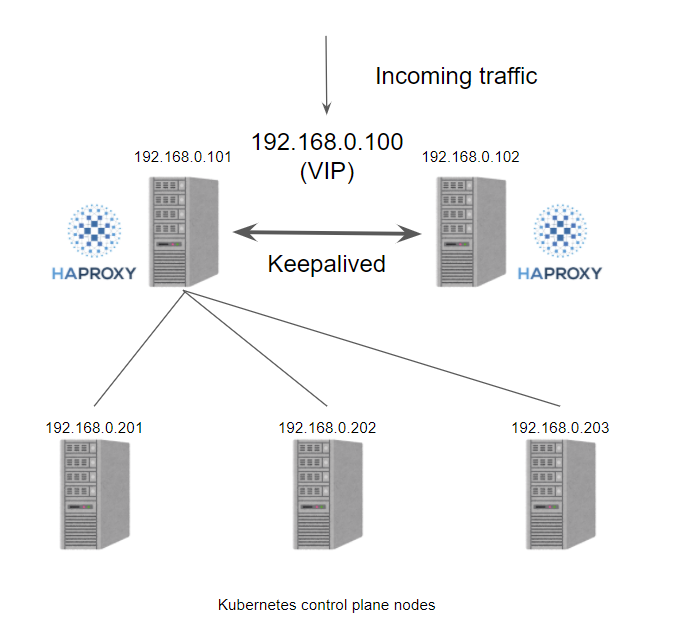
HAProxy and kube-vip for HA clusters
In the old days when we created a Kubernetes cluster in a private environment, we needed to prepare a hardware/software load balancer to create a multi-controller plane cluster, more often than not we would choose to use HAProxy + Keepalived to achieve this functionality. Typically we create 2 load balancer VMs and assign a VIP, then use the VIP to serve the load balancer and redirect the traffic to one of the Kubernetes controller plane nodes on the backend via the VIP.
Next, let’s see what happens if we use kube-vip.
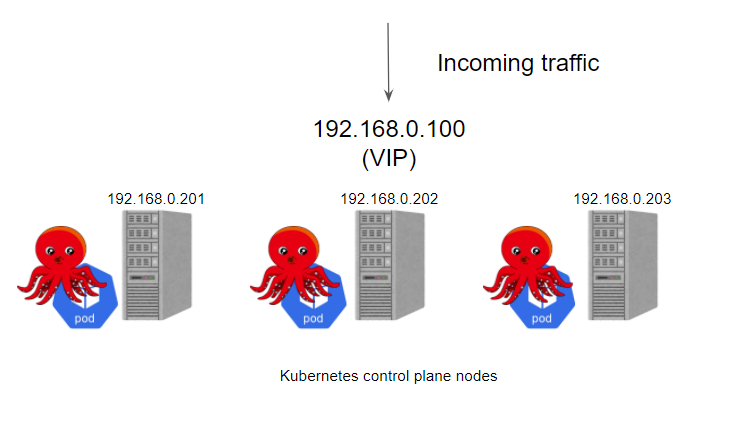
kube-vip can run on control plane nodes with static pods, these pods identify other hosts on each node through ARP conversations, so you need to set the IP address of each node in the hosts file, we can choose BGP or ARP to set the load balancer, which is more similar to Metal LB. Here we don’t have BGP service, we just want to test it quickly, so here we use ARP with static pods.
kube-vip architecture
kube-vip has many feature design options to provide high availability or network functionality as part of a VIP/load balancing solution.
Cluster
kube-vip creates a multi-node or multi-module cluster to provide high availability. In ARP mode, a leader is elected and this node inherits the virtual IP and becomes the leader of the load balancing within the cluster, while in BGP mode, all nodes are notified of the VIP address.
When using ARP or layer2, it will use leader election and of course raft clustering techniques, but this method has been largely superseded by leader election, especially when running in a cluster.
Virtual IP
The leader in the cluster will assign the vip and bind it to the selected interface declared in the configuration. When the leader changes, it will first revoke the vip, or in the case of failure, the vip will be assigned directly by the next elected leader.
When a vip is moved from one host to another, any host using the vip will retain the previous vip <-> MAC address mapping until the ARP expires (typically 30 seconds) and a new vip <-> MAC mapping is retrieved, which can be optimized by using gratuitous ARP broadcasts.
ARP
kube-vip可以被配置为广播一个无偿的arp(可选),通常会立即通知所有本地主机 vip <-> MAC 地址映射已经改变。
下面我们可以看到,当arp 广播被接收时,故障转移通常在几秒钟内完成。
|
|
Using kube-vip
Next, let’s build a highly available Kubernetes cluster using kube-vip. Start by preparing 6 nodes.
- 3 control plane nodes
- 3 worker nodes
First install the dependencies on the host, including kubeadm, kubelet, kubectl, and a container runtime, in this case containerd.
Get the docker image of kube-vip and set the yaml resource manifest file of the static pod in /etc/kuberentes/manifests so that Kubernetes will automatically deploy the pod of kube-vip on each control plane node.
|
|
Next, you can configure kubeadm as follows.
|
|
Then install CNI, for example we choose to use Cilium.
After the first control plane node is ready, let the other nodes join your cluster. For the other control plane nodes, run the following command.
For a working node, run a command similar to
The cluster is ready to start up after the normal execution is completed:
|
|
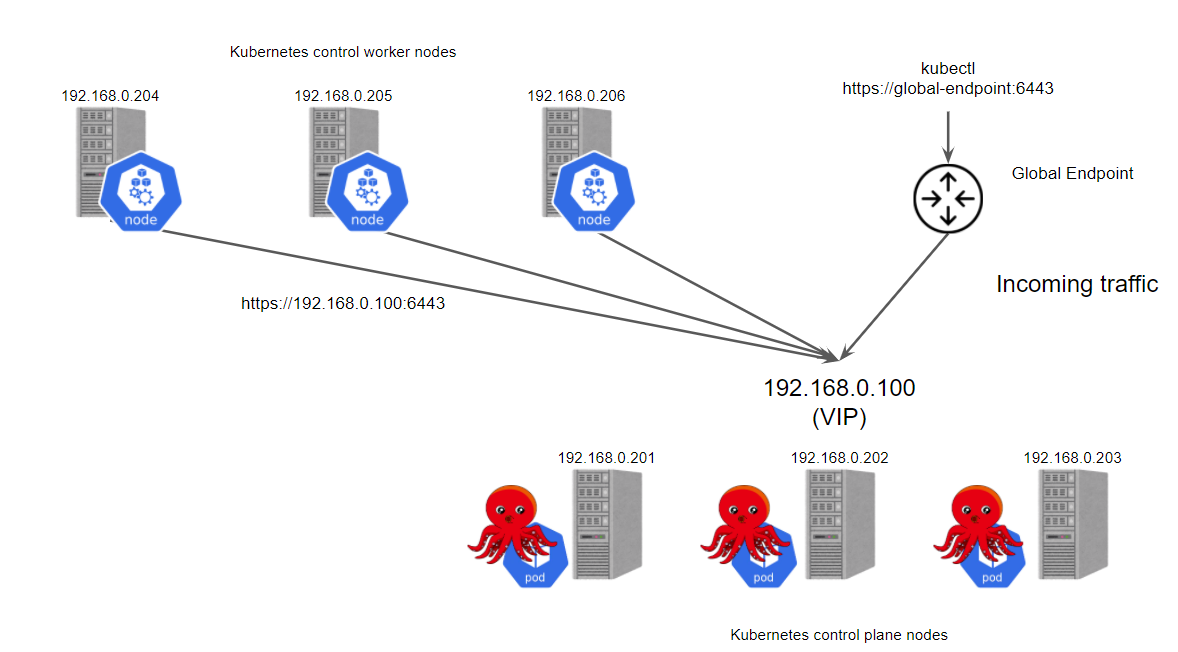
Now you can see that the endpoint of our control plane is 192.168.0.100, there are no other additional nodes, is not very convenient.