Introduction to Charles
Charles is an HTTP proxy server that allows Charles to monitor all data sent and received by a browser when it connects to Charles’ proxy to access the Internet. It allows a developer to view all HTTP traffic connected to the Internet, these include requests, responses and HTTP headers (containing cookies and caching information).

Charles main features.
- Support SSL proxy. Can intercept and analyze SSL requests.
- Support for traffic control. Can simulate slow networks and requests with long waiting time (latency).
- Support AJAX debugging. Automatically formats json or xml data for easy viewing.
- Support AMF debugging. Flash Remoting or Flex Remoting information can be formatted for easy viewing.
- Support retransmitting network requests for back-end debugging.
- Support modifying network request parameters.
- Support intercepting and dynamically modifying network requests.
- Check HTML, CSS and RSS content for W3C compliance.
The above describes the main features of Charles, personally in the use of the process is mainly used to crawl HTTP and HTTPS requests. In particular, HTTPS requests, there is still some trouble to capture, so here is a record.
Charles packet capture principle
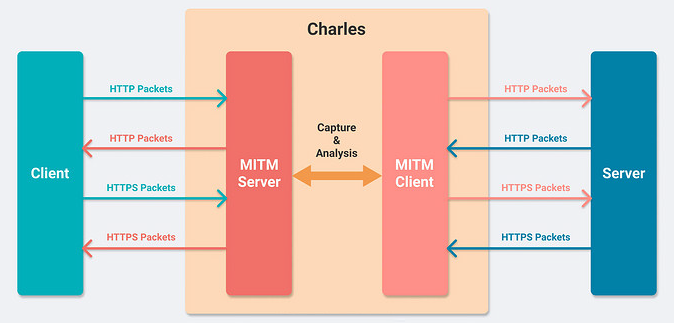
The principle behind most of the packet-capturing software on the market is the man-in-the-middle attack (MITM).
Wikipedia defines MITM as a man-in-the-middle attack in the field of cryptography and computer security, in which an attacker establishes separate connections with each end of a communication and exchanges the data he receives, making the two ends of the communication believe they are talking directly to each other over a private connection, when in fact the entire session is completely controlled by the attacker.
The above definition is clear, and the flow of HTTP Packets can be seen in the following diagram combined with the direction of the arrows.
Use of Charles
The installation process of Charles is relatively simple, just go to official website and download and install it. What is more difficult is the configuration of HTTPS requests.
HTTPS request packet capture under Windows
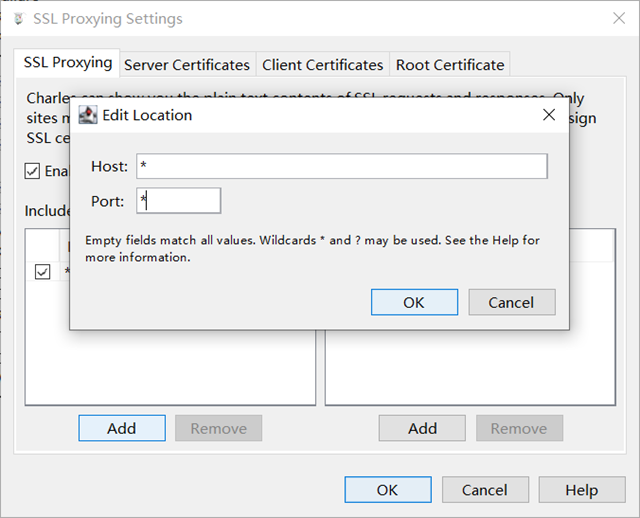
- Configure SSL support. Click [Proxy] -> [SSL Proxying Settings…], in the pop-up tab, check [Enable SSL Proxying] and click [add], enter [] in Host to receive any host, enter [] in Prot to receive any port and finally click [ok] to save.
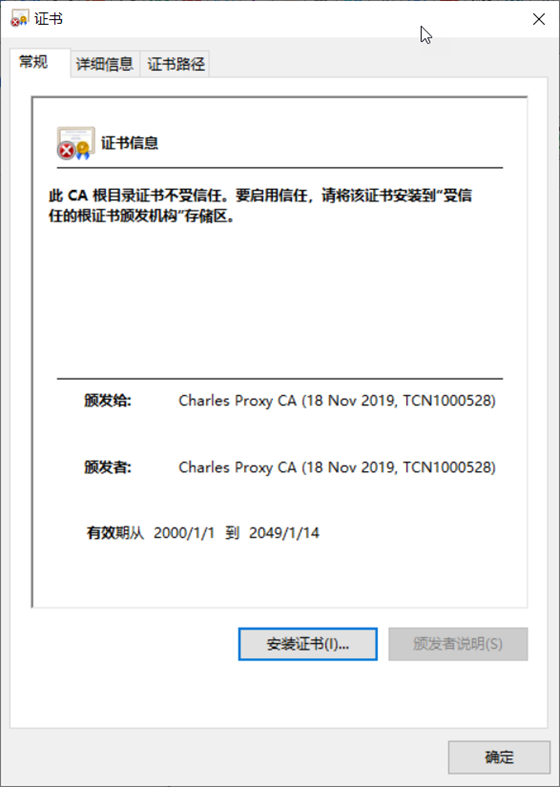
- Install the certificate. Click [Help]->[SSL Proxying]->[Install Charles Root Certificate], follow the guide to install the certificate.
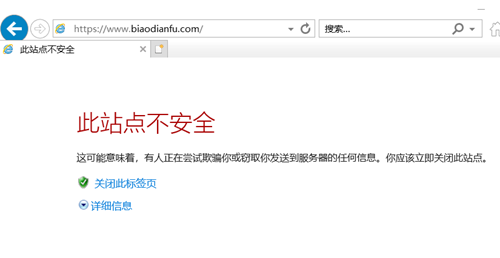
Open IE for testing after completion: Certificate error!
Open Chrome to test.
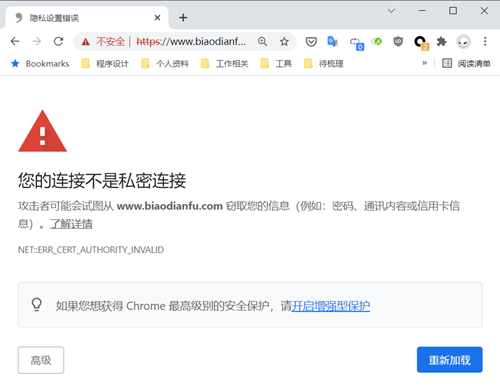
Open Edge test.
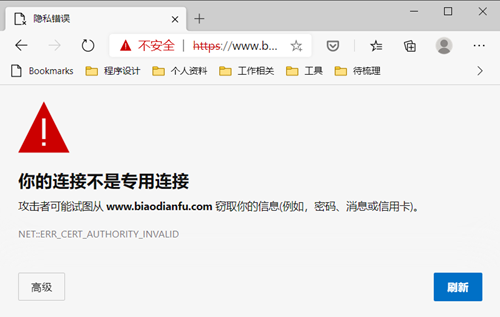
All blocked by security, installed the certificate are not working.
Solution: install Firefox!
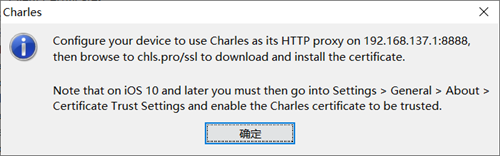
After installation in the opening of Charles, use Firefox to open, http://chls.pro/ssl, the following page pops up.

Select Save file and press OK. The file is saved to the download folder by default.
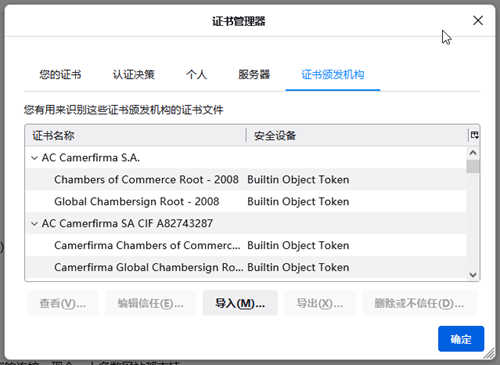
Open Firefox [Settings] -> [Privacy and Security] -> [Certificates] -> [View Certificate]

Use [Certificate Manager] -> [Certificate Scheme Authority] -> [Import] for import operation.
Packet grabbing for HTTPS requests under iOS
Turn on the shared network on the PC. Connect the phone to the WIFI shared by the PC.
Set the proxy address on the phone, the proxy IP is the PC’s IP and the port is Charles’ port.
Enter chls.pro in your phone’s own browser Safari, and you need to enter [Settings] to install the description file after you finish. After installation, if it is iOS 10 or later, you need to enter [Settings] -> [General] -> [About this machine] -> [Certificate trust settings] to turn on the certificate.
HTTPS request packet capture under Android
Turn on the shared network on the PC. Connect the phone to the WIFI shared by the PC.
Set the proxy address on the phone, the proxy IP is the PC’s IP and the port is Charles’ port.
Type chls.pro in the default browser of your phone, download the downloadfile.crt file, then open it in [My Downloads] and follow the guide to install it.