As a representative of non-relational database, MongoDB is very suitable for storing some unstructured data. With the purpose of understanding and research, I tried to install it on Windows machine and found that there are still many points to share in the middle.

Installation of MongoDB
I thought the installation was a very simple task, but I got stuck in downloading the installation package during the execution. The download page keeps returning 404 when I select the corresponding version from the official download center: https://www.mongodb.com/download-center. I have no choice but to find another download address: https://www.mongodb.org/dl/win32/x86_64-2008plus-ssl
After downloading, follow the instructions to install, but nothing happens after installation, MongoDB does not start by default, there is no desktop shortcut, and nothing is added to the Window menu, which makes you think that the installation is not successful.
MongoDB Installation False Death Problem
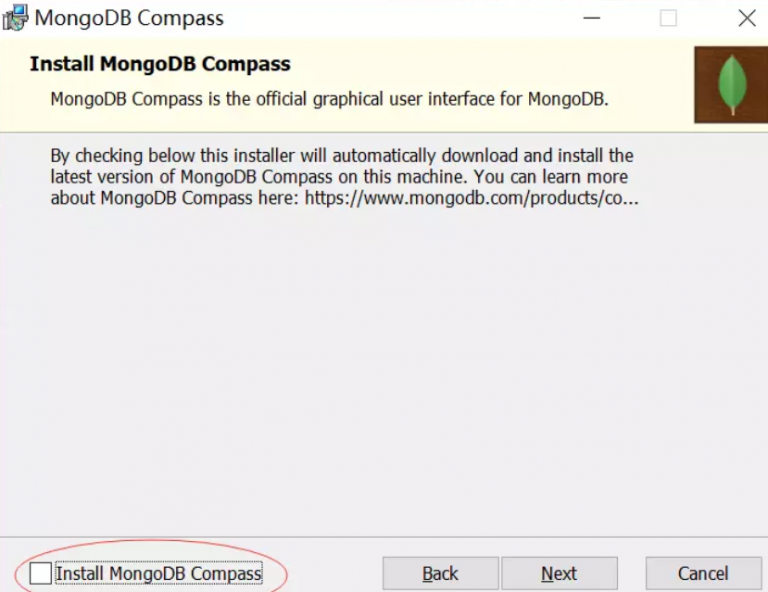
Problems with installing MongoDB on Windows usually occur, mainly because the installation process keeps falsely dying. The installation progress bar doesn’t move at all. Wait for an hour and nothing happens.
The progress displayed is: Status:Installing MongoDB Compass…(this may take a few minutes)
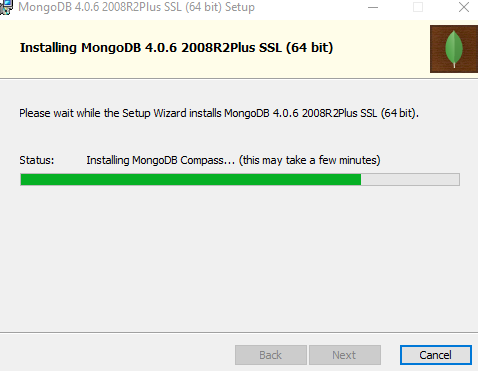
The probable reason is that MongoDB Compass is intercepted by SFW, resulting in not being downloaded. The solution is very simple, i.e. don’t choose to install MongoDB Compass during installation!
MongoDB startup configuration
After installing MongoDB, if you want to use it, you need to start it by yourself, the common way is to register it as a Windows service. The main process is as follows.
add environment variables
The main aspect is to execute mongodb command, you don’t need to switch to the folder every time, this step can be omitted
Variable name: MONGODB_HOME, value: C:\Program Files\MongoDB\Server\3.2 (the specific path is determined according to your installation path)
Variable name: PATH, append content: %MONGODB_HOME%\bin;
After finishing, you can execute MongoDB-related programs directly from the command line.
Install Windows services
In order to turn on and off MongoDB conveniently, you need to register Windows services, the method is relatively simple, as follows.
|
|
The above command calls the mongod.exe file in the C:\Program Files\MongoDB\Server\3.2\bin directory, and specifies the database file storage address and log file storage address. mongod’s main parameters are: (you can set them according to your own situation)
|
|
Set up auth authentication/permissions (optional)
By default, mongo has no password to enter, so if you need to set a username and password you need to do three steps.
- Create administrator
- Authorize authentication
- Add a user to the database you are using
|
|
Other related instructions.
Alternatively you can start or stop the operation from the Windows Service Management page.
Using MongoDB
Related tools.
- Robomongo: Robomongo a.k.a. Robo 3T, tried and tested, is considered the best (free, open source) among mongodb visualization tools.
- Studio 3T: A paid version of the above Robo 3T with more powerful features.
- RockMongo, a PHP-based mongodb management tool
- NoSQLBooster, a visualization tool for Windows.