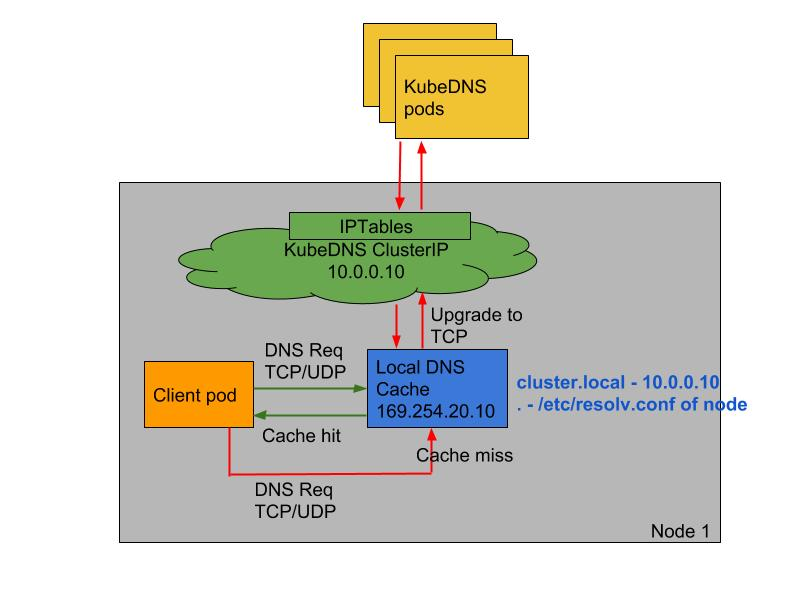
When solving the 5-second timeout problem with CoreDNS, we mentioned using NodeLocal DNSCache to solve the problem, in addition to forcing tcp resolution through dnsConfig. NodeLocal DNSCache improves clusterDNS performance and reliability by running a DaemonSet on the cluster nodes. Pods in ClusterFirst’s DNS mode can connect to kube-dns’s serviceIP for DNS queries. This is converted to a CoreDNS endpoint via iptables rules added by the kube-proxy component. By running DNS caching on each cluster node, NodeLocal DNSCache reduces the latency of DNS lookups, makes DNS lookup times more consistent, and reduces the number of DNS queries sent to kube-dns.
There are several benefits to running NodeLocal DNSCache in a cluster.
- Pods with the highest DNS QPS may have to resolve to another node if there is no local CoreDNS instance, and having a local cache will help improve latency when using NodeLocal DNSCache
- Skipping iptables DNAT and connection tracking will help reduce
conntrackcontention and prevent UDP DNS entries from filling up theconntracktable (a common 5s timeout problem is caused by this) - connections from the local cache proxy to the kube-dns service can be upgraded to TCP, TCP conntrack entries will be removed when the connection is closed, while UDP entries must time out (default nf_conntrack_udp_timeout is 30 seconds)
- Upgrading DNS queries from UDP to TCP will reduce the tail wait time attributed to dropped UDP packets and DNS timeouts, typically up to 30 seconds (3 retries + 10 seconds timeout)
To install NodeLocal DNSCache is also very simple, just get the official list of resources directly from
|
|
This resource manifest file contains several variables, among them.
__PILLAR__DNS__SERVER__: indicates the ClusterIP of the servicekube-dns, which can be obtained with the commandkubectl get svc -n kube-system | grep kube-dns | awk '{ print $3 }'__PILLAR__LOCAL__DNS__: indicates the local IP of DNSCache, default is 169.254.20.10__PILLAR__DNS__DOMAIN__: indicates the cluster domain, the default iscluster.local
There are also two parameters __PILLAR__CLUSTER__DNS__ and __PILLAR__UPSTREAM__SERVERS__, which are configured by mirroring 1.15.6 and above, and the corresponding values come from kube-dns ConfigMap and the custom Upstream Server configuration. The installation is done directly by executing the command shown below.
You can check if the corresponding Pod has started successfully by using the following command.
|
|
Note that node-local-dns is deployed with DaemonSet using
hostNetwork=true, which will take up port 8080 of the host, so you need to make sure that port is not taken.
If the kube-proxy component is using ipvs mode, we need to modify the -cluster-dns parameter of the kubelet to point to 169.254.20.10, Daemonset will create a NIC in each node to tie this IP, and the Pod will send a The Pod will send DNS requests to this IP, and only when the cache does not hit will it proxy to the upstream cluster DNS for queries. In iptables mode, Pod still requests to the original cluster DNS, and the node has this IP listening, which will be intercepted by the local machine and then request the upstream cluster DNS, so there is no need to change the --cluster-dns parameter.
Since I’m using a kubeadm installation of version 1.16 of the cluster here, we just need to replace the value of the parameter clusterDNS in the /var/lib/kubelet/config.yaml file on the node and restart it, or we can add an official DaemonSet resource object entirely to the initContainer in the official DaemonSet resource object to do this:
|
|
However, it should be noted that the above approach is not recommended for online environments, as it will give priority to modifying the cluster-dns parameter of the kubelet and then installing NodeLocal, which after all has a vacuum period in which we can manually go node by node to verify.
After the node-local-dns installation and configuration is complete, we can deploy a new Pod to verify: (test-node-local-dns.yaml)
Direct Deployment.
We can see that nameserver has become 169.254.20.10. Of course, if you want to use node-local-dns for the previous history of Pod, you need to rebuild it.