Many times we may directly expose private information such as application passwords or API Token in the source code, which is obviously not a good way to expose such private information. The Kubernetes system provides a Secret object to store private data, but it is only a simple Base64 encoding, which is better than exposing it directly, but it is still not enough to use Secret directly for applications with high security requirements. In this article, we will introduce how to use HashiCorp Vault for secret key management in Kubernetes clusters.

Introduction to Vault

Vault is a central management service for handling and encrypting secret keys across the infrastructure. Vault manages all secret keys through a secret engine. Vault has a set of secret engines that can be used.

There are many advantages of using Vault.

  • The secret key management service can simply be seen as 1Password in the back-end domain. first of all, it will ensure the security of the secret key storage, no matter who gets the landed data file of the secret key management service, it still cannot be decrypted without the secret key.
  • To get the previously configured passwords, secret keys and other key data from Vault, the administrator will need to assign Token, and for these assigned Token, the administrator can make various security policies including expiration, revocation, update and permission management, etc.
  • The security level of Vault can provide services open to the public network, so it can provide a developer’s Vault for the development environment, and it can be very convenient to develop at home or off-site.
  • Administrators can update c-security passwords or keys for individual data services at any time through Vault, and can withdraw or modify permissions for specific Tokens at any time. This is useful when Rolling out updates
  • Using Vault forces code to obtain various data connection passwords or secret keys through the Vault interface. This prevents developers from inadvertently obtaining and using secret key passwords in their code. And because of the way Vault is managed, we can manage separate Vaults for different development stages, even though there is only one copy of the code. It is even possible to have only one person with Vault management privileges in a production environment and not feel overwhelmed with maintenance
  • All secret key access and modification are logged. This can be used as evidence after the fact as a clue for intrusion
  • Database and API keys are no longer scattered all over the code

Installation

Again for convenience we will use Helm3 here to install Vault on the Kubernetes cluster, corresponding to the environment version shown below.

1
2
3
4
5
$ helm version
version.BuildInfo{Version:"v3.0.1", GitCommit:"7c22ef9ce89e0ebeb7125ba2ebf7d421f3e82ffa", GitTreeState:"clean", GoVersion:"go1.13.4"}
$ kubectl version                          
Client Version: version.Info{Major:"1", Minor:"14", GitVersion:"v1.14.2", GitCommit:"66049e3b21efe110454d67df4fa62b08ea79a19b", GitTreeState:"clean", BuildDate:"2019-05-16T18:55:03Z", GoVersion:"go1.12.5", Compiler:"gc", Platform:"darwin/amd64"}
Server Version: version.Info{Major:"1", Minor:"16", GitVersion:"v1.16.2", GitCommit:"c97fe5036ef3df2967d086711e6c0c405941e14b", GitTreeState:"clean", BuildDate:"2019-10-15T19:09:08Z", GoVersion:"go1.12.10", Compiler:"gc", Platform:"linux/amd64"}

Here you can install it directly using the official chart package provided by Vault: https://github.com/hashicorp/vault-helm. The package is not uploaded to the chart repository, so we can directly clone the code to the client where Helm3 is located and install it directly, or of course, you can install it directly by specifying Release package can also be installed by using the following command:

 1
 2
 3
 4
 5
 6
 7
 8
 9
10
11
12
13
14
15
16
17
18
19
20
21
22
$ helm install vault --namespace kube-system \
    --set "server.dev.enabled=true" \
    https://github.com/hashicorp/vault-helm/archive/v0.3.3.tar.gz
NAME: vault
LAST DEPLOYED: Wed Feb 19 10:50:42 2020
NAMESPACE: kube-system
STATUS: deployed
REVISION: 1
TEST SUITE: None
NOTES:
Thank you for installing HashiCorp Vault!

Now that you have deployed Vault, you should look over the docs on using
Vault with Kubernetes available here:

https://www.vaultproject.io/docs/


Your release is named vault. To learn more about the release, try:

  $ helm status vault
  $ helm get vault

The above command will install a Helm release named vault under the kube-system namespace.

1
2
3
4
5
6
7
8
$ helm ls -n kube-system
NAME 	NAMESPACE  	REVISION	UPDATED                             	STATUS  	CHART      	APP VERSION
vault	kube-system	1       	2020-02-19 10:50:42.449755 +0800 CST	deployed	vault-0.3.3
$ $ kubectl get pods -n kube-system
NAME                                    READY   STATUS    RESTARTS   AGE
......
vault-0                                 1/1     Running   0          6m26s
vault-agent-injector-584db8849f-x6wsv   1/1     Running   0          6m27s

Seeing the above two Vault-related Pods running successfully proves that they have been installed successfully, so the installation is very easy, so let’s focus on how to use them.

Usage

If you want Vault to store the database username and password under the internal/database/config path of the application, you need to create the secret by opening the kv secret engine and putting the username and password in the specified path.

To access the command line interactive terminal of the vault-0 container.

1
2
$ kubectl exec -it vault-0 /bin/sh -n kube-system
/ $ 

Enable the kv-v2 secrets engine under the internal path.

1
2
/ $ vault secrets enable -path=internal kv-v2
Success! Enabled the kv-v2 secrets engine at: internal/

Then add a username and password secret key under the internal/exampleapp/config path.

1
2
3
4
5
6
7
/ $ vault kv put internal/database/config username="db-readonly-username" password="db-secret-password"
Key              Value
---              -----
created_time     2020-02-19T02:58:54.06574878Z
deletion_time    n/a
destroyed        false
version          1

Once created, the secret created above can be verified with the following command.

 1
 2
 3
 4
 5
 6
 7
 8
 9
10
11
12
13
14
/ $ vault kv get internal/database/config
====== Metadata ======
Key              Value
---              -----
created_time     2020-02-19T02:58:54.06574878Z
deletion_time    n/a
destroyed        false
version          1

====== Data ======
Key         Value
---         -----
password    db-secret-password
username    db-readonly-username

This stores the username and password information in the Vault, which provides a Kubernetes authentication method that allows clients to authenticate by using the Kubernetes ServiceAccount for authentication.

To enable Kubernetes authentication.

1
2
/ $ vault auth enable kubernetes
Success! Enabled kubernetes auth method at: kubernetes/

Vault accepts Service Token from any client in the Kubernetes cluster, and during authentication, Vault verifies the ServiceAccount’s Token information with the configured Kubernetes address. Configure the Kubernetes authentication method with the ServiceAccount’s Token, Kubernetes address, and CA certificate information.

1
2
3
4
5
/ $ vault write auth/kubernetes/config \
>         token_reviewer_jwt="$(cat /var/run/secrets/kubernetes.io/serviceaccount/token)" \
>         kubernetes_host="https://$KUBERNETES_PORT_443_TCP_ADDR:443" \
>         kubernetes_ca_cert=@/var/run/secrets/kubernetes.io/serviceaccount/ca.crt
Success! Data written to: auth/kubernetes/config

Both token_reviewer_jwt and kubernetes_ca_cert are injected into the Pod by default by Kubernetes, and the environment variable KUBERNETES_PORT_443_TCP_ADDR is also built-in to represent the Kubernetes APIServer’s intranet address of the Kubernetes APIServer. In order for the client to read the secret data defined in the previous step under the internal/database/config path, you also need to grant the read permission to that path.

Here we create a policy name internal-app that will enable read access to the secret in the path internal/database/config.

1
2
3
4
5
6
/ $ vault policy write internal-app - <<EOH
> path "internal/data/database/config" {
>   capabilities = ["read"]
> }
> EOH
Success! Uploaded policy: internal-app

Then create a Kubernetes authentication role named internal-app.

1
2
3
4
5
6
$ / $ vault write auth/kubernetes/role/internal-app \
>         bound_service_account_names=internal-app \
>         bound_service_account_namespaces=default \
>         policies=internal-app \
>         ttl=24h
Success! Data written to: auth/kubernetes/role/internal-app

This role connects a ServiceAccount named internal-app under the Kubernetes default namespace to Vault’s internal-app policy, and the Token returned after authentication has a 24-hour validity period. Finally, we exit vault-0 directly.

1
2
/ $ exit
$

Now that the Vault-related preparations are done, the next step is how to read our Secret data above in Kubernetes. Above we defined a ServiceAccount named internal-app under the default namespace, which does not exist yet, so first create: (vault-sa.yaml)

1
2
3
4
5
apiVersion: v1
kind: ServiceAccount
metadata:
  name: internal-app  # 需要和上面的 bound_service_account_names 一致
  namespace: default  # 需要和上面的 bound_service_account_namespaces 一致

Just create directly.

1
2
3
4
5
6
$ kubectl apply -f vault-sa.yaml
serviceaccount/internal-app created
$ kubectl get sa
NAME                     SECRETS   AGE
internal-app             1         91m
......

Then we use the sa object created above in our application: (vault-demo.yaml)

 1
 2
 3
 4
 5
 6
 7
 8
 9
10
11
12
13
14
15
16
17
18
19
apiVersion: apps/v1
kind: Deployment
metadata:
  name: vault-demo
  labels:
    app: vault-demo
spec:
  selector:
    matchLabels:
      app: vault-demo
  template:
    metadata:
      labels:
        app: vault-demo
    spec:
      serviceAccountName: internal-app  # 使用上面创建的 serviceaccount 对象
      containers:
        - name: vault
          image: cnych/vault-demo:0.0.1

One of the more important things is that the spec.template.spec.serviceAccountName field needs to use the ServiceAccount resource object called internal-app that we created above, again directly.

 1
 2
 3
 4
 5
 6
 7
 8
 9
10
11
$ kubectl apply -f vault-demo.yaml
deployment.apps/vault-demo created
$ kubectl get pods
NAME                                      READY   STATUS    RESTARTS   AGE
vault-demo-7fb8449d7b-x8bft               1/1     Running   0          10m
......
$ kubectl get pods -n kube-system
NAME                                    READY   STATUS    RESTARTS   AGE
vault-0                                 1/1     Running   0          112m
vault-agent-injector-584db8849f-x6wsv   1/1     Running   0          112m
......

The normal case is that the vault-agent-injector program in our deployed Vault will look up the annotations property of the deployed application in the Kubernetes cluster for processing. -7fb8449d7b-x8bft` pod is not getting any secret data, which can be verified by the following command.

1
2
3
$ kubectl exec -it vault-demo-7fb8449d7b-x8bft -- ls /vault/secrets
ls: /vault/secrets: No such file or directory
command terminated with exit code 1

You can see that there is no corresponding secret data in the container. At this point we need to add some instructions for getting the secret data via annotations: (vault-inject.yaml)

1
2
3
4
5
6
7
spec:
  template:
    metadata:
      annotations:
        vault.hashicorp.com/agent-inject: "true"
        vault.hashicorp.com/role: "internal-app"
        vault.hashicorp.com/agent-inject-secret-database-config.txt: "internal/data/database/config"

The annotations above defines some of the vault-related information, all starting with the prefix vault.hashicorp .com prefix.

  • agent-inject identifies that the Vault Agent injection service is enabled
  • role indicates the Vault Kubernetes authentication role
  • agent-inject-secret-FILEPATH prefixes the path to the file database-config.txt that is written to /vault/secrets, corresponding to the secret data storage path defined in Vault.

Use the annotations defined above directly to patch the Deployment above.

1
2
3
4
5
$ kubectl patch deployment vault-demo --patch "$(cat vault-inject.yaml)"
deployment.apps/vault-demo patched
$ kubectl get pods
NAME                                      READY   STATUS    RESTARTS   AGE
vault-demo-574d67ff98-2dsqh               2/2     Running   0          3m14s

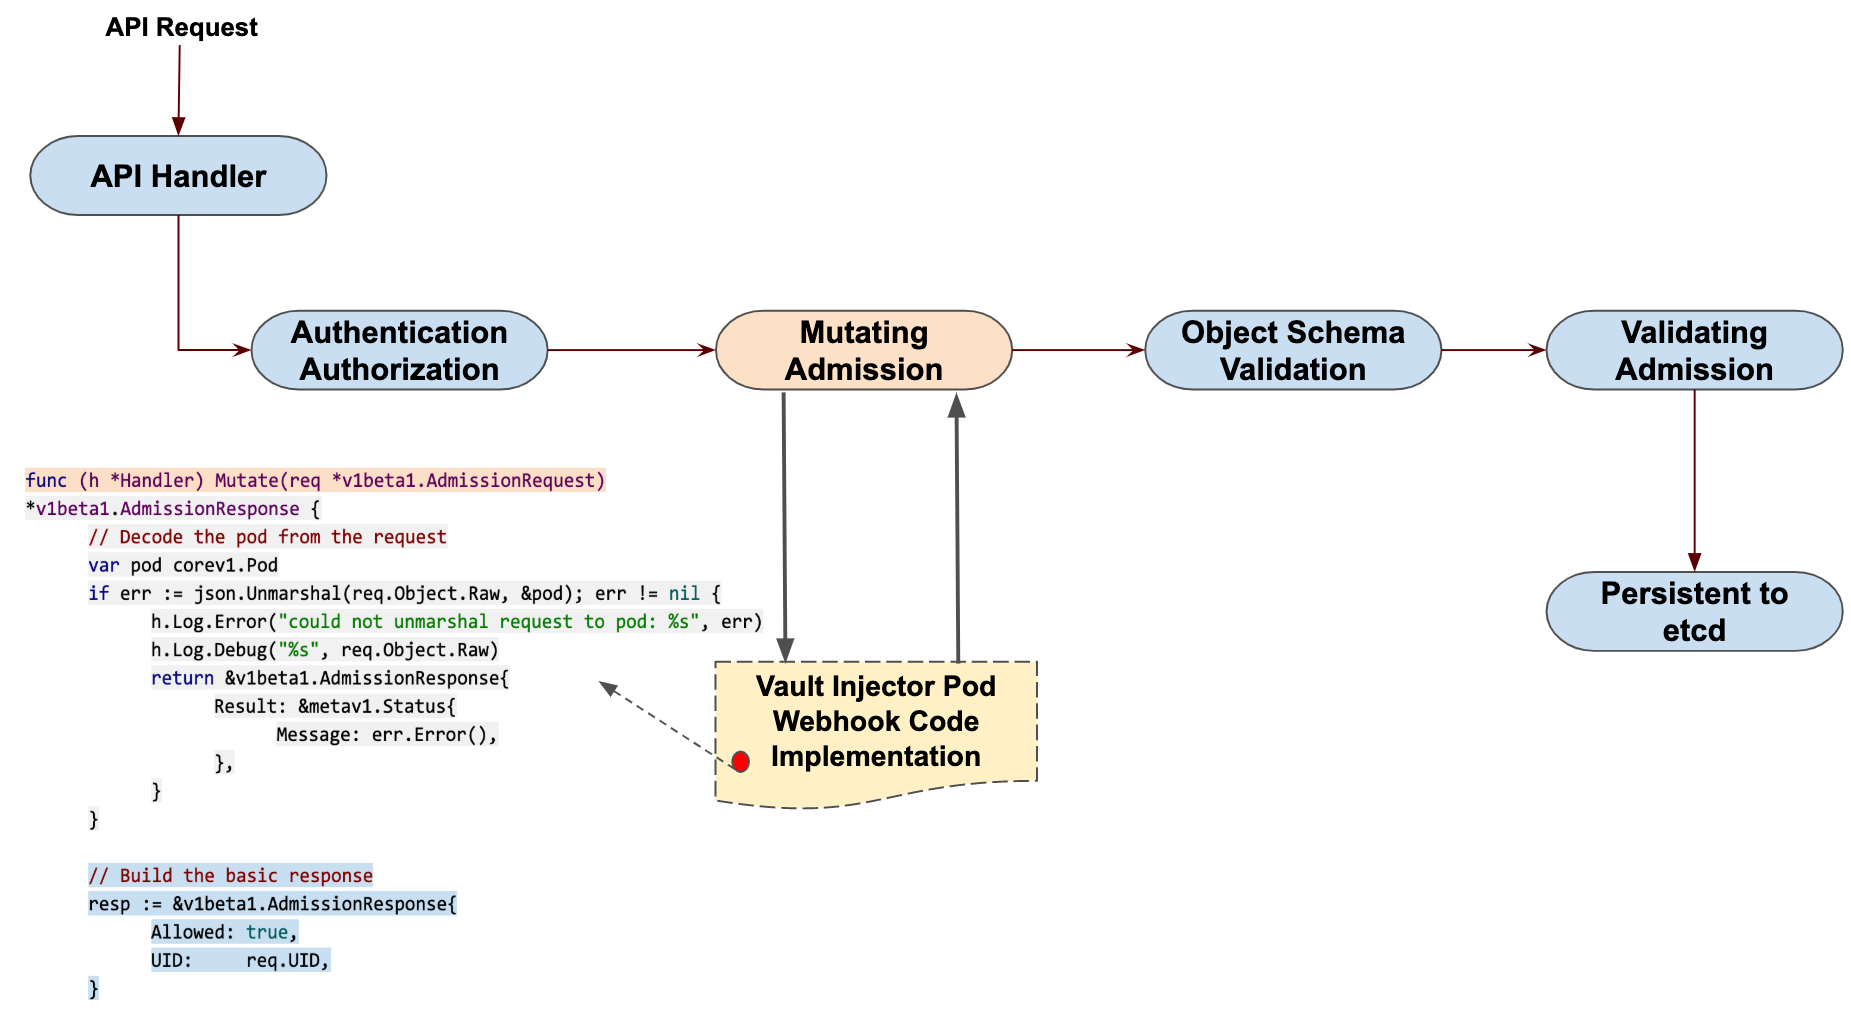
The new Pod will now contain two containers, the vault-demo container we defined and a Vault Agent container called vault-agent. Automatically adding a vault-agent Sidecar container to the Pod is actually done using the Mutating Admission Webhook, the same mechanism implemented by Istio.

We can now view the logs of the vault-agent container.

 1
 2
 3
 4
 5
 6
 7
 8
 9
10
11
12
13
14
15
16
17
18
19
20
21
22
23
24
25
26
$ kubectl logs -f vault-demo-574d67ff98-2dsqh vault-agent
2020-02-19T11:24:26.127+0800 [INFO]  sink.file: creating file sink
2020-02-19T11:24:26.128+0800 [INFO]  sink.file: file sink configured: path=/home/vault/.token mode=-rw-r-----
2020-02-19T11:24:26.129+0800 [INFO]  auth.handler: starting auth handler
2020-02-19T11:24:26.129+0800 [INFO]  auth.handler: authenticating
2020-02-19T11:24:26.129+0800 [INFO]  template.server: starting template server
2020/02/19 03:24:26.129648 [INFO] (runner) creating new runner (dry: false, once: false)
2020/02/19 03:24:26.130647 [INFO] (runner) creating watcher
2020-02-19T11:24:26.130+0800 [INFO]  sink.server: starting sink server
==> Vault server started! Log data will stream in below:

==> Vault agent configuration:

                     Cgo: disabled
               Log Level: info
                 Version: Vault v1.3.1

2020-02-19T11:24:26.155+0800 [INFO]  auth.handler: authentication successful, sending token to sinks
2020-02-19T11:24:26.155+0800 [INFO]  auth.handler: starting renewal process
2020-02-19T11:24:26.155+0800 [INFO]  sink.file: token written: path=/home/vault/.token
2020-02-19T11:24:26.155+0800 [INFO]  template.server: template server received new token
2020/02/19 03:24:26.155649 [INFO] (runner) stopping
2020/02/19 03:24:26.155649 [INFO] (runner) creating new runner (dry: false, once: false)
2020-02-19T11:24:26.166+0800 [INFO]  auth.handler: renewed auth token
2020/02/19 03:24:26.176648 [INFO] (runner) creating watcher
2020/02/19 03:24:26.176648 [INFO] (runner) starting

The vault-agent container manages the entire Token lifecycle and secret data retrieval, and the secret data we define is added to the application container under the /vault/secrets/database-config.txt path.

1
2
3
$ kubectl exec -it vault-demo-574d67ff98-2dsqh -c vault -- cat /vault/secrets/database-config.txt
data: map[password:db-secret-password username:db-readonly-username]
metadata: map[created_time:2020-02-19T02:58:54.06574878Z deletion_time: destroyed:false version:1]

Here the secret data is successfully stored in our application container, but for practical applications we can read the corresponding secret data directly through the SDK provided by Vault. For example, the following is an example of reading dynamic authentication data through the Vault SDK.

 1
 2
 3
 4
 5
 6
 7
 8
 9
10
11
12
13
14
15
16
17
18
19
20
21
22
23
24
25
26
27
28
29
30
31
32
33
34
35
36
37
38
39
40
41
42
43
44
package main

import (
	"fmt"
	"io/ioutil"

	vaultApi "github.com/hashicorp/vault/api"
)

var (
	vaultHost           string
	vaultCAPath         string
	vaultServiceAccount string
	vaultJWTPath        string
)

func main() {
	vaultJWTPath = "/var/run/secrets/kubernetes.io/serviceaccount/token"
	vaultServiceAccount = "internal-app"

	tlsConfig := &vaultApi.TLSConfig{
		CACert:   vaultCAPath,
		Insecure: false,
	}

    config := vaultApi.DefaultConfig()
    // todo,配置 vault 地址
	config.Address = fmt.Sprintf("https://%s", vaultHost)
	config.ConfigureTLS(tlsConfig)

	client, _ := vaultApi.NewClient(config)
	buf, _ := ioutil.ReadFile(vaultJWTPath)
	jwt := string(buf)

	options := map[string]interface{}{
		"jwt":  jwt,
		"role": vaultServiceAccount,
	}
	loginSecret, _ := client.Logical().Write("auth/kubernetes/login", options)
	client.SetToken(loginSecret.Auth.ClientToken)

	secret, _ := client.Logical().Read("internal/data/database/config")
	fmt.Println(secret)
}

It is also important to note that the authentication role we defined above only has 24 hours to expire, so you can perform a renew operation before it expires.

For more information on the use of Vault in conjunction with Kubernetes, check out the official documentation at https://learn.hashicorp.com/vault/getting-started-k8s/k8s-intro.