Spinnaker is a continuous delivery platform, originally developed by Netflix, for releasing software changes quickly and reliably. Spinnaker makes it easier for developers to focus on writing code without worrying about the underlying cloud infrastructure, and it integrates seamlessly with Jenkins It integrates seamlessly with Jenkins and other popular build tools. I’ve been wanting to try Spinnaker for a long time, but I’ve tried many times without success due to GFW, and this time I finally successfully deployed Spinnaker on a Kubernetes cluster after solving the proxy issue.
In this article, we will use helm3 to demonstrate the installation of Spinnaker on a Kubernetes cluster, and the corresponding environment version is shown below.
1
2
3
4
5
|
$ helm version
version.BuildInfo{Version:"v3.0.1", GitCommit:"7c22ef9ce89e0ebeb7125ba2ebf7d421f3e82ffa", GitTreeState:"clean", GoVersion:"go1.13.4"}
$ kubectl version
Client Version: version.Info{Major:"1", Minor:"14", GitVersion:"v1.14.2", GitCommit:"66049e3b21efe110454d67df4fa62b08ea79a19b", GitTreeState:"clean", BuildDate:"2019-05-16T18:55:03Z", GoVersion:"go1.12.5", Compiler:"gc", Platform:"darwin/amd64"}
Server Version: version.Info{Major:"1", Minor:"16", GitVersion:"v1.16.2", GitCommit:"c97fe5036ef3df2967d086711e6c0c405941e14b", GitTreeState:"clean", BuildDate:"2019-10-15T19:09:08Z", GoVersion:"go1.12.10", Compiler:"gc", Platform:"linux/amd64"}
|
The installation and configuration of Helm3 is really simple, just install the Helm3 client on top of the node where kubectl is located, and by default it will read the kubeconfig file to access the cluster. We use the helm chart repository provided by Microsoft here.
1
2
3
4
5
6
7
|
$  helm repo ls
NAME            URL
stable          http://mirror.azure.cn/kubernetes/charts/
$ helm repo update
Hang tight while we grab the latest from your chart repositories...
...Successfully got an update from the "stable" chart repository
Update Complete. ⎈ Happy Helming!⎈
|
Since we are using Kubernetes version 1.16.x, which deprecated some old APIs for many resource objects, such as Deployment, we can only use the apps/v1 version, and the Spinnaker chart package we are using here is still using the previous API version. So we need to download it manually and make a change: apps/v1.
1
2
|
$ helm fetch stable/spinnaker
$ tar -xvf spinnaker-1.23.2.tgz
|
Then change the apiVersion of Deployment, StatefulSet and other resource objects in the spinnaker chart template to apps/v1, also remember that if it is Deployment you need to add the selector.matchLabels field, you can use it directly I changed the chart template https://github.com/cnych/spinnaker-helm.
In the values.yaml file of the chart template, I specified halyard.spinnakerVersion=1.17.6, which is still a problem because of the apiVersion version, which is compatible with Kubernetes v1.16.x clusters, and replaced the default gcr.io image with a Microsoft image. In addition, the default gcr.io image is replaced with the Microsoft image source gcr.azk8s.cn, and there is also a very important thing is the storage designation, here we create a StorageClass resource object to provide storage, I am creating a Ceph RBD type of storage rook-ceph-block, of course any available StorageClass resource object is fine: the
 1
 2
 3
 4
 5
 6
 7
 8
 9
10
11
12
13
14
15
16
17
18
19
20
21
22
23
24
25
26
|
apiVersion: storage.k8s.io/v1
kind: StorageClass
metadata:
   name: rook-ceph-block
provisioner: rook-ceph.rbd.csi.ceph.com
reclaimPolicy: Retain
parameters:
    # clusterID 是 rook 集群运行的命名空间
    clusterID: rook-ceph

    # 指定存储池
    pool: k8s-test-pool

    # RBD image (实际的存储介质) 格式. 默认为 "2".
    imageFormat: "2"

    # RBD image 特性. CSI RBD 现在只支持 `layering` .
    imageFeatures: layering

    # Ceph 管理员认证信息,这些都是在 clusterID 命名空间下面自动生成的
    csi.storage.k8s.io/provisioner-secret-name: rook-csi-rbd-provisioner
    csi.storage.k8s.io/provisioner-secret-namespace: rook-ceph
    csi.storage.k8s.io/node-stage-secret-name: rook-csi-rbd-node
    csi.storage.k8s.io/node-stage-secret-namespace: rook-ceph
    # 指定 volume 的文件系统格式,如果不指定, csi-provisioner 会默认设置为 `ext4`
    csi.storage.k8s.io/fstype: ext4
|
It is necessary to specify the corresponding storage for halyard, redis, and mino, but of course it is possible to specify a suitable PVC directly, which can be decided here according to the actual situation.
 1
 2
 3
 4
 5
 6
 7
 8
 9
10
11
12
13
14
15
16
|
halyard:
  ...
  persistence:
    storageClass: rook-ceph-block
...
redis:
  ...
  master:
    persistence:
      storageClass: rook-ceph-block
...
minio:
  ...
  persistence:
    storageClass: rook-ceph-block
...
|
The next most important step is to configure a proxy for halyard, so the prerequisite to continue is that you need to configure a proxy that can be accessed in the Kubernetes Pod, for example, if my proxy address is 10.151.30.11:8118, you need to configure the JAVA_OPTS environment variable as follows : `JAVA_OPTS
1
2
3
4
|
halyard:
  env:
    - name: JAVA_OPTS
      value: '"-Djava.security.egd=file:/dev/./urandom" "-Dhttp.proxyHost=10.151.30.11" "-Dhttps.proxyHost=10.151.30.11" "-Dhttp.proxyPort=8118" "-Dhttps.proxyPort=8118" "-Dhttp.nonProxyHosts=\"localhost|*.spinnaker.com\""'
|
Get the above modified Chart template of Spinnaker and replace the above configuration in the values.yaml file with your own configuration.
1
2
3
4
|
$ git clone https://github.com/cnych/spinnaker-helm spinnaker
$ kubectl create ns spinnaker
# 安装 spinnaker
$ helm install spinnaker --namespace spinnaker ./spinnaker
|
Since the installation process is very time consuming, there may be a timeout for the helm install process above, which can be ignored.
1
2
3
|
$ helm ls -n spinnaker
NAME            NAMESPACE       REVISION        UPDATED                                 STATUS  CHART            APP VERSION
spinnaker       spinnaker       1               2020-02-17 19:28:02.644552 +0800 CST    failed  spinnaker-1.23.2 1.16.2
|
The installation will initially generate several Pods as shown below, with spinnaker-install-using-hal-th8qf being one of the Job tasks used to actually install Spinnaker: spinnaker-install-using-hal-th8qf.
1
2
3
4
5
|
$ kubectl get pods -n spinnaker
spinnaker-install-using-hal-th8qf   0/1     Completed   0          17h
spinnaker-minio-86f5b8785-bkjfq     1/1     Running     0          17h
spinnaker-redis-master-0            1/1     Running     0          17h
spinnaker-spinnaker-halyard-0       1/1     Running     0          17h
|
However, since the gcr.io image will be used during the installation of Spinnaker, you will see a lot of Pod image pulling failure errors, at this time we can manually edit the Deployment object to change the image address.
 1
 2
 3
 4
 5
 6
 7
 8
 9
10
11
|
$ kubectl get deploy -n spinnaker
NAME               READY   UP-TO-DATE   AVAILABLE   AGE
spin-clouddriver   0/1     1            0           17h
spin-deck          0/1     1            0           17h
spin-echo          0/1     1            0           17h
spin-front50       0/1     1            0           17h
spin-gate          0/1     1            0           17h
spin-igor          0/1     1            0           17h
spin-orca          0/1     1            0           17h
spin-rosco         0/1     1            0           17h
spinnaker-minio    1/1     1            1           17h
|
For example, change the mirror address of the Deployment resource object spin-deck to
1
2
|
$ kubectl edit deploy spin-deck -n spinnaker
# 然后在打开的编辑中将 gcr.io 替换成 gcr.azk8s.cn
|
Replace the other resource objects in the same way, and after a normal replacement, the Pod will start normally after some time. The final list of Pods is shown below.
 1
 2
 3
 4
 5
 6
 7
 8
 9
10
11
12
13
14
|
$ kubectl get pods -n spinnaker
NAME                                READY   STATUS      RESTARTS   AGE
spin-clouddriver-76b8989b4f-cjw8r   1/1     Running     0          17h
spin-deck-5fd7b64b77-fnl5r          1/1     Running     0          17h
spin-echo-644c4cb6b6-gh98w          1/1     Running     0          17h
spin-front50-9d99cd697-cqbxb        1/1     Running     0          17h
spin-gate-6c49bccb6f-nhbzx          1/1     Running     0          17h
spin-igor-7c84d9bcb-rltw7           1/1     Running     0          17h
spin-orca-b5944685-wbm5p            1/1     Running     0          17h
spin-rosco-6d5f9c8f55-g89hq         1/1     Running     0          17h
spinnaker-install-using-hal-th8qf   0/1     Completed   0          17h
spinnaker-minio-86f5b8785-bkjfq     1/1     Running     0          17h
spinnaker-redis-master-0            1/1     Running     0          17h
spinnaker-spinnaker-halyard-0       1/1     Running     0          17h
|
If we want to expose Spinnaker to external users, we can of course create a NodePort service or an Ingress resource object, which we can specify in the chart template above. In fact, in the chart template above, we can specify the parameters of the Ingress resource object through configuration. Since I am using Traefik version 2.1 here, I create a separate IngressRoute resource object to expose the service.
 1
 2
 3
 4
 5
 6
 7
 8
 9
10
11
12
13
14
15
16
17
18
19
20
21
22
23
24
25
26
27
28
29
30
31
32
33
34
35
36
37
38
39
40
41
42
43
44
|
apiVersion: traefik.containo.us/v1alpha1
kind: IngressRoute
metadata:
  name: spin-deck-https
  namespace: spinnaker
spec:
  entryPoints:
  - websecure
  routes:
  - match: Host(`spinnaker.qikqiak.com`)
    kind: Rule
    services:
    - name: spin-deck
      port: 9000
  tls:
    certResolver: ali
    domains:
    - main: "*.qikqiak.com"
---
apiVersion: traefik.containo.us/v1alpha1
kind: Middleware
metadata:
  name: redirect-https
  namespace: spinnaker
spec:
  redirectScheme:
    scheme: https
---
apiVersion: traefik.containo.us/v1alpha1
kind: IngressRoute
metadata:
  name: spin-deck-http
  namespace: spinnaker
spec:
  entryPoints:
  - web
  routes:
  - match: Host(`spinnaker.qikqiak.com`)
    kind: Rule
    services:
    - name: spin-deck
      port: 9000
    middlewares:
    - name: redirect-https
|
Just create the resource object above, and then do a DNS resolution of the domain spinnaker.qikqiak.com to access Spinnaker in your browser.
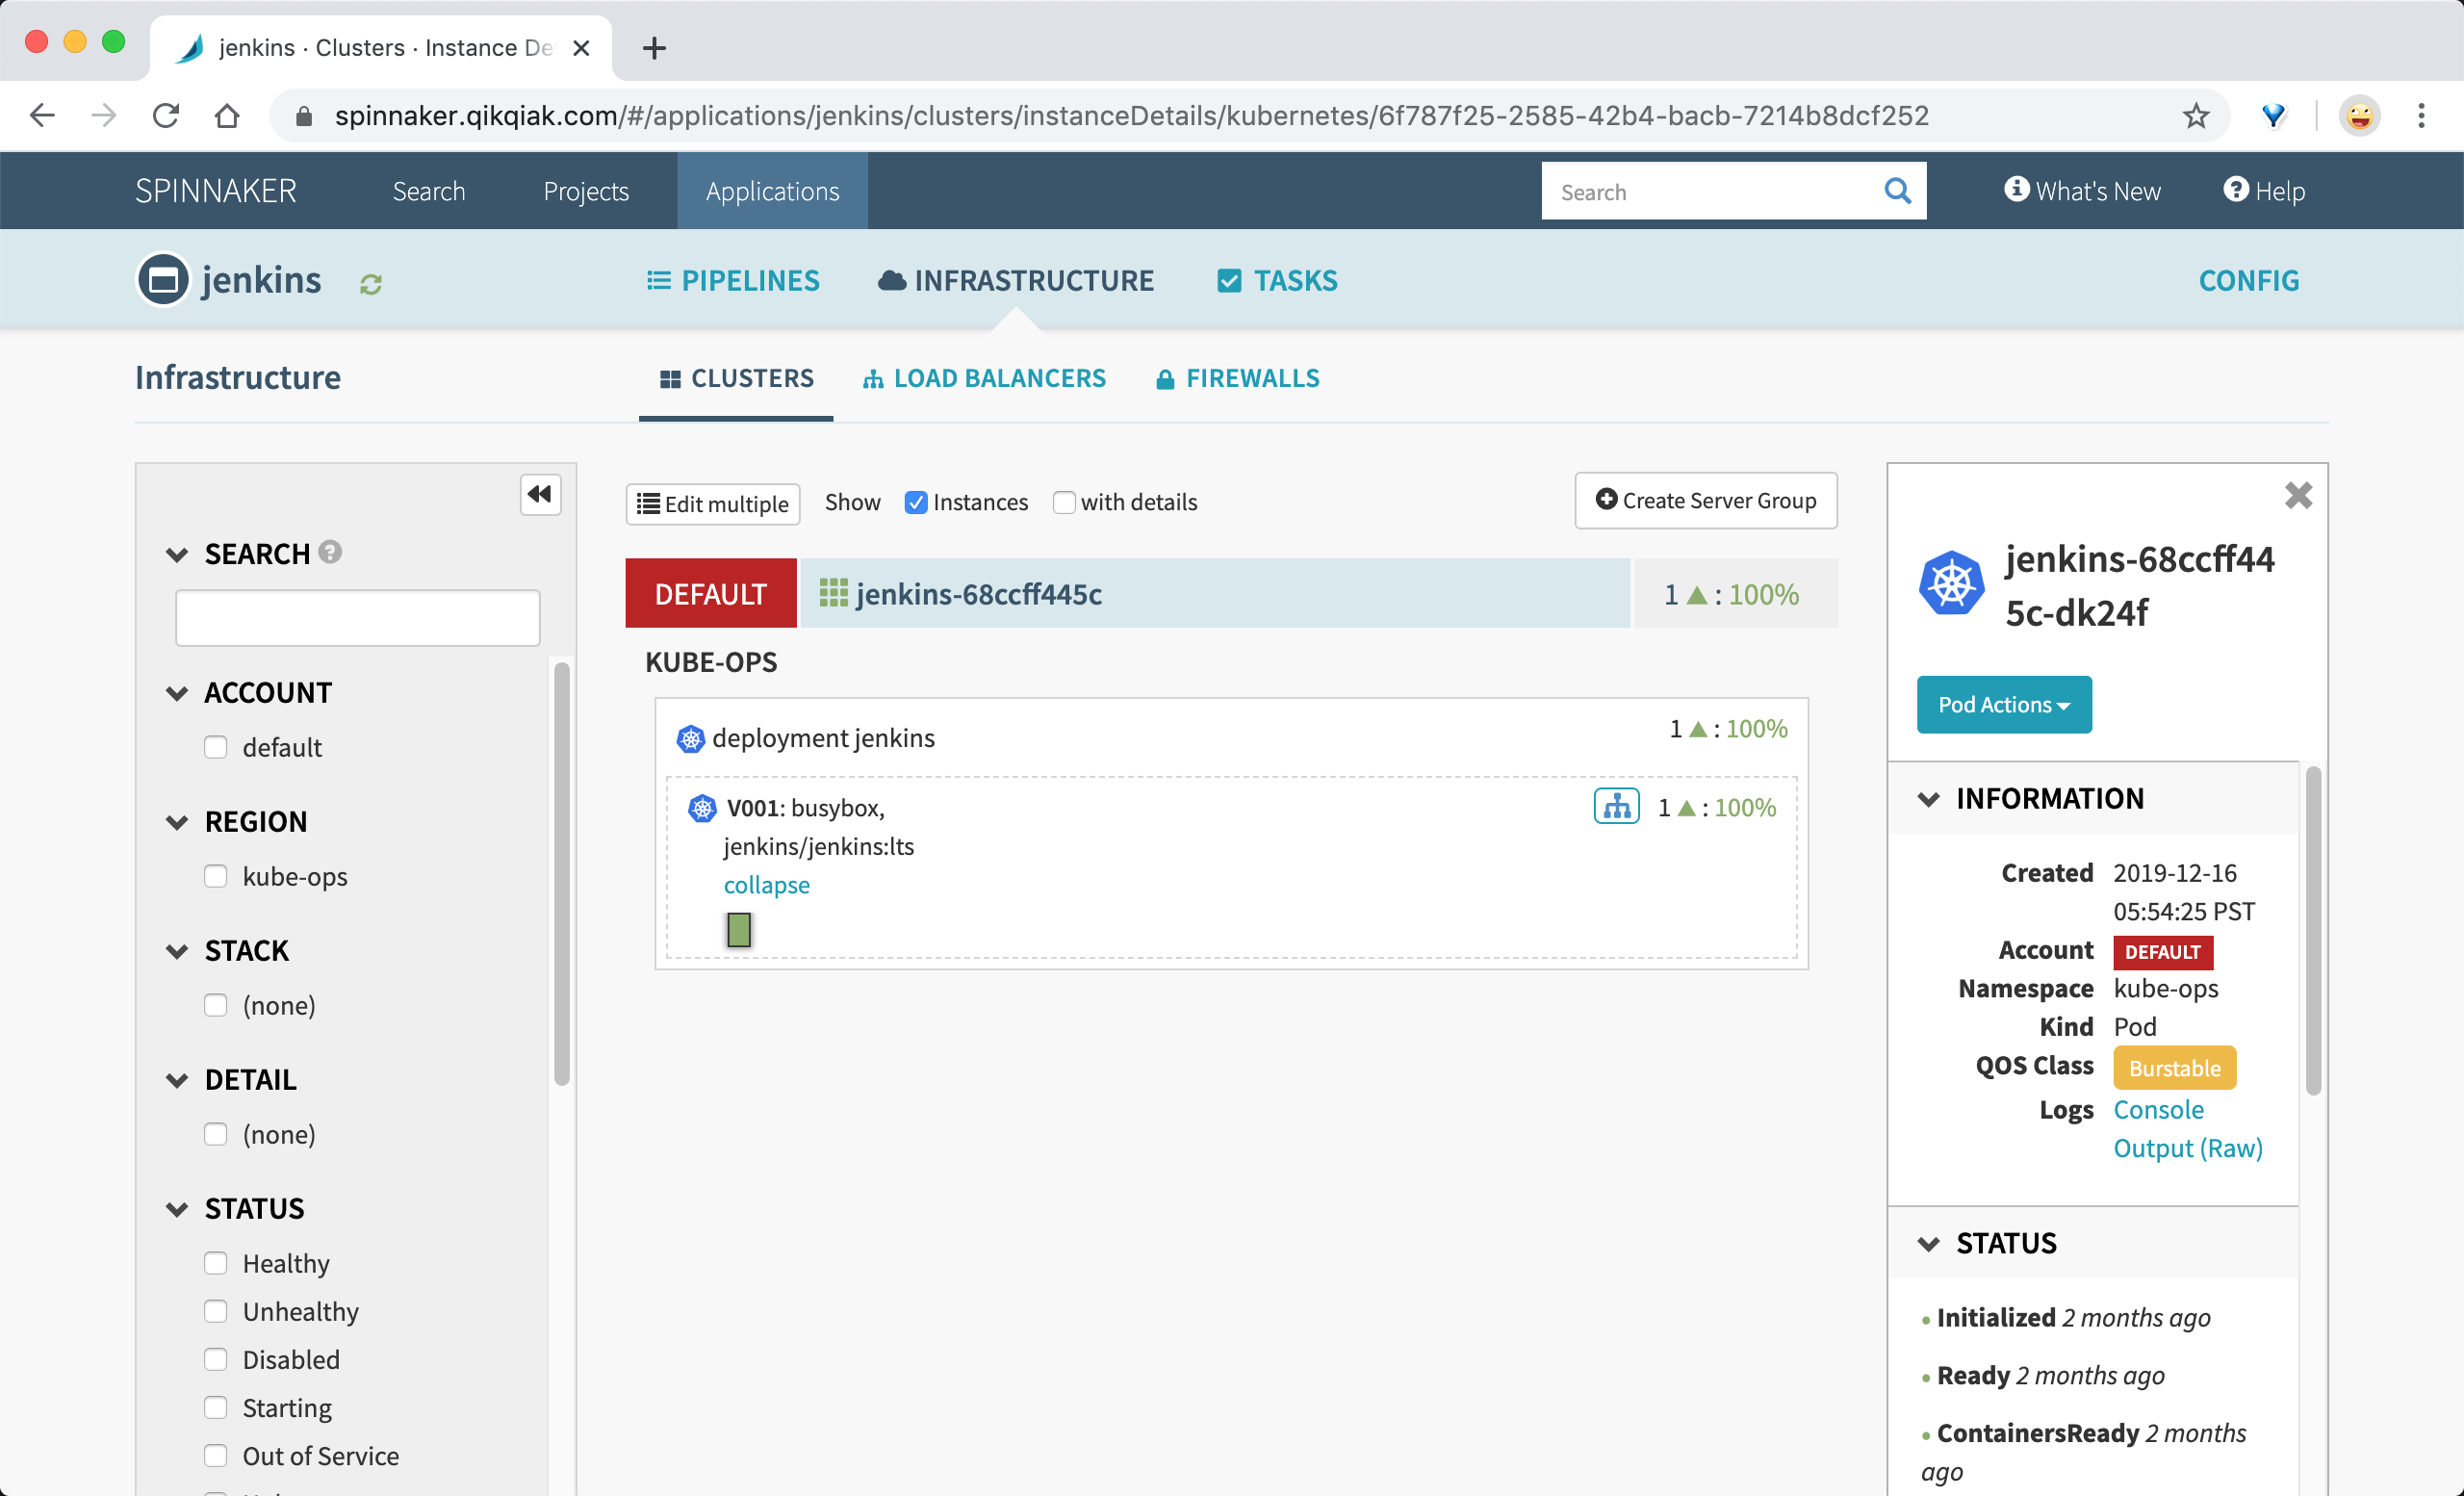
Here the installation is successful, of course, this is only the first step of the long journey it, and then we will slowly go to understand Spinnaker in the end what features worth our attention.