Auth2.0 Protocol Introduction
Regarding the application system user identity management requirements, including authentication, permission authorization, single sign-on, federated authentication and other business scenarios, there are a bunch of standards and specifications in the industry, such as CAS and Kerberos for single sign-on, OpenID for third-party authentication, OAuth for third-party user authorization, SAML for federated authentication and authorization data standards, and so on. Each technology has its own application scenarios and there are also crossover scenarios. To figure them out, you need to understand the working principles and application scenarios of various technologies. Today, starting with one of these technologies, a brief introduction to OAuth2.0 user authorization framework, want a comprehensive understanding of the framework can refer to the framework’s standard RFC6749.
Oauth use scenarios.
- third-party login (to determine the identity of the login and other information)
- API authentication (to determine whether the requesting party is licensed)
Before OAuth, HTTP Basic Authentication, i.e., user authentication in the form of user name & password, was insecure, and OAuth emerged to address the security and flexibility of accessing resources. To give a common example, a user stores photos, videos, and contact data in the Picture, Video, and Contact modules of the content hosting cloud service R (Resource); the user uses the online photo printing service P (Printer), and the user needs to let the P service read the photos in the R service for printing, but does not want the P service to read the other data in the R service. but does not want the P service to read the other data in the R service.
In the traditional way, the user can only provide the user name and password of the R service to the P service, and the P service logs into the R service through the user name and password to read the photos, and cannot restrict the scope of the P service to read.
Using the OAuth framework, the following authorization process is used to grant the P service limited permission to operate the S service without exposing the user password, and the overall process is as follows.
- The user logs in to the P service and clicks on the link to obtain the privileges of the R service.
- The browser jumps to the R service. After the user logs in to the R service, the interface for granting permissions to the P service pops up.
- The user selects the authorization options for granting Picture module, read-only, and valid for 1 hour permissions and submits them.
- The page jumps back to the P service and carries the authorization code produced by the R service (read-only permission for the Picture module).
- The P service obtains the authorization code and initiates a read Picture module request to the R service via the authorization code (with clint_id and client_secret appended).
- The R service verifies the user information and authorization code and provides the P service with the Picture read access.
OAuth has developed to date, there are three versions, respectively: the initialization version OAuth1.0; vulnerability repair version OAuth 1.0a; not backward-compatible OAuth2.0 version. 2.0 version is mainly to repair the security vulnerabilities of the previous version, the authorization process has been optimized to provide a richer use of the scenario, because the optimization of the streamlined steps of authorization, so can not Backward compatible.
OAuth 2.0 authorization authentication process
The core concepts of OAuth 2.0
According to the RFC description, OAuth 2.0 defines four service roles, which are described as follows.
- Resource Owner Resource Owner, the entity that can grant access to protected resources, when the resource owner is a person, the resource owner is the end user.
- Resource Server A server that hosts protected resources and can accept and respond to protected resource requests using an Access Token.
- Client, the application that initiates requests to the protected resource on behalf of the resource owner and with its authorization.
- Authorization Server, an authorization server that authenticates the resource owner and obtains authorization, and then issues an Access Token to the client
Some of the concepts involved in the process of authentication and authorization.
access token
Access token is an authorization credential issued by the authorization server to the client under the user’s authorization, the token means “the user grants the APP to access which services related to himself within how much time range”, so the access token is mainly controlled in two dimensions: time range and permission range.
refresh token
The role of refresh token is to update the access token, the validity period of the access token is generally short, so as to ensure that in the event of access token leakage, not to cause too bad impact, but the side effect of setting the validity period of the access token is too short is that the user needs to authorize frequently, although a certain mechanism can be silent authorization, but frequent calls to the authorization interface, the authorization server is also a kind of pressure In this case, you can issue a refresh token at the same time as the access token, the refresh token is obviously longer than the access token, so that when the access token fails, you can use the refresh token to authorize the server for a new access token, but the protocol for the refresh token is not mandatory, whether the token is needed is the client can choose.
Callback address (redirect uri)
OAuth2.0 is a callback-based authorization protocol. In the authorization code model, the entire authorization needs to be divided into two steps: the first step is to issue the authorization code, and the second step is to request the authorization server to issue the access token based on the authorization code obtained in the first step.
In the first step, OAuth adds the authorization code to the callback address in the form of parameters and sends it in the form of 302 hops, which simplifies the operation of the client and does not need to actively trigger another request to enter the next process. In addition, it will make the authorization server into a “request sender”, using the authorization server as a proxy to request the target address, consuming the performance of the authorization server while generating DDOS attacks on the target address server.
In order to avoid the above security risks, OAuth protocol forces clients to fill in their own callback address during registration, the purpose of this callback address is to allow callback requests to reach the client’s own server, so that they can go through the process of obtaining access tokens. The client can configure multiple callback addresses at the same time and carry one address when requesting authorization. The server will verify whether the callback address passed up by the client is the same as the previously registered callback address, or the former is an element of the latter set, and only when this condition is met is the authorization code allowed to be issued, and the protocol also requires that the callback address carried by the client in both steps of the request must be the same, through these measures to ensure that the callback process can properly reach the client’s own server, and continue the process of taking the authorization code for the access token later.
Permission scope
Access tokens come with an expiration time to control authorization in the time dimension, while in the scope dimension, OAuth introduces the concept of scope. scope can be seen as an object containing the ID, name, and description of a permission, such as “Get your basic information (avatar, nickname) “. The scope must be requested from the third-party login service provider when accessing the account service, and the parameter must be specified when requesting authorization (otherwise it indicates that all permissions allowed by the application are obtained), and these permissions must be shown to the user without reservation when the user confirms the authorization, so that the user knows which data or services the app needs to obtain from the user.
Authentication ideas and processes
OAuth sets up an authorization layer between the “client” and the “service provider”. client” cannot log in directly to the “service provider”, but only to the authorization layer, thus distinguishing the user from the client. The token used by the “client” to log in to the authorization layer is different from the user’s password, and the user can specify the scope of authority and validity of the authorization layer token at the time of logging in. After the “client” logs in to the authorization layer, the “service provider” opens the user’s stored data to the “client” based on the token’s permission range and validity period.
The OAuth 2.0 flowchart in the official RFC 6749 document is a bit obscure and has been optimized as follows
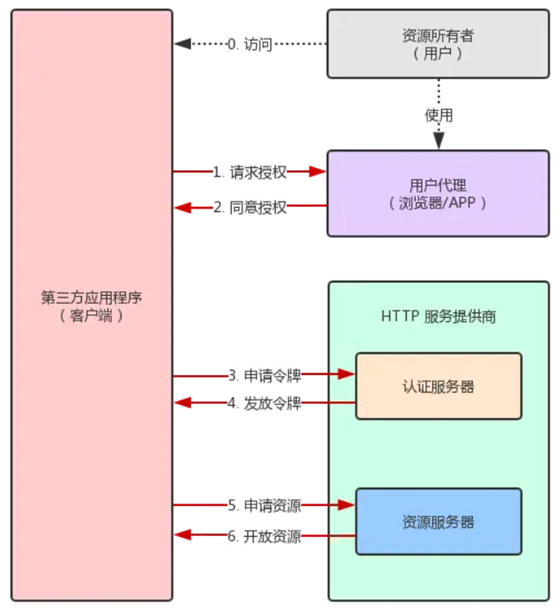
- After the user accesses the third party application (referred to as: client), the client asks the user to grant authorization.
- The user agrees to grant authorization to the client. 3.
- The client uses the authorization obtained in step 2 to request a token from the authentication server.
- After the authentication server authenticates the client, it confirms that the token is correct and agrees to issue the token.
- The client uses the token to request resources from the resource server. 6.
- The resource server confirms that the token is correct and agrees to open the resources to the client.
Step 2 of the above is the key, that is, how the user can give authorization to the client. With this authorization, the client can get the token and then get the resources with the token.
The four modes of OAuth2.0
OAuth2.0 has more refinements in authorization modes compared to version 1.0, and there are four defined authorization modes: Authorization Code Grant, Implicit Grant, Resource Owner Password Credentials Grant), and Client Credentials Grant.
Authorization code mode (authorization code)
Authorization code mode is the most similar to version 1.0 in the whole authorization process, but the whole process is still much simpler, and it is also the most standard and widely used authorization mode in OAuth2.0. This authorization mode is very suitable for applications with server side, of course, most APPs have their own server side nowadays, so most of the OAuth authorization of APPs can take the authorization code mode, the following figure shows the interaction sequence between the roles of authorization code (here the user is directly involved, omitting the user agent).
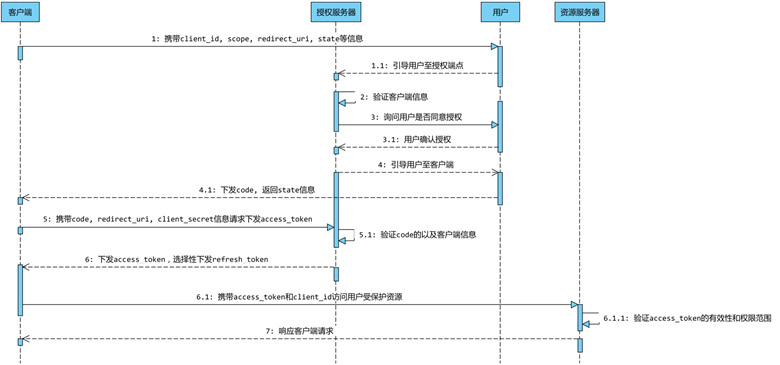
The entire authorization process is described as follows.
- The client carries client_id, scope, redirect_uri, state and other information to guide the user to request the authorization server to issue the code from the authorization endpoint.
- The authorization server verifies the client’s identity and asks the user if he agrees to the authorization (at this point, it will jump to the authorization page that the user can visually see and wait for the user to click to confirm the authorization)
- Assuming that the user agrees to the authorization, the authorization server splices the code and state (if the client passes the parameter) after the redirect_uri and sends the code as a 302
- The client carries the code, redirect_uri, and client_secret to request the authorization server’s token endpoint to issue the access_token (this step actually goes through the client’s server, except for the code, all other parameters are added on the application server side)
- The authorization server verifies the client’s identity and verifies that the code and redirect_uri are the same as when the code was requested, and then issues the access_token and optionally the refresh_token.
Get Authorization Code
Authorization code is an intermediate temporary credential of the authorization process, a temporary certificate for the user to confirm the authorization of this operation, its life cycle is generally short, the protocol recommends that the maximum should not exceed 10 minutes, in this effective time cycle, the client can rely on this temporary certificate to the authorization server in exchange for access tokens.
Request parameter description.
| Name | Must | Descriptive Information |
|---|---|---|
| response_type | must | for authorization code mode response_type=code |
| client_id | must | The client ID, used to identify a client, equivalent to appId, generated when registering the application |
| redirect_uri | Optional | Authorization callback address, see sub-section 2.2.3 |
| scope | optional | permission scope, used to control the client’s permissions, if the client does not pass this parameter, then the server replaces it with all permissions for that application |
| state | recommended | is used to maintain the state of the request and callback process, to prevent CSRF attacks, the server does not do any processing of this parameter, if the client carries the parameter, then the server returns it as is in the response |
Example of request parameters.
The client will request the token endpoint of the authorization server with the above parameters. The authorization server will verify the identity of the client and the relevant parameters, and pop up the confirmation authorization page to ask the user whether to authorize or not on the premise of confirming the user’s login, and if the user agrees to authorize, the authorization code (code) and state information (if the client has passed the parameter) will be added to the callback address and sent down as 302.
Successful response parameters are described as follows
| Name | Must | Descriptive Information |
|---|---|---|
| code | must | Authorization code, the authorization code represents a temporary credential for the user to confirm authorization, can only be used once, and the recommended maximum lifetime is no more than 10 minutes |
| state | Optional | If the client passes this parameter, it must be returned unchanged |
Example of a successful response.
If the request parameters are wrong, or the server-side response is wrong, then the error message needs to be added to the callback address and sent down as 302 (except for the callback address error, or invalid client-side identifier).
Error response parameter description.
| Name | Must | Descriptive Information |
|---|---|---|
| error | mandatory | error code |
| error_description | Optional | Error description information with readability |
| error_uri | Optional | Error_description |
| state | optional | must be returned unchanged if the client passes this parameter |
Example error response.
Dispatching access token
After the authorization endpoint of the authorization server sends the code in the form of 302, the user User-Agent, such as a browser, will request the user-specified redirect_url with the corresponding code, which should ensure that the request hits the corresponding interface of the application server, which can thus get the code and request the token endpoint of the authorization server with the corresponding parameters, and the authorization endpoint will verify the code and the related parameters, and send the access_token if the verification is passed.
The request parameters are described as follows
| Name | Must | Descriptive Information |
|---|---|---|
| grant_type | must | for authorization code mode grant_type=authorization_code |
| code | must | The authorization code obtained in the previous step |
| redirect_uri | must | authorization callback address, see subsection 2.2.3, must be the same if set in previous step |
| client_id | must | The client ID to identify a client, equivalent to the appId, which is generated when registering the application |
- If client credential information (client_secret) is sent down when registering the application, then the client must carry this parameter in order for the authorization server to verify the validity of the client.
- One more point that needs to be made about client credentials is that they cannot be passed to the client, the client cannot guarantee the security of the credentials, the credentials should always stay on the server side of the application and when the downcode callback request is made to the application server, carry the credentials on the server side to request the downcode token again.
Example of request parameters.
The authorization server needs to verify the validity of the client and whether it is the same as the client that requested the authorization code before (the information when requesting authorization can be recorded in the code, or create a cache with the code as the key), and the authorization server also needs to ensure that the code is in the life cycle (recommended to be valid within 10 minutes) and can only be used once. The authorization server generates access_token and optionally sends refresh_token after verification. The OAuth2.0 protocol specifies the token sending policy, but does not explain much about the generation policy.
The success response parameters are described as follows
| Name | Must | Descriptive Information |
|---|---|---|
| access_token | must | access_token |
| token_type | must | access token type, such as bearer, mac, etc. |
| expires_in | recommended | The lifecycle of the access token, in seconds, indicating how long the token expires after it is issued, or the default value if it is not specified |
| refresh_token | recommended | refresh the token, optionally, see 2.2.2 |
| scope | optional | permission range, if the final access token issued corresponds to a permission range different from the one specified by the actual application, then this parameter must be used when issuing the access token to specify |
The final access token responds in JSON format and requires that the response headers Cache-Control: no-store and Pragma: no-cache be specified.
Example of a successful response.
Error response parameter description.
| name | must | description information |
|---|---|---|
| error | mandatory | error code |
| error_description | Optional | Error description with readable information |
| error_uri | Optional | Error_description |
Example error response.
The authorization code authorization process is divided into two steps, separating user authorization and token issuance, which brings more flexibility to the authorization process. However, in some scenarios, such as an internal SSO login application integrated with a third-party application based on OAuth login, a better user experience in OAuth authorization to log in to the third-party application does not require the user to enter the user name and password again to log in, which requires the peripheral APP login state to be passed to the application, but this is a security problem, the user’s login state must be grasped in the application that takes the SSO login process, so the two-step process of authorization code authorization mode in such a scenario can In such a scenario, the two-step process of the authorization code authorization mode can be satisfied without handing over the user’s login state and authorizing it without logging in again.
The internal application can take the client_id and other information of the third-party application to request the code instead of the third-party application, because it holds the user’s login state, so the user does not need to enter the user name and password again during the process, and after getting the code, it will give it to the third-party application, which will use the code and its own client_secret information to request authorization. The server issues the token, and the internal application does not need to give up its own user login state, and the third-party application does not need to give up its own client_secret information, so that the whole authorization process can be completed without logging in again while protecting the user login credentials.
Token refresh
In order to prevent the client from using a token for an unlimited number of times, the token will generally have an expiration time limit, when it is about to expire, you need to reacquire the token, and if you go through the authorization process of the authorization code again, it is very bad for the user experience, so OAuth 2.0 allows users to automatically renew the token.
The specific method is, when the B site issues a token, two tokens are issued at once, one for getting data and the other for getting a new token (refresh token field). Before the token expires, the user uses the refresh token to send a request to renew the token.
|
|
In the URL above.
- the grant_type parameter is refresh_token to indicate a request to renew the token, the value here is fixed to refresh_token, mandatory.
- client_id parameter and client_secret parameter are used to confirm the identity.
- refresh_token parameter is the token used to update the token.
After the B site is verified, a new token will be issued.
Note: The third-party application server gets the refresh token and must store it on the server and reacquire the new token through the background to protect the confidentiality of the refresh token.
Implicit Grant model
Some web applications are purely front-end applications, with no back-end. RFC 6749 specifies a second way, allowing tokens to be issued directly to the front end. This approach does not have an authorization code as an intermediate step, so it is called (authorization code) “hidden” (implicit).
|
|
It proceeds as follows.
- (A) The client directs the user to the authentication server.
- (B) The user decides whether to grant authorization to the client.
- (C) Assuming the user gives authorization, the authentication server directs the user to the “redirect URI” specified by the client, and includes the access token in the hash portion of the URI.
- (D) The browser sends a request to the resource server, which does not include the hash value received in the previous step.
- (E) The resource server returns a web page that contains code to obtain the token in the Hash value.
- (F) The browser executes the script obtained in the previous step and extracts the token.
- (G) The browser sends the token to the client.
The following are the parameters needed for these steps above.
A step, the HTTP request from the client, contains the following parameters.
- response_type: the authorization type, the value here is fixed to “token”, mandatory.
- client_id: the ID of the client, mandatory.
- redirect_uri: URI of the redirect, optional.
- scope: the scope of the permission, optional.
- state: the current state of the client, any value can be specified, the authentication server will return the value as is.
C step, the authentication server responds to the client’s URI with the following parameters.
- access_token: indicates the access token, mandatory.
- token_type: indicates the token type, the value is case-insensitive, mandatory.
- expires_in: indicates the expiration time in seconds. If this parameter is omitted, the expiration time must be set in some other way.
- scope: the scope of the permission. If the scope is the same as the client’s request, this parameter can be omitted.
- state: If the client’s request contains this parameter, the authentication server’s response must also contain this parameter in exactly the same way.
In the above example, the authentication server uses the Location field of the HTTP header message to specify the URL of the browser redirect. Note that the Hash portion of this URL contains the token.
According to step D above, the browser will next access the URL specified by Location, but the Hash part will not be sent. The next step E, the code sent from the service provider’s resource server, will extract the token in the Hash.
Resource Owner Password Credentials Grant
RFC 6749 also allows users to give their user name and password directly to an application if you have a high level of trust in that application. This is usually used when the user has a high degree of trust in the client, such as when the client is part of an operating system or produced by a reputable company. The authentication server, on the other hand, should only consider using this mode if other authorization modes cannot be enforced. The application then uses your password to request a token, in a way called “password”.
|
|
It proceeds as follows.
- (A) The user provides the user name and password to the client.
- (B) The client sends the user name and password to the authentication server and requests a token from the latter.
- (C) The authentication server confirms that there is no error and then provides the access token to the client.
In step B, the client sends an HTTP request containing the following parameters.
- grant_type: indicates the authorization type, the value here is fixed to “password”, mandatory.
- username: user name, mandatory.
- password: The password of the user, mandatory.
- scope: The scope of the permission, optional.
In step C, the authentication server sends an access token to the client, an example of which is shown below.
The client shall not save the user’s password during the whole process.
Client Credentials Mode (Client Credentials Grant)
The last approach is credential-based (client credentials) for command-line applications that do not have a front-end, i.e., requesting a token at the command line.
When a client requests access to a protected resource under its control, the client can only use its client credentials (or other supported authentication method) to request an access token. Or other resource owners previously arranged with the authorization server (whose methods are outside the scope of this document). The client credential grant type must be used by confidential clients only.
It proceeds as follows.
- (A) The client authenticates itself to the authentication server and requests an access token.
- (B) The authentication server confirms that there is no error and provides the access token to the client.
In step A, the client sends an HTTP request with the following parameters.
- granttype: indicates the authorization type, the value here is fixed to “clientcredentials”, mandatory.
- scope: indicates the scope of the authority, optional.
The authentication server must, in some way, verify the identity of the client.
In step B, the authentication server sends an access token to the client.