Cloudflare proxy
HTTPS certificate is too expensive, a wildcard domain name certificate a year to spend at least a couple of thousand. So how to meet the needs of the general public to build a website? Cloudflare is a very good choice. Cloudflare is a CDN provider, can provide reverse proxy for the site. It does this by resolving the domain name to Cloudflare’s server (or proxy), and then the browser uses Cloudflare’s certificate to establish an SSL connection with the proxy; then the proxy will establish an SSL connection with the target server using a self-signed certificate, and the next data are forwarded by the proxy. Cloudflare will trust this self-signed certificate, so the whole process is no problem.
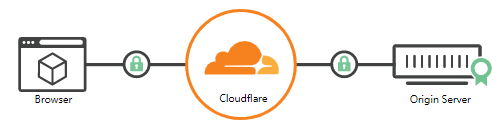
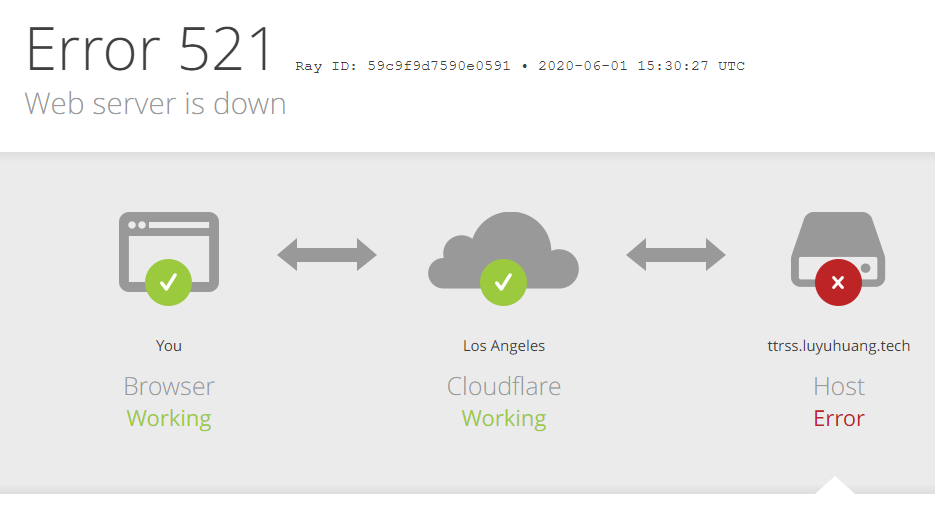
As the browser to the proxy connection and the proxy to the server connection are encrypted authentication, so the two connections are secure, not afraid of eavesdropping and tampering. The only problem is, Cloudflare becomes the middleman. Given that we build only for personal use of small sites, and Cloudflare is also a large multinational company, we can assume that this intermediary is trusted. In fact, there are a large number of sites are using Cloudflare, including V2EX, Moe Encyclopedia, TTRSS official website, etc.. We often see the following error message when surfing the Internet, it is because the site uses Cloudflare as a proxy, but the target server behind the proxy hung.
Domain name and DNS resolution service
First of all, you need to register a domain name, which can be registered in AliCloud or Tencent Cloud. Domain names are relatively inexpensive, and the domain name I have is RMB 69 for 3 years. It should be noted that domain name and DNS resolution service are different, registering a domain name is only paying money to the organization to register the domain name under your name, in order to map the domain name to an IP address, you also need DNS resolution service. For example, if you buy a domain name from AliCloud, click on “Resolve” to enter AliCloud’s domain name resolution console, you can see that although the basic resolution service is free, there are still some advanced features that require additional payment. But it does not matter, because we want to use the Cloudflare DNS resolution service.
First register a Cloudflare account, then enter your domain name, select the free plan (the rich feel free), then it will ask you to your domain name registrar to change the DNS resolution service address to the Cloudflare DNS address. Take AliCloud as an example, enter the domain name console, select “DNS Modify” and click “Modify DNS Server” to change the original AliCloud DNS server to Cloudflare’s DNS server. It will take some time for the modification to take effect, and Cloudflare will notify you by email when the modification has taken effect.
Resolve domain names to Github Pages
By entering Cloudflare’s DNS console, we can add a resolution record for the domain name. To resolve a domain name to Github Pages, we add a CNAME record and set the content to the corresponding Github Pages domain name, for example:

Again, Cloudflare will do the proxy for our service, so both the A record and the CNAME record will actually resolve to Cloudflare’s proxy server. This time if we directly that domain access, Github Pages is returned 404. Because then the first part of the HTTP request HOST is our custom domain name, Github Pages does not recognize. So we have to tell Github to use the custom domain in the Github Pages settings:

This will allow you to access Github Pages using our domain name. To increase security, you should also enable Always Use HTTPS in the SSL/TLS settings of Cloudflare.
Resolve domain name to VPS
Add an A record to Cloudflare’s DNS console and set the content to the IP address of the VPS to resolve the domain name to the corresponding VPS. But before that, we should also set up an HTTP service on the VPS, otherwise the resolution will not be accessible. Here I use Nginx. As you will see later, we will configure Nginx to act as a reverse proxy for RSSHub and TTRSS. It’s sometimes a good idea to compile Nginx directly from source, because it’s more controllable.
|
|
Then start Nginx, access it in your browser with your IP address, and see “Welcome to nginx!” to indicate successful installation.
Next we let Cloudflare resolve the domain name to the VPS. As mentioned earlier, we want to make an SSL connection between Cloudflare and the VPS. The first step is to create a certificate. Under SSL/TLS, select Origin Server, click Create Certificate. Here I directly let Cloudflare generate the private key and certificate, and then set the domain name and expiration date, click Next to generate the private key and certificate. Save the private key as cert.key and the certificate as cert.pem, both in the conf directory of Nginx, and then edit the Nginx configuration file to configure an HTTPS service:
|
|
Then add an A record in Cloudflare’s DNS console and set the content to the IP address of the VPS. This way, you can see the familiar “Welcome to nginx!” in your browser when you use the domain name.
Finally, be sure to turn on your firewall. On Ubuntu, you usually use the ufw firewall.
You can use ufw status verbose to check the firewall status.
|
|
Building RSSHub and TTRSS services
The easiest thing to do is to use Docker. First install Docker, for RSSHub, refer to the official documentation, download its docker-compose.yml and execute docker-compose up -d. And slow down! Here’s the big problem, Docker has a pitfall, it opens ports that can bypass firewall rules, which is very dangerous. This can be circumvented by configuring "iptables": false in /etc/docker/daemon.json, but this will cause the DNS in the container to fail to resolve, which in turn will make RSSHub unusable. I haven’t found a solution here yet, so if anyone has a better solution, please let me know. What I have done here is to modify docker-compose.yml to keep the container’s port closed to the public. Next, we modify the Nginx configuration to add a reverse proxy to RSSHub:
|
|
The domain name of RSSHub is rsshub.luyuhuang.tech, so you just need to add an A record to point the domain name to this host.
For TTRSS, also refer to the official documentation, get the Docker related files, and edit .env to set the domain name, URL, and other necessary environment variables. TTRSS seems to require the URL to be */tt-rss/ , I can’t find a way to change it here, so I can only configure it this way, if you have a better way, please let me know.
Next, run docker-compose up -d to start the container. Then, similarly, configure Nginx to add a reverse proxy to TTRSS:
|
|
Because I really don’t want the URL to have a /tt-rss/, I’ve done some work on the Nginx side. You also need to set the HOST prefix to the appropriate domain name to fool TTRSS, otherwise it will still report a SELF_URL_PATH configuration error.
Also add an A record to the DNS console to point the domain to this host. Nginx will forward to different services depending on the domain name.
Finally, it is best to disable IP access. Edit the Nginx configuration to add a server configuration that does not restrict server_name but rejects all requests directly on top of the two servers:
Summary
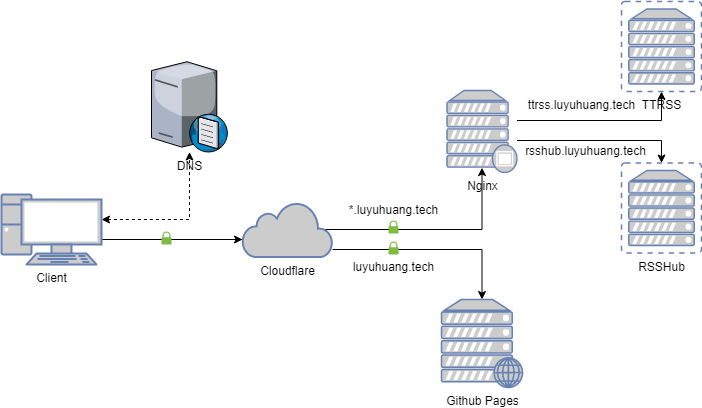
The final diagram of the entire service architecture is as follows: