Vault is a secrets management, encryption-as-a-service and privilege management tool from hashicorp. Its features are briefly described as follows.
- secrets management: support for saving various custom information, automatic generation of various types of keys, vault automatically generated keys can also be automatically rotated (rotate)
- authentication: support access to major cloud vendors’ account systems (such as the Aliyun RAM sub-account system) or LDAP, etc. for authentication, without creating additional account systems.
- permissions management: policy, you can set very detailed ACL permissions.
- key engine: it also supports taking over the account system of major cloud vendors (such as AliCloud RAM subaccount system) to achieve automatic rotation of API Key.
- Support access to kubernetes rbac permissions system, and configure permissions for each Pod individually through serviceaccount+role.
- Support for injecting secrets into pods via sidecar/init-container or synchronizing vault data to k8s secrets via k8s operator
Before using Vault, we were using Apollo, a Ctrip open source, as a distributed configuration center for microservices.
Apollo is very popular in China. It is powerful, supports configuration inheritance, and also provides HTTP API for automation. The disadvantage is that permission management and secrets management are weak, and it does not support information encryption, which is not suitable for direct storage of sensitive information. So we have switched to Vault.
At present, our local CI/CD streamline and microservice system on the cloud are using Vault to do secrets management.
I. Vault Basic Concepts
Let’s start with a diagram of the Vault architecture.
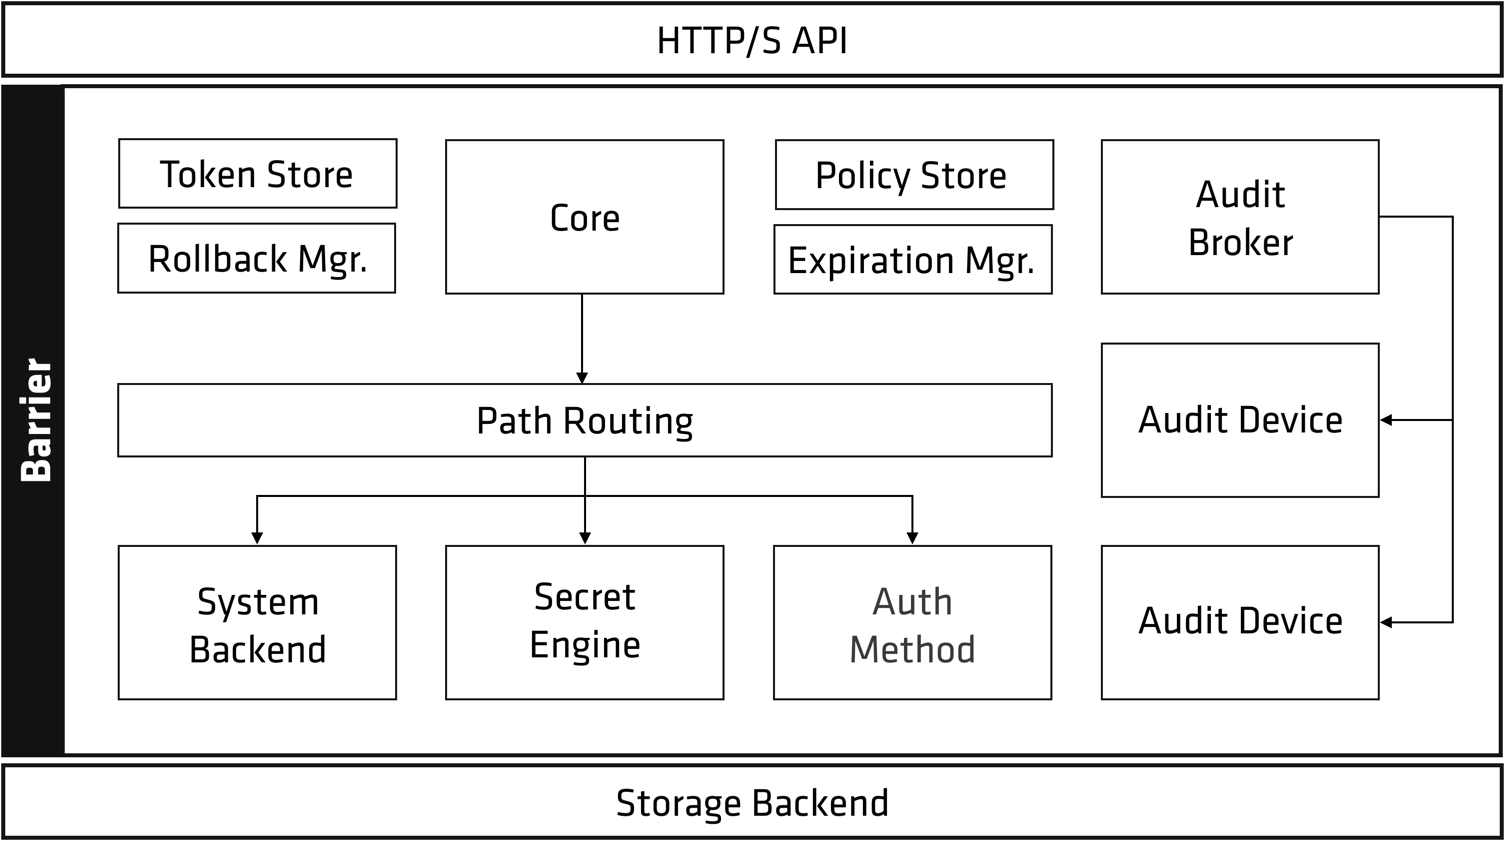
As you can see, almost all Vault components are collectively called “Barrier”, and the Vault can be simply divided into three parts: Storage Backend, Barrier and HTTP/S API.
In analogy to a bank vault, the Barrier is the “steel” and “concrete” surrounding the Vault, through which all data flows between the Storage Backend and the client.
“The Barrier ensures that only encrypted data is written to the Storage Backend, and that encrypted data is verified and decrypted as it is read out through the Barrier.
Much like the door to a bank vault, the Barrier must be unsealed before the data in the Storage Backend can be decrypted.
1. Data Storage and Encryption Decryption
Storage Backend: The Vault does not store data itself, so it needs to be configured with a “Storage Backend”. The “Storage Backend” is not trusted and is only used to store encrypted data.
Initialization: Vault needs to be initialized when it is first started, this step generates an Encryption Key which is used to encrypt the data.
Unseal: After the Vault is started, it will enter the “Sealed” state because it does not know the “Encryption Key”.
The “encryption key” is protected by the “master key” and we must provide the “master key” to complete the Unseal operation.
By default, Vault uses the Shamir key sharing algorithm to split the “master key” into five “Key Shares”, and any three of these “Key Shares” must be provided to reconstruct the “master key” for Unseal.

The number of “Key Shares” and the minimum number of key shares needed to rebuild the “master key” can be adjusted. The Shamir key sharing algorithm can also be turned off, so that the master key will be used directly in Unseal.
2. Authentication system and permission system
After unblocking is complete, Vault is ready to start processing requests.
The entire processing of HTTP requests is managed by the vault core, which forces ACL checks and ensures audit logging is completed.
When a client first connects to the vault, it needs to complete authentication. vault’s “auth methods” module has a number of authentication methods to choose from.
- User-friendly authentication methods, suitable for administrators: username/password, cloud provider, ldap
- When creating a user, you need to bind policy for the user and give appropriate permissions.
- Application-friendly methods for applications: public/private keys, tokens, kubernetes, jwt
Authentication requests flow through Core and into auth methods, which determine whether the request is valid and return a list of “policies”.
ACL Policies are managed and stored by the policy store, and ACL checks are performed by the core. The default behavior of ACLs is deny, which means that an action will be denied unless the Policy is explicitly configured to allow it.
After the authentication is done by auth methods and the returned “associated policies” are OK, the “token store” will generate and manage a new token which will be returned to the client for subsequent requests.
Similar to cookies on web sites, tokens have a lease or expiration date, which enhances security.
The token is associated with policy policies that are used to verify the permissions of the request.
If the secret engine returns a secret (automatically generated by the vault), Core registers it with the expiration manager and appends a lease ID to it. lease IDs are used by the client to renew (renew) or revoke (revoke). The lease ID is used by the client to update (renew) or revoke (revoke) the secret it has received.
If the client allows the lease to expire, the expiration manager will automatically revoke the secret.
Core is responsible for processing requests and response logs from the audit broker, sending requests to all configured audit devices.
3. Secret Engine
Secret Engines are components that store, generate or encrypt data and are very flexible.
Some Secret Engines simply store and read data, such as kv, which can be thought of as an encrypted Redis. Others connect to other services and generate dynamic credentials on demand.
There are also Secret Engines that provide “encryption as a service” capabilities, such as transit, certificate management, etc.
Examples of commonly used engines.
- AliCloud Secrets Engine: dynamically generates AliCloud Access Token based on RAM policy, or AliCloud STS credentials based on RAM role
- Access Token is automatically updated (Renew), while STS credentials are used temporarily and expire after expiration.
- kv: Key-value store, which can be used to store some static configurations. It can replace the Apollo configuration center in Ctrip to some extent.
- Transit Secrets Engine: Provides encryption-as-a-service function, it is only responsible for encryption and decryption, not storage. The main application scenario is to help apps encrypt and decrypt data, but the data is still stored in MySQL and other databases.
II. Deploying Vault
The official recommendation is to deploy vault via Helm.
- deploy and run vault using helm/docker.
- Initialize/unblock vault: vault security measures, each reboot must be unblocked (can be set to automatically unblock).
0. How do I choose a storage backend?
First, we definitely need HA, or at least retain the ability to upgrade to HA, so it is not recommended to choose a backend that does not support HA.
The exact choice varies depending on the team’s experience, and people tend to prefer to use a backend they are familiar with and know well, or go with a cloud service.
For example, if we are familiar with MySQL/PostgreSQL, and we don’t need to think too much about maintenance when using a database provided by a cloud service, and MySQL as a common protocol is not kidnapped by cloud vendors, then we tend to use MySQL/PostgreSQL.
And if you are locally self-built, then you may prefer to use Etcd/Consul/Raft for backend storage.
1. docker-compose deployment (non-HA)
Recommended for local development test environments, or other environments that do not require high availability.
The docker-compose.yml example is as follows.
|
|
config.hcl reads as follows.
Save the two configurations as above in the same non-folder and provide the TLS certificate server.crt and the private key server.key in . /certs with the TLS certificate server.crt and the private key server.key.
Then docker-compose up -d will start running a vault instance.
2. Deploy a highly available vault via helm
Recommended for production environments
Deploy via helm.
Refer to the downloaded . /vault/values.yaml to write custom-values.yaml and deploy a HA vault with mysql as the backend storage:
The configuration is extensive, but mostly copied directly from
./vault/values.yaml, with very few changes. Most of the configuration items can be ignored when testing the vault.
|
|
Now deploy vautl using the custom custom-values.yaml:
3. initialize and unseal vault
Official documentation: Initialize and unseal Vault - Vault on Kubernetes Deployment Guide
Deploying a vault via helm deploys a three-copy StatefulSet by default, but all three copies will be in a NotReady state (as will the docker deployment). Next, you need to manually initialize and unblock the vault in order to Ready :
- Step 1: Select any one of the three copies and run the vault initialization command:
kubectl exec -ti vault-0 -- vault operator init- The initialization operation will return 5 unseal keys, and an Initial Root Token, which is very sensitive and important, and must be saved to a safe place!
- Step 2: On each copy, use any three unseal keys for the unseal operation.
- There are three copies in total, which means you have to unseal 3*3 times to complete the complete unsealing of the vault!
|
|
This completes the deployment, but be aware that the **vault instance needs to be unblocked again after each restart! That is, re-do the second step! **
4. Initialize and set auto unseal
Without setting auto unseal, vault has to unseal all vault instances manually every time it restarts, which is really troublesome.
To simplify this process, you can consider configuring auto unseal to allow vault unblocking automatically.
There are currently two ways to do this.
- Use the key repository provided by cloud services such as AliCloud/AWS/Azure to manage the encryption key
- AWS: awskms Seal
- If it is a k8s cluster, the ServiceAccount used by vault needs to have permission to use AWS KMS, which replaces the access_key/secret_key attributes in config.hcl
- AliCloud: alicloudkms Seal
- AWS: awskms Seal
- If you don’t want to use cloud services, then consider autounseal-transit, which uses the transit engine provided by another vault instance to This approach uses the transit engine provided by another vault instance to implement auto-unseal.
- Simple and brutal: write a crontab or add a timed task to the CI platform to execute the unseal command to achieve auto-unseal. But this is not very secure.
Take awskms as an example, first create aws IAM policy with the following content:
Then create an IAM Role to bind the above policy, and create an IAM Role for the vault’s k8s serviceaccount to bind to this policy.
This way the serviceaccount used by the vault will have access to awskms itself and will not need to access awskms via access_key/secret_key.
For more information on how to bind IAM roles to k8s serviceaccounts, see the official documentation: IAM roles for EKS service accounts
When you are done, modify the helm configuration provided earlier, deploy it, and finally initialize it with the following command.
Then it’s done, you can try to delete the vault pod, the new pod should be automatically unblocked.
III. Vault’s own configuration management
Vault itself is a complex secrets tool that provides Web UI and CLI for manually managing and viewing the contents of Vault.
But as a DevOps, we of course prefer an automated approach, and there are two options:
- Use the sdk for vault: python-hvac
- Use terraform-provider-vault or pulumi-vault pulumi-vault) to automate the management of vault configurations.
While the Web UI is suitable for manual work, sdk/ terraform-provider-vault is suitable for automating the management of the vault.
Our test environment uses pulumi-vault to automate the configuration of the vault policy and kubernetes role, and then automate the injection of all secrets for testing.
1. Automated vault configuration using pulumi
The advantage of using pulumi to manage the vault configuration is great because the sensitive information of the resources on the cloud (database account passwords, resource IDs, RAM subaccounts) are created by pulumi.
Combined with the use of pulumi_valut, the sensitive information is automatically generated and immediately saved to the vault, making it fully automated.
Subsequent microservices can then read sensitive information directly from the vault through kubernetes authentication.
Or it can be written to a local vault for backup, so that administrators can log in and view the sensitive information when needed.
1.1 Token generation
pulumi_vault itself is quite simple, declarative configuration, just use it directly.
However, it must require VAULT_TOKEN as authentication credentials (in practice, userpass/approle cannot be used directly, it will report no vault token found), and pulumi will also generate a temporary child token, which will be used for subsequent operations.
The root token should be blocked and should not be enabled except for emergencies.
So how should I generate a token with limited privileges for the vault to use? My approach is to create a userpass account and give it limited privileges via policy. Then manually (or automatically) login to get the token, and then provide the token to pulumi_vault.
The catch is that you have to give the userpass account the permission to create a child token.
Without this permission, pulumi_vault will keep reporting errors.
Then you have to give it the permissions it needs to “automate the configuration”, such as creating/updating policy/secrets/kubernetes automatically, as shown in the following example:
|
|
IV. Injecting secrets in Kubernetes using vault
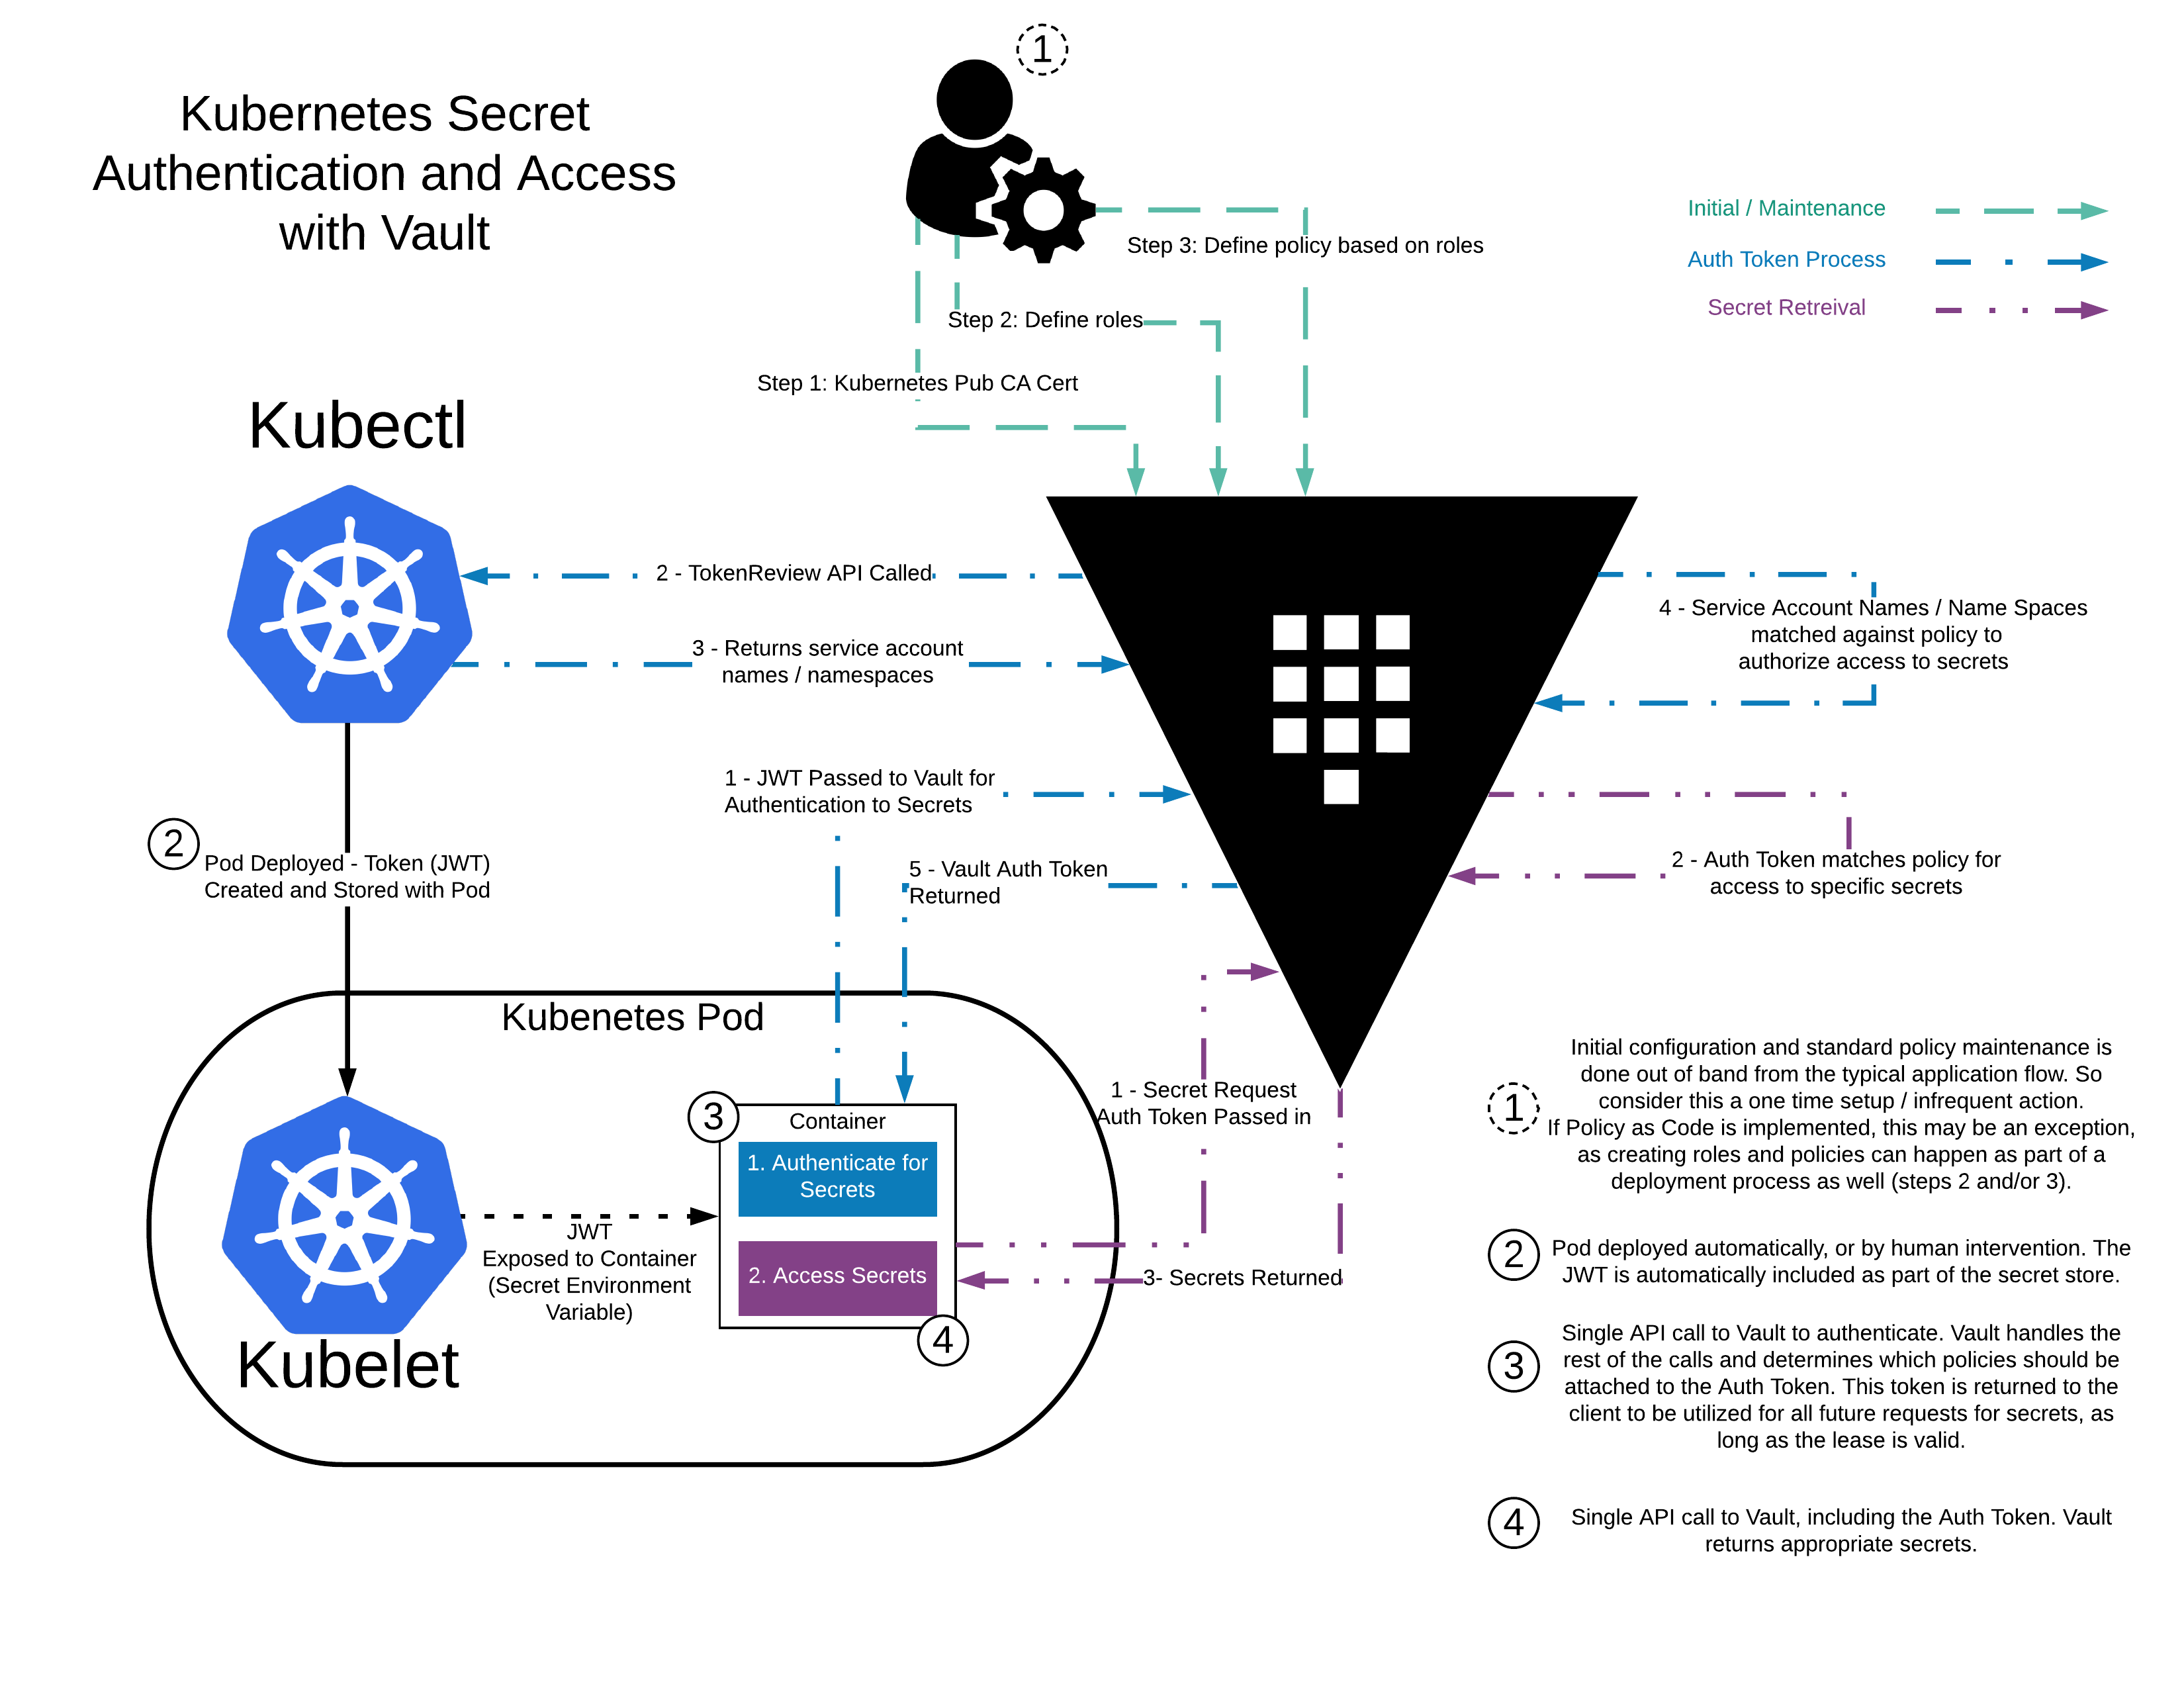
As mentioned earlier, vault supports assigning permissions to each Pod individually through Kubernetes’ ServiceAccount.
There are two ways for applications to read the configuration in vault.
- With Vault Sidecar, secrets are automatically injected into the Pod as a file, such as
/vault/secrets/config.json.- The vault sidecar updates the configuration every 15 seconds in resident mode, and applications can use
watchdogto monitor changes to the secrets file in real time.
- The vault sidecar updates the configuration every 15 seconds in resident mode, and applications can use
- The application itself uses the SDK to access the vault api directly to get secrets
Both of these methods can be used to authenticate and assign permissions with the Kubernetes ServiceAccount.
The following is an example of how to inject secrets into a Pod as a file in Sidecar mode.
1. Deploy and configure the vault agent
First enable Kubernetes authentication for Vault:
|
|
1.1 Using valut instances external to the cluster
If you do not have this requirement, please skip this section.
See [Install the Vault Helm chart configured to address an external Vault](https://learn.hashicorp.com/tutorials/vault/kubernetes-external- vault?in=vault/kubernetes#install-the-vault-helm-chart-configured-to-address-an-external-vault)
kubernetes can also be integrated with external vault instances, with only the vault-agent deployed in the cluster.
This is suitable for multiple kubernetes clusters and other APPs that share a single vault instance, such as our local development and testing clusters, which all share the same vault instance to facilitate unified management of application secrets.
First, use helm chart to deploy the vault-agent to access the external vault instance. The custom-values.yaml example used is as follows.
|
|
Now on the vault instance side, enable kubernetes authentication, and within the vault instance, execute the following command.
Obviously there is no kubectl or kubeconfig inside the vault instance, so for simplicity, the following vault commands can also be done via the Web UI.
|
|
This completes the integration of kubernetes with the external vault!
2. Associate the k8s rbac permissions system with the vault
Next things to do.
- Define which resources each role (microservice) can access through the vault policy.
- Generate a role for each microservice, and bind the corresponding vault policy and kubernetes serviceaccount to the role.
- The role is a property of the vault’s kubernetes plugin itself, it has nothing to do with the kubernetes role.
- Create a ServiceAccount and use this to deploy microservices using this ServiceAccount
The first and second steps can be automated through the vault api. The third step can be done during deployment via kubectl.
For convenience, it is recommended to use the same name as the microservice for all three configurations, vault policy / role / k8s serviceaccount.
In the above configuration, the role acts as a primer, associating the k8s serviceaccount and vault policy configurations.
For example, create a vault policy named my-app-policy with the content:
Then, in the vault kuberntes plugin configuration, create role my-app-role with the following configuration:
- Associate the serviceaccount
my-app-accountin the k8s default namespace and create the serviceaccount. - Associate the vault token policy, which is the
my-app-policycreated earlier. - Set the token period (validity)
After this, each microservice will be able to read all the information in my-app from the vault via serviceaccount.
3. Deploy Pod
Reference: https://www.vaultproject.io/docs/platform/k8s/injector
The next step is to inject the configuration into the microservice container, which requires the use of Agent Sidecar Injector. vault automates the injection and dynamic update of the configuration via sidecar.
Specifically, a bunch of Agent Sidecar Injector annotations are added to the Pod, or if there are more configurations, they can be saved using configmap and referenced in the annotations.
Note that vault-inject-agent has two modes of operation.
- init mode: Initialize only once before the Pod starts, and exit after running (Completed)
- resident mode: the container does not exit, continuously monitors the vault for configuration updates and maintains synchronization between Pod configuration and vualt configuration.
Example.
|
|
Common errors.
- vault-agent(sidecar) error:
namespace not authorized- The role in
auth/kubernetes/configis not bound to the Pod namespace.
- The role in
- vault-agent(sidecar) error: `permission denied
- Check the logs of the
vaultinstance, there should be a corresponding error log, most likelyauth/kubernetes/configis not paired, vault cannot verify the kube-apiserver tls certificate, or the kubernetes token used does not have permission.
- Check the logs of the
- vault-agent(sidecar) error:
service account not authorized.- The role in
auth/kubernetes/configis not bound to the serviceAccount used by the Pod.
- The role in
4. vault agent configuration
For the vault-agent configuration, the following should be noted.
- If you use configmap to provide the full
config.hclconfiguration, note thatagent-init
vautl-agent template description.
The most popular configuration file format is json/yaml, so take json as an example, for each microservice’s kv data, consider saving all its personalized configuration under <engine-name>/<service-name>/, and then inject the configuration using the following template.
See: https://github.com/hashicorp/consul-template#secret for template syntax details
Note: For v2 kv secrets, the list interface has changed, so when traversing v2 kv secrets, you must write
range secrets "<engine-name>/metadata/<service-name>/", i.e. insertmetadatain between, and read/list permissions for<engine-name>/metadata/<service-name>/must be open in the policy! The official documentation doesn’t mention this at all, I figured this out by debugging with wireshark packet grabbing and comparing with the official KV Secrets Engine - Version 2 (API).
The generated content will be in json format, but there is an incompatibility: the last secrets has a comma , at the end of the rendered effect.
Because of the trailing comma, parsing it directly using the json standard library will report an error. So how do I parse it? I found the solution on the almighty stackoverflow: yaml is fully compatible with json syntax and supports trailing comma!
Take python for example, yaml.safe_load() will parse the json generated by vault perfectly.
5. Expanding: Other ways to use vault in kubernetes
In addition to using the official sidecar schema for secrets injection, the community has provided some other options, which can be found at
- hashicorp/vault-csi-provider: the official Beta project that mounts vault secrets as data volumes via the Secrets Store CSI driver mount the vault secrets as a data volume in the pod
- kubernetes-external-secrets: provides CRD definitions to synchronize secret from vault to kubernetes secrets
The official sidecar/init-container model is still the most recommended.
V. Automatic rotation of AWS IAM Credentials using vault
To be continued.