Recently I’ve been learning how to make code run more efficiently in development, and while browsing through various good logging designs, I came across a logging library called zap from uber that caught my attention, with its main feature of extreme performance and memory allocation optimizations.
For me, I was originally using logrus as log output in my project, but when I saw the benchmark of zap, I felt that it beat logrus in terms of performance, so that’s what drove me to see how it was optimized.
Of course, besides that, I wanted to get more familiar with it so that I could use the library more efficiently and avoid being unable to locate it when problems arise.
Here is the benchmark to give you some motivation to read on.
| Package | Time | Time % to zap | Objects Allocated |
|---|---|---|---|
| zap | 862 ns/op | +0% | 5 allocs/op |
| zap (sugared) | 1250 ns/op | +45% | 11 allocs/op |
| zerolog | 4021 ns/op | +366% | 76 allocs/op |
| go-kit | 4542 ns/op | +427% | 105 allocs/op |
| apex/log | 26785 ns/op | +3007% | 115 allocs/op |
| logrus | 29501 ns/op | +3322% | 125 allocs/op |
| log15 | 29906 ns/op | +3369% | 122 allocs/op |
zap design
Instantiation of log
To get started, we can use the official example to understand the internal components of zap.
|
|
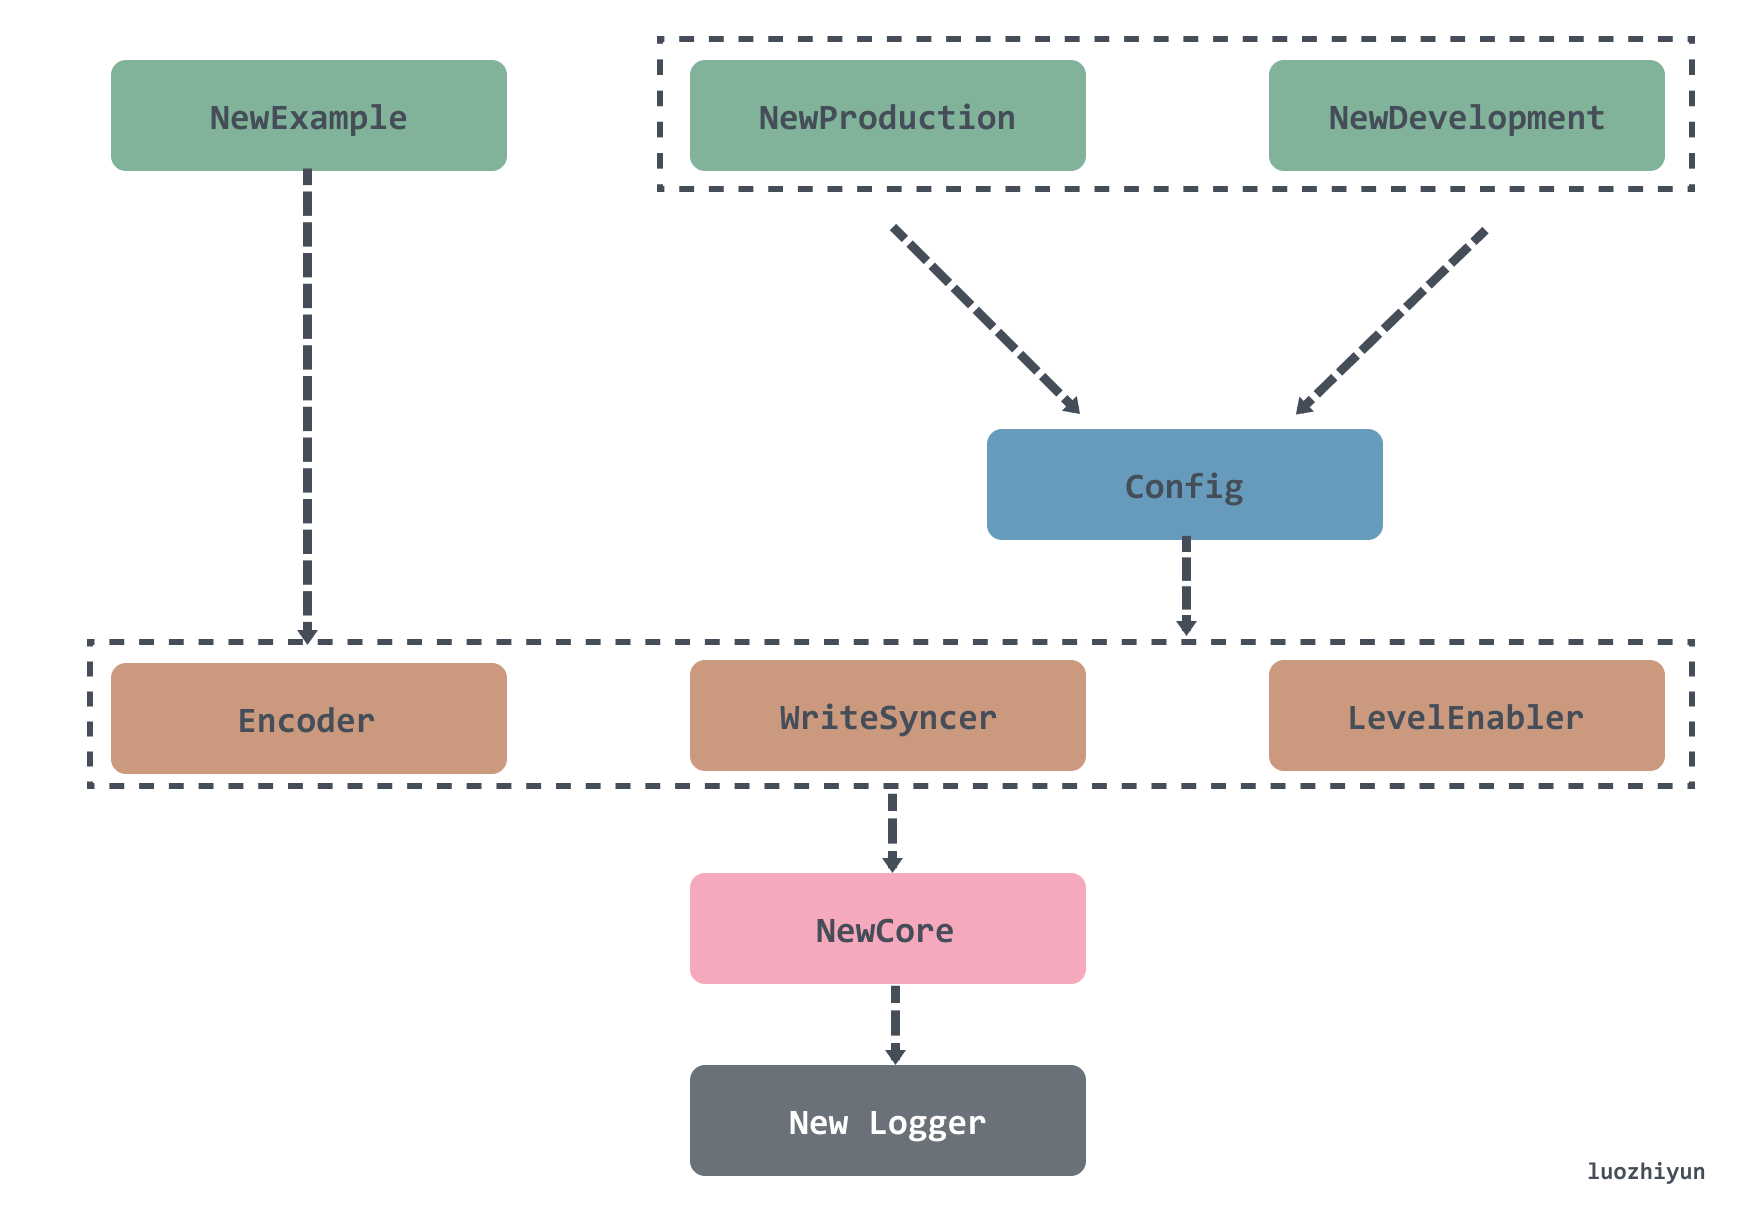
The NewExample function shows a Core structure to be created by NewCore, which we should be able to guess is the core of zap based on its name.
For a logging library, there are three main categories.
- how the input data needs to be serialized.
- where to store the input data after serialization, be it console or file, or somewhere else.
- and then the level of logging, whether it is Debug, Info or Error.
Similarly with zap, the three parameters that need to be passed when creating a Core structure with NewCore are: Encoder for the input data, WriteSyncer for the log data, and LevelEnabler for the log level.
In addition to the NewExample constructor, zap also provides NewProduction and NewDevelopment to construct log instances.
These two functions create the parameters needed for NewCore by constructing a Config structure and then calling the Build method, which then instantiates the log instance.
Output of log data
After initializing the log instance, you can print the log using Info, Debug, Error, etc.
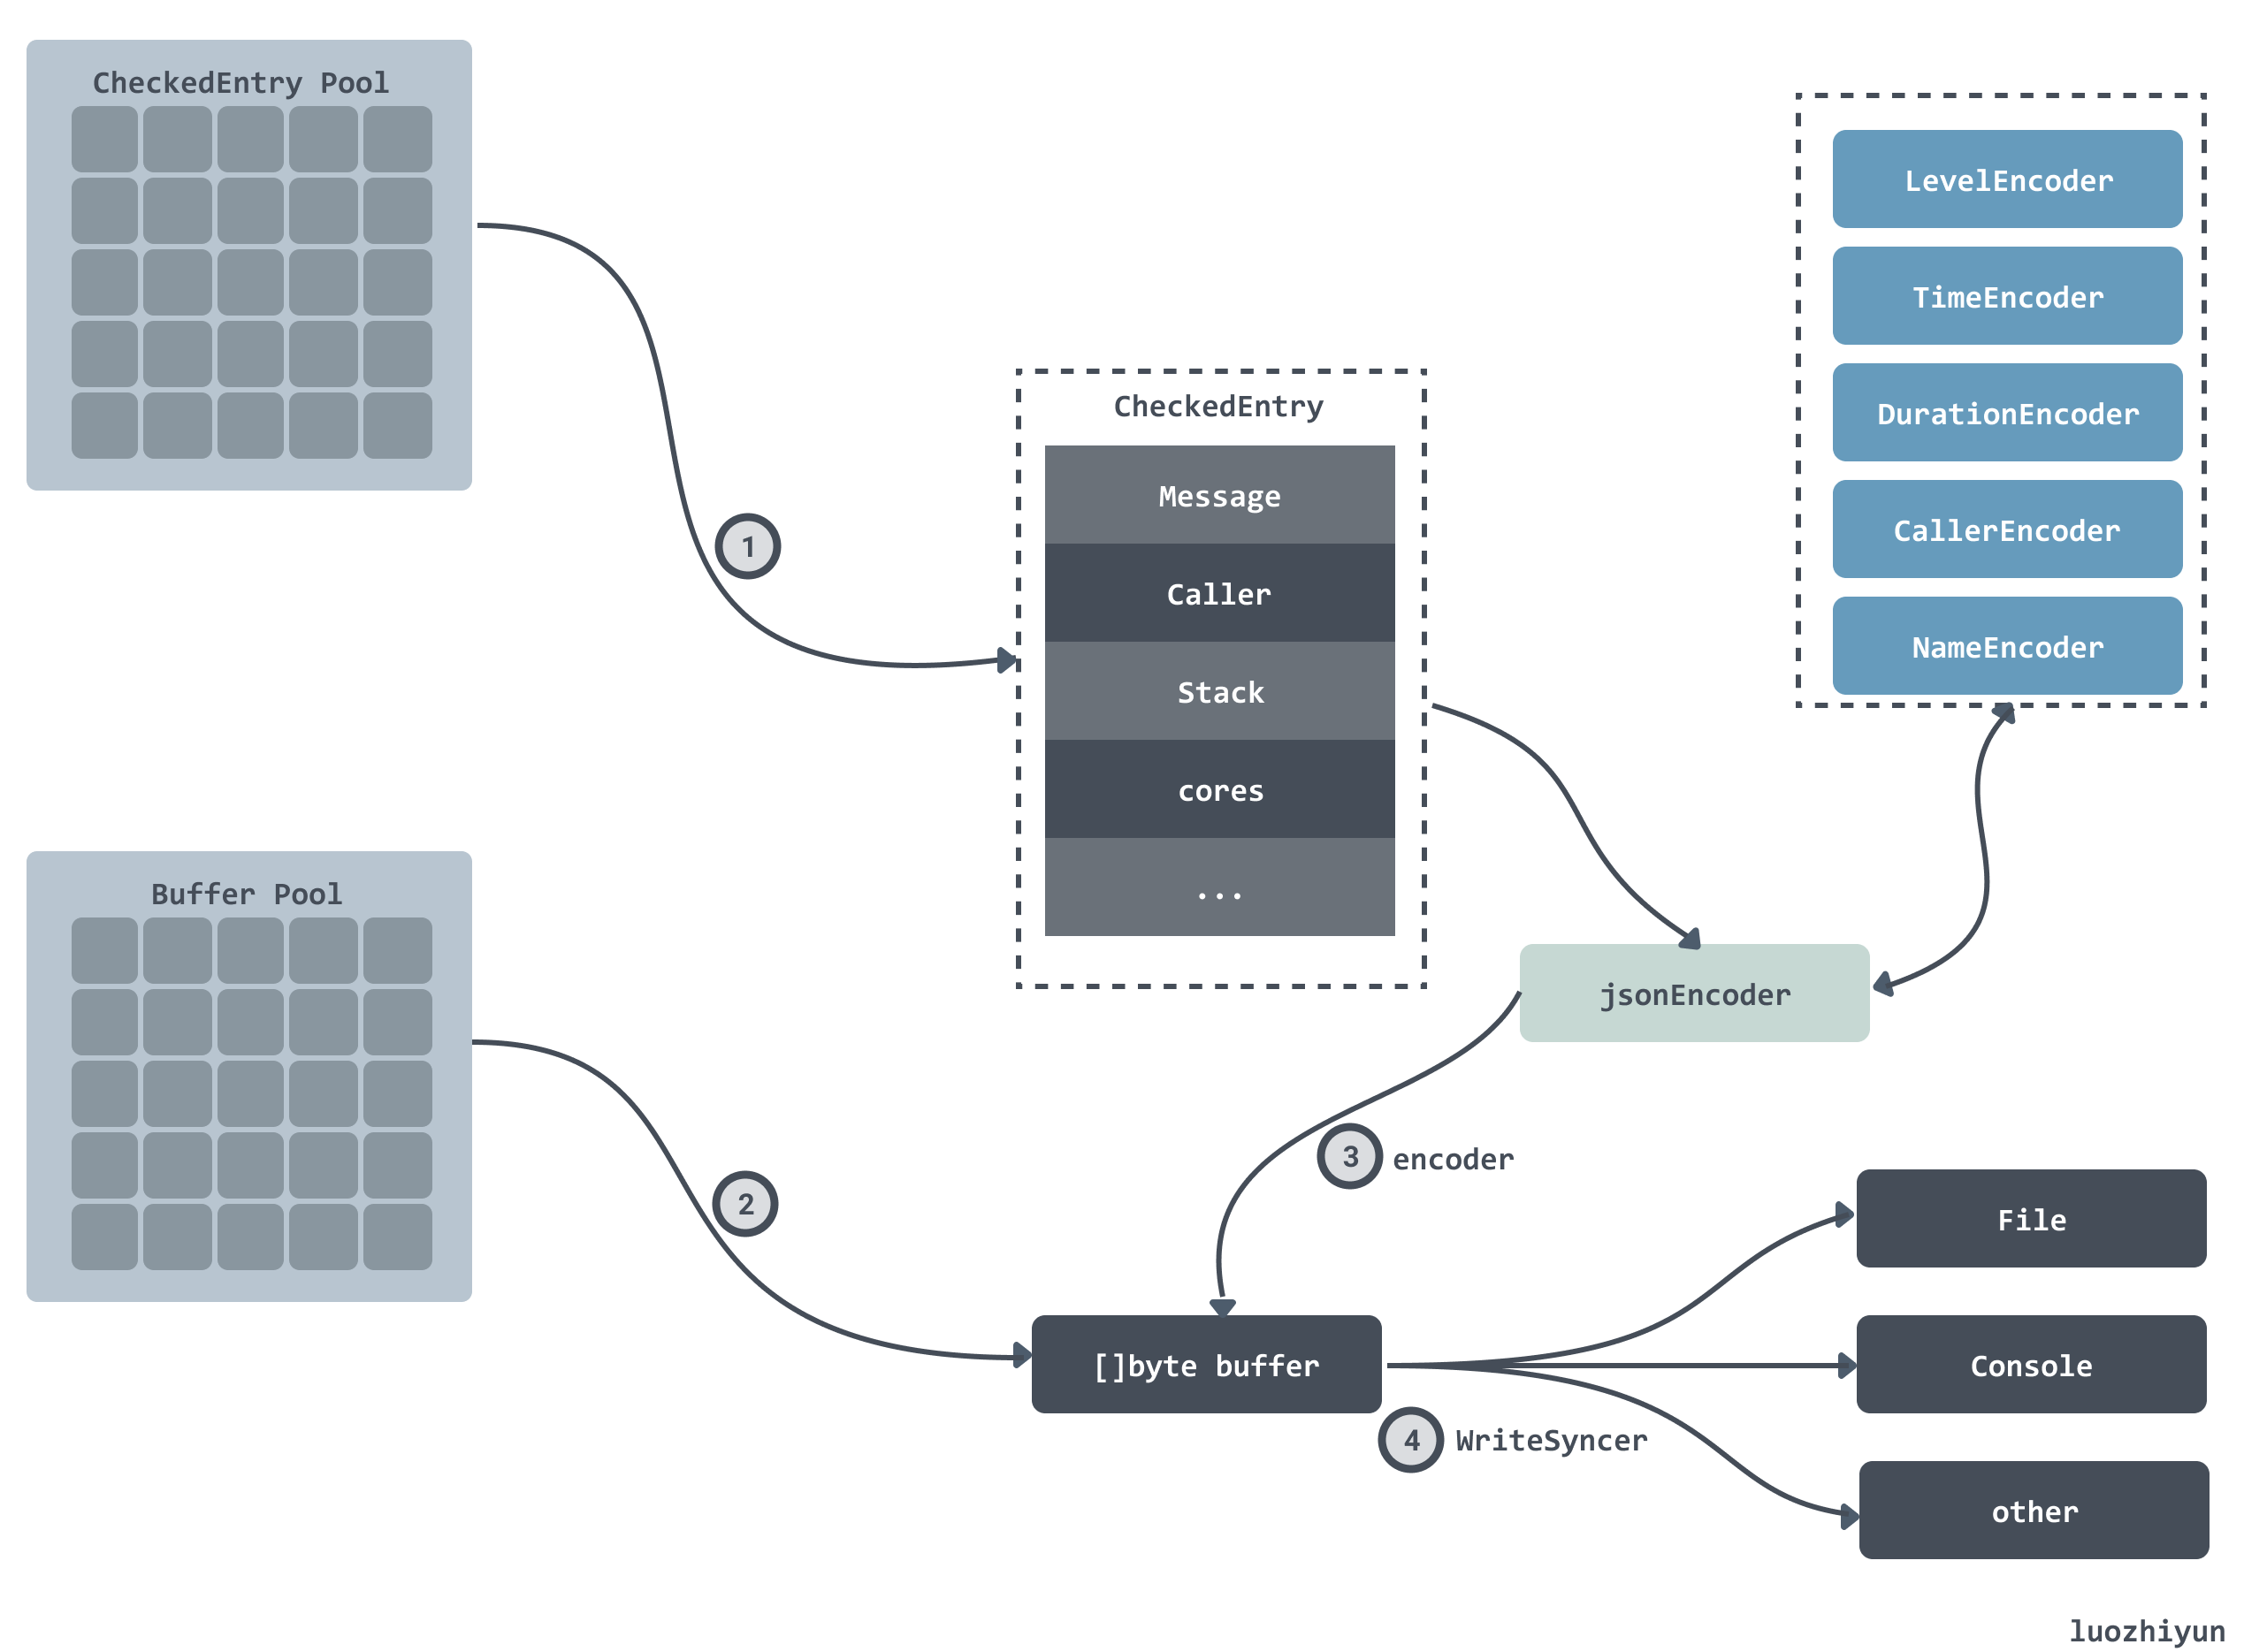
Let’s take a look at the steps for zap to print a structured log:
- first check the logging configuration level, for example, the Error logging configuration level must not output the Debug log.
- then the log data is encapsulated into an Entry instance.
- add multiple Cores to the CheckedEntry instance because multiCore can be passed in the zap.
- iterate through the Cores in the CheckedEntry instance.
- serialize the log data into the Buffer according to the Encoder in the Core;
- the WriteSyncer then outputs the log data from the Buffer.
Interface and framework design
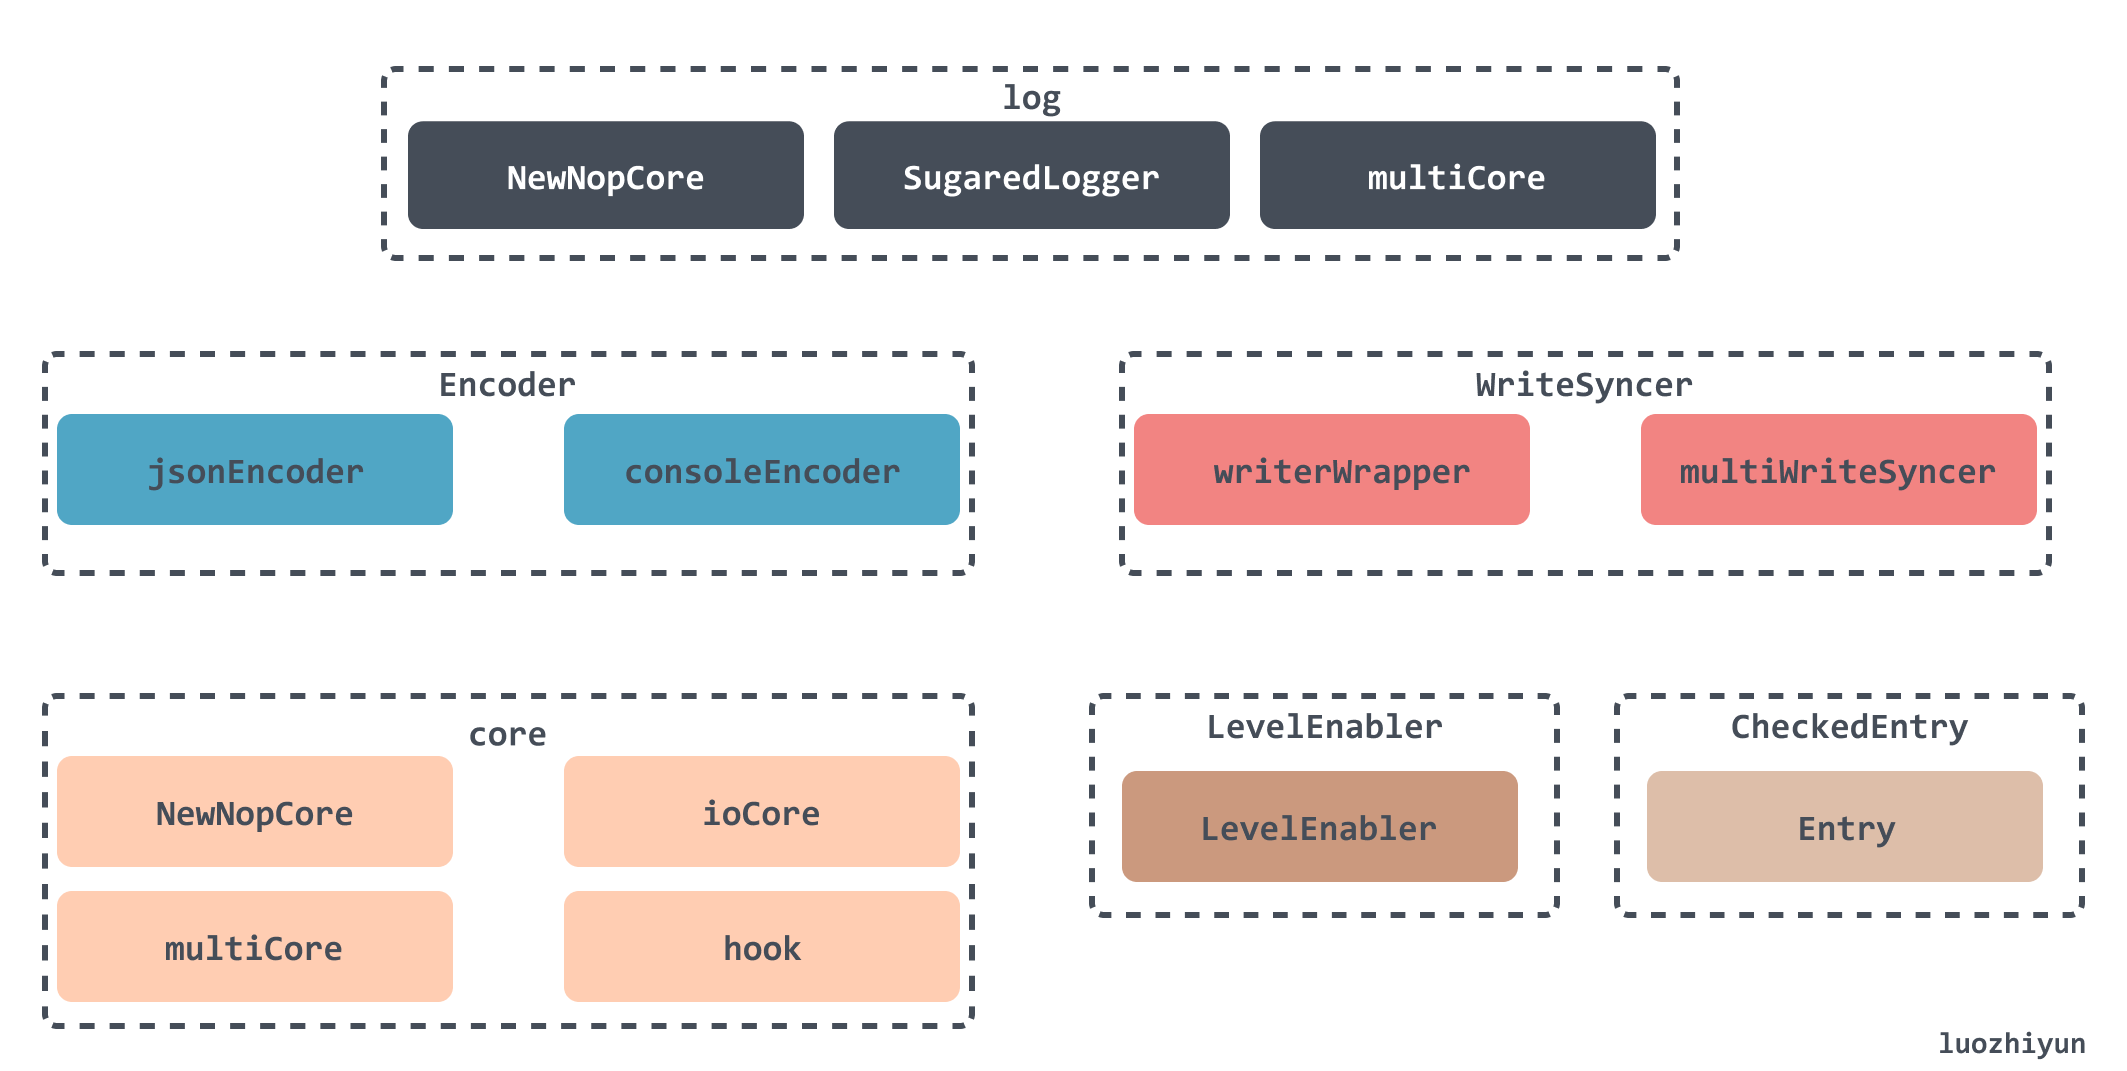
The code structure is designed with a simple interface encapsulation to achieve a variety of styles of configuration combinations to meet various needs. The top-level design implements three logs used to achieve different functions.
Logger : more cumbersome to use, only structured output can be used, but better performance.
SugaredLogger: can use Printf to output logs, performance is about 40% worse than Logger; zapgrpc: can use Printf to output logs, performance is about 40% worse than Logger.
zapgrpc: used for grpc logging output.
Logger can be easily converted to SugaredLogger and zapgrpc by design; these Loggers require passing in a Core interface implementation class to create.
Core interface: zap also provides a variety of implementation options: NewNopCore, ioCore, multiCore, hook.
The most commonly used are ioCore, multiCore, from the name you can see that multiCore is a configuration that can contain multiple ioCore, for example, you can make the Error log output one log format and set a log output destination, so that the Info log output in another log format to another place.
As mentioned above, the Core implementation class ioCore requires three objects to be passed in: Encoder, the encoder of the input data, WriteSyncer, the destination of the log data, and LevelEnabler, the log level.
Encoder interface: zap provides implementations of consoleEncoder, jsonEncoder, which provide log output in console format and JSON format respectively, and these Encoders have their own serialization implementations, which allows for faster formatting of code.
EncoderConfig : The Encoder described above also allows the user to flexibly configure the log output format according to the EncoderConfig configuration, from the key name of the log message, the log level name, to the definition of the time format output, the definition of the method name can be flexibly configured through it.
WriteSyncer interface : zap provides a single log output implementation of writerWrapper and a multiWriteSyncer implementation that can output logs to multiple locations.
Entry : With the configuration out of the way, it’s time to encapsulate the log data. First, the log data will be encapsulated into an Entry, which contains the log name, log time, log level, and log data information, no Field information, and then experience Core’s Check method to generate a CheckedEntry instance after the log level is verified.
CheckedEntry contains all the information about the log data, including the above-mentioned Entry, call stack information, etc.
Performance
Using Object Pools
zap reuses a large number of objects that can be reused through the object pools provided by sync.
zap When instantiating CheckedEntry, Buffer, Encoder and other objects, it will get them directly from the object pool, instead of instantiating a new one directly, so that reusing objects can reduce the pressure of GC and reduce memory allocation.
Avoid reflection
If we use the official log library, output the log like this.
|
|
The Printf function called by log actually calls the fmt.Sprintf function to format the log data for output.
However, the efficiency of fmt.Sprintf is actually very low, and by looking at the source code of fmt.
- the type accepted by
fmt.Sprintfis interface{}, which uses reflection internally. fmt.Sprintfis used for formatting strings, which requires parsing format strings such as%s,%dand so on, increasing the time spent on parsing.
However, in zap, the built-in Encoder is used, which stitches log data in byte form through the internal Buffer, reducing the performance loss caused by reflection; and zap uses structured logs, so there are no %s or %d identifiers to parse, which is also a performance improvement.
A more efficient and flexible serializer
Both serializers can be configured flexibly according to the EncoderConfig passed in. This flexible configuration is not just the name of the log output key, but the user-defined Encoder implementation can be called by passing in a function in EncoderConfig.
The standard library serialization tool is used for serializing JSON like logrus, which is also less efficient.
zap code analysis
Since I feel that the zap code is still written in an elegant way, here is a little bit of source code analysis.
Initialization
Initializing Core
As we learned in the diagram above, Core has 4 implementation classes, so let’s take the most commonly used ioCore as an example to explain.
The ioCore is very simple and requires a total of three fields: Encoder for the input data, WriteSyncer for the log data destination, and LevelEnabler for the log level.
The NewCore function also returns an object pointer when used to create an ioCore.
Initializing a Logger
zap will instantiate a Logger with the New function.
The New function sets up the appropriate default fields, including the core instance, the error log output location, the output level of the stack log, the log time, etc., and then instantiates a Logger object to return a pointer.
The information of the Logger structure is as follows.
|
|
The Logger structure will contain a lot of configuration information, and we can add the corresponding parameters through WithOptions in our development. For example, add the log line number.
|
|
The AddCaller function creates a callback hook for WithOptions to execute, which is the beauty of functional programming.
WithOptions you can pass in an array of Options, then iterate through the array and call the apply method.
|
|
The code here is very interesting. In go, a function is also a type, and like a struct, it can have a method.
Here optionFunc is a function type that implements the apply method, so it is equivalent to inheriting the Option interface. Then in the WithCaller, optionFunc is used to wrap a function in a layer, which looks fantastic, but is actually no different from int64(123).
Then in the WithOptions function, the function returned by the WithCaller is converted to optionFunc and passed to log for execution, which is equivalent to changing the addCaller property of log.
If you don’t understand it, you can try it yourself on the compiler.
Printing the log
The entire process of printing the log is as follows.
- first, get the CheckedEntry instance and encapsulate the corresponding log data;
- then encode it according to the encoder encapsulated in the core, and put the encoded content into a buffer.
- output the contents of the buffer to the WriteSyncer encapsulated in the core.
After we initialize the Logger, we can use it to call the appropriate Info, Warn, Error, etc. methods to print the log output. Since the output methods are the same for all log levels, here we will analyze them through the Info method.
This method first calls the check method to check whether the current log data should be printed at the configured log level.
For Info log level, InfoLevel is passed in, and for Error log level, ErrorLevel is passed in. zap log levels are defined by these constants.
The minimum DebugLevel starts at -1.
check
|
|
The Enabled method of the core is called first to determine if the log should be printed. Since the log level is actually an int8 type, this is a straightforward determination based on size.
After determining that there are no problems, the Check method is called to get the CheckedEntry instance pointer. After getting the CheckedEntry instance pointer, it will set the value according to the configuration information and then return.
Here is how to get the CheckedEntry instance pointer.
The main thing is that the ce passed in is a nil pointer, but that doesn’t mean that Go calls its AddCore method (which would be an error on java).
|
|
The AddCore method is also very simple, you should take a look at it and understand, not much to say.
Write log printing
This is where we call the Write method of core to write log data, and continue on.
|
|
The Write method calls the EncodeEntry method of the encoder, depending on the encoder. Both the jsonEncoder and the consoleEncoder get a Buffer instance from the bufferpool in the EncodeEntry method and then encapsulate the data in the Buffer instance in a certain format.
Once the data is obtained, the WriteSyncer’s Write method is called to write the log data.
Finally, the Buffer instance is released back into the bufferpool.
Summary
This article explains the design principles and code implementation of zap. We can see that the coding structure is designed in such a way that it can be configured in a simple way to achieve rich functionality. In terms of performance, it reduces the overhead of memory allocation through the use of object pools, reduces the overhead of serialization through a built-in high-performance serializer, and reduces the overhead of formatting log data through a structured log format called fmt.Sprintf.