Recently we have been doing a technical selection of databases and inevitably we need to do a benchmark test of the databases so that we can compare the performance of different databases across the board.
Cloud Serving Benchmark (YCSB) is a tool developed by Yahoo for basic testing of cloud services. Redis, etc.
As a go developer, we used the Go YCSB developed by pingcap for benchmarking purposes.
Installation
First make sure your local Go version is not lower than 1.16, then download and compile.
1
2
3
|
git clone https://github.com/pingcap/go-ycsb.git
cd go-ycsb
make
|
In the bin folder is our compiled program go-ycsb.
Let’s start by looking at the workloads folder, which contains various workload templates that can be customised based on the workload templates. The default 6 test scenarios are as follows.
- workloada: Read/write balanced, 50%/50%, Reads/Writes
- workloadb: read more/write less, 95%/5%, Reads/Writes
- workloadc: read-only, 100%, Reads
- workloadd: read recent write record type, 95%/5%, Reads/insert
- workloade: scan interval type, 95%/5%, scan/insert
- workloadf: read/write in record balanced, 50%/50%, Reads/insert
- workload_template: parameter list template.
So we can test the system in multiple dimensions according to different workloads, which include the following operations
- Insert: inserts a new record
- Update: update one or all fields of a record
- Read: reads one or all fields of a record
- Scan: randomly scans random rows in sequence starting with a key
When testing, we also need to simulate the test according to different business scenarios, which can be controlled by requestdistribution.
- uniform: random selection of a record.
- sequential: selects records sequentially.
- zipfian: selects records according to the zipfian distribution. Roughly, this means the 80/20 principle, which is often referred to on the Internet, i.e. 20% of the keys will take up 80% of the accesses.
- latest: similar to Zipfian, but tends to access significantly more new data than old data.
- hotspot: hotspot distribution of accesses.
- exponential: exponentially distributed accesses.
Here we look at what parameters can be filled in the workload.
 1
 2
 3
 4
 5
 6
 7
 8
 9
10
11
12
13
14
15
16
17
18
19
20
21
22
23
24
25
26
27
28
29
30
31
32
33
34
35
36
37
38
39
40
41
42
43
44
45
46
47
48
49
50
51
52
53
54
55
56
57
58
59
60
61
62
63
64
65
66
67
68
69
70
71
72
73
74
|
# 目前只实现了这一种
workload=core

# 总记录数
recordcount=1000000

# 测试阶段被操作的记录数,如果设置了 threadcount,那么每个线程操作的记录数=operationcount/threadcount
operationcount=3000000

# 线程数
threadcount=500

# 如果一个表里面已经有记录数了,那么load的数据的时候从这个记录数开始
insertstart=0

# 一行数据的字段数
fieldcount=10

# 每个字段大小
fieldlength=100

# 是否应该读取所有字段
readallfields=true

# 是否应该更新所有字段
writeallfields=false

# 字段长度分布
fieldlengthdistribution=constant
#fieldlengthdistribution=uniform
#fieldlengthdistribution=zipfian

# 读操作概率
readproportion=0.95
# 更新操作概率
updateproportion=0.05

# 插入操作概率
insertproportion=0

# 先读后写操作同一条记录概率
readmodifywriteproportion=0

# 范围操作的概率
scanproportion=0

# 范围操作,最大的可操作的记录数
maxscanlength=1000

# 用来选择扫描时访问的记录数量分布情况
scanlengthdistribution=uniform
#scanlengthdistribution=zipfian

# 记录应按顺序插入还是伪随机插入
insertorder=hashed
#insertorder=ordered

# 以什么方式模拟测试
requestdistribution=zipfian
#requestdistribution=uniform
#requestdistribution=latest

# 下面这两种方式时针对requestdistribution为hotspot的时候
# 构成热点集的数据项的百分比
hotspotdatafraction=0.2

# 访问热点集的数据操作百分比
hotspotopnfraction=0.8

# 操作数据的表名
table=usertable

# 延迟测量结果展现形式,暂时没实现
measurementtype=histogram
|
Testing
For example, we now want to test the performance of redis by first writing a workload.
1
2
3
4
5
6
7
8
|
recordcount=1000000
operationcount=1000000
workload=core
readallfields=true
readmodifywriteproportion=1
requestdistribution=uniform
redis.addr=127.0.0.1:6379
threadcount=50
|
The above workload means that 1 million rows of data are inserted into the library when it is loaded, and the amount of data manipulated is also 1 million, but there are 50 threads, i.e. each thread actually manipulates 20,000 rows of records.
The test uses readmodifywriteproportion, which reads before it writes, and operates on the records in a uniform, or random, way.
First load the data.
1
|
./bin/go-ycsb load redis -P workloads/workloada
|
Then run the test.
1
|
./bin/go-ycsb run redis -P workloads/workloada
|
Results
1
|
READ_MODIFY_WRITE - Takes(s): 18.8, Count: 499312, OPS: 26539.8, Avg(us): 1388, Min(us): 107, Max(us): 42760, 99th(us): 3000, 99.9th(us): 7000, 99.99th(us): 26000
|
- Takes(s) : indicates the total time taken for the test.
- Count : the number of operation records.
- OPS: Operates Per Second, generally the number of operations, not very different from qps.
- Avg, Min, Max: average, minimum, maximum time taken for single record operations.
- 99th, 99.9th, 99.99th: P99, P99.9, P99.99 time delay.
Code Implementation Analysis
For me, of course, it is important to look at the code and learn how others have written it to help us in our work.
For the Go YCSB, it has a few components.
- workload: loads the initialization configuration file and creates a thread to execute the test.
- client: encapsulates the workload, configuration parameters, DB, etc. and is used to run the tests.
- db: configures a bunch of databases that can be executed by the client, executing specific read and write databases.
- measurement: a statistics module that counts the number of executions, latency, etc.
Let’s take a look at redis as an example of what to do if you want to test your own Database.
Defining the DB
In Go YCSB, all the DBs are placed under the db directory.
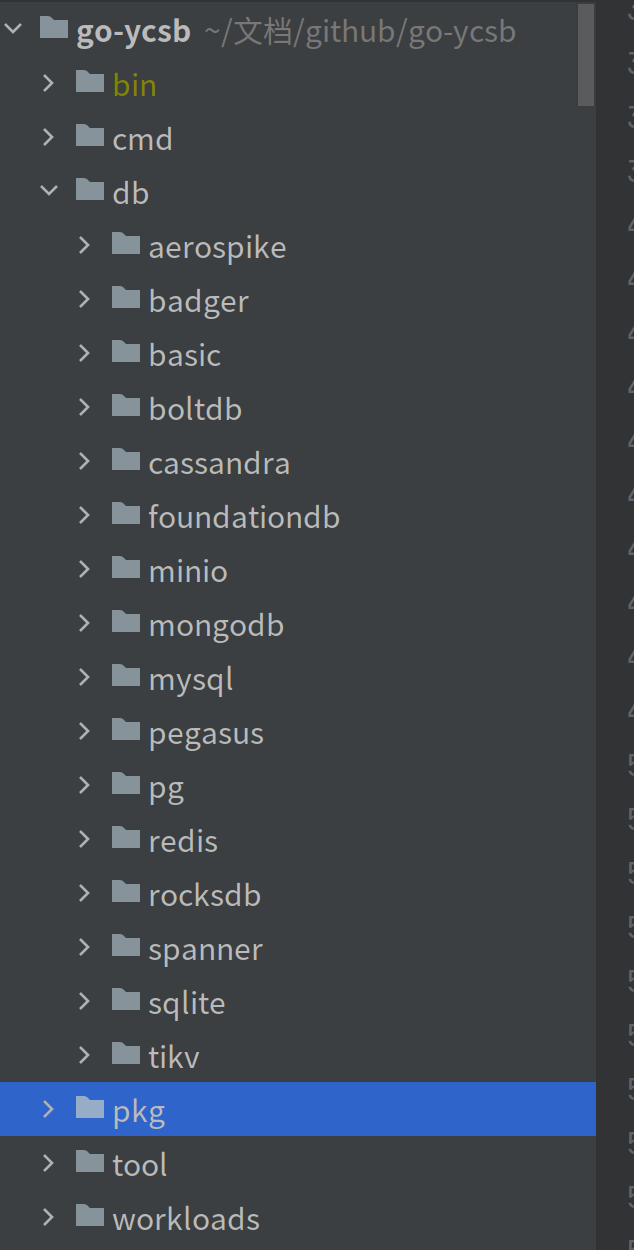
So, we can create our own db under this folder and construct a struct that implements the DB interface.
 1
 2
 3
 4
 5
 6
 7
 8
 9
10
11
|
type DB interface {
    ToSqlDB() *sql.DB
    Close() error
    InitThread(ctx context.Context, threadID int, threadCount int) context.Context
    CleanupThread(ctx context.Context)
    Read(ctx context.Context, table string, key string, fields []string) (map[string][]byte, error)
    Scan(ctx context.Context, table string, startKey string, count int, fields []string) ([]map[string][]byte, error)
    Update(ctx context.Context, table string, key string, values map[string][]byte) error
    Insert(ctx context.Context, table string, key string, values map[string][]byte) error
    Delete(ctx context.Context, table string, key string) error
}
|
Inside, specific DB operations are defined.
Then a factory needs to be defined to create this DB struct, implementing the DBCreator interface.
1
2
3
|
type DBCreator interface {
    Create(p *properties.Properties) (DB, error)
}
|
Then an init function needs to be defined to register the DBCreator when it is started.
 1
 2
 3
 4
 5
 6
 7
 8
 9
10
11
12
13
14
|
func init() {
    ycsb.RegisterDBCreator("redis", redisCreator{})
}

var dbCreators = map[string]DBCreator{}

func RegisterDBCreator(name string, creator DBCreator) {
    _, ok := dbCreators[name]
    if ok {
        panic(fmt.Sprintf("duplicate register database %s", name))
    }

    dbCreators[name] = creator
}
|
RegisterDBCreator is called at initialization time to get the DB registered by the init method. In this way Go YCSB implements the customisation of the DB.
Global parameter initialisation
First Go YCSB uses cobra at runtime to execute two different methods depending on whether load or run is passed in.
1
2
3
4
5
6
7
|
func runLoadCommandFunc(cmd *cobra.Command, args []string) {
    runClientCommandFunc(cmd, args, false)
}

func runTransCommandFunc(cmd *cobra.Command, args []string) {
    runClientCommandFunc(cmd, args, true)
}
|
This is where the runClientCommandFunc function will be called.
 1
 2
 3
 4
 5
 6
 7
 8
 9
10
11
12
13
14
15
16
17
18
19
20
21
22
23
24
25
26
27
28
29
30
31
32
33
34
35
36
37
38
39
|
func runClientCommandFunc(cmd *cobra.Command, args []string, doTransactions bool) {
    dbName := args[0]
    // 初始化全局参数
    initialGlobal(dbName, func() {
        doTransFlag := "true"
        if !doTransactions {
            doTransFlag = "false"
        }
        globalProps.Set(prop.DoTransactions, doTransFlag)

        if cmd.Flags().Changed("threads") {
            // We set the threadArg via command line.
            globalProps.Set(prop.ThreadCount, strconv.Itoa(threadsArg))
        }

        if cmd.Flags().Changed("target") {
            globalProps.Set(prop.Target, strconv.Itoa(targetArg))
        }

        if cmd.Flags().Changed("interval") {
            globalProps.Set(prop.LogInterval, strconv.Itoa(reportInterval))
        }
    })

    fmt.Println("***************** properties *****************")
    for key, value := range globalProps.Map() {
        fmt.Printf("\"%s\"=\"%s\"\n", key, value)
    }
    fmt.Println("**********************************************")
    // 初始化 client
    c := client.NewClient(globalProps, globalWorkload, globalDB)
    start := time.Now()
    // 运行测试
    c.Run(globalContext)

    fmt.Printf("Run finished, takes %s\n", time.Now().Sub(start))
    // 测试结果输出
    measurement.Output()
}
|
The initialisation of the parameters is mainly done inside initialGlobal.
 1
 2
 3
 4
 5
 6
 7
 8
 9
10
11
12
13
14
15
16
17
18
19
20
21
22
23
24
25
26
27
28
29
30
|
func initialGlobal(dbName string, onProperties func()) {
    ...
    go func() {
        http.ListenAndServe(addr, nil)
    }()
    //初始化 measurement
    measurement.InitMeasure(globalProps)

    if len(tableName) == 0 {
        tableName = globalProps.GetString(prop.TableName, prop.TableNameDefault)
    }
    // 获取 WorkloadCreator
    workloadName := globalProps.GetString(prop.Workload, "core")
    workloadCreator := ycsb.GetWorkloadCreator(workloadName)
    //创建Workload
    var err error
    if globalWorkload, err = workloadCreator.Create(globalProps); err != nil {
        util.Fatalf("create workload %s failed %v", workloadName, err)
    }
    // 获取要被测试的 db
    dbCreator := ycsb.GetDBCreator(dbName)
    if dbCreator == nil {
        util.Fatalf("%s is not registered", dbName)
    }
    // 创建 db
    if globalDB, err = dbCreator.Create(globalProps); err != nil {
        util.Fatalf("create db %s failed %v", dbName, err)
    }
    globalDB = client.DbWrapper{globalDB}
}
|
The main thing here is to create the Workload and DB, which will initialise a lot of information in the configuration file.
Running tests
The runClientCommandFunc calls the client’s Run method to execute the test.
 1
 2
 3
 4
 5
 6
 7
 8
 9
10
11
12
13
14
15
16
17
18
19
20
21
22
23
24
25
26
27
28
29
30
31
32
33
34
35
36
37
38
39
40
41
42
43
44
45
46
47
48
49
50
51
52
53
54
55
56
57
58
59
60
61
62
63
|
func (c *Client) Run(ctx context.Context) {
    var wg sync.WaitGroup
    threadCount := c.p.GetInt(prop.ThreadCount, 1)

    wg.Add(threadCount)
    measureCtx, measureCancel := context.WithCancel(ctx)
    measureCh := make(chan struct{}, 1)
    go func() {
        defer func() {
            measureCh <- struct{}{}
        }()
        // 这里很有意思,因为有时候我们做数据库是需要初始化数据到缓存里面的
        // 所以开始的一段时间我们不能计入测试统计中,这里有隔预热时间,可以通过 warmuptime 配置
        if c.p.GetBool(prop.DoTransactions, true) {
            dur := c.p.GetInt64(prop.WarmUpTime, 0)
            select {
            case <-ctx.Done():
                return
            case <-time.After(time.Duration(dur) * time.Second):
            }
        }
        // 预热完毕
        measurement.EnableWarmUp(false)

        dur := c.p.GetInt64(prop.LogInterval, 10)
        t := time.NewTicker(time.Duration(dur) * time.Second)
        defer t.Stop()

        for {
            select {
            // 在运行的时候每隔 10 秒输出一次统计信息
            case <-t.C:
                measurement.Output()
            case <-measureCtx.Done():
                return
            }
        }
    }()
    // 做一些初始化的工作,如mysql需要创建表
    if err := c.workload.Init(c.db); err != nil {
        fmt.Printf("Initialize workload fail: %v\n", err)
        return
    }
    // 根据 threadCount 创建多个线程操作数据库
    for i := 0; i < threadCount; i++ {
        go func(threadId int) {
            defer wg.Done()
            // 初始化 worker
            w := newWorker(c.p, threadId, threadCount, c.workload, c.db)
            ctx := c.workload.InitThread(ctx, threadId, threadCount)
            ctx = c.db.InitThread(ctx, threadId, threadCount)
            // 开始跑测试
            w.run(ctx)
            // 跑完测试做清理工作
            c.db.CleanupThread(ctx)
            c.workload.CleanupThread(ctx)
        }(i)
    }
    // 等待测试跑完
    wg.Wait()
    measureCancel()
    <-measureCh
}
|
The first part is to create a thread which will control whether to start the test statistics and then output the statistics every 10 seconds; the second part is to create a thread based on the set threadcount and run the worker to run the test.
The second part is to create a thread according to the set threadcount and run the worker to run the test; the newWorker will set the totalOpCount according to the operationcount to indicate the total number of executions required, and use totalOpCount / int64(threadCount) to set the opCount to indicate the number of records for a single thread operation.
 1
 2
 3
 4
 5
 6
 7
 8
 9
10
11
12
13
14
15
16
17
18
19
20
21
22
23
24
25
26
27
28
29
30
31
32
33
34
35
36
37
38
39
40
41
|
func (w *worker) run(ctx context.Context) {
    // 将线程操作分散开来,这样它们就不会同时击中DB了。
    if w.targetOpsPerMs > 0.0 && w.targetOpsPerMs <= 1.0 {
        time.Sleep(time.Duration(rand.Int63n(w.targetOpsTickNs)))
    }

    startTime := time.Now()
    // 循环直到操作数达到 opsDone
    for w.opCount == 0 || w.opsDone < w.opCount {
        var err error
        opsCount := 1
        // 这里是执行基准测试
        if w.doTransactions {
            if w.doBatch {
                err = w.workload.DoBatchTransaction(ctx, w.batchSize, w.workDB)
                opsCount = w.batchSize
            } else {
                err = w.workload.DoTransaction(ctx, w.workDB)
            }
            //  这里是执行 load 数据
        } else {
            if w.doBatch {
                err = w.workload.DoBatchInsert(ctx, w.batchSize, w.workDB)
                opsCount = w.batchSize
            } else {
                err = w.workload.DoInsert(ctx, w.workDB)
            }
        }
        // 预热完了会进行操作次数的统计
        if measurement.IsWarmUpFinished() {
            w.opsDone += int64(opsCount)
            w.throttle(ctx, startTime)
        }

        select {
        case <-ctx.Done():
            return
        default:
        }
    }
}
|
The execution of the benchmark test is left to the DoTransaction method of the workload to determine the execution.
 1
 2
 3
 4
 5
 6
 7
 8
 9
10
11
12
13
14
15
16
17
18
19
|
func (c *core) DoTransaction(ctx context.Context, db ycsb.DB) error {
    state := ctx.Value(stateKey).(*coreState)
    r := state.r
    // 根据会根据不同的测试场景,进入到不同的测试分支
    // Next 方法会根据设置的 readproportion、updateproportion、 scanproportion等概率来获取相应操作类型
    operation := operationType(c.operationChooser.Next(r))
    switch operation {
    case read:
        return c.doTransactionRead(ctx, db, state)
    case update:
        return c.doTransactionUpdate(ctx, db, state)
    case insert:
        return c.doTransactionInsert(ctx, db, state)
    case scan:
        return c.doTransactionScan(ctx, db, state)
    default:
        return c.doTransactionReadModifyWrite(ctx, db, state)
    }
}
|
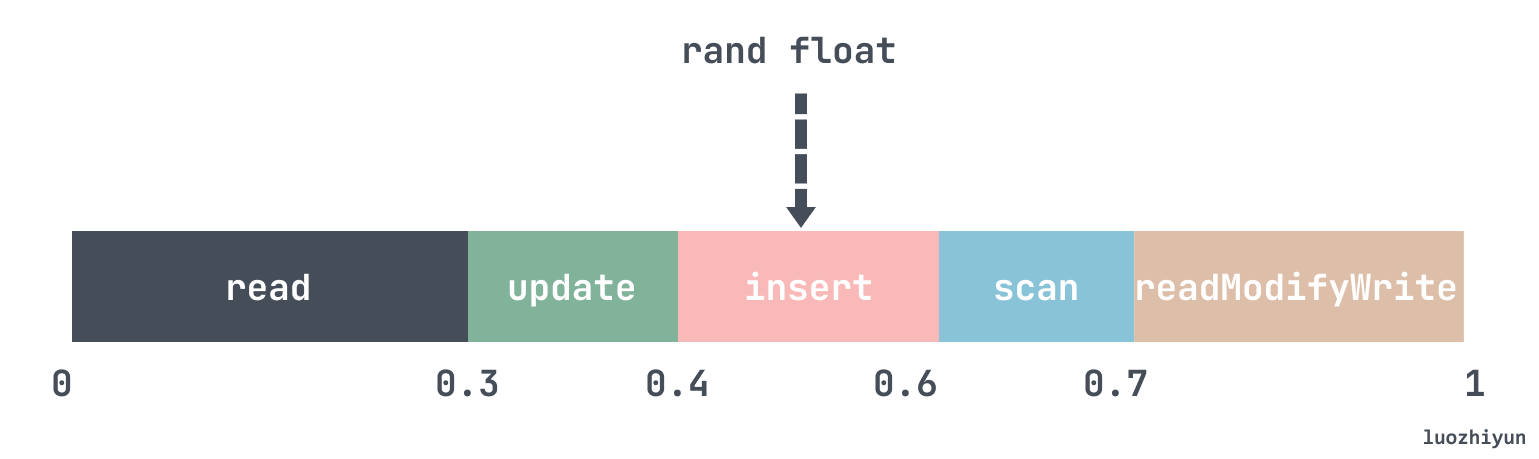
Here the Next method of the operationChooser is called to determine which instruction to execute, the probability of execution being set in the configuration file.
The algorithm is very simple: at initialisation the operationChooser will add the values of the parameters readproportion, updateproportion and scanproportion to the values of the operationChooser in the form of an array, and then check which range the random number falls in by randomising a fractional number from 0 to 1.
 1
 2
 3
 4
 5
 6
 7
 8
 9
10
11
12
13
14
15
16
17
|
func (d *Discrete) Next(r *rand.Rand) int64 {
    sum := float64(0)
    for _, p := range d.values {
        sum += p.Weight
    }
    // 随机一个 0~1的小数
    val := r.Float64()
    for _, p := range d.values {
        pw := p.Weight / sum
        if val < pw {
            d.SetLastValue(p.Value)
            return p.Value
        }
        val -= pw
    }
    panic("oops, should not get here.")
}
|
The implementation of the code is to add up all the values as described above to get sum, and then calculate whether each value accounts for a random value.
Finally, let’s look at how doTransactionRead works.
 1
 2
 3
 4
 5
 6
 7
 8
 9
10
11
12
13
14
15
16
17
18
19
20
21
22
23
24
25
26
27
|
func (c *core) doTransactionRead(ctx context.Context, db ycsb.DB, state *coreState) error {
    r := state.r
    // 根据我们设置的 requestdistribution 获取一个 key 值
    keyNum := c.nextKeyNum(state)
    keyName := c.buildKeyName(keyNum)

    //被读取的字段
    var fields []string
    if !c.readAllFields {
        // 如果不是读取所有字段,那么根据fieldChooser字段选择器选择一个字段执行
        fieldName := state.fieldNames[c.fieldChooser.Next(r)]
        fields = append(fields, fieldName)
    } else {
        fields = state.fieldNames
    }
    //调用 db 的read方法
    values, err := db.Read(ctx, c.table, keyName, fields)
    if err != nil {
        return err
    }
    //校验数据完整性
    if c.dataIntegrity {
        c.verifyRow(state, keyName, values)
    }

    return nil
}
|
Here we first call nextKeyNum to get the key value, which will be obtained according to certain rules based on the requestdistribution parameter we set. Then, after checking which fields need to be read, the Read method of the DbWrapper is called to read the data.
1
2
3
4
5
6
7
8
9
|
func (db DbWrapper) Read(ctx context.Context, table string, key string, fields []string) (_ map[string][]byte, err error) {
    start := time.Now()
    defer func() {
        // 进行测试数据统计
        measure(start, "READ", err)
    }()

    return db.DB.Read(ctx, table, key, fields)
}
|
The DbWrapper wraps a layer and uses the defer method to call measure for statistics.
However, the problem I have here is that when reading the data, it is also parsed according to the fields passed in, which also loses some performance, I don’t know if this makes sense, like the Read method of redis.
 1
 2
 3
 4
 5
 6
 7
 8
 9
10
11
12
13
14
15
16
|
func (r *redis) Read(ctx context.Context, table string, key string, fields []string) (map[string][]byte, error) {
    data := make(map[string][]byte, len(fields))

    res, err := r.client.Get(table + "/" + key).Result()

    if err != nil {
        return nil, err
    }
    // 反序列化
    err = json.Unmarshal([]byte(res), &data)
    if err != nil {
        return nil, err
    }
    // TODO: filter by fields
    return data, err
}
|
Data statistics
The measure method is called after each operation and the test data is counted.
1
2
3
4
5
6
7
8
9
|
func measure(start time.Time, op string, err error) {
    // 计算耗时
    lan := time.Now().Sub(start)
    if err != nil {
        measurement.Measure(fmt.Sprintf("%s_ERROR", op), lan)
        return
    }
    measurement.Measure(op, lan)
}
|
Statistics need to be manipulated in a thread-safe manner as there are multiple threads operating simultaneously.
 1
 2
 3
 4
 5
 6
 7
 8
 9
10
11
12
13
14
15
16
17
18
19
20
21
22
23
24
25
26
27
28
29
30
31
32
33
34
35
36
37
38
|
func (h *histogram) Measure(latency time.Duration) {
    // 这里是 us 微秒
    n := int64(latency / time.Microsecond)

    atomic.AddInt64(&h.sum, n)
    atomic.AddInt64(&h.count, 1)
    // 这里转为毫秒ms
    bound := int(n / h.boundInterval)
    // boundCounts 是一个并发map,用来统计每个时间段(单位:ms)中有多少次操作
    h.boundCounts.Upsert(bound, 1, func(ok bool, existedValue int64, newValue int64) int64 {
        if ok {
            return existedValue + newValue
        }
        return newValue
    })
    // 设置最小时延
    for {
        oldMin := atomic.LoadInt64(&h.min)
        if n >= oldMin {
            break
        }

        if atomic.CompareAndSwapInt64(&h.min, oldMin, n) {
            break
        }
    }
    // 设置最大时延
    for {
        oldMax := atomic.LoadInt64(&h.max)
        if n <= oldMax {
            break
        }

        if atomic.CompareAndSwapInt64(&h.max, oldMax, n) {
            break
        }
    }
}
|
counting the number of operations per time period (in ms) is done using boundCounts, which is Go YCSB’s own implementation of ConcurrentMap for thread safety, to count the number of operations per unit of time.
The maximum and minimum delays are manipulated by CAS, also for thread safety.
After the count, getInfo is called to calculate the elapsed time.
 1
 2
 3
 4
 5
 6
 7
 8
 9
10
11
12
13
14
15
16
17
18
19
20
21
22
23
24
25
26
27
28
29
30
31
32
33
34
35
36
37
38
39
40
41
42
43
44
45
46
47
48
49
50
51
52
|
func (h *histogram) getInfo() map[string]interface{} {
    min := atomic.LoadInt64(&h.min)
    max := atomic.LoadInt64(&h.max)
    sum := atomic.LoadInt64(&h.sum)
    count := atomic.LoadInt64(&h.count)

    bounds := h.boundCounts.Keys()
    sort.Ints(bounds)

    avg := int64(float64(sum) / float64(count))
    per99 := 0
    per999 := 0
    per9999 := 0

    opCount := int64(0)
    // 计算 P99,P99.9,P99.99
    // 这里实际上是统计一个占比
    // bound 里面会保存每毫秒有多少次操作
    for _, bound := range bounds {
        boundCount, _ := h.boundCounts.Get(bound)
        opCount += boundCount
        per := float64(opCount) / float64(count)
        // 这里是 99% 的操作是落在哪个时间区间内
        if per99 == 0 && per >= 0.99 {
            per99 = (bound + 1) * 1000
        }

        if per999 == 0 && per >= 0.999 {
            per999 = (bound + 1) * 1000
        }

        if per9999 == 0 && per >= 0.9999 {
            per9999 = (bound + 1) * 1000
        }
    }
    // 计算整个测试耗时
    elapsed := time.Now().Sub(h.startTime).Seconds()
    // 计算单位耗时内操作次数
    qps := float64(count) / elapsed
    res := make(map[string]interface{})
    res[ELAPSED] = elapsed
    res[COUNT] = count
    res[QPS] = qps
    res[AVG] = avg
    res[MIN] = min
    res[MAX] = max
    res[PER99TH] = per99
    res[PER999TH] = per999
    res[PER9999TH] = per9999

    return res
}
|
The per99, per999, per9999 here are actually only milliseconds in precision and are designed to do histogram export (and then the author has been at this project for 3 years and hasn’t added this feature yet).
Summary
The above analysis shows that Go YCSB is very well designed and can be extended with very little code; the configuration is also quite flexible, providing different test environments for different requestdistributions, and the read and write probabilities can be adjusted at will in the tests to ensure that the online environment can be simulated as much as possible.
But it also has a lot of shortcomings, on the one hand, the documentation is very inadequate, basically just write a few parameters configuration; on the other hand is a lot of features are not implemented, online testing will often appear ERROR, go to the code to see the results are not implemented. Three years ago, the author said in his blog that he wanted to implement the test result export function, but the result has not been implemented yet. I have sent an email to the author at tl@pingcap.com and am waiting for a reply.