This article is only for ipv4 networks
This article first introduces the basic concept and common commands of iptables, and then analyzes how docker/podman is a standalone container network implemented with iptables and Linux virtual network interface.
iptables
iptables provides packet filtering, NAT and other packet handling capabilities. iptables is most used in firewall and NAT scenarios.
Both iptables and the new nftables are based on netfilter and are subprojects of netfilter.
But the eBPF community is currently working on a new project designed to replace netfilter, bpfilter, and one of their goals is to be compatible with iptables/nftables rules, so let’s wait and see.
iptables Basic Concepts - Four Tables and Five Chains
There is actually a security table related to SELinux (I think it was added in a newer kernel, but it is not clear which version), but I have not touched it, so I skipped it.
By default, iptables provides four tables (not considering security) and five chains, and the data processing flow in these four tables and five chains is shown in the following diagram.
In this introduction, we can ignore the links in the link layer layer of the diagram for now, it belongs to the ebtables category. In addition, conntrack is also ignored for now, and the function of conntrack will be introduced in detail in the next sub-section.
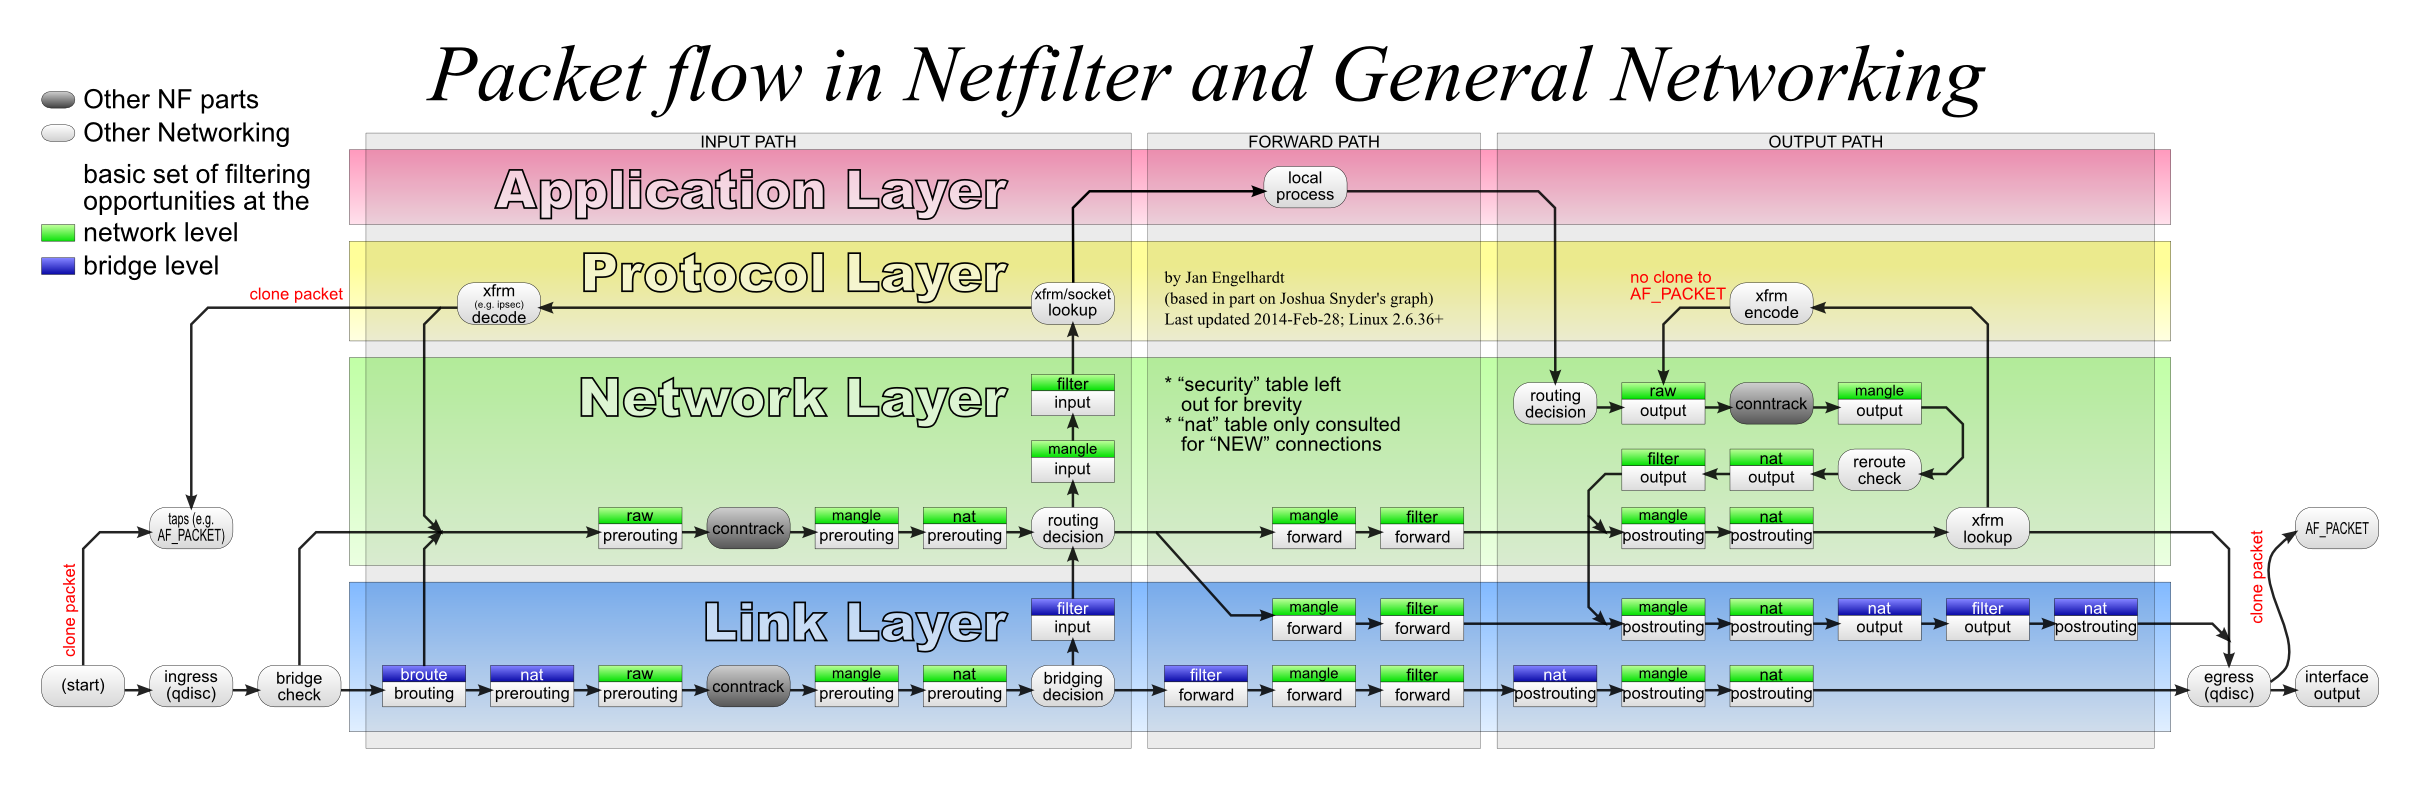
Comparing the above diagram, for data sent to a particular user-level program, the traffic sequence is as follows.
- First into the PREROUTING chain, which goes through these three tables in order: raw -> mangle -> nat
- Then it enters the INPUT chain, which also has three tables, and the processing order is: mangle -> nat -> filter
- After passing through the INPUT chain, the data enters the kernel stack and finally reaches the user layer program.
The messages sent by the user layer programs go through these tables in order: OUTPUT -> POSTROUTING
It is also easy to see from the diagram that if the data dst ip is not the ip of any of the local interfaces, then the chains it passes through are: PREROUTEING -> FORWARD -> POSTROUTING
The functions and names of the five chains are identical and should be easy to understand. The four tables in the chain are described below in order of priority.
- raw: Processing of received packets before connection tracking. Generally not used and can be ignored
- Once the user has used the RAW table, the NAT table and ip_conntrack processing will be skipped after the RAW table is processed, i.e., no more address translation and packet link tracking will be done.
- mangle: Used to modify messages, tag messages
- nat: mainly used to do network address translation, SNAT or DNAT
- filter: mainly used to filter packets
Once a rule A is matched in a table, the next processing rule is specified by the target parameter of rule A. All subsequent tables** are ignored. targets are of the following types.
- ACCEPT: Directly allow packets to pass
- DROP: Discard packets directly, which means 100% packet loss for the program
- This is more friendly to the program, but there are security risks, so it is usually not used.
- MASQUERADE: (Masquerade) rewrites src ip to NIC ip, the difference with SNAT is that it automatically reads NIC ip. Required for routing devices.
- SNAT/DNAT: As the name implies, does network address translation.
- REDIRECT: Do port mapping on local machine.
- LOG: Record log information in /var/log/messages file, then pass the packet to the next rule, that is, do not do anything to the packet other than logging, still let the next rule to match.
- Only this target is special in that the data matching it can still match the next rule and will not be skipped.
- Other types, you can check when you need them.
After understanding the above diagram and the purpose of the four tables, it is easy to understand the iptables command.
Common Commands
Note : The changes made by the iptables command provided below are unpersistent and will be lost upon reboot! The method of persistent configuration will be briefly described in the next section.
Command Format.
1
|
iptables [-t table] {-A|-C|-D} chain [-m matchname [per-match-options]] -j targetname [per-target-options]
|
The table defaults to the filter table, but it feels like the INPUT table is actually used most by system administrators to set up the firewall.
The following is a brief description of adding and modifying rules on the INPUT table to set up the firewall.
 1
 2
 3
 4
 5
 6
 7
 8
 9
10
11
12
13
14
15
16
17
18
19
20
21
22
23
24
25
26
27
28
29
30
31
32
|
# --add 允许 80 端口通过
iptables -A INPUT -p tcp --dport 80 -j ACCEPT

# --list-rules 查看所有规则
iptables -S

# --list-rules 查看 INPUT 表中的所有规则
iptables -S INPUT
# 查看 iptables 中的所有规则(比 -L 更详细)

# ---delete 通过编号删除规则
iptables -D 1
# 或者通过完整的规则参数来删除规则
iptables -D INPUT -p tcp --dport 80 -j ACCEPT

# --replace 通过编号来替换规则内容
iptables -R INPUT 1 -s 192.168.0.1 -j DROP

# --insert 在指定的位置插入规则,可类比链表的插入
iptables -I INPUT 1 -p tcp --dport 80 -j ACCEPT

# 在匹配条件前面使用感叹号表示取反
# 如下规则表示接受所有来自 docker0,但是目标接口不是 docker0 的流量
iptables -A FORWARD -i docker0 ! -o docker0 -j ACCEPT

# --policy 设置某个链的默认规则
# 很多系统管理员会习惯将连接公网的服务器,默认规则设为 DROP,提升安全性,避免错误地开放了端口。
# 但是也要注意,默认规则设为 DROP 前,一定要先把允许 ssh 端口的规则加上,否则就尴尬了。
iptables -P INPUT DROP

# --flush 清空 INPUT 表上的所有规则
iptables -F INPUT
|
For the rest of the analysis, it is assumed that the user is already familiar with linux bridge, veth, and other virtual network interfaces.
conntrack connection tracing and NAT
In between the conntrack talk, let’s review the netfilter data processing flowchart given earlier.
In the previous section we ignored the conntrack in the diagram, which is the star of this section - the connection tracking module of netfilter.
The flowchart above shows that conntrack takes effect after the raw chain of PREROUTEING and OUTPUT tables.
The following is an example of the default bridge network of docker to introduce the function of conntrack.
First, here is the docker0 network architecture I gave in the article “Virtual Network Interfaces for Linux”:
 1
 2
 3
 4
 5
 6
 7
 8
 9
10
11
12
13
14
15
16
17
18
19
20
21
22
23
24
25
26
27
|
+-----------------------------------------------+-----------------------------------+-----------------------------------+
|                      Host                     |           Container A             |           Container B             |
|                                               |                                   |                                   |
|   +---------------------------------------+   |    +-------------------------+    |    +-------------------------+    |
|   |       Network Protocol Stack          |   |    |  Network Protocol Stack |    |    |  Network Protocol Stack |    |
|   +----+-------------+--------------------+   |    +-----------+-------------+    |    +------------+------------+    |
|        ^             ^                        |                ^                  |                 ^                 |
|........|.............|........................|................|..................|.................|.................|
|        v             v  ↓                     |                v                  |                 v                 |
|   +----+----+  +-----+------+                 |          +-----+-------+          |           +-----+-------+         |
|   | .31.101 |  | 172.17.0.1 |      +------+   |          | 172.17.0.2  |          |           |  172.17.0.3 |         |
|   +---------+  +-------------<---->+ veth |   |          +-------------+          |           +-------------+         |
|   |  eth0   |  |   docker0  |      +--+---+   |          | eth0(veth)  |          |           | eth0(veth)  |         |
|   +----+----+  +-----+------+         ^       |          +-----+-------+          |           +-----+-------+         |
|        ^             ^                |       |                ^                  |                 ^                 |
|        |             |                +------------------------+                  |                 |                 |
|        |             v                        |                                   |                 |                 |
|        |          +--+---+                    |                                   |                 |                 |
|        |          | veth |                    |                                   |                 |                 |
|        |          +--+---+                    |                                   |                 |                 |
|        |             ^                        |                                   |                 |                 |
|        |             +------------------------------------------------------------------------------+                 |
|        |                                      |                                   |                                   |
|        |                                      |                                   |                                   |
+-----------------------------------------------+-----------------------------------+-----------------------------------+
         v
    Physical Network  (192.168.31.0/24)
|
docker adds the following rules to iptables for the docker0 bridge.
1
2
3
4
|
-t nat -A POSTROUTING -s 172.17.0.0/16 ! -o docker0 -j MASQUERADE

-t filter -P DROP
-t filter -A FORWARD -o docker0 -m conntrack --ctstate RELATED,ESTABLISHED -j ACCEPT
|
These lines enable the docker container to access the external network properly. MASQUERADE automatically does a SNAT to replace src ip with the egress NIC’s ip when requesting outbound access. This allows the packets to exit the network properly, and the packets returned by the other side now go back to the egress NIC properly.
Now the question arises: Can the egress NIC receive the returned packets and then forward them to the original source of the data, a docker container? Does docker additionally add a dst ip reverse translation rule that corresponds to MASQUERADE?
In fact, this step relies on the conntrack connection tracking feature provided by iptables, which is described in detail in the “Reference” article.
The contribution of conntrack to NAT is that when doing NAT conversion, there is no need to manually add additional rules to perform reverse conversion to enable bidirectional data transfer. netfilter/conntrack system will record the connection status of NAT, and the reverse conversion of NAT addresses is done automatically based on this status.
For example, in the above figure, Container A initiates N connections to baidu.com through the bridge network, and then the data is processed as follows.
- First, the packet sent by
Container A is processed by MASQUERADE rule, replacing src ip with eth0 ip, and then sent to physical network 192..168.31.0/24.
- The conntrack system records the status of this connection before and after it is processed by NAT, and sets its status to NEW, indicating that it is a newly initiated connection
- The packet returned by the other side baidu.com will reach the eth0 NIC first.
- conntrack checks the table and finds that the connection returning the packet is already recorded in the table and its status is NEW, so it changes the status of the connection to ESTABLISHED and changes the dst_ip to
172.17.0.2 and sends it out
- Note that this has nothing to do with ESTABLISHED of tcp
- After the route matching, the packet will enter docker0, and then match the iptables rule:
-t filter -A FORWARD -o docker0 -m conntrack --ctstate RELATED,ESTABLISHED -j ACCEPT, the data will be released directly.
- The data goes through veth and ends up in
Container A and is handed over to the container’s kernel stack for processing.
- The data is sent by
Container A’s kernel stack to the “application that initiated the connection”.
Actual test conntrack
Now let’s actually test to see if this is the case.
1
2
3
|
# 使用 tcpdump 分别在出口网卡 wlp4s0 (相当于 eth0)和 dcoker0 网桥上抓包,后面会用来分析
❯ sudo tcpdump -i wlp4s0 -n > wlp4s0.dump   # 窗口一,抓 wlp4s0 的包
❯ sudo tcpdump -i docker0 -n > docker0.dump  # 窗口二,抓 docker0 的包
|
Now create a new window three, start a container, and download a video file at low speed via the curl command.
1
|
❯ docker run --rm --name curl -it curlimages/curl "https://media.w3.org/2010/05/sintel/trailer.mp4" -o /tmp/video.mp4 --limit-rate 100k
|
Then create a new window four and check the conntrack status on the host
1
2
3
4
5
6
|
❯ sudo zypper in conntrack-tools  # 这个记得先提前安装好
❯ sudo conntrack -L | grep 172.17
# curl 通过 NAT 网络发起了一个 dns 查询请求,DNS 服务器是网关上的 192.168.31.1
udp      17 22 src=172.17.0.4 dst=192.168.31.1 sport=59423 dport=53 src=192.168.31.1 dst=192.168.31.228 sport=53 dport=59423 [ASSURED] mark=0 use=1
# curl 通过 NAT 网络向 media.w3.org 发起了 tcp 连接
tcp      6 298 ESTABLISHED src=172.17.0.4 dst=198.18.5.130 sport=54636 dport=443 src=198.18.5.130 dst=192.168.31.228 sport=443 dport=54636 [ASSURED] mark=0 use=1
|
Wait for the curl command to run for 10 seconds or so, then close all windows and applications, and proceed with the data analysis.
 1
 2
 3
 4
 5
 6
 7
 8
 9
10
11
12
13
14
15
16
17
18
19
20
21
22
23
24
25
26
27
28
29
30
31
32
33
34
35
36
37
38
|
# 前面查到的,本地发起请求的端口是 54636,下面以此为过滤条件查询数据

# 首先查询 wlp4s0/eth0 进来的数据,可以看到本机的 dst_ip 为 192.168.31.228.54636
❯ cat wlp4s0.dump | grep 54636 | head -n 15
18:28:28.349321 IP 192.168.31.228.54636 > 198.18.5.130.443: Flags [S], seq 750859357, win 64240, options [mss 1460,sackOK,TS val 3365688110 ecr 0,nop,wscale 7], length 0
18:28:28.350757 IP 198.18.5.130.443 > 192.168.31.228.54636: Flags [S.], seq 2381759932, ack 750859358, win 28960, options [mss 1460,sackOK,TS val 22099541 ecr 3365688110,nop,wscale 5], length 0
18:28:28.350814 IP 192.168.31.228.54636 > 198.18.5.130.443: Flags [.], ack 1, win 502, options [nop,nop,TS val 3365688111 ecr 22099541], length 0
18:28:28.357345 IP 192.168.31.228.54636 > 198.18.5.130.443: Flags [P.], seq 1:518, ack 1, win 502, options [nop,nop,TS val 3365688118 ecr 22099541], length 517
18:28:28.359253 IP 198.18.5.130.443 > 192.168.31.228.54636: Flags [.], ack 518, win 939, options [nop,nop,TS val 22099542 ecr 3365688118], length 0
18:28:28.726544 IP 198.18.5.130.443 > 192.168.31.228.54636: Flags [P.], seq 1:2622, ack 518, win 939, options [nop,nop,TS val 22099579 ecr 3365688118], length 2621
18:28:28.726616 IP 192.168.31.228.54636 > 198.18.5.130.443: Flags [.], ack 2622, win 482, options [nop,nop,TS val 3365688487 ecr 22099579], length 0
18:28:28.727652 IP 192.168.31.228.54636 > 198.18.5.130.443: Flags [P.], seq 518:598, ack 2622, win 501, options [nop,nop,TS val 3365688488 ecr 22099579], length 80
18:28:28.727803 IP 192.168.31.228.54636 > 198.18.5.130.443: Flags [P.], seq 598:644, ack 2622, win 501, options [nop,nop,TS val 3365688488 ecr 22099579], length 46
18:28:28.727828 IP 192.168.31.228.54636 > 198.18.5.130.443: Flags [P.], seq 644:693, ack 2622, win 501, options [nop,nop,TS val 3365688488 ecr 22099579], length 49
18:28:28.727850 IP 192.168.31.228.54636 > 198.18.5.130.443: Flags [P.], seq 693:728, ack 2622, win 501, options [nop,nop,TS val 3365688488 ecr 22099579], length 35
18:28:28.727875 IP 192.168.31.228.54636 > 198.18.5.130.443: Flags [P.], seq 728:812, ack 2622, win 501, options [nop,nop,TS val 3365688488 ecr 22099579], length 84
18:28:28.729241 IP 198.18.5.130.443 > 192.168.31.228.54636: Flags [.], ack 598, win 939, options [nop,nop,TS val 22099579 ecr 3365688488], length 0
18:28:28.729245 IP 198.18.5.130.443 > 192.168.31.228.54636: Flags [.], ack 644, win 939, options [nop,nop,TS val 22099579 ecr 3365688488], length 0
18:28:28.729247 IP 198.18.5.130.443 > 192.168.31.228.54636: Flags [.], ack 693, win 939, options [nop,nop,TS val 22099579 ecr 3365688488], length 0


# 然后再查询 docker0 上的数据,能发现本地的地址为 172.17.0.4.54636
❯ cat docker0.dump | grep 54636 | head -n 20
18:28:28.349299 IP 172.17.0.4.54636 > 198.18.5.130.443: Flags [S], seq 750859357, win 64240, options [mss 1460,sackOK,TS val 3365688110 ecr 0,nop,wscale 7], length 0
18:28:28.350780 IP 198.18.5.130.443 > 172.17.0.4.54636: Flags [S.], seq 2381759932, ack 750859358, win 28960, options [mss 1460,sackOK,TS val 22099541 ecr 3365688110,nop,wscale 5], length 0
18:28:28.350812 IP 172.17.0.4.54636 > 198.18.5.130.443: Flags [.], ack 1, win 502, options [nop,nop,TS val 3365688111 ecr 22099541], length 0
18:28:28.357328 IP 172.17.0.4.54636 > 198.18.5.130.443: Flags [P.], seq 1:518, ack 1, win 502, options [nop,nop,TS val 3365688118 ecr 22099541], length 517
18:28:28.359281 IP 198.18.5.130.443 > 172.17.0.4.54636: Flags [.], ack 518, win 939, options [nop,nop,TS val 22099542 ecr 3365688118], length 0
18:28:28.726578 IP 198.18.5.130.443 > 172.17.0.4.54636: Flags [P.], seq 1:2622, ack 518, win 939, options [nop,nop,TS val 22099579 ecr 3365688118], length 2621
18:28:28.726610 IP 172.17.0.4.54636 > 198.18.5.130.443: Flags [.], ack 2622, win 482, options [nop,nop,TS val 3365688487 ecr 22099579], length 0
18:28:28.727633 IP 172.17.0.4.54636 > 198.18.5.130.443: Flags [P.], seq 518:598, ack 2622, win 501, options [nop,nop,TS val 3365688488 ecr 22099579], length 80
18:28:28.727798 IP 172.17.0.4.54636 > 198.18.5.130.443: Flags [P.], seq 598:644, ack 2622, win 501, options [nop,nop,TS val 3365688488 ecr 22099579], length 46
18:28:28.727825 IP 172.17.0.4.54636 > 198.18.5.130.443: Flags [P.], seq 644:693, ack 2622, win 501, options [nop,nop,TS val 3365688488 ecr 22099579], length 49
18:28:28.727847 IP 172.17.0.4.54636 > 198.18.5.130.443: Flags [P.], seq 693:728, ack 2622, win 501, options [nop,nop,TS val 3365688488 ecr 22099579], length 35
18:28:28.727871 IP 172.17.0.4.54636 > 198.18.5.130.443: Flags [P.], seq 728:812, ack 2622, win 501, options [nop,nop,TS val 3365688488 ecr 22099579], length 84
18:28:28.729308 IP 198.18.5.130.443 > 172.17.0.4.54636: Flags [.], ack 598, win 939, options [nop,nop,TS val 22099579 ecr 3365688488], length 0
18:28:28.729324 IP 198.18.5.130.443 > 172.17.0.4.54636: Flags [.], ack 644, win 939, options [nop,nop,TS val 22099579 ecr 3365688488], length 0
18:28:28.729328 IP 198.18.5.130.443 > 172.17.0.4.54636: Flags [.], ack 693, win 939, options [nop,nop,TS val 22099579 ecr 3365688488], length 0
|
You can see that the dst_ip was indeed changed from 192.168.31.228 (wlp4s0’s ip) to 172.17.0.4 (Container A’s ip) before it entered the docker0 bridge.
How does NAT assign ports?
In the previous section, we actually tested that after the MASQUERADE rule of iptables, only the src ip is modified, but the port is still the same.
However, if NAT does not modify the port of the connection, there is actually a problem. If two containers make requests to ip: 198.18.5.130, port: 443 at the same time, and they happen to use the same src port, there will be a port conflict on the host! Because when these two requests are SNATted, if only the src ip is modified, they will map to the same connection on the host!
How is this problem solved by NAT? I think if you encounter this situation, NAT should choose a different port by certain rules.
You can look through the source code to see this sometime, to be continued…
How to persist the iptables configuration
The first thing to note is that centos7/opensuse 15 have switched to firewalld as the firewall configuration software, and ubuntu18.04 lts have switched to ufw for firewall configuration.
Including docker should also dynamically add iptables configuration at boot time.
For the new systems mentioned above, it is recommended to use firewalld/ufw to configure the firewall directly, or search online for solutions to turn off ufw/firewalld and enable iptables persistence.
The main purpose of this article is to understand the principle of docker container networking, and to lay a good foundation for understanding the kubernetes network plugin calico/flannel later, so I won’t introduce persistence much.
How to implement a container network using iptables + bridge + veth
Docker/Podman both use bridge networks by default, and their underlying implementations are exactly similar. Here’s an example of docker (Podman’s analysis process is basically the same).
Running containers via docker run
First, run a few containers with docker run to check the network status.
 1
 2
 3
 4
 5
 6
 7
 8
 9
10
11
12
13
14
15
16
17
18
19
20
21
22
23
24
25
26
27
28
29
30
31
32
33
34
35
36
37
38
39
40
41
42
43
44
45
46
47
48
49
50
51
52
53
54
55
56
57
58
59
60
61
62
63
64
65
66
67
68
69
70
71
72
73
74
|
# 运行一个 debian 容器和一个 nginx
❯ docker run -dit --name debian --rm debian:buster sleep 1000000
❯ docker run -dit --name nginx --rm nginx:1.19-alpine

# 查看网络接口,有两个 veth 接口(而且都没设 ip 地址),分别连接到两个容器的 eth0(dcoker0 网络架构图前面给过了,可以往前面翻翻对照下)
❯ ip addr ls
...
5: docker0: <BROADCAST,MULTICAST,UP,LOWER_UP> mtu 1500 qdisc noqueue state UP group default
    link/ether 02:42:42:c7:12:ba brd ff:ff:ff:ff:ff:ff
    inet 172.17.0.1/16 brd 172.17.255.255 scope global docker0
       valid_lft forever preferred_lft forever
    inet6 fe80::42:42ff:fec7:12ba/64 scope link
       valid_lft forever preferred_lft forever
100: veth16b37ea@if99: <BROADCAST,MULTICAST,UP,LOWER_UP> mtu 1500 qdisc noqueue master docker0 state UP group default
    link/ether 42:af:34:ae:74:ae brd ff:ff:ff:ff:ff:ff link-netnsid 0
    inet6 fe80::40af:34ff:feae:74ae/64 scope link
       valid_lft forever preferred_lft forever
102: veth4b4dada@if101: <BROADCAST,MULTICAST,UP,LOWER_UP> mtu 1500 qdisc noqueue master docker0 state UP group default
    link/ether 9e:f1:58:1a:cf:ae brd ff:ff:ff:ff:ff:ff link-netnsid 1
    inet6 fe80::9cf1:58ff:fe1a:cfae/64 scope link
       valid_lft forever preferred_lft forever

# 两个 veth 接口都连接到了 docker0 上面,说明两个容器都使用了 docker 默认的 bridge 网络
❯ sudo brctl show
bridge name     bridge id               STP enabled     interfaces
docker0         8000.024242c712ba       no              veth16b37ea
                                                        veth4b4dada

# 查看路由规则
❯ ip route ls
default via 192.168.31.1 dev wlp4s0 proto dhcp metric 600
#下列路由规则将 `172.17.0.0/16` 网段的所有流量转发到 docker0
172.17.0.0/16 dev docker0 proto kernel scope link src 172.17.0.1 linkdown
192.168.31.0/24 dev wlp4s0 proto kernel scope link src 192.168.31.228 metric 600

# 查看 iptables 规则
# NAT 表
❯ sudo iptables -t nat -S
-P PREROUTING ACCEPT
-P INPUT ACCEPT
-P OUTPUT ACCEPT
-P POSTROUTING ACCEPT
-N DOCKER
# 所有目的地址在本机的,都先交给 DOCKER 链处理一波
-A PREROUTING -m addrtype --dst-type LOCAL -j DOCKER
-A OUTPUT ! -d 127.0.0.0/8 -m addrtype --dst-type LOCAL -j DOCKER
# (容器访问外部网络)所有出口不为 docker0 的流量,都做下 SNAT,把 src ip 换成出口接口的 ip 地址
-A POSTROUTING -s 172.17.0.0/16 ! -o docker0 -j MASQUERADE
-A DOCKER -i docker0 -j RETURN

# filter 表
❯ sudo iptables -t filter -S
-P INPUT ACCEPT
-P FORWARD DROP
-P OUTPUT ACCEPT
-N DOCKER
-N DOCKER-ISOLATION-STAGE-1
-N DOCKER-ISOLATION-STAGE-2
-N DOCKER-USER
# 所有流量都必须先经过如下两个表处理,没问题才能继续往下走
-A FORWARD -j DOCKER-ISOLATION-STAGE-1
-A FORWARD -j DOCKER-USER
# (容器访问外部网络)出去的流量走了 MASQUERADE,回来的流量会被 conntrack 识别并转发回来,这里允许返回的数据包通过。
# 这里直接 ACCEPT 被 conntrack 识别到的流量
-A FORWARD -o docker0 -m conntrack --ctstate RELATED,ESTABLISHED -j ACCEPT
# 将所有访问 docker0 的流量都转给自定义链 DOCKER 处理
-A FORWARD -o docker0 -j DOCKER
# 允许所有来自 docker0 的流量通过,不论下一跳是否是 docker0
-A FORWARD -i docker0 ! -o docker0 -j ACCEPT
-A FORWARD -i docker0 -o docker0 -j ACCEPT
# 下面三个表目前啥规则也没有,就是简单的 RETURN,交给后面的表继续处理
-A DOCKER-ISOLATION-STAGE-1 -j RETURN
-A DOCKER-ISOLATION-STAGE-2 -j RETURN
-A DOCKER-USER -j RETURN
|
Next, start a caddy container with the following docker-compose configuration, add a custom network and port mapping, and later verify how docker implements these two networks.
docker-compose.yml reads.
 1
 2
 3
 4
 5
 6
 7
 8
 9
10
11
12
13
14
15
16
|
version: "3.3"
services:
  caddy:
    image: "caddy:2.2.1-alpine"
    container_name: "caddy"
    restart: always
    command: caddy file-server --browse --root /data/static
    ports:
      - "8081:80"
    volumes:
      - "/home/ryan/Downloads:/data/static"
    networks:
    - caddy-1

networks:
  caddy-1:
|
Now start the caddy container with the above configuration, and then check the network status.
  1
  2
  3
  4
  5
  6
  7
  8
  9
 10
 11
 12
 13
 14
 15
 16
 17
 18
 19
 20
 21
 22
 23
 24
 25
 26
 27
 28
 29
 30
 31
 32
 33
 34
 35
 36
 37
 38
 39
 40
 41
 42
 43
 44
 45
 46
 47
 48
 49
 50
 51
 52
 53
 54
 55
 56
 57
 58
 59
 60
 61
 62
 63
 64
 65
 66
 67
 68
 69
 70
 71
 72
 73
 74
 75
 76
 77
 78
 79
 80
 81
 82
 83
 84
 85
 86
 87
 88
 89
 90
 91
 92
 93
 94
 95
 96
 97
 98
 99
100
101
|
# 启动 caddy
❯ docker-compose up -d
# 查下 caddy 容器的 ip
> docker inspect caddy | grep IPAddress
...
    "IPAddress": "172.18.0.2",

# 查看网络接口,可以看到多了一个网桥,它就是上一行命令创建的 caddy-1 网络
# 还多了一个 veth,它连接到了 caddy 容器的 eth0(veth) 接口
❯ ip addr ls
...
5: docker0: <BROADCAST,MULTICAST,UP,LOWER_UP> mtu 1500 qdisc noqueue state UP group default
    link/ether 02:42:42:c7:12:ba brd ff:ff:ff:ff:ff:ff
    inet 172.17.0.1/16 brd 172.17.255.255 scope global docker0
       valid_lft forever preferred_lft forever
    inet6 fe80::42:42ff:fec7:12ba/64 scope link
       valid_lft forever preferred_lft forever
100: veth16b37ea@if99: <BROADCAST,MULTICAST,UP,LOWER_UP> mtu 1500 qdisc noqueue master docker0 state UP group default
    link/ether 42:af:34:ae:74:ae brd ff:ff:ff:ff:ff:ff link-netnsid 0
    inet6 fe80::40af:34ff:feae:74ae/64 scope link
       valid_lft forever preferred_lft forever
102: veth4b4dada@if101: <BROADCAST,MULTICAST,UP,LOWER_UP> mtu 1500 qdisc noqueue master docker0 state UP group default
    link/ether 9e:f1:58:1a:cf:ae brd ff:ff:ff:ff:ff:ff link-netnsid 1
    inet6 fe80::9cf1:58ff:fe1a:cfae/64 scope link
       valid_lft forever preferred_lft forever
103: br-ac3e0514d837: <BROADCAST,MULTICAST,UP,LOWER_UP> mtu 1500 qdisc noqueue state UP group default
    link/ether 02:42:7d:95:ba:7e brd ff:ff:ff:ff:ff:ff
    inet 172.18.0.1/16 brd 172.18.255.255 scope global br-ac3e0514d837
       valid_lft forever preferred_lft forever
    inet6 fe80::42:7dff:fe95:ba7e/64 scope link
       valid_lft forever preferred_lft forever
105: veth0c25c6f@if104: <BROADCAST,MULTICAST,UP,LOWER_UP> mtu 1500 qdisc noqueue master br-ac3e0514d837 state UP group default
    link/ether 9a:03:e1:f0:26:ea brd ff:ff:ff:ff:ff:ff link-netnsid 2
    inet6 fe80::9803:e1ff:fef0:26ea/64 scope link
       valid_lft forever preferred_lft forever


# 查看网桥,能看到 caddy 容器的 veth 接口连在了 caddy-1 这个网桥上,没有加入到 docker0 网络
❯ sudo brctl show
bridge name     bridge id               STP enabled     interfaces
br-ac3e0514d837         8000.02427d95ba7e       no              veth0c25c6f
docker0         8000.024242c712ba       no              veth16b37ea
                                                        veth4b4dada

# 查看路由,能看到新网桥使用的地址段是 172.18.0.0/16,是 docker0 递增上来的
❯ ip route ls
default via 192.168.31.1 dev wlp4s0 proto dhcp metric 600
172.17.0.0/16 dev docker0 proto kernel scope link src 172.17.0.1
# 多了一个网桥的
172.18.0.0/16 dev br-ac3e0514d837 proto kernel scope link src 172.18.0.1
192.168.31.0/24 dev wlp4s0 proto kernel scope link src 192.168.31.228 metric 600

# iptables 中也多了 caddy-1 网桥的 MASQUERADE 规则,以及端口映射的规则
❯ sudo iptables -t nat -S
-P PREROUTING ACCEPT
-P INPUT ACCEPT
-P OUTPUT ACCEPT
-P POSTROUTING ACCEPT
-N DOCKER
-A PREROUTING -m addrtype --dst-type LOCAL -j DOCKER
-A OUTPUT ! -d 127.0.0.0/8 -m addrtype --dst-type LOCAL -j DOCKER
-A POSTROUTING -s 172.18.0.0/16 ! -o br-ac3e0514d837 -j MASQUERADE
-A POSTROUTING -s 172.17.0.0/16 ! -o docker0 -j MASQUERADE
# 端口映射过来的入网流量,都做下 SNAT,把 src ip 换成出口 docker0 的 ip 地址
-A POSTROUTING -s 172.18.0.2/32 -d 172.18.0.2/32 -p tcp -m tcp --dport 80 -j MASQUERADE
-A DOCKER -i br-ac3e0514d837 -j RETURN
-A DOCKER -i docker0 -j RETURN
# 主机上所有其他接口进来的 tcp 流量,只要目标端口是 8081,就转发到 caddy 容器去(端口映射)
# DOCKER 是被 PREROUTEING 链的 target,因此这会导致流量直接走了 FORWARD 链,直接绕过了通常设置在 INPUT 链的主机防火墙规则!
-A DOCKER ! -i br-ac3e0514d837 -p tcp -m tcp --dport 8081 -j DNAT --to-destination 172.18.0.2:80

❯ sudo iptables -t filter -S
-P INPUT ACCEPT
-P FORWARD DROP
-P OUTPUT ACCEPT
-N DOCKER
-N DOCKER-ISOLATION-STAGE-1
-N DOCKER-ISOLATION-STAGE-2
-N DOCKER-USER
-A FORWARD -j DOCKER-USER
-A FORWARD -j DOCKER-ISOLATION-STAGE-1
# 给 caddy-1 bridge 网络添加的转发规则,与 docker0 的规则完全一一对应,就不多介绍了。
-A FORWARD -o br-ac3e0514d837 -m conntrack --ctstate RELATED,ESTABLISHED -j ACCEPT
-A FORWARD -o br-ac3e0514d837 -j DOCKER
-A FORWARD -i br-ac3e0514d837 ! -o br-ac3e0514d837 -j ACCEPT
-A FORWARD -i br-ac3e0514d837 -o br-ac3e0514d837 -j ACCEPT
-A FORWARD -o docker0 -m conntrack --ctstate RELATED,ESTABLISHED -j ACCEPT
-A FORWARD -o docker0 -j DOCKER
-A FORWARD -i docker0 ! -o docker0 -j ACCEPT
-A FORWARD -i docker0 -o docker0 -j ACCEPT
# 这一条仍然是端口映射相关的规则,接受所有从其他接口过来的,请求 80 端口且出口是 caddy-1 网桥的流量
-A DOCKER -d 172.18.0.2/32 ! -i br-ac3e0514d837 -o br-ac3e0514d837 -p tcp -m tcp --dport 80 -j ACCEPT
# 当存在多个 bridge 网络的时候,docker 就会在下面两个 STAGE 链中处理将它们隔离开,禁止互相访问
-A DOCKER-ISOLATION-STAGE-1 -i br-ac3e0514d837 ! -o br-ac3e0514d837 -j DOCKER-ISOLATION-STAGE-2
-A DOCKER-ISOLATION-STAGE-1 -i docker0 ! -o docker0 -j DOCKER-ISOLATION-STAGE-2
-A DOCKER-ISOLATION-STAGE-1 -j RETURN
# 这里延续上面 STAGE-1 的处理,彻底隔离两个网桥的流量
-A DOCKER-ISOLATION-STAGE-2 -o br-ac3e0514d837 -j DROP
-A DOCKER-ISOLATION-STAGE-2 -o docker0 -j DROP
-A DOCKER-ISOLATION-STAGE-2 -j RETURN
-A DOCKER-USER -j RETURN
|
Here, we have briefly analyzed how docker implements bridge networking and port mapping via iptables. With this foundation, you can try to analyze the kubernetes network plugin flannel/calico/cilium in depth later haha.
macvlan/ipvlan mode for Docker/Podman
Note: macvlan and wifi don’t seem to be compatible, so don’t use the wireless interface when testing!
I have introduced the new virtual interfaces macvlan and ipvlan in my previous article on Linux virtual network interfaces.
Currently Podman/Docker support the use of macvlan to build a container network, this mode to create containers directly connected to the external network, containers can have independent external IP, no port mapping, and do not need to use iptables.
This is very similar to the Bridge mode of virtual machines, which is mainly used when you want containers to have independent external IPs.
Here is a detailed analysis of Docker’s macvlan network (Podman should be exactly the same).
 1
 2
 3
 4
 5
 6
 7
 8
 9
10
11
12
13
14
15
16
17
18
19
20
21
22
23
24
25
26
27
28
29
30
31
32
33
|
# 首先创建一个 macvlan 网络
# subnet/gateway 的参数需要和物理网络一致
# 通过 -o parent 设定父接口,我本机的以太网口名称为 eno1
$ docker network create -d macvlan \
  --subnet=192.168.31.0/24 \
  --gateway=192.168.31.1 \
  -o parent=eno1 \
  macnet0

# 现在使用 macvlan 启动一个容器试试
# 建议和我一样,通过 --ip 手动配置静态 ip 地址,当然不配也可以,DHCP 会自动分配 IP
$ docker run --network macnet0 --ip=192.168.31.233 --rm -it buildpack-deps:buster-curl /bin/bash
# 在容器中查看网络接口状况,能看到 eth0 是一个 macvlan 接口
root@4319488cb5e7:/# ip -d addr ls
1: lo: <LOOPBACK,UP,LOWER_UP> mtu 65536 qdisc noqueue state UNKNOWN group default qlen 1000
    link/loopback 00:00:00:00:00:00 brd 00:00:00:00:00:00 promiscuity 0 minmtu 0 maxmtu 0 numtxqueues 1 numrxqueues 1 gso_max_size 65536 gso_max_segs 65535
    inet 127.0.0.1/8 scope host lo
       valid_lft forever preferred_lft forever
8: eth0@if2: <BROADCAST,MULTICAST,UP,LOWER_UP> mtu 1500 qdisc noqueue state UP group default
    link/ether 02:42:c0:a8:1f:e9 brd ff:ff:ff:ff:ff:ff link-netnsid 0 promiscuity 0 minmtu 68 maxmtu 9194
    macvlan mode bridge numtxqueues 1 numrxqueues 1 gso_max_size 64000 gso_max_segs 64
    inet 192.168.31.233/24 brd 192.168.31.255 scope global eth0
       valid_lft forever preferred_lft forever
# 路由表,默认 gateway 被自动配置进来了
root@4319488cb5e7:/# ip route ls
default via 192.168.31.1 dev eth0
192.168.31.0/24 dev eth0 proto kernel scope link src 192.168.31.233

# 可以正常访问 baidu
root@4319488cb5e7:/# curl baidu.com
<html>
<meta http-equiv="refresh" content="0;url=http://www.baidu.com/">
</html>
|
Another network mode supported by Docker is ipvlan (the difference between ipvlan and macvlan I covered in a previous article, so I won’t go into it again), and the creation command is almost identical to macvlan.
 1
 2
 3
 4
 5
 6
 7
 8
 9
10
11
12
13
14
15
16
17
18
19
20
21
22
23
24
25
26
27
28
29
30
31
32
33
34
35
|
# 首先创建一个 macvlan 网络
# subnet/gateway 的参数需要和物理网络一致
# 通过 -o parent 设定父接口,我本机的以太网口名称为 eno1
# ipvlan_mode 默认为 l2,表示工作在数据链路层。
$ docker network create -d ipvlan \
  --subnet=192.168.31.0/24 \
  --gateway=192.168.31.1 \
  -o parent=eno1 \
  -o ipvlan_mode=l2 \
  ipvnet0

# 现在使用 macvlan 启动一个容器试试
# 建议和我一样,通过 --ip 手动配置静态 ip 地址,当然不配也可以,DHCP 会自动分配 IP
$ docker run --network ipvnet0 --ip=192.168.31.234 --rm -it buildpack-deps:buster-curl /bin/bash
# 在容器中查看网络接口状况,能看到 eth0 是一个 ipvlan 接口
root@d0764ebbbf42:/# ip -d addr ls
1: lo: <LOOPBACK,UP,LOWER_UP> mtu 65536 qdisc noqueue state UNKNOWN group default qlen 1000
    link/loopback 00:00:00:00:00:00 brd 00:00:00:00:00:00 promiscuity 0 minmtu 0 maxmtu 0 numtxqueues 1 numrxqueues 1 gso_max_size 65536 gso_max_segs 65535
    inet 127.0.0.1/8 scope host lo
       valid_lft forever preferred_lft forever
12: eth0@if2: <BROADCAST,MULTICAST,UP,LOWER_UP> mtu 1500 qdisc noqueue state UNKNOWN group default
    link/ether 38:f3:ab:a3:e6:71 brd ff:ff:ff:ff:ff:ff link-netnsid 0 promiscuity 0 minmtu 68 maxmtu 65535
    ipvlan  mode l2 bridge numtxqueues 1 numrxqueues 1 gso_max_size 64000 gso_max_segs 64
    inet 192.168.31.234/24 brd 192.168.31.255 scope global eth0
       valid_lft forever preferred_lft forever
# 路由表,默认 gateway 被自动配置进来了
root@d0764ebbbf42:/# ip route ls
default via 192.168.31.1 dev eth0
192.168.31.0/24 dev eth0 proto kernel scope link src 192.168.31.234

# 可以正常访问 baidu
root@d0764ebbbf42:/# curl baidu.com
<html>
<meta http-equiv="refresh" content="0;url=http://www.baidu.com/">
</html>
|
Network implementation for Rootless containers
If the container is also running in Rootless mode, it does not have permission to add virtual network interfaces such as bridge/veth to the host, in which case the container network we described earlier cannot be set up.
So how does podman/containerd(nerdctl) currently build a container network in Rootless mode?
Looking at the documentation, I found that they all use something related to rootlesskit, which provides several implementations of rootless networks, see rootlesskit/docs/network.md
The currently recommended and default solution for podman/containerd(nerdctl) is rootless-containers/slirp4netns
Take containerd(nerdctl) for example, after installing it according to the official documentation, start some random containers, then check iptables / ip addr ls on the host, you will find nothing. This is obviously because containerd in rootless mode cannot change the host’s iptables configuration and virtual network interface. But you can see that the host slirp4netns is running in the background.
1
2
|
❯ ps aux | grep tap
ryan     11644  0.0  0.0   5288  3312 ?        S    00:01   0:02 slirp4netns --mtu 65520 -r 3 --disable-host-loopback --enable-sandbox --enable-seccomp 11625 tap0
|
But I’ve been reading the documentation for a long time and I only see how to create a new namespace using rootlesskit / slirp4netns, but I don’t see how to access an existing slirp4netns namespace…
Using nsenter -a -t 11644 also keeps reporting errors, any program is no such binary …
I’ll revisit it later when I have time…
Anyway, what I can confirm is that it implements container networking by creating a tap virtual interface in a virtual namespace, and the performance is a little bit worse than the network introduced earlier.
nftables
The previous section describes iptables and its application to docker and firewalls. But in fact the major Linux distributions no longer recommend using iptables, and have even renamed iptables to iptables-leagacy .
nftables is now pre-installed and recommended in opensuse/debian/opensuse, and firewalld already uses nftables as its backend by default.
I tested it on opensuse tumbleweed and firewalld added nftables, while docker is still using the old iptables, which means I have two sets of netfilter tools on my machine.
 1
 2
 3
 4
 5
 6
 7
 8
 9
10
11
12
13
14
15
16
17
18
19
20
21
22
23
24
25
26
27
28
29
30
31
32
|
# 查看 iptables 数据
> iptables -S
-P INPUT ACCEPT
-P FORWARD DROP
-P OUTPUT ACCEPT
-N DOCKER
-N DOCKER-ISOLATION-STAGE-1
-N DOCKER-ISOLATION-STAGE-2
-N DOCKER-USER
-A FORWARD -j DOCKER-ISOLATION-STAGE-1
-A FORWARD -o br-e3fbbb7a1b3a -m conntrack --ctstate RELATED,ESTABLISHED -j ACCEPT
-A FORWARD -o br-e3fbbb7a1b3a -j DOCKER
...

# 确认下是否使用了 nftables 的兼容层,结果提示请我使用 iptables-legacy
> iptables-nft -S
# Warning: iptables-legacy tables present, use iptables-legacy to see them
-P INPUT ACCEPT
-P FORWARD ACCEPT
-P OUTPUT ACCEPT

# 查看 nftables 规则,能看到三张 firewalld 生成的 table
> nft list ruleset
table inet firewalld {
    ...
}
table ip firewalld {
    ...
}
table ip6 firewalld {
    ...
}
|
But now kubernetes/docker are still using iptables, nftables I learned is not very useful, I will have time to add later.