ClickHouse is a column-oriented database management system (DBMS) for online analytical processing (OLAP) of queries.
Clickhouse Features
-
A true column-oriented DBMS
In a true column-oriented DBMS, no additional data is stored along with the values. Beyond that, this means that constant length values must be supported to avoid storing their length “numbers” next to the values. For example, a billion UInt8 type values should consume about 1 GB uncompressed, otherwise this would severely impact CPU usage. Even in the uncompressed case, the data must be stored compactly (without any “garbage”), because the speed of decompression (CPU usage) depends largely on the amount of uncompressed data.
ClickHouse is a database management system, not a single database. clickHouse allows to create tables and databases, load data and run queries at runtime without reconfiguring and restarting the server.
-
Data compression
In addition to efficient general-purpose compression codecs with different trade-offs between disk space and CPU consumption, ClickHouse offers specialized codecs for specific types of data, which allows ClickHouse to compete with and outperform more niche databases, such as time series databases.
-
Disk storage of data
Keeping data physically sorted by primary key allows extraction of data for a specific value or range of values with low latency (less than tens of milliseconds). Some column-oriented DBMSs (such as SAP HANA and Google PowerDrill) only work in RAM. This approach encourages allocating a larger hardware budget than is required for real-time analysis.
ClickHouse is designed for common hard drives, which means the cost per GB of data storage is low, but if available, it can also take advantage of SSDs and additional RAM.
-
Multi-core parallel processing
Large queries are naturally parallelized, taking up all necessary resources available on the current server.
-
Distributed processing on multiple servers
In ClickHouse, data can reside on different slices. Each slice can be a set of replicas for fault tolerance. All slices are used to run queries in parallel, transparent to the user.
-
SQL Support
ClickHouse supports SQL-based declarative query language, which in many cases is identical to ANSI SQL standard.
Supported queries include GROUP BY, ORDER BY, subqueries in FROM, JOIN clauses, IN operators, window functions and scalar subqueries.
-
Vector Computing Engine
Data is not only stored by column, but also processed by vectors (part of a column), resulting in high CPU efficiency.
-
Real-time data update
ClickHouse supports tables with primary keys. To quickly perform queries on the range of primary keys, the data is sorted incrementally using merge trees. Thus, data can be continuously added to the table. No locking when ingesting new data.
-
First-level indexes
Physical sorting of data by primary key allows data to be fetched for its specific value or range of values with low latency (less than tens of milliseconds).
-
Secondary indexes
Unlike other database management systems, secondary indexes in ClickHouse do not point to specific rows or ranges of rows. Instead, they let the database know in advance that all rows in certain parts of the data will not match the query filters and not read them at all, so they are called data-skipping indexes.
-
Suitable for online queries
Most OLAP database management systems do not target online queries with sub-second latency. In alternative systems, report build times of tens of seconds or even minutes are often considered acceptable. Sometimes even more effort is needed to prepare reports offline
In ClickHouse, low latency means that queries can be processed without delay while loading user interface pages, without trying to prepare answers in advance. In other words, online.
-
Support for approximate calculations
ClickHouse provides several ways to exchange performance accuracy.
Aggregate functions for approximate calculation of different values, medians and quartiles.
Run queries based on partial (sample) data and get approximate results. In this case, the data retrieved from disk is reduced proportionally.
Run aggregation for a limited number of random keys instead of all keys. Under specific conditions of key distribution in the data, this provides fairly accurate results while using fewer resources.
-
Adaptive join algorithm
ClickHouse adaptively selects how to JOIN multiple tables by preferring the hash join algorithm and falling back to the merge join algorithm if there is more than one large table.
-
Data replication and data integrity support
ClickHouse uses asynchronous multi-master replication. After writing any available replicas, all remaining replicas retrieve their copies in the background. The system maintains the same data on different replicas. Most post-failure recovery is performed automatically or, in complex cases, semi-automatically.
-
Role-based access control
ClickHouse implements user account management using SQL queries and allows role-based access control configurations similar to those found in ANSI SQL standards and popular relational database management systems.
For more features refer to the official documentation:https://clickhouse.com/docs/en/introduction/performance/
Clickhouse Persistence Configuration
Data persistence here uses NFS for persisting data.
Install NFS.
 1
 2
 3
 4
 5
 6
 7
 8
 9
10
11
12
13
14
15
16
17
18
19
20
21
22
23
24
25
26
27
28
29
30
31
32
33
34
35
36
37
38
39
40
41
42
43
44
45
46
47
48
49
50
51
52
53
54
55
56
57
58
59
60
|
#这里我使用单独服务器进行演示,实际上顺便使用一台服务器安装nfs都可以 (建议和kubernetes集群分开,找单独一台机器)
[root@nfs ~]# yum install nfs-utils -y rpcbind

#接下来设置nfs存储目录
[root@nfs ~]# mkdir /data/k8s-volume
[root@nfs ~]# chmod 755 /data/k8s-volume/

#编辑nfs配置文件
[root@nfs ~]# cat /etc/exports
/data/k8s-volume  *(rw,no_root_squash,sync)

#存储目录,*允许所有人连接,rw读写权限,sync文件同时写入硬盘及内存,no_root_squash 使用者root用户自动修改为普通用户
接下来启动rpcbind
[root@nfs ~]# systemctl start rpcbind
[root@nfs ~]# systemctl enable rpcbind
[root@nfs ~]# systemctl status rpcbind
● rpcbind.service - RPC bind service
   Loaded: loaded (/usr/lib/systemd/system/rpcbind.service; enabled; vendor preset: enabled)
   Active: active (running) since 四 2019-12-19 18:44:29 CST; 11min ago
 Main PID: 3126 (rpcbind)
   CGroup: /system.slice/rpcbind.service
           └─3126 /sbin/rpcbind -w

#由于nfs需要向rpcbind进行注册,所以我们需要优先启动rpcbind

#启动NFS
[root@nfs ~]# systemctl restart nfs
[root@nfs ~]# systemctl enable nfs
[root@nfs ~]# systemctl status nfs
● nfs-server.service - NFS server and services
   Loaded: loaded (/usr/lib/systemd/system/nfs-server.service; enabled; vendor preset: disabled)
  Drop-In: /run/systemd/generator/nfs-server.service.d
           └─order-with-mounts.conf
   Active: active (exited) since 四 2019-12-19 18:44:30 CST; 13min ago
 Main PID: 3199 (code=exited, status=0/SUCCESS)
   CGroup: /system.slice/nfs-server.service

#检查rpcbind及nfs是否正常
[root@nfs ~]# rpcinfo |grep nfs
    100003    3    tcp       0.0.0.0.8.1            nfs        superuser
    100003    4    tcp       0.0.0.0.8.1            nfs        superuser
    100227    3    tcp       0.0.0.0.8.1            nfs_acl    superuser
    100003    3    udp       0.0.0.0.8.1            nfs        superuser
    100003    4    udp       0.0.0.0.8.1            nfs        superuser
    100227    3    udp       0.0.0.0.8.1            nfs_acl    superuser
    100003    3    tcp6      ::.8.1                 nfs        superuser
    100003    4    tcp6      ::.8.1                 nfs        superuser
    100227    3    tcp6      ::.8.1                 nfs_acl    superuser
    100003    3    udp6      ::.8.1                 nfs        superuser
    100003    4    udp6      ::.8.1                 nfs        superuser
    100227    3    udp6      ::.8.1                 nfs_acl    superuser

#查看nfs目录挂载权限
[root@nfs ~]# cat /var/lib/nfs/etab
/data/k8s-volume   *(rw,sync,wdelay,hide,nocrossmnt,secure,no_root_squash,no_all_squash,no_subtree_check,secure_locks,acl,no_pnfs,anonuid=65534,anongid=65534,sec=sys,rw,secure,no_root_squash,no_all_squash)

#检查挂载是否正常
[root@nfs ~]# showmount -e 127.0.0.1
Export list for 127.0.0.1:
/data/k8s-volume *
|
Create nfs client, the nfs server address is 192.168.31.101 and the data storage directory is /data/k8s-volume.
 1
 2
 3
 4
 5
 6
 7
 8
 9
10
11
12
13
14
15
16
17
18
19
20
21
22
23
24
25
26
27
28
29
30
31
32
33
34
35
|
kind: Deployment
apiVersion: apps/v1
metadata:
  name: nfs-client-provisioner
spec:
  replicas: 1
  selector:
    matchLabels:
      app: nfs-client-provisioner
  strategy:
    type: Recreate
  template:
    metadata:
      labels:
        app: nfs-client-provisioner
    spec:
      serviceAccountName: nfs-client-provisioner
      containers:
        - name: nfs-client-provisioner
          image: quay.io/external_storage/nfs-client-provisioner:latest
          volumeMounts:
            - name: nfs-client-root
              mountPath: /persistentvolumes
          env:
            - name: PROVISIONER_NAME
              value: fuseim.pri/ifs
            - name: NFS_SERVER
              value: 192.168.31.101           #nfs server 地址
            - name: NFS_PATH
              value: /data/k8s-volume     #nfs共享目录
      volumes:
        - name: nfs-client-root
          nfs:
            server: 192.168.31.101
            path: /data/k8s-volume
|
Next, we need to create a serveraccount to bind the ServiceAccount in nfs-client-provisioner to a ClusterRole of nfs-client-provisioner-runner, which declares The ClusterRole declares some permissions, including CRUD for persistentvolumes, so we can use the ServiceAccount to automatically create PVs.
 1
 2
 3
 4
 5
 6
 7
 8
 9
10
11
12
13
14
15
16
17
18
19
20
21
22
23
24
25
26
27
28
29
30
31
32
33
34
35
36
37
38
|
apiVersion: v1
kind: ServiceAccount
metadata:
  name: nfs-client-provisioner
---
kind: ClusterRole
apiVersion: rbac.authorization.k8s.io/v1
metadata:
  name: nfs-client-provisioner-runner
rules:
  - apiGroups: [""]
    resources: ["persistentvolumes"]
    verbs: ["get", "list", "watch", "create", "delete"]
  - apiGroups: [""]
    resources: ["persistentvolumeclaims"]
    verbs: ["get", "list", "watch", "update"]
  - apiGroups: ["storage.k8s.io"]
    resources: ["storageclasses"]
    verbs: ["get", "list", "watch"]
  - apiGroups: [""]
    resources: ["events"]
    verbs: ["list", "watch", "create", "update", "patch"]
  - apiGroups: [""]
    resources: ["endpoints"]
    verbs: ["create", "delete", "get", "list", "watch", "patch", "update"]
---
kind: ClusterRoleBinding
apiVersion: rbac.authorization.k8s.io/v1
metadata:
  name: run-nfs-client-provisioner
subjects:
  - kind: ServiceAccount
    name: nfs-client-provisioner
    namespace: default
roleRef:
  kind: ClusterRole
  name: nfs-client-provisioner-runner
  apiGroup: rbac.authorization.k8s.io
|
Check if the pod is ok
1
2
3
|
[root@k8s-01 nfs]# kubectl  get pod
NAME                                      READY   STATUS    RESTARTS   AGE
nfs-client-provisioner-7995946c89-n7bsc   1/1     Running   0          13m
|
Create storageclass . Here we declare a Storageclass object named managed-nfs-storage.
1
2
3
4
5
|
apiVersion: storage.k8s.io/v1
kind: StorageClass
metadata:
  name: managed-nfs-storage
provisioner: fuseim.pri/ifs # or choose another name, must match deployment's env PROVISIONER_NAME'
|
Check Status.
1
2
3
|
[root@k8s-01 nfs]# kubectl  get storageclasses.storage.k8s.io
NAME                  PROVISIONER      RECLAIMPOLICY   VOLUMEBINDINGMODE   ALLOWVOLUMEEXPANSION   AGE
managed-nfs-storage   fuseim.pri/ifs   Delete          Immediate           false                  104d
|
Create pvc for clickhouse.
First you need to create a namespace to put ck related.
1
|
$ kubectl create ns test
|
The contents of the pvc yaml file are as follows
 1
 2
 3
 4
 5
 6
 7
 8
 9
10
11
12
13
|
apiVersion: v1
kind: PersistentVolumeClaim
metadata:
  name: clickhouse-pvc
  namespace: test
spec:
  resources:
    requests:
      storage: 10Gi                         #数据大小
  accessModes:
  - ReadWriteMany                            # pvc数据访问类型
  storageClassName: "managed-nfs-storage"    #storageclass 名称
|
Check Status.
1
2
3
|
[root@k8s-01 clickhouse]# kubectl  get pvc -n test
NAME             STATUS   VOLUME                                     CAPACITY   ACCESS MODES   STORAGECLASS          AGE
clickhouse-pvc   Bound    pvc-ee8a47fc-a196-459f-aca4-143a8af58bf3   10Gi       RWX            managed-nfs-storage   25s
|
Clickhouse installation
Since we need to modify the users.xml configuration here and do some configuration parameter jumping, I will download the users.xml here and modify it and mount it using configmap.
1
2
3
4
5
6
7
8
|
#这里可以直接下载我的配置,或者是启动ck在复制users.xml拷贝下来修改
wget https://d.frps.cn/file/kubernetes/clickhouse/users.xml

[root@k8s-01 clickhouse]# kubectl create cm -n test clickhouse-users --from-file=users.xml   #不做配置持久化可以跳过
configmap/clickhouse-users created
[root@k8s-01 clickhouse]# kubectl get cm -n test
NAME               DATA   AGE
clickhouse-users   1      5s
|
The clickhouse yaml file is as follows.
 1
 2
 3
 4
 5
 6
 7
 8
 9
10
11
12
13
14
15
16
17
18
19
20
21
22
23
24
25
26
27
28
29
30
31
32
33
34
35
36
37
38
39
40
41
42
43
44
45
46
47
48
49
50
51
52
53
54
55
56
57
58
59
60
61
62
|
apiVersion: apps/v1
kind: Deployment
metadata:
  labels:
    app: clickhouse
  name: clickhouse
  namespace: test
spec:
  replicas: 1
  revisionHistoryLimit: 10
  selector:
    matchLabels:
      app: clickhouse
  template:
    metadata:
      labels:
        app: clickhouse
    spec:
      containers:
      - image: clickhouse/clickhouse-server
        imagePullPolicy: IfNotPresent
        name: clickhouse
        ports:
        - containerPort: 8123
          protocol: TCP
        resources:
          limits:
            cpu: 1048m
            memory: 2Gi
          requests:
            cpu: 1048m
            memory: 2Gi
        volumeMounts:
        - mountPath: /var/lib/clickhouse
          name: clickhouse-volume
        - mountPath: /etc/clickhouse-server/users.xml
          subPath: users.xml
          name: clickhouse-users
      volumes:
      - name: clickhouse-users
        configMap:
          name: clickhouse-users
          defaultMode: 511
      - name: clickhouse-volume
        persistentVolumeClaim:
          claimName: clickhouse-pvc
      restartPolicy: Always
      terminationGracePeriodSeconds: 30
---
apiVersion: v1
kind: Service
metadata:
  name: clickhouse
  namespace: test
spec:
  ports:
  - port: 8123
    protocol: TCP
    targetPort: 8123
  selector:
    app: clickhouse
  type: ClusterIP
|
Check if the service is working.
1
2
3
4
5
6
7
8
|
Events:
  Type    Reason     Age        From               Message
  ----    ------     ----       ----               -------
  Normal  Scheduled  <unknown>  default-scheduler  Successfully assigned test/clickhouse-bd6cb4f4b-8b6lx to k8s-02
  Normal  Pulling    6m17s      kubelet, k8s-02    Pulling image "clickhouse/clickhouse-server"
  Normal  Pulled     4m25s      kubelet, k8s-02    Successfully pulled image "clickhouse/clickhouse-server"
  Normal  Created    4m20s      kubelet, k8s-02    Created container clickhouse
  Normal  Started    4m17s      kubelet, k8s-02    Started container clickhouse
|
Check pod svc status.
1
2
3
4
5
6
7
|
[root@k8s-01 clickhouse]# kubectl  get pod -n test
NAME                         READY   STATUS    RESTARTS   AGE
clickhouse-bd6cb4f4b-8b6lx   1/1     Running   0          7m4s

[root@k8s-01 clickhouse]# kubectl  get svc -n test
NAME         TYPE        CLUSTER-IP      EXTERNAL-IP   PORT(S)    AGE
clickhouse   ClusterIP   10.100.88.207   <none>        8123/TCP   7m23s
|
pod internal call test.
 1
 2
 3
 4
 5
 6
 7
 8
 9
10
11
12
13
14
15
16
17
18
19
20
21
22
23
24
25
26
27
28
29
30
31
32
33
34
35
36
37
38
39
40
41
42
43
44
45
46
47
48
49
50
51
52
53
54
55
56
57
58
59
60
61
62
63
64
65
66
67
68
69
|
[root@k8s-01 clickhouse]# kubectl exec -it -n test clickhouse-bd6cb4f4b-8b6lx bash     #进入到容器
kubectl exec [POD] [COMMAND] is DEPRECATED and will be removed in a future version. Use kubectl kubectl exec [POD] -- [COMMAND] instead.
root@clickhouse-bd6cb4f4b-8b6lx:/# clickhouse-client                          #连接客户端
ClickHouse client version 21.12.3.32 (official build).
Connecting to localhost:9000 as user default.
Connected to ClickHouse server version 21.12.3 revision 54452.

clickhouse-bd6cb4f4b-8b6lx :) show databases;                     #查看数据库

SHOW DATABASES

Query id: d89a782e-2fb5-47e8-a4e0-1ab3aa038bdf

┌─name───────────────┐
│ INFORMATION_SCHEMA │
│ default            │
│ information_schema │
│ system             │
└────────────────────┘

4 rows in set. Elapsed: 0.003 sec.

clickhouse-bd6cb4f4b-8b6lx :) create database abcdocker                 #创建测试库

CREATE DATABASE abcdocker

Query id: 3a7aa992-9fe1-49fe-bc54-f537e0f4a104

Ok.

0 rows in set. Elapsed: 3.353 sec.

clickhouse-bd6cb4f4b-8b6lx :) show databases;

SHOW DATABASES

Query id: c53996ba-19de-4ffa-aa7f-2f3c305d5af5

┌─name───────────────┐
│ INFORMATION_SCHEMA │
│ abcdocker          │
│ default            │
│ information_schema │
│ system             │
└────────────────────┘

5 rows in set. Elapsed: 0.006 sec.

clickhouse-bd6cb4f4b-8b6lx :) use abcdocker;

USE abcdocker

Query id: e8302401-e922-4677-9ce3-28c263d162b1

Ok.

0 rows in set. Elapsed: 0.002 sec.

clickhouse-bd6cb4f4b-8b6lx :) show tables

SHOW TABLES

Query id: 29b3ec6d-6486-41f5-a526-28e80ea17107

Ok.

0 rows in set. Elapsed: 0.003 sec.

clickhouse-bd6cb4f4b-8b6lx :)
|
Next, we create a Telnet container and test whether it works to access the container directly using svc name.
1
2
3
4
5
6
|
$ kubectl run -n test --generator=run-pod/v1 -i --tty busybox --image=busybox --restart=Never -- sh
/ # telnet clickhouse 8123
Connected to clickhouse

#如果不在同一个命名空间就需要使用clickhouse.test.svc.cluster.local
|
External access to Clickhouse
k8s internal calls we use svc name, external can be implemented via nodeport.
 1
 2
 3
 4
 5
 6
 7
 8
 9
10
11
12
13
14
15
16
17
18
19
20
21
22
23
24
25
26
27
28
29
30
31
32
33
34
35
36
37
|
#svc 外部yaml如下
apiVersion: v1
kind: Service
metadata:
  name: clickhouse-node
  namespace: test
spec:
  ports:
  - port: 8123
    protocol: TCP
    targetPort: 8123
  selector:
    app: clickhouse
  type: NodePort

[root@k8s-01 clickhouse]# kubectl  get svc -n test
NAME              TYPE        CLUSTER-IP      EXTERNAL-IP   PORT(S)          AGE
clickhouse        ClusterIP   10.100.88.207   <none>        8123/TCP         33m
clickhouse-node   NodePort    10.99.147.187   <none>        8123:32445/TCP   8s

#如果用的阿里云托管可以直接使用阿里云LoadBalancer
apiVersion: v1
kind: Service
metadata:
  annotations:
    service.beta.kubernetes.io/alibaba-cloud-loadbalancer-id: "xxxx"
    service.beta.kubernetes.io/alibaba-cloud-loadbalancer-force-override-listeners: "true"
  name: clickhouse-ck
  namespace: test
spec:
  ports:
  - port: 8123
    protocol: TCP
    targetPort: 8123
  selector:
    app: clickhouse
  type: LoadBalancer
|
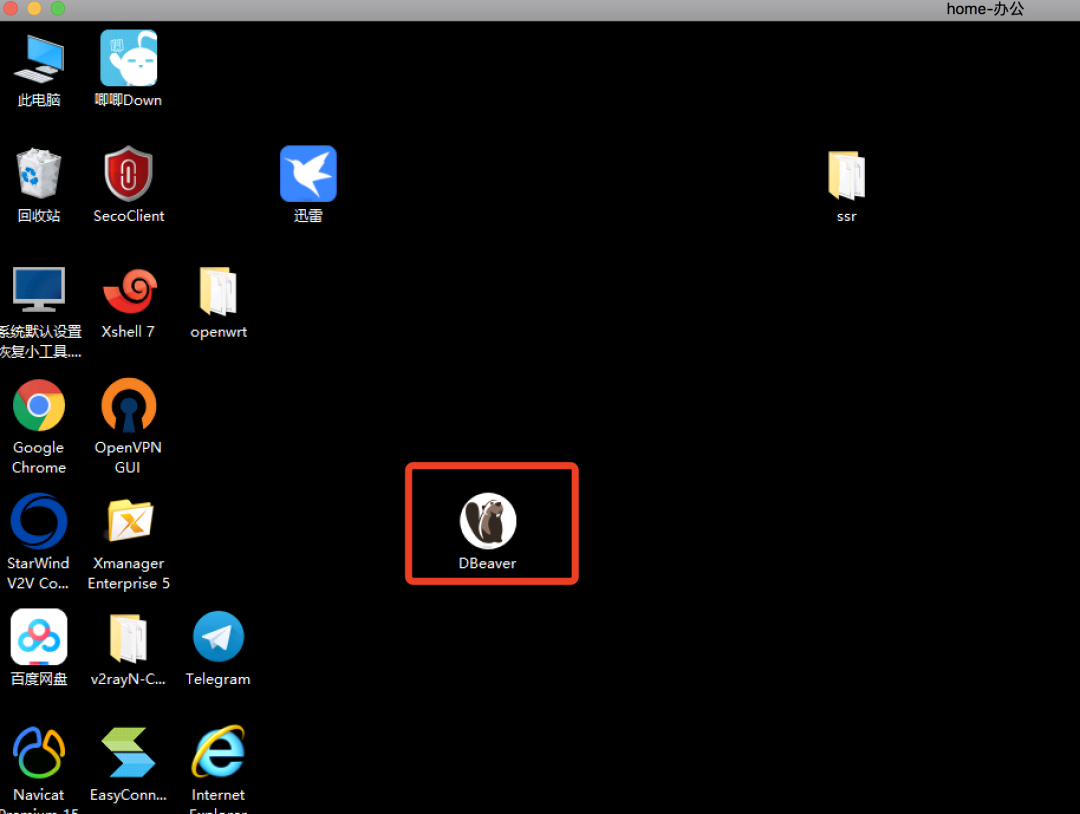
First you need to download Windows Tools
https://dbeaver.io/download/
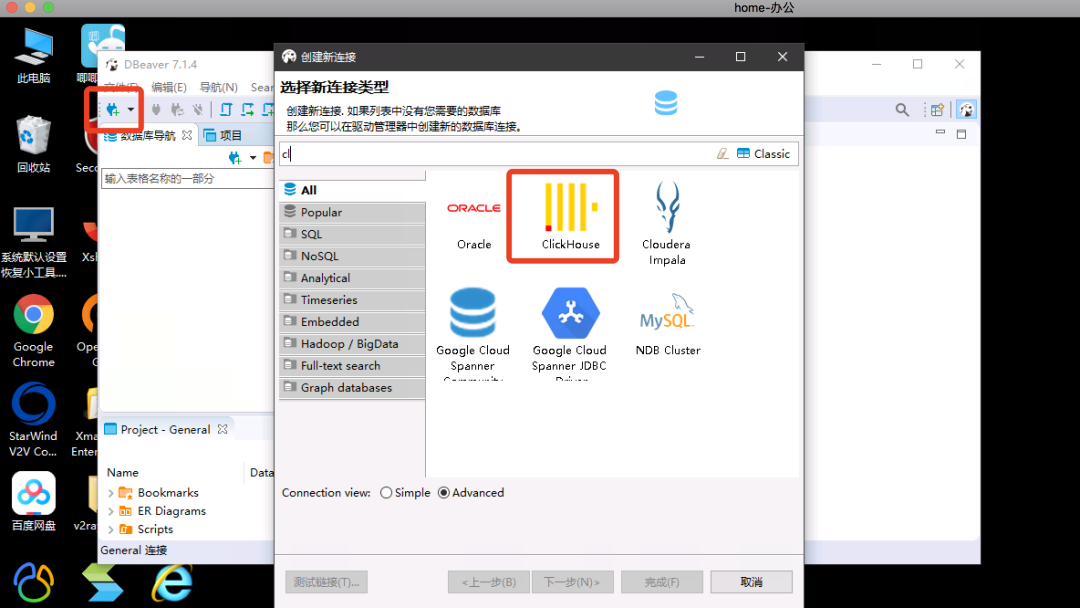
Next, connect to ck and check if the library we created exists (install the downloaded package).
Add clickhouse connection
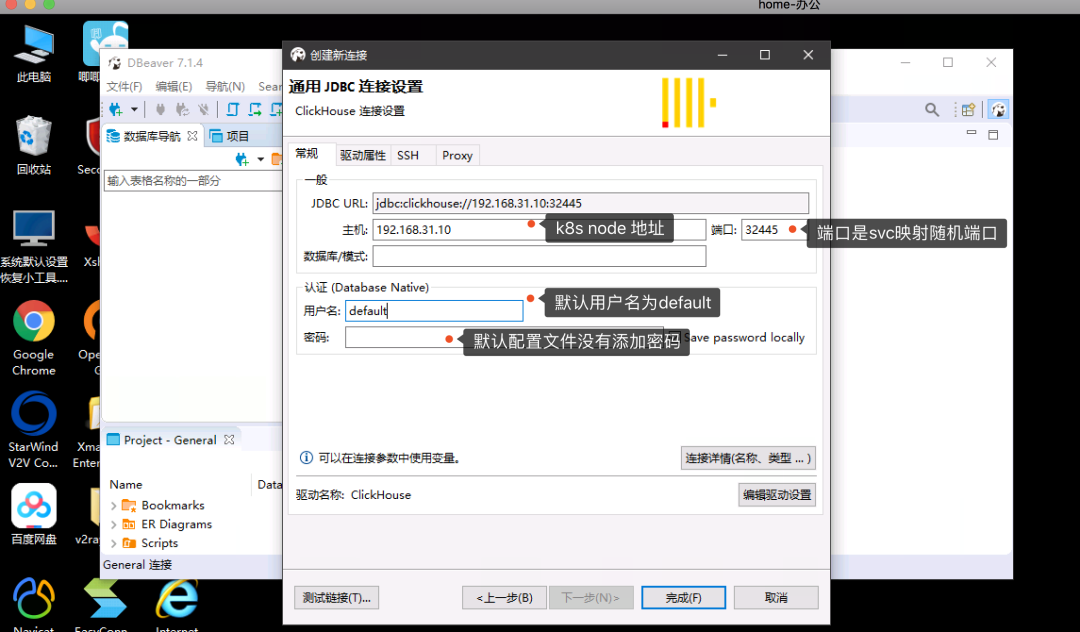
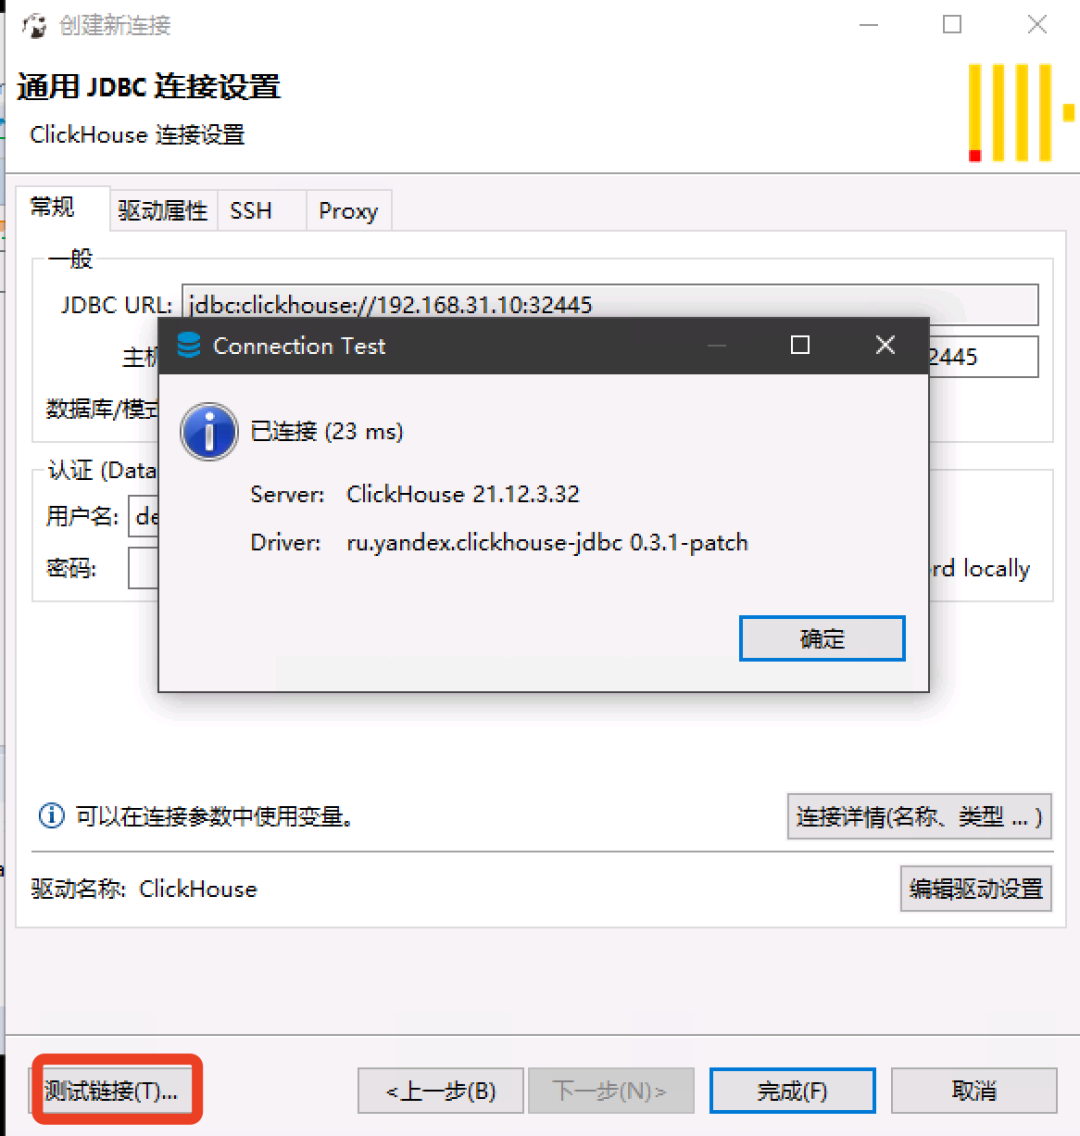
Here you can already see the database we created, which is just an empty database.
If we need to set a password for ck, we need to modify the configmap we mounted.
 1
 2
 3
 4
 5
 6
 7
 8
 9
10
11
12
13
|
root@clickhouse-bd6cb4f4b-8b6lx:/etc/clickhouse-server# cat users.xml |grep pass
            <!-- See also the files in users.d directory where the password can be overridden.
                 If you want to specify password in plaintext (not recommended), place it in 'password' element.
                 Example: <password>qwerty</password>.
                 If you want to specify SHA256, place it in 'password_sha256_hex' element.
                 Example: <password_sha256_hex>65e84be33532fb784c48129675f9eff3a682b27168c0ea744b2cf58ee02337c5</password_sha256_hex>
                 If you want to specify double SHA1, place it in 'password_double_sha1_hex' element.
                 Example: <password_double_sha1_hex>e395796d6546b1b65db9d665cd43f0e858dd4303</password_double_sha1_hex>
                  place 'kerberos' element instead of 'password' (and similar) elements.
                 How to generate decent password:
                 In first line will be password and in second - corresponding SHA256.
                 In first line will be password and in second - corresponding double SHA1.
            <password></password>     #设置免密参数
|