Automated Placement is a core feature of the Kubernetes scheduler that is used to assign new Pods to nodes that meet container resource requests and comply with the scheduling policy. This pattern describes the principles of Kubernetes’ scheduling algorithm and the way it influences scheduling decisions from the outside.
Problems
A reasonably sized microservices-based system consists of dozens or even hundreds of independent processes. Containers and Pods do provide good abstraction instances for packaging and deployment, but do not solve the problem of scheduling these processes on the right nodes. With the large and growing number of microservices, assigning and scheduling them individually to nodes is not a manageable activity.
There are dependencies between containers, dependencies on nodes, and resource requirements, all of which will also change over time. The resources available on the cluster also change over time, by shrinking or expanding the cluster, or by being consumed by containers that have already been scheduled. The way we schedule containers also affects the availability, performance, and capacity of a distributed system. All of this makes scheduling containers to nodes a changing target that must be identified in the midst of change.
Solution
In Kubernetes, the assignment of Pods to nodes is done by the scheduler. As of this writing, this is a highly configurable, still evolving, and rapidly changing area. In this chapter, we will describe the main scheduling control mechanisms, the drivers that influence scheduling, why one or the other option is chosen, and the consequences that result. the Kubernetes scheduler is an effective and time-saving tool. It plays a foundational role in the overall Kubernetes platform, but similar to other Kubernetes components (API Server, Kubelet), it can be run alone or not used at all.
At a very high level, the main operation performed by the Kubernetes scheduler is to monitor each newly created Pod definition from the API Server and assign it to a node. It finds a suitable node for each Pod (whenever such a node is available), whether it is for initial application scheduling, scaling, or when moving an application from an unhealthy node to a healthier one. It also considers runtime dependencies, resource requirements, and high-availability guiding policies by scaling Pods horizontally and also by bringing nearby Pods together for performance and low-latency interactions. However, in order for the scheduler to do its job correctly and allow declarative scheduling, it needs nodes with available capacity, and containers with declarative resource profiles and guidance policies. Let’s look at each of these in more detail.
Available Node Resources
First, a Kubernetes cluster needs nodes with enough resource capacity to run new Pods. each node has the capacity available to run Pods, and the scheduler ensures that the sum of the resources requested by a Pod is less than the capacity of the nodes available for allocation. Considering a node dedicated only to Kubernetes, its capacity is calculated using the formula in Example 1-1.
If you don’t reserve resources for the system daemon that powers the OS and Kubernetes itself, Pods may be scheduled up to the full capacity of the node, which can cause Pods and the system daemon to compete for resources, leading to under-resourcing issues on the node. Also keep in mind that if containers are running on nodes that are not managed by Kubernetes, this is reflected in Kubernetes’ node capacity calculations.
A workaround to this limitation is to run an empty Pod that does nothing but make resource requests for CPU and memory that correspond to the resource usage of untracked containers. Such a Pod is created simply to represent and retain the resource consumption of untracked containers and help the scheduler build a better resource model of the nodes.
Container Resource Demands
Another important requirement for efficient Pod scheduling is that containers have their runtime dependencies and resource requirements defined. It boils down to having containers declare their resource profiles (with requests and limits) and environmental dependencies, such as storage or ports. Only then will Pods be reasonably assigned to nodes and be able to run without affecting each other during peak times.
Scheduling Policy
The final piece of the puzzle is having the right filtering or prioritization policies to meet your specific application needs. The scheduler is configured with a default set of judgment and prioritization policies, which is sufficient for most applications. When the scheduler starts, it can be overridden with a different policy, as shown in Example 1-2.
|
|
- Judgment is a rule that filters out ineligible nodes. For example, PodFitsHostsPortsschedules Pods request certain fixed host ports only on those nodes that still have that port.
- Priority is a rule that ranks available nodes based on preference. For example, LeastRequestedPriority gives a higher priority to nodes that request fewer resources.
Consider the policy of running multiple schedulers in addition to configuring the default scheduler, and allow the Pod to specify which scheduler to schedule. You can give it a unique name to start another instance of the scheduler with a different configuration. Then when defining the Pod, simply add the field .spec.scheduleName to the Pod specification and add your custom scheduler name to the Pod specification and the Pod will be received only by the custom scheduler.
Scheduling Process
Pods are assigned to nodes with a certain capacity based on the scheduling policy. For completeness, Figure 1-1 visualizes, at a high level, how these elements come together and the main steps Pods go through when they are scheduled.
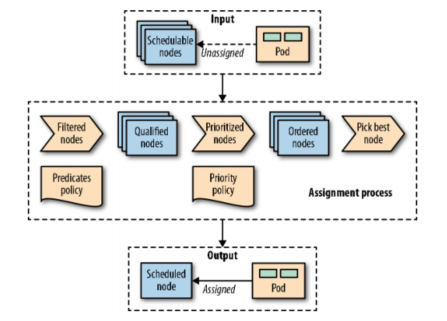
Once a Pod is created that has not yet been assigned to a node, it is selected by the scheduler, along with all available nodes and the set of filtering and prioritization policies. In the first phase, the scheduler applies the filtering policy and removes all unqualified nodes based on the Pod’s criteria. In the second stage, the remaining nodes get sorted by weight. In the last stage, Pods get a node assignment, which is the main result of the scheduling process.
In most cases, it is best to let the scheduler do the Pod-to-node assignment rather than micromanaging the scheduling logic. However, in some cases, you may want to force a Pod to be assigned to a specific node or group of nodes. This assignment can be done using the node selector A .spec.nodeSelector is a Pod field that specifies a mapping of key-value pairs that must exist as labels on a node for that node to be eligible to run a Pod. for example, suppose you want to force a Pod to run on a specific node that has SSD storage or GPU-accelerated hardware. In the Pod definition in Example 1-3, nodeSelector matches disktype: ssd, and only nodes with the label disktype=ssd are eligible to run Pods.
In addition to assigning custom tags to nodes, you can use some of the default tags that are available on every node. Each node has a unique kubernetes.io/hostname tag that allows Pods to be scheduled on the node by their hostname. Other default tags indicating operating system, architecture, and instance type are also useful for scheduling.
Node Affinity
Kubernetes supports many more flexible ways to configure the scheduling process. One such feature is Node Affinity, which is a generalization of the node selector approach described earlier and allows rules to be specified as required or preferred. The required rules must be satisfied for a Pod to be dispatched to a node, while the preferred rules only imply a preference by increasing the weight of matching nodes, and are not mandatory. In addition, the node affinity feature greatly extends the types of constraints you can express, making the language more expressive with operators such as In, NotIn, Exists, DoesNotExist, Gt, or Lt. Example 1-4 demonstrates how to declare node affinity.
|
|
Pod Affinity and Antiaffinity
Node affinity is a more powerful scheduling approach that should be preferred when nodeSelector is not sufficient. This mechanism allows limiting the nodes a Pod can run based on label or field matching, but it does not allow expressing dependencies between Pods to determine the relative position of a Pod. It does not allow the expression of dependencies between Pods to determine where a Pod should be scheduled relative to other Pods. To express how Pods should be distributed for high availability, or packaged and grouped together for improved latency, Pod affinity and anti-affinity can be used.
Node affinities work at the node granularity, but Pods affinities are not limited to nodes and can express rules at multiple topology levels. Using the ==topologyKey field and the matching label == tag, finer granularity rules can be enforced that combine rules for domains such as nodes, racks, cloud provider regions, and zones, as shown in Example 1-5.
|
|
Similar to node affinity, Pod affinity and anti-affinity also have hard and soft requirements, called requiredDuringSchedulingIgnoredDuringExecution and preferredDuringSchedulingIgnoredDuringExecution, respectively. Similarly, as with node affinity, the field names have the IgnoredDuringExecution suffix, which is there for future scalability. For now, Pods will continue to run if the labels on the node change and affinity rules are no longer valid, but future runtime changes may be taken into account.
Taints and Tolerations
A more advanced feature is to control where Pods can be scheduled and allowed to run based on taints and tolerations. While node affinity is a property of Pods that allows Pods to select nodes, taints and tolerations are the opposite. They allow nodes to control which Pods should or should not be scheduled on top of them. Taint is a property of a node that, when present, prevents Pods from scheduling to the node unless the Pod is tolerant to taint. In this sense, taint and tolerance can be thought of as a choice between allowing scheduling to nodes that, by default, cannot be scheduled, and affinity rules as a choice that excludes all non-selected nodes by explicitly choosing on which nodes to run.
Adding a taint to a node by using kubectl: kubectl taint nodes master node-role.kubernetes.io/master="true":NoSchedule has the effect shown in Example 1-6. The matching toleration is added to the Pod as shown in Example 1-7. Note that the values of the key and effect in the taints section of Example 1-6 are the same as the values in the tolerations: section of Example 1-7.
|
|
There are hard taints that prevent scheduling on a node (effect=NoSchedule), soft taints that try to avoid scheduling on a node (effect=PreferNoSchedule), and taints that can evict already running Pods from a node (effect=NoExecute).
Taint and tolerance allow for complex use cases, such as dedicated nodes for a set of exclusive Pods, or forced eviction of Pods from problematic nodes via these tainted nodes.
You can influence scheduling based on the high availability and performance needs of your application, but try not to be too restrictive with the scheduler and back yourself into a corner where you can no longer schedule Pods and strand too many resources. For example, if the granularity of your container resource requirements is too coarse, or the nodes are too small, you may end up with stranded resources in nodes that are not being utilized.
In Figure 1-2, we can see that Node A has 4GB of unused memory because there are no CPUs available to place other containers. Creating containers with smaller resourcere quirements may help improve this situation. Another solution is to use the Kubernetes descheduler, which helps to break up nodes and improve their utilization.
Once a Pod is assigned to a node, the scheduler’s job is done, and it does not change the location of Pod scheduling unless the Pod is deleted and recreated without a node assignment. as you can see, this can lead to resource fragmentation and poor cluster resource utilization over time. Another potential problem is that when a new Pod is scheduled, the scheduler’s decision is based on its view of the cluster. If a cluster is dynamic and the resource profile of a node changes or a new node is added, the scheduler does not correct the previous Pod scheduling. In addition to changing the node capacity, the labels on the nodes can be changed to affect the scheduling, but the past scheduling will not be corrected either.
All of these are scenarios that descheduler can address. kubernetes descheduler is an optional feature that typically runs as a Job when the cluster administrator decides it is time to organize and break up the cluster by rescheduling Pods. descheduler comes with a number of predefined policies that can be enabled, adjusted or disabled. These policies are passed to the descheduler Pod in the form of files, and currently, they are as follows.
-
RemoveDuplicates
This policy ensures that only a single Pod associated with a ReplicaSet or Deployment is running on a single node. If there are more than one Pod, these redundant Pods will be evicted. This policy is useful in cases where a node becomes unhealthy and the management controller starts a new Pod on another healthy node. when an unhealthy node recovers and joins the cluster, there are more Pods running than expected and the descheduler can help bring the number back to the expected number of replicas. Removing duplicates on nodes can also help Pods to be evenly distributed across more nodes when the scheduling policy and cluster topology change after the initial scheduling.
-
LowNodeUtilization
This policy finds underutilized nodes and evicts Pods from other overutilized nodes, hopefully scheduling them on underutilized nodes to better spread and utilize resources. Underutilized nodes are identified as nodes that have less CPU, memory, or Pods than the configured threshold. Similarly, overutilized nodes are those with values greater than the configured target thresholds. Any node between these values is properly utilized and is not affected by this policy.
-
RemovePodsViolatingInterPodAntiAffinity
Pods evicted by this policy violate the anti-affinity rules between Pods, which can happen when anti-affinity rules are added after Pods are scheduled on a node.
-
RemovePodsViolatingNodeAffinity
This policy is used to evict Pods that violate the node affinity rule.
-
Regardless of the policy used, the descheduler avoids evicting the followding.
Of course, all evictions respect the QoS level of Pods, with Best-EffortsPods selected first, then Burstable Pods, and finally Guaranteed Pods as candidates for eviction.
Discussion
Scheduling is an area where you want as little intervention as possible. With predictable requirements and declaring all the active requirements for the container, the scheduler will do its job and place Pods on the most appropriate nodes. However, when that is not enough, there are multiple ways to direct the scheduler toward the desired deployment topology. In summary, from simple to complex, the following methods control Pod scheduling (keep in mind that this list is subject to change with every other version of Kubernetes as of this writing).
-
nodeName
The simplest hard form is Pod to node. This field is best populated by the scheduler, which is driven by policy, rather than manually assigning nodes. Assigning Pods to nodes greatly limits the scope of Pod scheduling. This takes us back to the pre-Kubernetes days, when we explicitly specified the nodes on which to run the application.
-
nodeSelector
Specifies the mapping of key-value pairs. In order for a Pod to be eligible to run on a node, the Pod must have the specified key-value pair as a label on the node. After putting some meaningful labels on the Pod and the node (which you should do anyway), the node selector is one of the simplest and most acceptable mechanisms for controlling scheduler selection.
-
Default scheduling alteration
The default scheduler is responsible for scheduling new Pods to nodes within the cluster, and it does so reasonably well. However, this scheduler’s list of filtering and prioritization policies, order, and weights can be changed if necessary.
-
Pod affinity and anti-affinity
These rules allow a Pod to exhibit dependencies on other Pods, for example, latency requirements for an application, high availability, security constraints, etc.
-
Node affinity
This rule allows a Pod to exhibit dependencies towards a node. For example, consider a node’s hardware, location, etc.
-
Taints and tolerations
Taints and tolerations allow nodes to control which Pods should or should not be scheduled on top of them. For example, commit a node to a group of Pods, or even evict Pods at runtime. another advantage of Taints and tolerations is that if you expand a Kubernetes cluster by adding new nodes with new tags, you don’t need to add new tags on all Pods, but only on the Pods that should be placed on the new nodes.
-
Custom scheduler
If none of the previous methods are good enough, or if you have complex scheduling needs, you can also write your own custom scheduler. The custom scheduler can run instead of or alongside the standard Kubernetes scheduler. ahybrid does this by having a “scheduling extender” process that the standard Kubernetes scheduler calls when making scheduling decisions this process as the final pass. This way you don’t have to implement a full scheduler, but just provide the HTTP API to filter and prioritize nodes. The benefit of having your own scheduler is that you can consider factors outside of the Kubernetes cluster, such as hardware cost, network latency, and better utilization, while assigning Pods to nodes. You can also use multiple custom schedulers along with the default scheduler and configure which scheduler to use for each Pod. Each scheduler can have a different set of policies dedicated to a subset of Pods.
As you can see, there are many ways to control Pod placement, and choosing the right one or combining multiple methods can be challenging. The takeaway from this chapter is to size and declare container resource profiles, label Pods and nodes accordingly, and finally, make only minimal interventions with the Kubernetes scheduler.