Most of the authentication mechanisms in K8s are done with ServiceAccount. Although K8s has the concept of User, there is no resource that corresponds to a “person”, so it is still very difficult to do user management in K8s. The good thing is that K8s provides an alternative way for user management, which is to interface with the OIDC protocol. In this article, we’ll take a look at what the OIDC protocol is and how it is used in K8s.
OIDC Protocol
The OpenID Connect protocol (OIDC protocol) is a standard protocol for authentication based on the OAuth 2.0 protocol, which builds an identity layer on top of OAuth 2.0. Before we introduce the OIDC protocol, let’s take a look at the OAuth 2.0 protocol.
OAuth 2.0 protocol
The main scenario for OAuth 2.0 protocol is third-party application login, for example, we can login to a new website without registering an account and use a Github account.
The OAuth 2.0 protocol defines an authorization layer between the client and the server, where the client only needs to authenticate based on the obtained token, and does not need to store password information. The process is as follows.
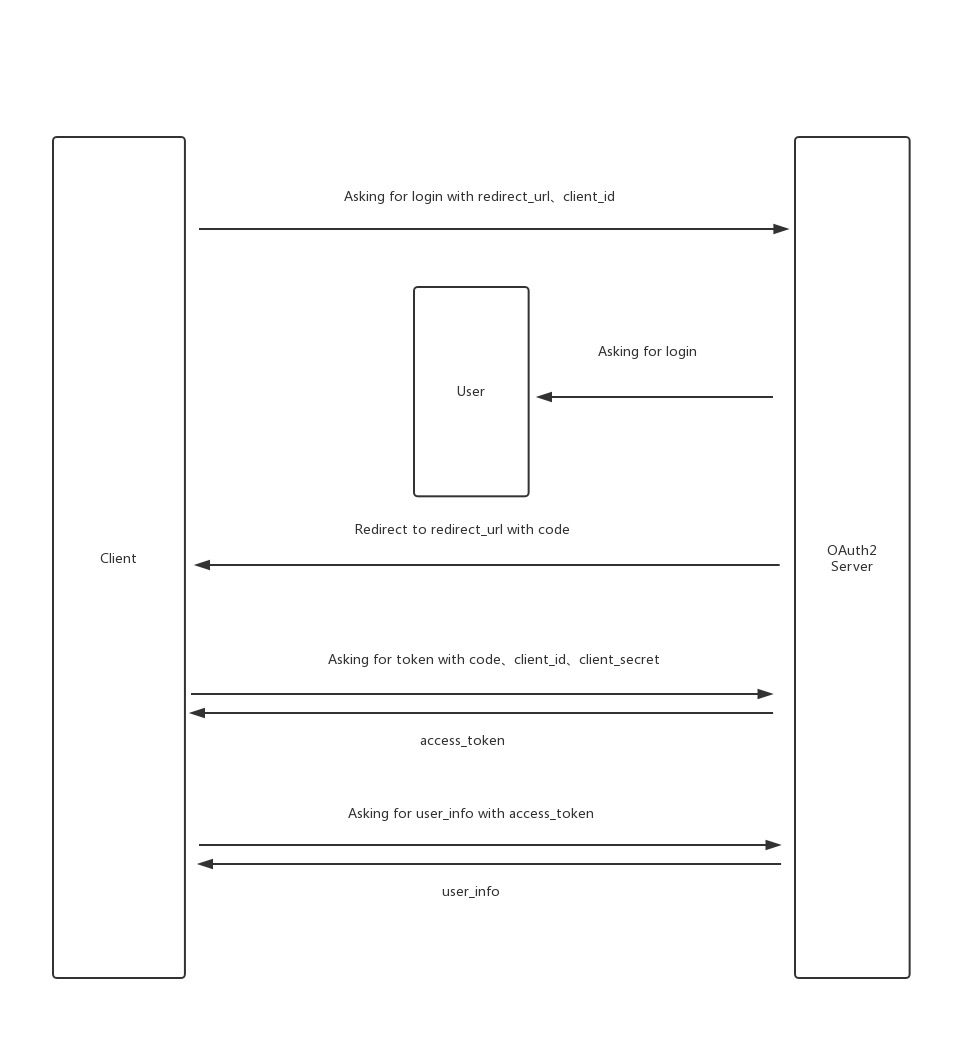
This process is not difficult to understand, but the key point is that compared with the ordinary account password login, there is an additional step of exchanging code for token.
This step seems to be very redundant, but it ensures security because the code needs to be placed in the URL parameter when jumping from OAuth Server to Client, and if the token is directly passed to Client in the URL parameter, it is equivalent to exposing the key to the whole Internet. Therefore, in OAuth 2.0 protocol, the token transfer is placed in a later step, that is, the token is placed in the Response body.
The flow of OIDC protocol
In general, the OAuth 2.0 protocol only provides authorization authentication, but not identity authentication, and this deficiency is filled by the OIDC protocol, which builds another identity layer, as follows.
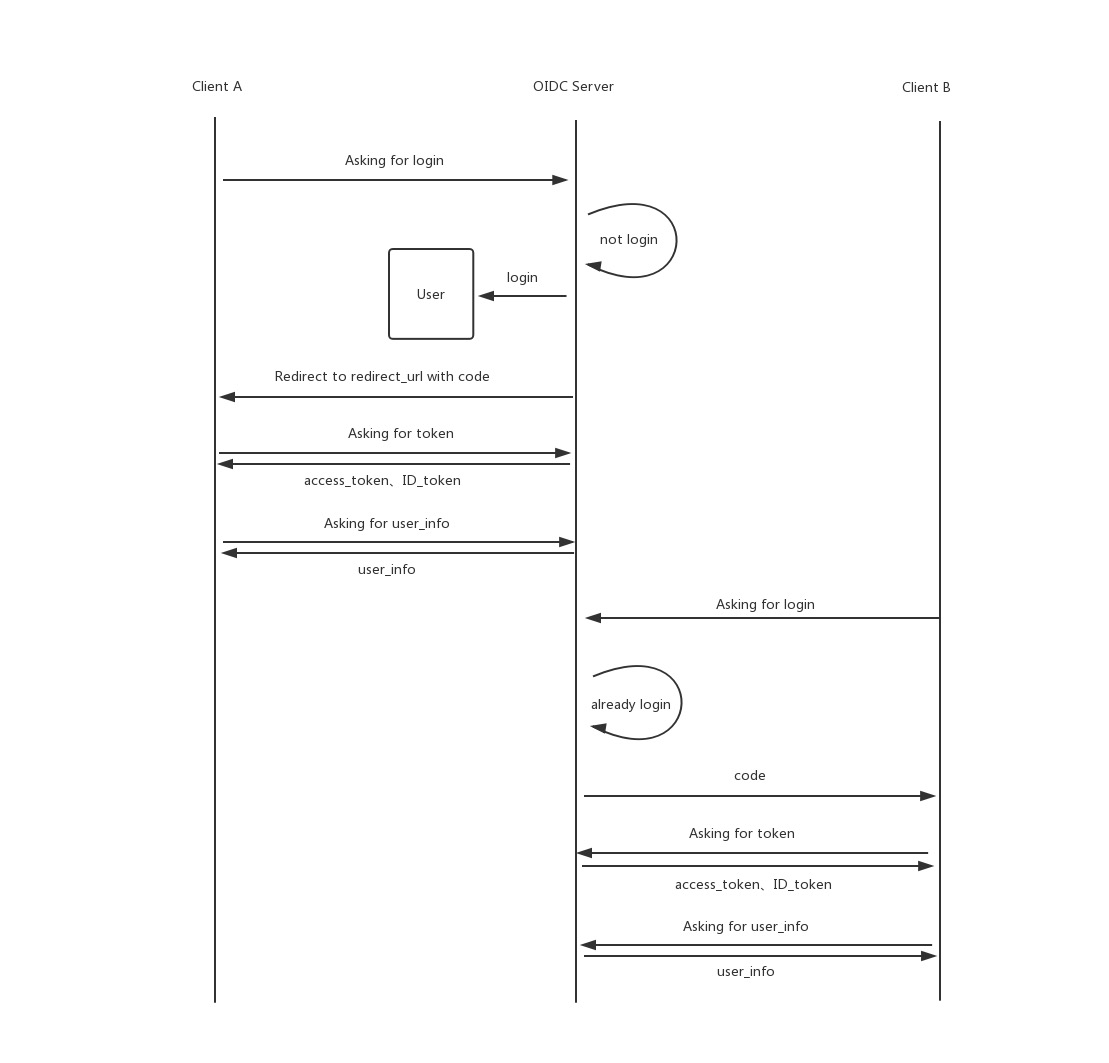
As you can see, when Client A requests to log in, OIDC Server will detect that the user is not logged in, thus starting the login process similar to the OAuth process; and when the same user requests to log in at Client B, OIDC Server will detect that the user is already logged in, and then start the process later.
The main extension of the OIDC login process compared to OAuth is the provision of ID Token, let’s further familiarize ourselves with ID Token.
ID Token
ID Token is a security token whose data format satisfies the JWT format, where a set of user information is provided by the server in the JWT’s Payload. Its main information includes.
- iss(Issuer Identifier): Required. The unique identifier of the person providing the authentication information. Generally an https url (does not contain q uerystring and fragment parts).
- sub(Subject Identifier): Required. iss provides a user identifier that is unique in the iss range, and it is sometimes used by clients to identify unique users. A maximum of 255 ASCII characters.
- aud(Audiences): Required. Identifies the audience of the ID Token. Must contain the client_id of OAuth2.
- exp(Expiration time): Required. Expiration time, after which the ID Token will be invalidated.
- iat(Issued At Time): Required. the time when the JWT was built.
- auth_time(AuthenticationTime): the time at which the user completes authentication.
- nonce: a random string provided by the client when sending the request, used to mitigate replay attacks and also to associate the ID Token with the client’s own Session information.
- acr(Authentication Context Class Reference): optional. indicates an authentication context reference value that can be used to identify the authentication context class.
- amr (Authentication Methods References): optional. Indicates a set of authentication methods.
- azp(Authorized party): Optional. Used in conjunction with aud. This value is used only when the authenticated party and the audience (aud) do not agree, and is rarely used in general.
In addition to the above, the user information of the ID Token can contain other information, configured by the server side.
In addition the ID Token must be JWS signed and JWE encrypted to ensure authentication integrity, non-repudiation and optionally confidentiality.
Principle of using OIDC in K8s
After understanding the flow and principles of the OIDC protocol, let’s look at the principles of using OIDC in K8s.
First, let’s look at the process of using OIDC in K8s.
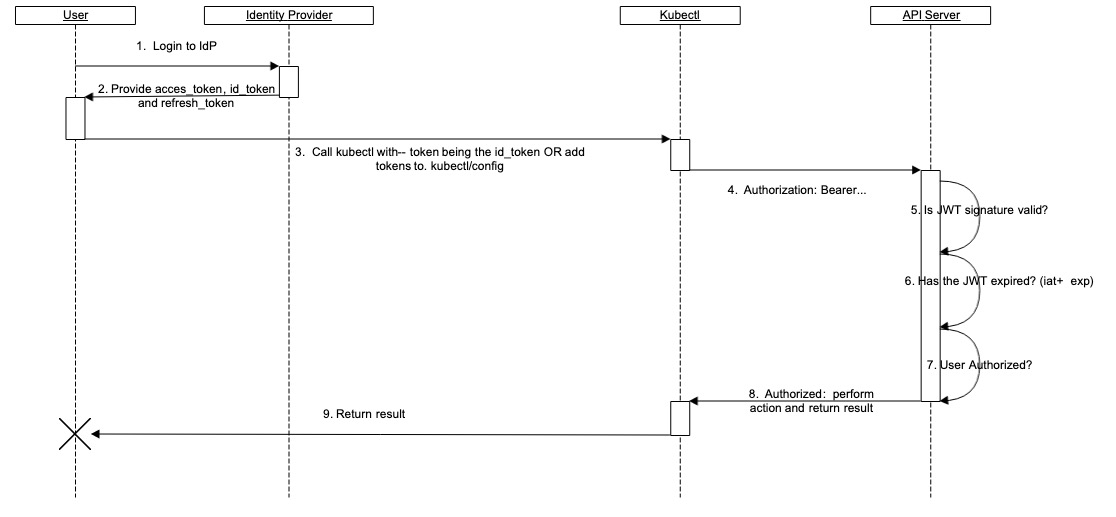
As you can see, APIServer itself does not have much interaction with OIDC Server (i.e. Identity Provider), we need to get the ID Token ourselves and write it to Kubectl’s configuration, which will use it to interact with APIServer.
In addition to the ID Token, we also need to provide the refresh Token to Kubectl, which is used to automatically reacquire the ID Token when it expires.
After APIServer gets the ID Token, there are several steps.
- check if it is in JWT format.
- determine if the Token is expired (based on iat and exp).
- whether the user has permission for this operation.
How does APIServer know which user it is based on the ID Token? This also requires us to specify the corresponding field in the ID Token in the APIServer’s configuration.
Another thing to note is that although user rights management can be done in OIDC Server, we can also find out from the above process that K8s does not recognize the rights management of OIDC Server. Because K8s already has a very good RBAC system, we can leave the privilege control management steps in the K8s cluster.