In Kubernetes, all access and changes to resources revolve around the APIServer. For example, kubectl commands and client-side HTTP RESTFUL requests are all done by calling the APIServer API, so this article focuses on what k8s does for cluster security.
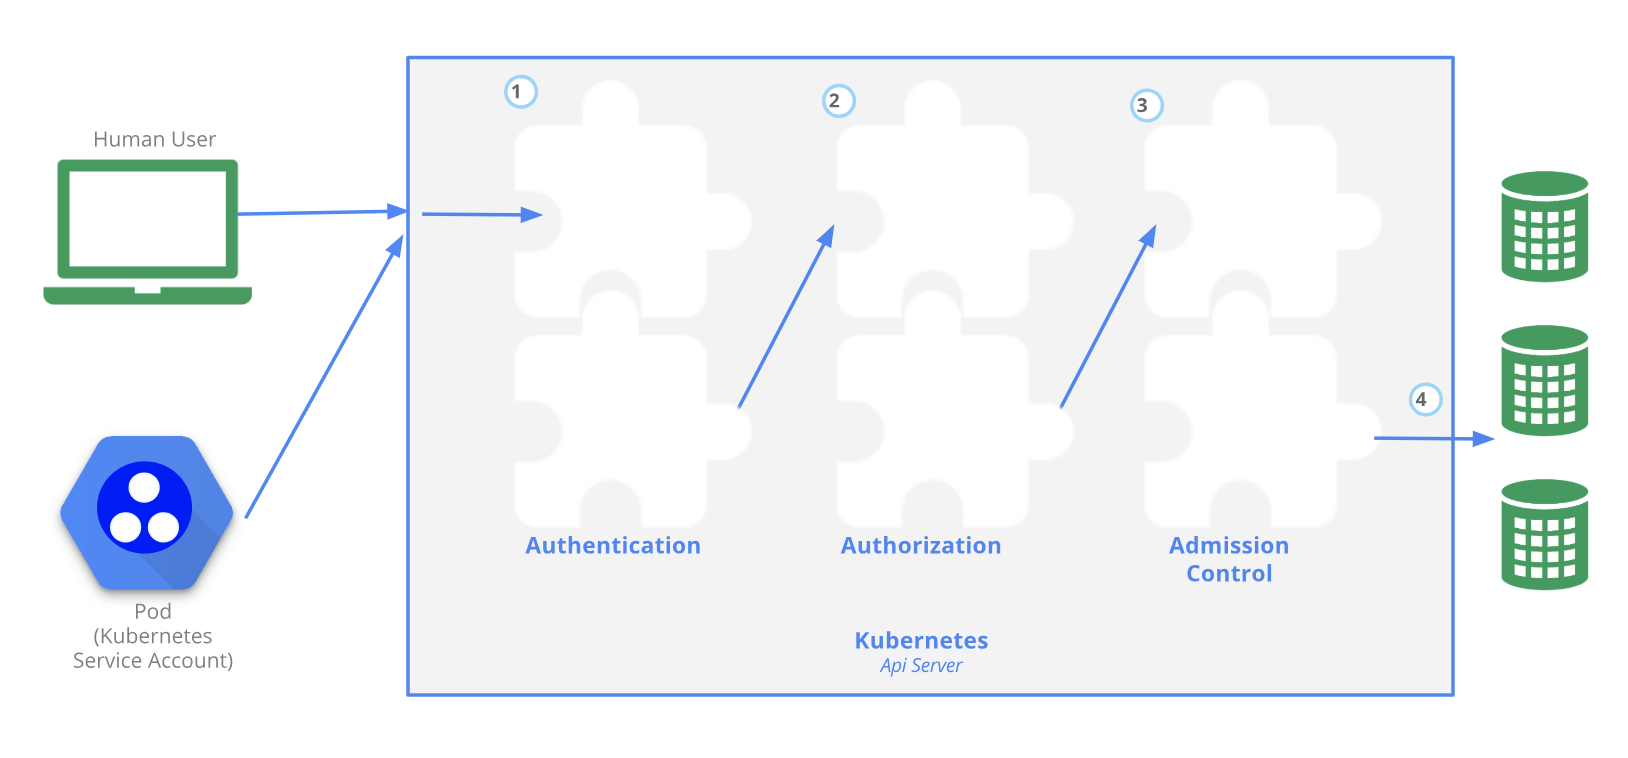
First, the official Kubernetes documentation gives the diagram above. It describes the authentication, authorization, and access control mechanisms of the APIServer that users need to go through before they can access or change resources. These three mechanisms can be understood as follows: first check if the user is legitimate, then check if the request acts with permission, and finally do further authentication or add default parameters.
Users
There are two kinds of users in Kubernetes, the built-in “user” ServiceAccount and what I call a natural person.
A natural person is a “person” as opposed to a resource such as a pod, which can be understood as a person who actually operates the “kubectl” command. admin can distribute private keys, but a natural person can store a file like KeyStone or even a file containing an account password, so there is no API for natural persons in k8s. The natural person is not described as an API object in k8s.
In a typical Kubernetes cluster, the API is typically served on port 443, and the APIServer provides self-signed certificates. When you create a cluster user with kube-up.sh, the certificate is automatically created in $USER/.kube/config, and subsequent accesses to the APIServer with the kubectl command are made with this certificate.
In contrast, ServiceAccounts are described and managed in k8s as API objects, which are bound to a specific namespace and can be created automatically by APIServer or by manually calling the k8s API.
Authentication mechanism (Authentication)
The authentication mechanism in k8s is the first step in the user’s access to the APIServer. Usually a complete HTTP request is made, but this step often only detects the request header or client certificate.
The authentication mechanism currently has several modes: client certificate, bearer tokens, authenticating proxy, HTTP basic auth. There are usually the following ways to use them.
- X509 Client Certs: The client certificate mode requires the
-client-ca-file=<SOMEFILE>parameter to be added to thekubectlcommand, specifying the location of the certificate. 2. - Static Token File:
-token-auth-file=<SOMEFILE>parameter specifies the location ofbearer tokens. - bearer tokens: Add
Authorization: Bearer <TOKEN>to the HTTP request header. - Bootstrap Tokens: Same as
bearer tokens, but in TOKEN format[a-z0-9]{6}. [a-z0-9]{16}. This method is called dynamically-managed Bearer token and is stored inkube-system namespaceassecretand can be created and managed dynamically. Also, enabling this method requires turning on--enable-bootstrap-token-authin APIServer, which is still in alpha stage. - Static Password File: Specify the location of the basic auth file with the parameter
-basic-auth-file=<SOMEFILE>. This basic auth file is in the form of a csv file containing at least three pieces of information: password, username, user id, and this mode requiresAuthorization: Basic BASE64ENCODED(USER:PASSWORD)in the request header when used. - Service Account Tokens: This mode is usually used by pods to access ApiServer by specifying the ServiceAccount in
PodSpec.
In addition to the above listed methods, there are some special access methods, which are not explained in detail here.
Authorization mechanism
Once the user is authenticated, k8s’ authorization mechanism checks the user’s behavior and so on for authorization. In other words, the request itself, whether it has permission restrictions on a resource, namespace, or operation.
There are currently 4 modes of authorization mechanism: RBAC, ABAC, Node, Webhook, and the following is an analysis of each of these 4 modes.
RBAC
Role-based access control (RBAC) is role-based access control, usually for “built-in users”. This mode was developed in k8s v1.6. To enable this mode, set the parameter --authorization-mode=RBAC at APIServer startup.
The API Group used by RBAC is rbac.authorization.k8s.io/v1beta1 until Kubernetes v1.8, when the RBAC module reaches a stable level and the API Group used is rbac.authorization.k8s.io/v1.
Role-based access control means that a user is given a role, and that role usually determines what permissions are available to which resources.
ServiceAccount
First, let’s take a look at the “built-in user”. Most of the time we don’t use the “natural person” feature, but rather the ServiceAccount, and granting a ServiceAccount to another resource makes it possible to access APIServer as a “built-in user”.
Creating a ServiceAccount is as simple as specifying its namespace and name. As an example.
Role & Rolebinding
The most important concepts in RBAC are Role and RoleBinding. A Role defines a set of permissions to operate on Kubernetes API objects, while a RoleBinding defines the relationship between a specific ServiceAccount and a Role.
An example of a Role is as follows.
where
-
namespace: is limited to logical “isolation” and does not provide any actual isolation or multi-tenancy capabilities.
-
rules: defines the permission rules that allow the “actee” to GET and LIST the Pod objects under hdls.
-
apiGroups: is "" for core API Group.
-
resources: refers to the resource type, which can also be divided in detail, specifying the name of the resources that can be manipulated,such as.
-
verbs: refers to specific operations. All operations that can be performed on API objects in the current Kubernetes (v1.11) are “get”, “list”, “watch”, “create”, “update”, “patch”, “delete”.
Look at the RoleBinding example again.
As you can see, this RoleBinding object defines a subjects field, which is the “acted upon”. The subjects can also be User and Group, User is the user in k8s, and Group is the ServiceAccounts.
The roleRef field is used to refer to the Role object we defined earlier (hdls-role) directly by name, thus defining the binding relationship between Subject and Role.
At this point, if we look at the previous ServiceAccount with the kubectl get sa -n hdls -o yaml command, we can see ServiceAccount.secret, because k8s automatically creates and assigns a Secret object to a ServiceAccount. object for a ServiceAccount, and this Secret is the authorization file used to interact with the APIServer: Token. The content of the Token file is usually a certificate or password that is stored in etcd as a Secret object.
At this point, we define the field .spec.serviceAccountName as the ServiceAccount name above in our Pod’s YAML file to be declared for use.
If a Pod does not declare serviceAccountName, Kubernetes will automatically create a default ServiceAccount called default under its Namespace and assign it to the Pod. That is, it has access to most of the APIServer at this point.
ClusterRole & ClusterRoleBinding
Note that both Role and RoleBinding objects are Namespaced objects and they only work on resources within their own Namespace.
If a Role needs to work on a non-Namespaced object (e.g. Node), or if it wants to work on all Namespaces, we need to use ClusterRole and ClusterRoleBinding to do the authorization.
The usage of these two API objects is exactly the same as Role and RoleBinding. Except that they do not have the Namespace field in their definitions.
It’s worth noting that Kubernetes has a number of built-in ClusterRoles reserved for the system, whose names start with system:. In general, these system-level ClusterRoles are bound to the ServiceAccount of the corresponding Kubernetes system component.
In addition, Kubernetes also provides four built-in ClusterRoles for direct use by users.
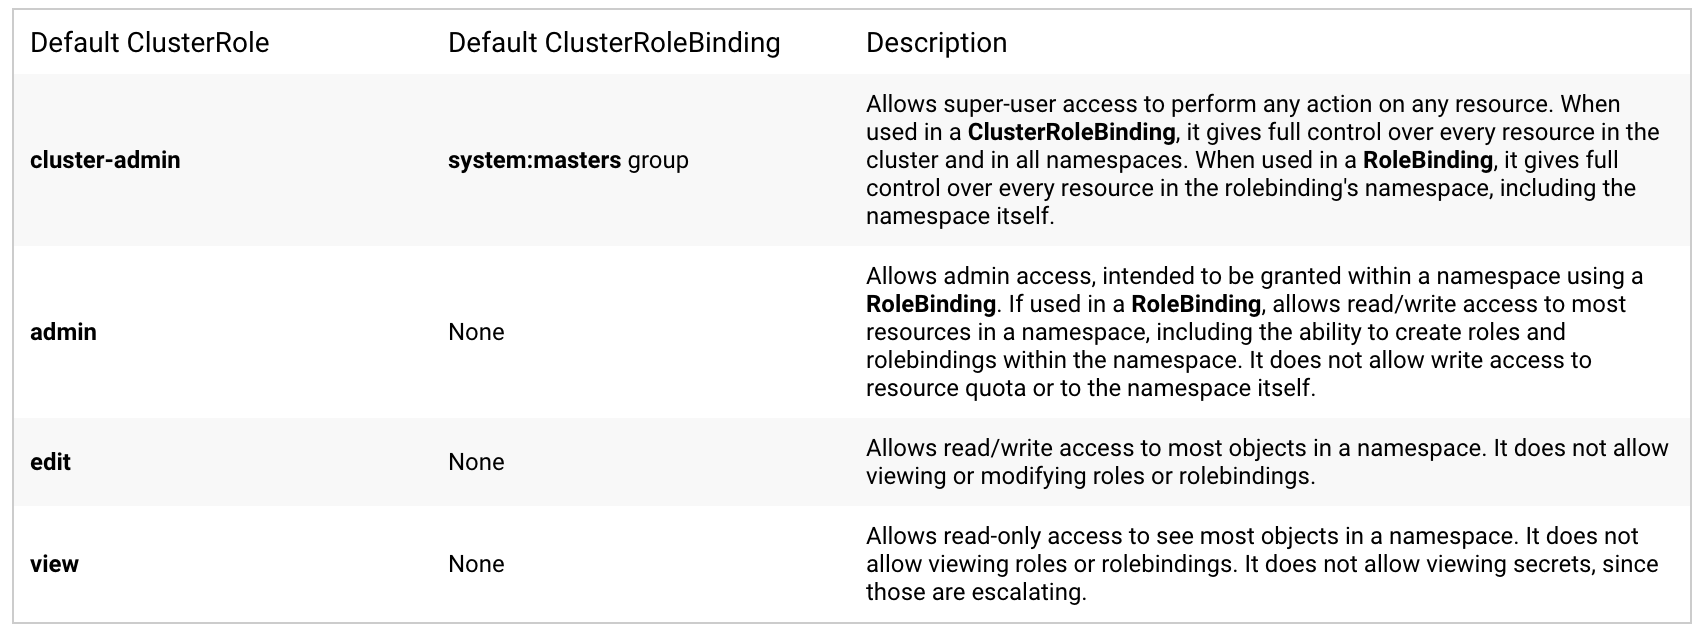
cluster-admin: the highest privilege of the whole cluster. If used in ClusterRoleBinding, it means that all resources in all namespaces in this cluster have the highest privileges and can do whatever they want; if used in RoleBinding, it means that they can do whatever they want in a particular namespace.
admin: administrator privileges. If used in RoleBinding, this means that you have read and write access to most resources in a namespace, including the ability to create Roles and RoleBinding, but no write access to the resource quota or the namespace itself.
edit: write access. In a namespace, you have read and write access to most resources, but no read or write access to the Role and RoleBinding.
view: read access. In a namespace, only read access to most resources, no read access to Role and RoleBinding, and no read access to seccrets.
Aggregated ClusterRoles
After Kubernetes v1.9, there is a new way to define ClusterRole, which is to use aggregationRule to combine multiple ClusterRoles into a new ClusterRole.
Let’s start with an example from the official k8s website.
The rules field does not need to be defined and will be automatically populated by the controller manager.
You can see that aggregationRule is a combination of all ClusterRoles that satisfy the label condition into one ClusterRole, and the new ClusterRole permissions are the sum of the others.
Group
In contrast to User, k8s also has the concept of a Group, which means a group of users. The same concept of “group” applies to the “built-in user” ServiceAccount.
In fact, a ServiceAccount, in Kubernetes, corresponds to a “user” with the following name: system:serviceaccount:<ServiceAccount name>; and it corresponds to a built-in The name of the built-in “user group” is system:serviceaccounts:<Namespace name>.
As an example of the use of Groups, we define subjects in the RoleBinding like this.
This means that the permission rules for this Role apply to all ServiceAccounts in hdls.
If the Group is defined as system:serviceaccounts without specifying Namespace, it means that it applies to all ServiceAccounts in the whole system.
ABAC
Attribute-based access control (ABAC) is attribute-based access control. To enable this mode, you need to enable the --authorization-policy-file=<SOME_FILENAME> and --authorization-mode=ABAC parameters when APIServer starts.
The policy file is used to specify permission rules and must be in the format of a json object for each line. You can specify user or group as a specific object and describe the permissions it has.
In line with the Yaml file, the attributes that must be described are apiVersion, kind, and spec, while spec describes the specific users, resources, and behaviors. See an example.
|
|
This describes that the user bob only has read access to the pod under the namespace projectCaribou. Similarly, the User can be a person, a kubelet or a ServiceAccount, where the ServiceAccount needs to be written in full, e.g. system:serviceaccount:kube-system:default.
If you want to describe everyone under a namespace, you need to use a group, such as.
|
|
Node
The Node authorization mechanism is a special mode of authorization for requests initiated by kubelet. To enable this mode, turn on the parameter --authorization-mode=Node.
By enabling --enable-admission-plugins=... , NodeRestriction, ... to restrict kubelet access to node, endpoint, pod, service, and related resources such as secret, configmap, PV, and PVC.
Webhook
The Webhook pattern is an HTTP callback pattern, a simple event notification implemented via the HTTP POST method. This mode requires the APIServer configuration parameter -authorization-webhook-config-file=<SOME_FILENAME>, and the format of the HTTP configuration file is similar to that of kubeconfig.
|
|
where Cluster refers to the client where the callback is needed, specifying its access certificate and URL; user refers to the identity accessed at the callback, specifying its required certificate and key; and contexts refers to the content of the callback.
Access Controls (Admission Controllers)
After a request has passed the authentication mechanism and authorization authentication, it needs to go through a final layer of screening, namely the access control. The code for this access control module is usually in the APIServer and is compiled into a binary file for execution. The point of this layer of security checks is to check if the request meets the system’s threshold, i.e. if it satisfies the system’s default settings and adds default parameters.
Access control exists in the form of a plugin, which is turned on as kube-apiserver --enable-admission-plugins=NamespaceLifecycle,LimitRanger ...
The shutdown is done as
kube-apiserver --disable-admission-plugins=PodNodeSelector,AlwaysDeny ...
Commonly used access control plugins are.
- AlwaysAdmit: allows all requests to pass, officially opposed because there is no practical point.
- AlwaysPullImages: change the image pull policy to always for each pod, which is used in multi-tenant clusters.
- AlwaysDeny: disallow all requests to go through, objected to by officials because it makes no practical sense.
- DefaultStorageClass: creates a default PV for each
PersistentVolumeClaim. - DefaultTolerationSeconds: if the pod has no tolerance for the taint
node.kubernetes.io/not-ready:NoExecuteandnode.alpha.kubernetes.io/unreachable:NoExecute, create a default 5-minute tolerance for its create default 5-minute tolerances fornotready:NoExecuteandunreachable:NoExecute. - LimitRanger: ensures that each request does not exceed the LimitRange under its namespace, and this access control plugin must be enabled if LimitRange objects are used in Deployment.
- NamespaceAutoProvision: checks if the corresponding namespace exists in the request, and automatically creates it if it does not exist.
- NamespaceExists: checks if the corresponding namespace exists in the request, and rejects the request if it does not exist; * NamespaceLifecycle: checks if the corresponding namespace exists in the request.
- NamespaceLifecycle: ensures that no new resources are created in the deleted namespace.
- NodeRestriction: does not allow kubelet to modify Node and Pod objects.
- PodNodeSelector: controls which label selectors are available under a namespace by reading the annotations and global configuration of the namespace.
- PodPreset: disallows pods that meet pre-set criteria to be created.
- Priority: determine priority via
priorityClassName. - ResourceQuota: guarantees the resource quota under namespace; * ServiceAccount: guarantees the ServiceAccount.
- ServiceAccount: Ensures automatic creation of ServiceAccount, which is recommended to be enabled if ServiceAccount is used.
The above is only a partial list, please move to the official Kubernetes documentation for more details.
Official recommendations.
-
Version > v1.10:
1--enable-admission-plugins=NamespaceLifecycle,LimitRanger,ServiceAccount,DefaultStorageClass,DefaultTolerationSeconds,MutatingAdmissionWebhook,ValidatingAdmissionWebhook,ResourceQuota -
v1.9
1--admission-control=NamespaceLifecycle,LimitRanger,ServiceAccount,DefaultStorageClass,DefaultTolerationSeconds,MutatingAdmissionWebhook,ValidatingAdmissionWebhook,ResourceQuota -
v1.6 - v1.8
1--admission-control=NamespaceLifecycle,LimitRanger,ServiceAccount,PersistentVolumeLabel,DefaultStorageClass,ResourceQuota,DefaultTolerationSeconds -
v1.4 - v1.5
1--admission-control=NamespaceLifecycle,LimitRanger,ServiceAccount,DefaultStorageClass,ResourceQuota