If resources such as Deployment and DaemonSet take on long, online compute for Kubernetes, then regular, short-term, and even one-time offline compute is what Job and CronJob take on.
Job
A Job is actually one or more pods that are defined to execute a task, and when the pod exits after execution, the Job is done. So Job is also called Batch Job, i.e. compute business or offline business.
Job Usage
The YAML definition of a Job is very similar to Deployment. Unlike Deployment, a Job does not need to define spec.selector to specify the pods it needs to control, see an example.
|
|
In this Job, we define a container for the Ubuntu image to output the current time to the /date/date.txt file on the host. Once this Job is created, we can view the Job object.
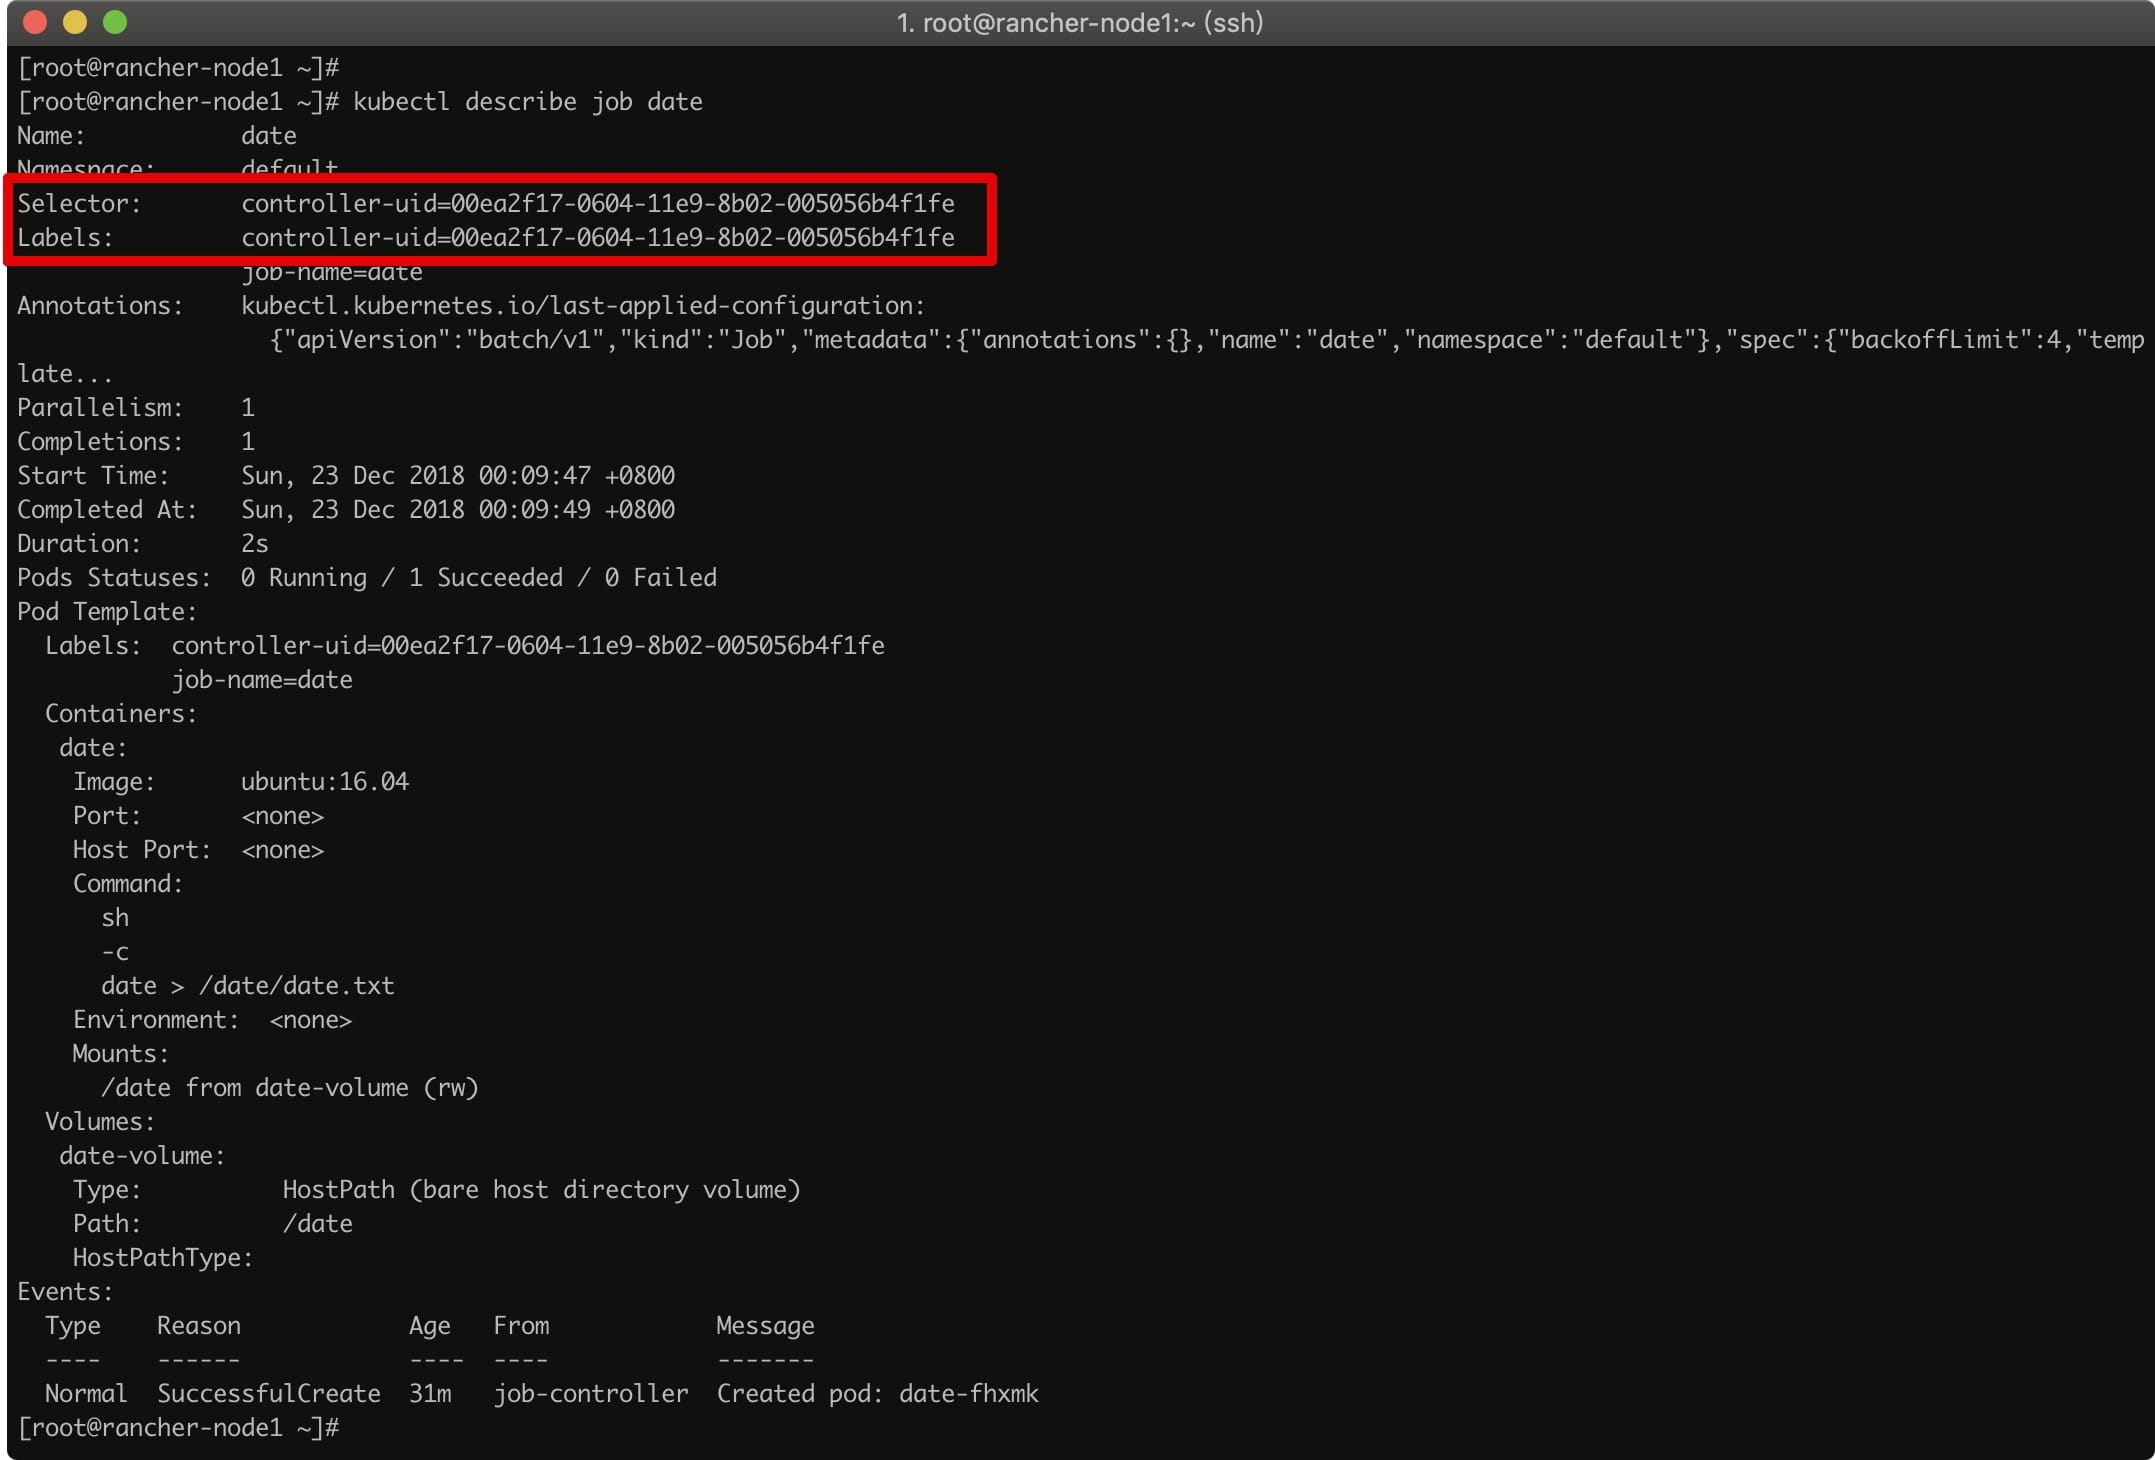
You can see that the Job is created with the Label controller-uid=***** and the corresponding Label Selector, thus ensuring the matching relationship between the Job and the Pod it manages. The same Label can be seen when viewing the pod.
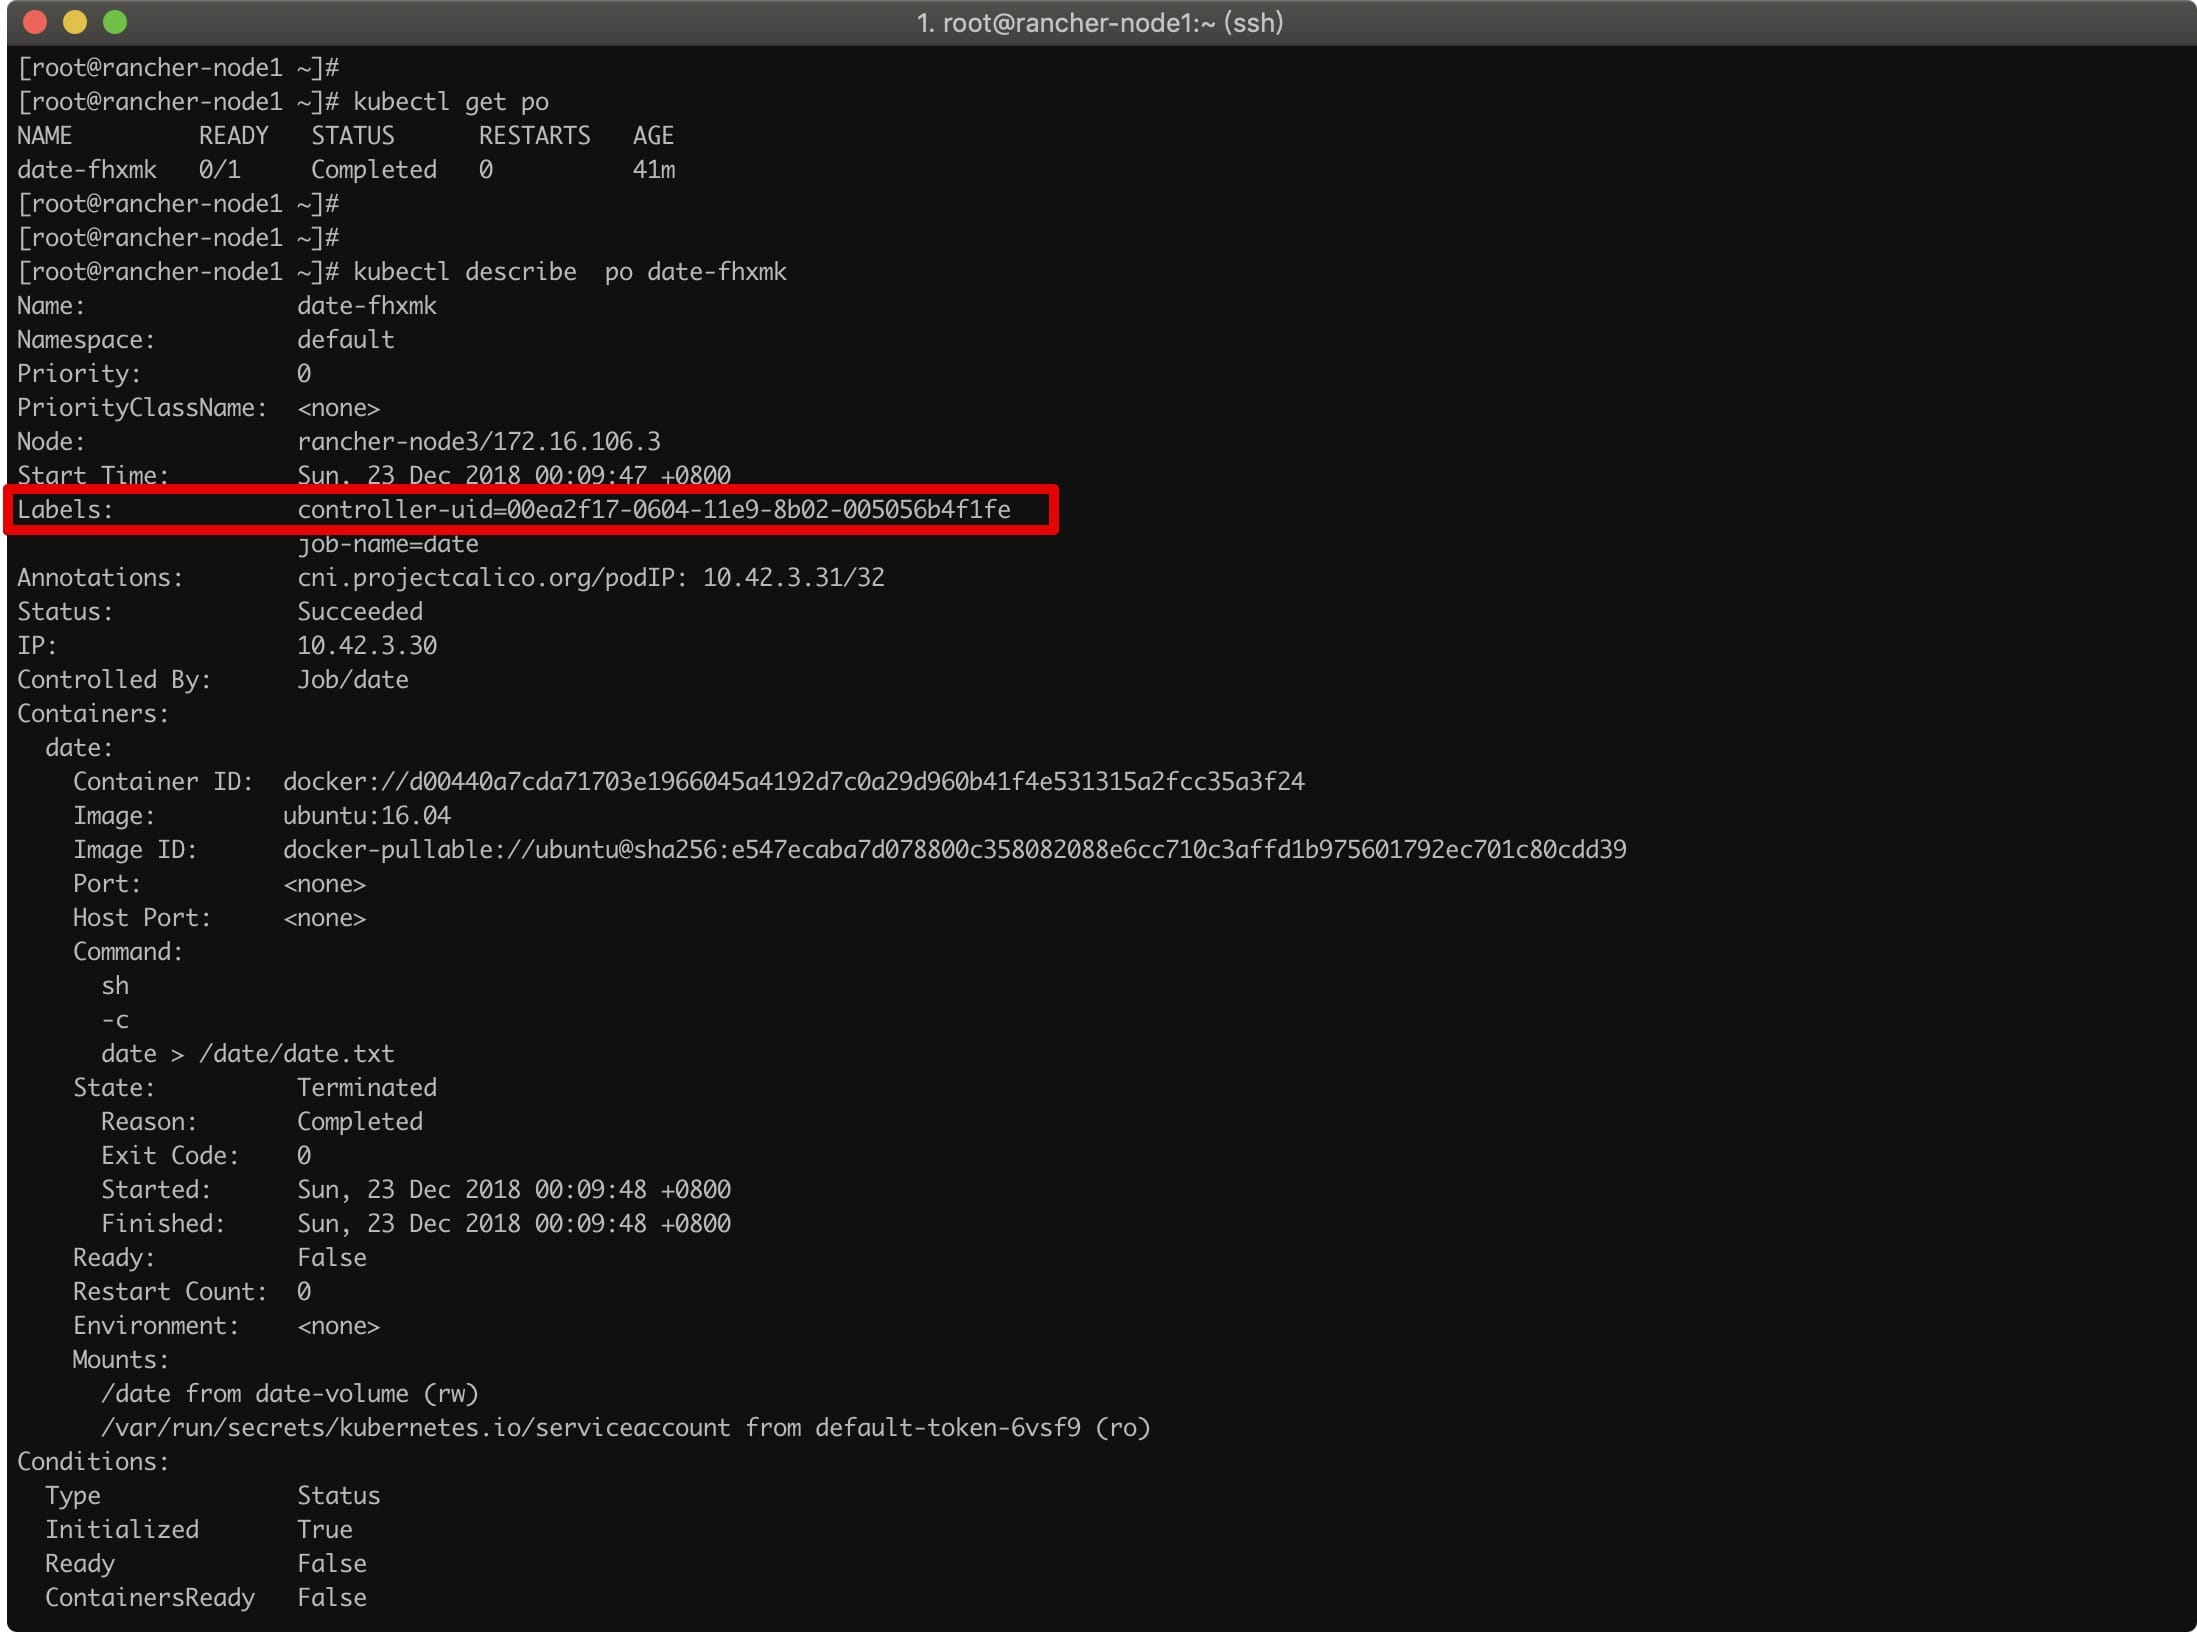
After the pod finishes executing, the status will change to Completed and we can go to the node where the pod was scheduled to see the date.txt file we mounted.
pod restart policy
In Job, the pod restart policy restartPolicy is not allowed to be set to Always, only Never or OnFailure. this is because Job’s pod exits directly after execution, if restartPolicy=Always, the pod will keep executing compute jobs, which is not what we expect. This is not what we want.
A Job can set the maximum runtime of a pod spec.activeDeadlineSeconds, after which all pods of the Job will be terminated.
So, what happens if a pod’s compute job fails under a different restart policy?
restartPolicy=Never
If restartPolicy=Never is set, then the Job Controller will keep trying to create a new pod out of the job, by default 6 times. This value can be set, of course, to the spec.backoffLimit field of the Job object.
Note that the interval to recreate a pod increases exponentially.
restartPolicy=OnFailure
If restartPolicy=Never is set, then the Job Controller will keep restarting the pod.
Job working principle
By looking at the Job creation process, it is easy to see that a Job maintains two values, DESIRED and SUCCESSFUL, which represent spec.completions and the number of successfully exited pods, respectively.
There are two parameters in the Job object that are significant and control the parallel tasks of the Job.
spec.parallelism: defines the maximum number of Pods a Job can start running simultaneously at any given time.
spec.completions: defines the minimum number of Pods that a Job must complete, i.e. the minimum number of Job completions.
After we figure out these two parameters, let’s look at how Job works.
First, the Job Controller controls the pods directly. During the whole Job operation, Job Controller calculates the number of pods that need to be created or deleted based on the actual number of running pods, the number of successfully exited pods, parallelism value, and completions value, and then calls APIServer to perform the specific operation.
To illustrate, let’s take the above example and change the YAML to the following.
|
|
Step 1: Determine that no pods are currently running and the number of successfully exited pods is 0. At most 2 pods are allowed to run in parallel. Send a request to APIServer to create 2 pods. At this time, 2 pods are running, when these 2 pods finish their tasks and exit successfully, enter the second step.
Step 2: The current number of running pods is 0, the number of successful exits is 2, the maximum number of pods allowed to run in parallel, and the minimum number of completed jobs is 3. Then a request to create 1 pod is sent to the APIServer. At this point, 1 pod is running, and when this pod completes its task and exits successfully, it enters the third step.
Step 3: The current number of successfully exited pods is 3, and the minimum number of Job completions is 3. Judge that the Job completes the job.
Batch Scheduling
Based on these characteristics of a Job, we can use it to implement batch scheduling, which means starting multiple computational processes in parallel to process a batch of work items. According to the characteristics of parallel processing, there are three types of Jobs, namely Job template expansion, Job with fixed number of completions, and Job with fixed number of parallelism.
Job template expansion
This is the simplest and most brute-force model, where the YAML of a Job is defined as a template that can be used by the outside world, and an external controller uses these templates to generate a single Job with no parallelism. for example, we rewrite the above example as a template.
|
|
And when you use it, just replace $ITEM.
|
|
In addition to this simple basic template use above, the Kubernetes website also provides a pattern of multiple template parameters implemented in the jinja2 template language.
|
|
To use this mode you need to make sure that the jinja2 package is installed: pip install --user jinja2.
Then run a Python command to replace it.
Or just do a kubectl create.
Job with fixed number of completions
This pattern is a true parallel work pattern with a fixed number of completions for a Job.
In this pattern, we need a queue to store work items, such as RabbitMQ, and we need to put the tasks to be processed into work items in the task queue first. When each pod is created, it gets a task from the queue and removes it from the queue when it finishes, until the defined number of completions is completed.
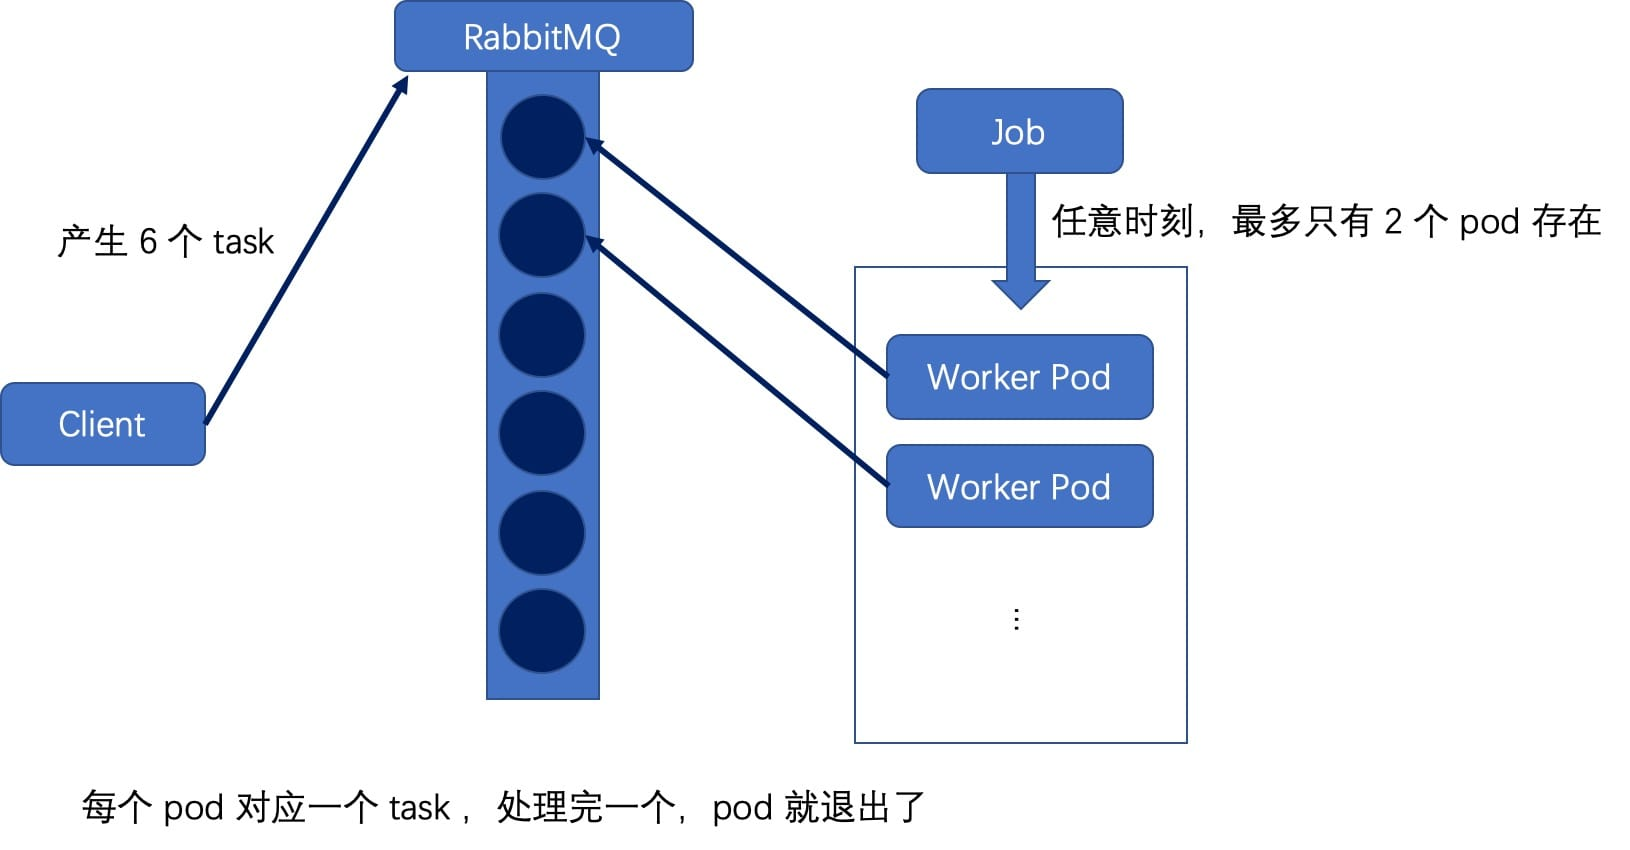
The above diagram depicts the schematic of a Job with completions=6 and parallelism=2. RabbitMQ is chosen to act as the work queue here; the external producer generates 6 tasks and puts them in the work queue; BROKER_URL is defined in the pod template to act as the consumer. Once the Job is created, it will consume these tasks with a concurrency of 2 until they are all completed. The yaml file is as follows.
|
|
Job with fixed parallelism number
The last pattern is to specify parallelism without setting a fixed value of completions.
Each pod goes to the queue to get a job and continues to go to the queue when it finishes, until there are no more jobs in the queue and the pod exits. In this case, as soon as one pod successfully exits, it means that the whole Job is finished. This pattern corresponds to the scenario where the total number of tasks is not fixed.
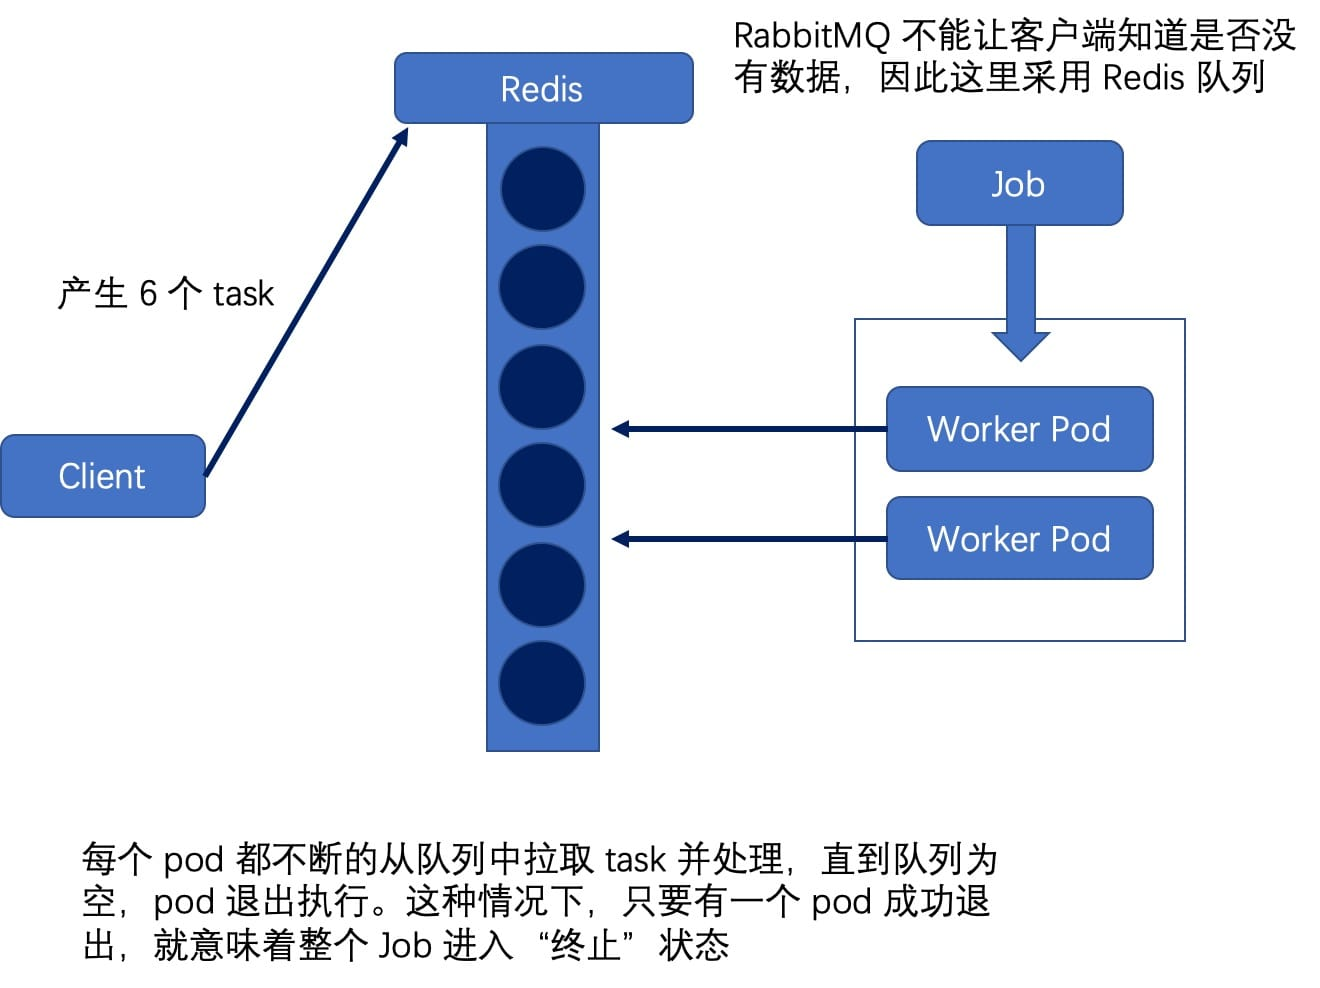
The above diagram depicts a Job with a parallelism of 2. RabbitMQ cannot let the client know if there is no data, so a Redis queue is used here; each pod goes to the queue and consumes one job after another until the queue is empty and exits. The corresponding yaml file is as follows.
CronJob
Kubernetes introduced the CronJob object in v1.5, as the name implies, it is a timed task, similar to Linux Cron.
|
|
CronJob is actually a controller for a Job object, which needs to define a Job template, i.e. jobTemplate field; in addition, its timing expression schedule is basically copied from the Linux Cron expression.
|
|
After the CronJob object is created, the CronJob will record the time of the last Job execution.
|
|
If some timed jobs are special, the next new Job is created before a Job has finished executing. In this case, the specific policy can be defined by setting the spec.concurrencyPolicy field.
- concurrencyPolicy=Allow, which is also the default case, meaning that these Jobs can exist simultaneously.
- concurrencyPolicy=Forbid, which means that no new Pods are created and the creation cycle is skipped.
- concurrencyPolicy=Replace, which means that the newly created Job replaces the old, unexecuted Job.
The number of Job creation failures tolerated by Kubernetes is 100, but its failure time window can be customized. That is, the field spec.startingDeadlineSeconds can be used to set this time window in seconds, which means that the maximum number of jobs tolerated within this time window is 100, and if it exceeds 100, the Job will not be executed again.