Nginx is a web server that acts as a reverse proxy, load balancer, mail proxy and HTTP cache, and follows a master-slave architecture.
A complicated term and a confusing definition filled with big confusing words, right? Don’t worry, I can help you first understand the basics of the architecture and terminology in Nginx. Then, we’ll move on to installing and creating Nginx configurations.
To make things easy, just remember: Nginx is an amazing web server .
Simply put, a web server is like a middleman. For example, suppose you want to go to www.myfreax.com and enter the URL https://myfreax.com , the browser will find the web server address of that server, and https://myfreax.com will then direct it to the back-end server that returns the response to the client.
Proxy and reverse proxy
The basic function of Nginx is to proxy. Therefore, it is important to understand what proxying and reverse proxying are.
Proxies
We have a client (> = 1), and an intermediate web server (in this case, we call it a proxy). The main thing that happens is that the Internent server doesn’t know which client is requesting. Let me explain it with a schematic.

In this case, let client1 and client2 send the request request1 and request2 to the server through the proxy server. Now, the server from the Internet backend will not know whether request1 was sent by client1 or client2, but will instead perform the operation directly back to the proxy and then back to clientX.
Reverse Proxy
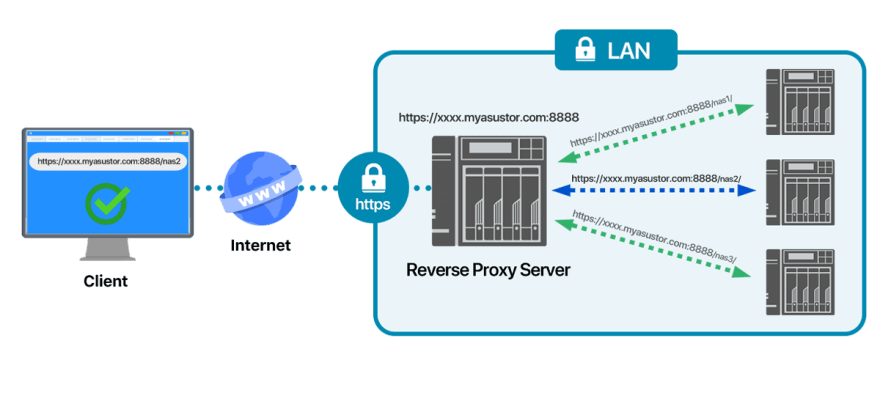
In the simplest terms, a reverse proxy is the opposite of a proxy. Here, we will assume that there is a client, an intermediate web server and several back-end servers (> = 1). Let’s do it with a diagram sketch!

In this case, the client will send the request through the web server. Now, the web server will be directed to any of the many servers by an algorithm and then the response will be sent back to the client via the web server. So here, the client is not aware of the back-end server with which it is interacting.
Load Balancing
Another new term, but this one is easier to understand because it is an example application of reverse proxy itself.
Let’s talk about the basic differences. In load balancing, you must have 2 or more backend servers, but in a reverse proxy setup, this is not required. It can even be used with 1 backend server.
Let’s look behind the scenes, if we have a large number of requests from clients, this load balancer will check the status of each backend server and distribute the requests and then send the responses to the clients faster.
Stateful vs. stateless applications
Stateful applications
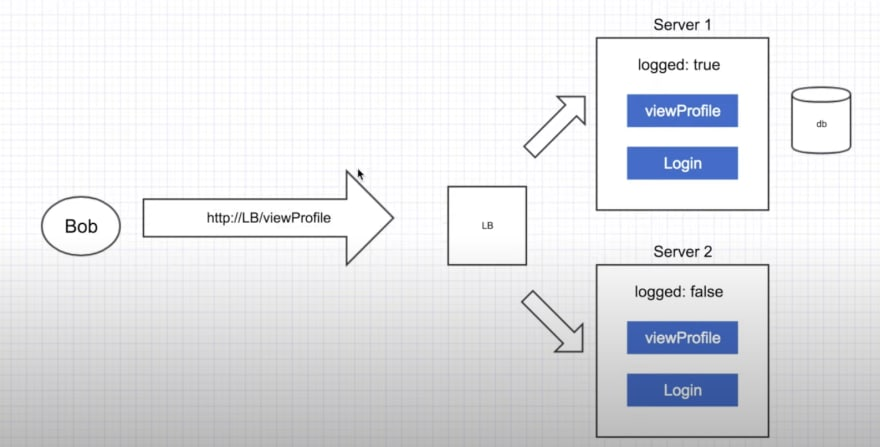
This application stores an additional variable to hold information that is only available for a single instance of the server.
By this I mean that if some information is stored for the backend server server1, some information will not be stored for server server2, so the client (in this case Bob) interacting may/may not get the desired result, as it may interact with server1 or server2. In this case, server1 will allow Bob to view the configuration file, while server2 will not. Therefore, even though it blocks many API calls to the database and is faster, it may cause this problem on a different server.
Stateless Applications
Now, statelessness is an API call to the database, but there are fewer problems when the client interacts with a different back-end server.

I know you don’t understand what I mean. Quite simply, if I send a request from the client to send a request from the back-end server server1 through the web server, it will provide the client with a token to use to access any other requests. The client can use the token and send the request to the web server. The web server will send the request along with the token to any back-end server, and each server will provide the same expected output.
What is Nginx?
Nginx is a web server, and I’ve been using the term web server throughout this blog so far. Honestly it’s like man in the middle .

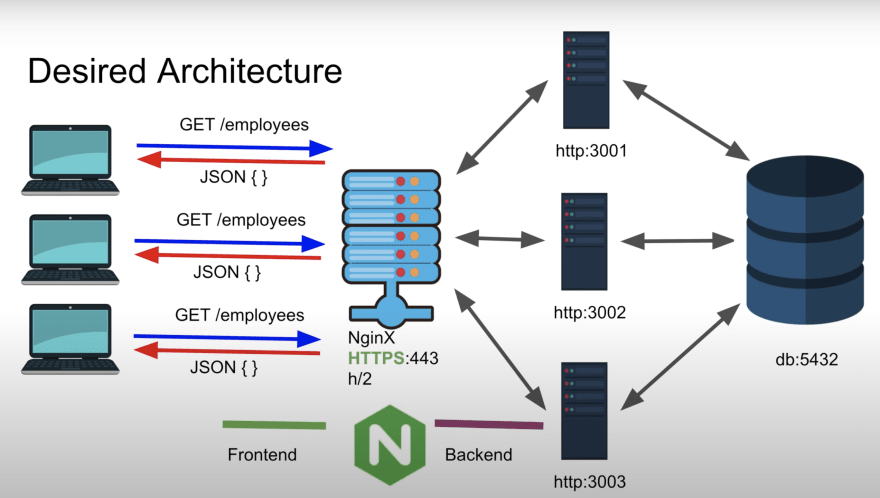
The diagram is not confusing, it is just a combination of all the concepts I have explained so far. Here we have 3 backend servers running on ports 3001, 3002, and 3003, all of which use the same database running on port 5432.
Now, when the client GET /employees sends a request on https://localhost (by default on port 443), it will pass that request to any backend server according to the algorithm and get the information from the database and send the JSON back to the Nginx web server and send it back to the client.
If we were to use an algorithm like round-robin’s, what it would do is assume that client 2 sends a request to https://localhost then the Nginx server would first pass the request to port 3000 and then send the response back to the client. For another request, Nginx will pass the request to 3002, and so on.
That’s a lot of information! But by this point, you have a clear understanding of what Nginx is and the terminology used in Nginx. Now, we’ll move on to installation and configuration techniques.
Installing Nginx
We’re finally here! I would be very proud if you finally understood the concept of the Nginx coding part.
Well, let me tell you that the installation process is honestly very simple on any system. I am an ubuntu user, so I will write commands based on it. However, for MAC and Windows and other Linux distributions, it will be done similarly.
This is required, and you have Nginx on your system now! I’m sure of it!
So easy to run! 😛
It’s again too easy to run this program and check if Nginx is running on your system.
|
|
After that, go ahead and use your favorite browser and navigate to http://localhost/ and you will see the following screen!

Basic configuration settings and examples
Okay, we will do an example to see the appeal of Nginx. First, create the directory structure on your local computer as shown below.
Also, include the basic context in the html and md files.
What are we trying to achieve?
Here, we have two separate folders nginx-demo and temp-nginx, each containing static HTML files. We’ll concentrate on running both folders on the public port and setting up our preferred rules.
Now back on track. To make changes to the default Nginx configuration, we will make changes in nginx.conf, which is located in /etc/nginx/. Also, I have vim on my system, so I can use vim to make the changes, but you are free to use the editor of your choice.
This will open a file with a default nginx configuration that I really don’t want to use. Therefore, my usual practice is to copy this configuration file and then make changes to the master file. We will do the same thing.
This will now open an empty file to which we will add configuration.
Add the basic configuration. You must add events {} because it is usually used to change the number of wokers in Nginx. We use it here in http to tell Nginx that we will be working at layer 7 of the OSI model.
Here, we tell nginx to listen on port 5000 and root to point to the static file mentioned in the main folder.
Next, we will add additional rules for the /content and /outsider URLs, where outsider will point to a directory other than the root mentioned in the first step.
Here location /content we change the pointing to root, and the /content sub-URLs will all be added to the end of the defined root URL. So here I’m specifying root /path/to/nginx-demo/ which just means I’m telling Nginx to show me the contents of the static files in the /path/to/nginx-demo/ folder when processing the http://localhost:5000/content/ URL.
That’s so cool! Now, Nginx is not limited to defining URL roots, but can also set rules so that I can block clients from accessing certain files.
We will write an additional rule in the defined master server to block access to any .md file. We can use regular expressions in Nginx, so we will define the rule as follows.
Let’s finish this off by learning the popular command proxy_pass . Now that we understand what a proxy and reverse proxy are, let’s start by defining another backend server running on port 8888. So, now we have 2 backend servers running on ports 5000 and 8888.
What we’re going to do is, when a client accesses port 8888 through Nginx, we’ll pass the request to port 5000 and send the response back to the client!
Let’s take a look at the final full code together
|
|
Every time you change the nginx configuration you need to restart nginx or reload it, now let’s restart nginx to test if our nginx directives are working correctly.
|
|