As Kubernetes becomes more and more functional and code-heavy, it may become relatively more complex. I sometimes wonder what users of Kubernetes should care about and what they should not care about. For a newbie, the first thing you should do when starting out is to figure out the basic workflow. Of course, if you look directly at the Kubernetes documentation, there are a lot of dazzling concepts that can be confusing and confusing.
In this article, we’ll start with a user’s perspective on the concepts involved in running an HTTP application on Kubernetes, and look at the following diagram.
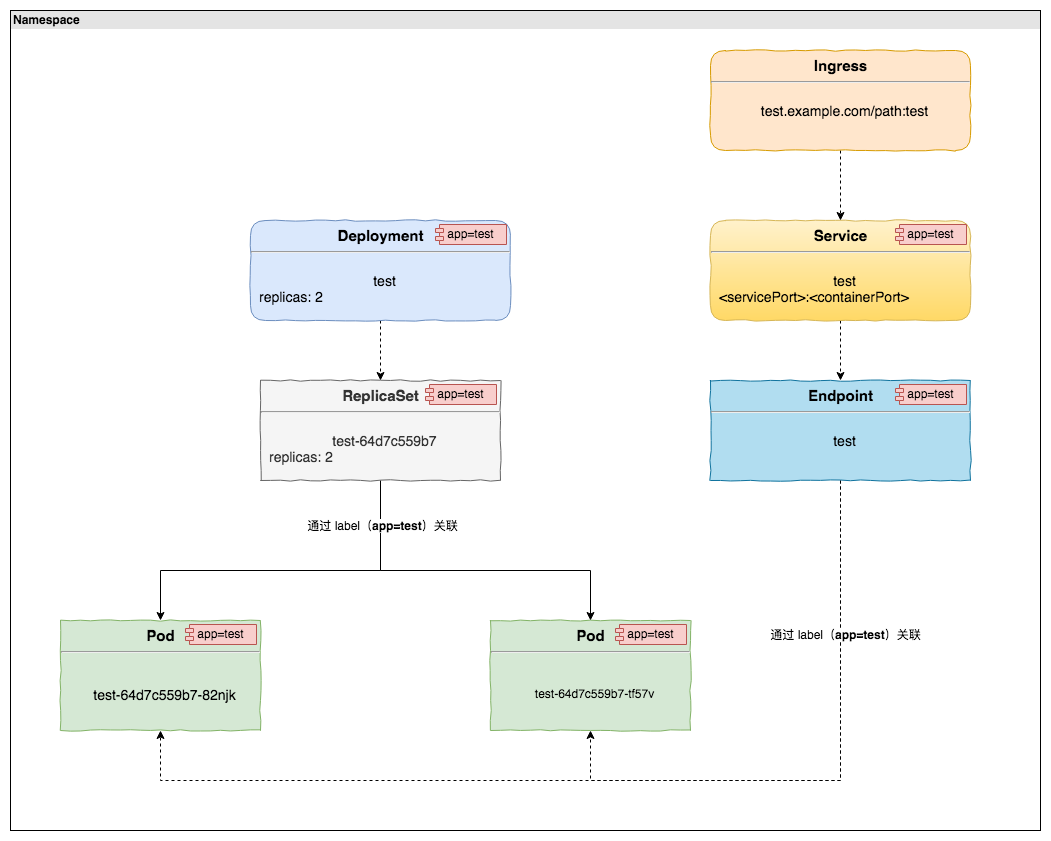
1. Namespace
This diagram covers a lot of terms in Kubernetes, so let’s start with the first term, Namespace. What is Namespace? It translates to space. If you want to deploy an application in Kubernetes, the first step is to create a space where the application will run, officially a Kubernetes physical cluster supports multiple virtual clusters, where the virtual clusters refer to Namespace. Namespaces are logically isolated from each other, and each Namespace can have appropriate resource limits (CPU, memory, etc.) and user management control (RBAC). Different spaces can run the same application, logically isolated by the space.
2. Deployment
Once we have Namespace, we can create a ReplicaSet to run our application. A Pod is the smallest deployment unit that Kubernetes can create and manage, and a Pod consists of one or more Containers that share storage, network, and other resources. A Pod is the smallest deployment unit that Kubernetes can create and manage. Normally, when we run a container with Docker, we can just specify the image to run. In Kubernetes, it is created in the form of a Pod, and although it actually runs as a container on the node, the final presentation from the Kubernetes perspective is a Pod.
If we want to run an application, we can just create a Pod and run it. Going back to the ReplicaSet, the Pod itself can run the application, so why not create a Pod directly? This is because a single deployment Pod, if the Pod because of some factors abnormal exit, the Pod itself is not automatically recovered. The ReplicaSet mechanism ensures that the Pods managed by them maintain a fixed number of copies and continue to run. If a Pod drops out due to an exception, the ReplicaSet will request the creation of a new Pod to keep the Pod running as we set it up.
In the above diagram we can see that there is a Deployment on top of the ReplicaSet, which provides the update declaration for both the Pod and the ReplicaSet. In general, it is not necessary to create a separate ReplicaSet, but directly by creating a Deployment, which will create and manage the ReplicaSet. This is because Deployment provides rolling update, rollback, pause, resume and other functions on top of ReplicaSet.
This is because Deployment provides rolling update, rollback, pause, and recovery functions on top of ReplicaSet. above, the relationship between Pod, ReplicaSet, and Deployment, if we want to run an application, then eventually we only need to create Deployment that can run, Deployment will automatically create and manage ReplicaSet. the operation relationship between them, in short, is Deployment -> ReplicaSet -> Pod, which corresponds to the relationship between the three in the diagram. The layers of abstraction may seem complicated, but when you understand it, you will understand that it is actually quite elegant.
3. Service
With a Deployment running an application, what happens if the application needs to be called by other applications in the current space? Users who haven’t known Kubernetes before might answer with an IP. Yes, each Pod has a separate IP, but each time these Deployments are updated, the associated old Pod is destroyed and a new Pod with a randomly assigned IP is created, which means that the Pod IP itself is not fixed. The IP before the update can correspond to the specific application, but after the update, it will fail to access the corresponding Pod. Another important point is that if the access through the Pod IP, multiple copies will not be meaningful. Then it is time to introduce Service, by creating Service can easily solve the above mentioned problems. Service can be understood as a load balancer, each Service has a name and VIP, and corresponds to a Pod or a group of Pods. applications in the same space can access each other directly through the <serviceName>:<servicePort> of the application.
Here, the Service follows the traditional architecture, so you can understand the Nginx proxy layer in front of the application. After the Service is created, the Endpoint is automatically created, and the Endpoint maintains the specific IP information of the corresponding Pod and dynamically updates the Pod list every time Deployment is updated. The Service itself is transparent to the user, and the user does not need to care about changes to the Pod IP.
4. Ingress
We know that access between applications in the same space in the same Kubernetes cluster is achieved through <serviceName>:<servicePort>, so some people may ask how to access across spaces. Actually, as long as we are in a Kubernetes cluster, there is a way to access each other between different applications. When accessing across spaces, we can use <serviceName>. <namespace>:<servicePort>, i.e., adding the space field to the original one.
Although cross-space access is possible, each space is generally regarded as a separate environment, and cross-space access is not recommended, although the actual situation is treated according to the actual needs.
If users or applications outside the cluster need to invoke it, then the Service may not be able to meet, then you need to introduce Ingress, through Ingress associated Service, you can expose the services of the cluster to external access purposes (the actual need to use ingress controller to really provide external access. For the sake of space, we will not introduce it here).
Of course, instead of Ingress, you can also expose services inside the cluster through
nodePort,hostNetwork, etc. The common practice is to expose services through Ingress, which is convenient for unified management on the one hand. In addition, ingress can also provide functional requirements that are not available in other ways.
5. Summary
The above is the complete knowledge of an HTTP application in Kubernetes. Going back to the previous diagram, all we really need to create for an application is Deployment, Service, and Ingress. If the service is not accessible to services outside the cluster then there is only Deployment and Service, ReplicaSet, Endpoint, Pod will be created automatically and the user does not need to care. There is an important point that we can see in the diagram, an important marker throughout is the app=test label, Deployment, Service and other resources in Kubernetes are associated with Pod markers through the label.