K3s is a lightweight Kubernetes distribution that is highly optimized for edge computing, IoT, and other scenarios.
Kubernetes distribution certified by CNCF.- Support for
X86_64 , ARM64 , ARMv7 platforms.
- A single process containing
Kubernetes master , kubelet and containerd.
K3s has the following enhancements.
- Package as a single binary.
- Package
K8S related components such as kube-api / kube-manager into a single binary, so that you can quickly start the corresponding components by simply launching the file.
- Use the default storage mechanism based on sqlite3.
- Support for using
etcd3, MySQL and PostgreSQL as storage mechanisms.
- Secure by default
- There is a default certificate management mechanism in
K3s (default one year validity) and also a feature to rotate certificates (that is, if you restart K3s in less than ninety days, it will automatically renew for one year).
- Powerful
batteries-included feature.
- Although some services are not provided by the binary file itself, you can use the built-in service to put the configuration file in the specified directory to start the service or replace the default component when you start it.
- All
K8S control-plane components are encapsulated in a single binary and process.
- Because they are encapsulated in a binary, there is only one process at startup. The advantage is that only this single process needs to be managed, and it also has the ability to operate complex clusters.
- Minimizes external dependencies.
- i.e. a slightly newer
Linux kernel is sufficient (requires kernel and cgroup mounts).
It’s called K3s because you want the installed K8S to be half the size in terms of memory footprint, and half the size is a 5 letter word, abbreviated as K3s.
- Life cycle
- Update cycle
- When
K8s is updated with a new version, generally K3s is updated within a week
- You can get
latest / stable / testing versions via this link
- We have the
stable version installed by default, which can be viewed by running the command
- Naming convention
- v1.20.4+k3s1 :
v1.20.4 is the K8s version, k3s1 is the patch version
 1
 2
 3
 4
 5
 6
 7
 8
 9
10
11
12
13
14
15
16
17
|
# K3s软件包需要的依赖项
containerd  # 容器运行时(可以使用docker替代)
Flannel     # 网络
CoreDNS     # DNS
CNI         # CNI
Traefik     # 默认的controller服务(apisix/ingress-controller)
iptables    # 主机实用程序
service load balancer     # 嵌入式服务负载均衡器
network policy controller # 嵌入式网络策略控制器

# K3s适用于以下场景
CI
Development
ARM
嵌入 K8s
物联网-IoT
边缘计算-Edge
|
At the same time, the Rancher team in China has launched an efficiency tool for K3s: AutoK3s . You can quickly create a K3s cluster and add a specified number of master nodes and worker nodes with a single command.
2. K3s Quick Start
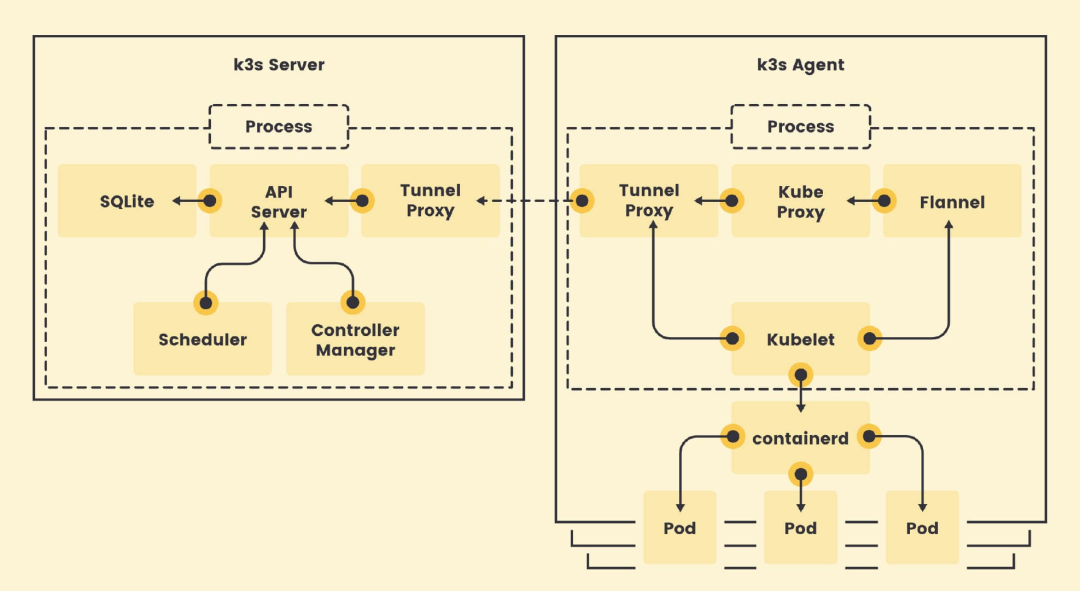
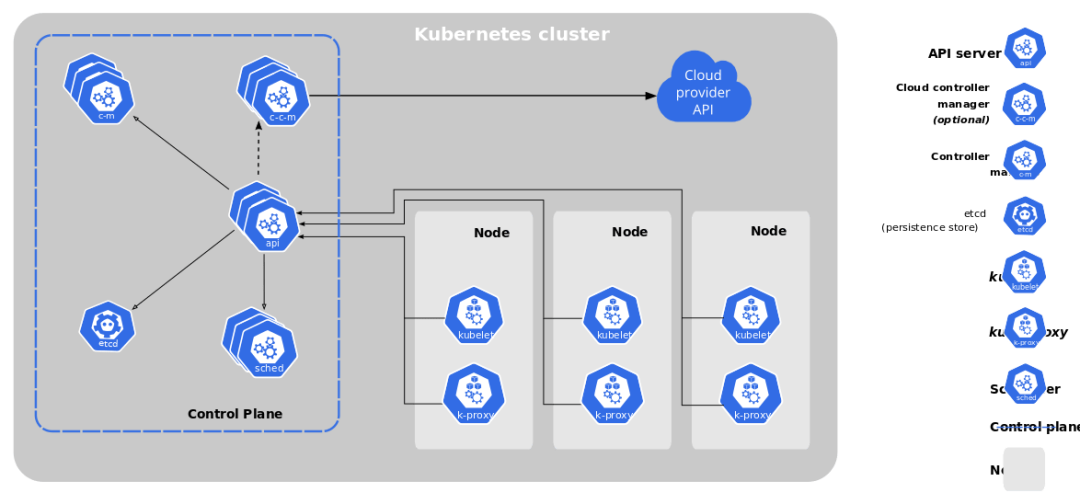
The principle is to encapsulate the components of K8S into the K3s binary, and then start the binary to start a full-fledged K8S cluster. We can see that the architecture of K3s and K8S is basically the same, where k3s-server corresponds to the control-plane and k3s-agent corresponds to the node node.
You can see that the default storage used in k3s is SQLite (self-contained) and the default network is Flannel (self-contained). When both the server and the client are started, they communicate through the Tunnel-Proxy component, which manages the network traffic through this channel. In the agent node, the corresponding Pod is created through the kubelet operation contaninerd.
K3s architecture
K8s architecture
In China, it is recommended to use the official mirror address, which not only speeds up the local K3s time, but also facilitates the deployment and update of the service. This is also why it is recommended to use k3s-install.sh to deploy the service in China, because the addresses used internally are obtained from China.
3. K3s Installation
Although it is possible to run server-side and working nodes by downloading the binaries ( . /k3s server ), but once we exit the process, the previously created nodes are also immediately destroyed, so it is still recommended to use a script for installation.
1
2
3
4
5
6
7
8
|
# 主节点
$ ./k3s server

# 工作节点
$ ./k3s agent K3s_URL=xxx K3s_TOKEN=xxx

# 清除垃圾文件
$ rm -rf /etc/rancher /var/lib/rancher
|
- Speed up by mirroring sites
 1
 2
 3
 4
 5
 6
 7
 8
 9
10
11
12
13
14
|
# 添加配置
$ cat >> /etc/rancher/k3s/registries.yaml <<EOF
mirrors:
  "docker.io":
    endpoint:
      - "https://fogjl973.mirror.aliyuncs.com"
      - "https://registry-1.docker.io"
EOF

# 重启服务
$ sudo systemctl restart k3s

# 是否生效
$ sudo crictl info | grep -A 2 "endpoint"
|
K3s provides an installation script that can be easily installed as a service on systems with systemd or openrc. After running this installation, the K3s service will be configured to restart automatically after a node reboot or if a process crashes or is killed.
Master Node - 192.168.100.100
1
2
3
4
5
6
7
8
9
|
# 安装脚本
# https://get.k3s.io
$ curl -sfL https://get.k3s.io | sh -

# 建议使用这个安装脚本(国内化了)
$ curl -sfL https://rancher-mirror.rancher.cn/k3s/k3s-install.sh | \
    INSTALL_K3s_MIRROR=cn K3s_NODE_NAME=k3s1 \
    K3s_KUBECONFIG_OUTPUT=/home/escape/.kube/config \
    INSTALL_K3s_EXEC="--docker" sh -
|
 1
 2
 3
 4
 5
 6
 7
 8
 9
10
11
12
13
14
15
16
17
18
19
20
21
22
23
24
25
26
27
28
|
# 查找stable分支版本信息
[INFO]  Finding release for channel stable
[INFO]  Using v1.23.6+k3s1 as release

# 获取国内镜像版本地址
[INFO]  Downloading hash https://rancher-mirror.rancher.cn/k3s/v1.23.6-k3s1/sha256sum-amd64.txt
[INFO]  Downloading binary https://rancher-mirror.rancher.cn/k3s/v1.23.6-k3s1/k3s
[INFO]  Verifying binary download

# 安装k3s二进制工具并链接相关工具(内置)
[INFO]  Installing k3s to /usr/local/bin/k3s
[INFO]  Skipping installation of SELinux RPM
[INFO]  Creating /usr/local/bin/kubectl symlink to k3s
[INFO]  Creating /usr/local/bin/crictl symlink to k3s
[INFO]  Skipping /usr/local/bin/ctr symlink to k3s, command exists in PATH at /usr/bin/ctr

# 安装清除和卸载k3s生成的配置和工具
[INFO]  Creating killall script /usr/local/bin/k3s-killall.sh
[INFO]  Creating uninstall script /usr/local/bin/k3s-uninstall.sh

# 常见了两个systemd的配置
[INFO]  env: Creating environment file /etc/systemd/system/k3s.service.env
[INFO]  systemd: Creating service file /etc/systemd/system/k3s.service
[INFO]  systemd: Enabling k3s unit
Created symlink /etc/systemd/system/multi-user.target.wants/k3s.service → /etc/systemd/system/k3s.service.

# 启动k3s服务
[INFO]  systemd: Starting k3s
|
Work node - 192.168.100.101
 1
 2
 3
 4
 5
 6
 7
 8
 9
10
11
12
13
14
15
16
17
18
|
# 工作节点上安装并将它们添加到集群
# https://docs.rancher.cn/docs/k3s/architecture/_index#注册-agent-节点
$ curl -sfL https://get.k3s.io | \
    K3s_URL=https://myserver:6443 \
    K3s_TOKEN=mynodetoken sh -

# 建议使用这个安装命令(国内化了)
# K3s_URL: 会使K3s以worker模式运行
# K3s_TOKEN: 使用的值存储在你的服务器节点上
# K3s_NODE_NAME: 为每个节点提供一个有效且唯一的主机名
$ curl -sfL https://rancher-mirror.rancher.cn/k3s/k3s-install.sh | \
    INSTALL_K3s_MIRROR=cn K3s_NODE_NAME=k3s2 \
    K3s_KUBECONFIG_OUTPUT=/home/escape/.kube/config \
    K3s_URL=https://192.168.100.100:6443 \
    K3s_TOKEN=mynodetoken sh -

# mynodetoken
$ sudo cat /var/lib/rancher/k3s/server/token
|
 1
 2
 3
 4
 5
 6
 7
 8
 9
10
11
12
13
14
15
16
17
18
19
20
21
22
23
24
25
26
27
|
# 查找stable分支版本信息
[INFO]  Finding release for channel stable
[INFO]  Using v1.23.6+k3s1 as release

# 获取国内镜像版本地址
[INFO]  Downloading hash https://rancher-mirror.rancher.cn/k3s/v1.23.6-k3s1/sha256sum-amd64.txt
[INFO]  Downloading binary https://rancher-mirror.rancher.cn/k3s/v1.23.6-k3s1/k3s
[INFO]  Verifying binary download

# 安装k3s二进制工具并链接相关工具(内置)
[INFO]  Installing k3s to /usr/local/bin/k3s
[INFO]  Creating /usr/local/bin/kubectl symlink to k3s
[INFO]  Creating /usr/local/bin/crictl symlink to k3s
[INFO]  Skipping /usr/local/bin/ctr symlink to k3s

# 安装清除和卸载k3s生成的配置和工具
[INFO]  Creating killall script /usr/local/bin/k3s-agent-killall.sh
[INFO]  Creating uninstall script /usr/local/bin/k3s-agent-uninstall.sh

# 常见了两个systemd的配置
[INFO]  env: Creating environment file /etc/systemd/system/k3s-agent.service.env
[INFO]  systemd: Creating service file /etc/systemd/system/k3s-agent.service
[INFO]  systemd: Enabling k3s-agent unit
Created symlink /etc/systemd/system/multi-user.target.wants/k3s-agent.service → /etc/systemd/system/k3s-agent.service.

# 启动k3s服务
[INFO]  systemd: Starting k3s-agent
|
Configuration requirements
Prerequisites
- On selection, two nodes cannot have the same hostname
- No hostname changes can be made by adding a random suffix or specifying a hostname
 1
 2
 3
 4
 5
 6
 7
 8
 9
10
11
12
13
14
|
# 为每个节点添加随机后缀
$ curl -sfL http://rancher-mirror.cnrancher.com/k3s/k3s-install.sh | \
    INSTALL_K3s_MIRROR=cn K3s_URL=https://192.168.100.100:6443 \
    K3s_TOKEN=xxx sh -s - --with-node-id

# 为每个节点指定主机名
$ curl -sfL http://rancher-mirror.cnrancher.com/k3s/k3s-install.sh | \
    K3s_NODE_NAME="k3s2" INSTALL_K3s_MIRROR=cn \
    K3s_URL=https://192.168.64.3:6443 K3s_TOKEN=xxx sh -

# 为每个节点指定主机名
$ curl -sfL http://rancher-mirror.cnrancher.com/k3s/k3s-install.sh | \
    INSTALL_K3s_MIRROR=cn K3s_URL=https://192.168.64.3:6443 \
    K3s_TOKEN=xxx sh -s - --node-name k3s2
|
- Operating system: Can run on most modern
Linux systems.
- Disk device:
K3s performance depends on the performance of the database (SSD hard drives are recommended).
- Network related:
K3s Server node inbound rules, all outbound traffic is allowed.
| protocol |
port |
source |
description |
| TCP |
6443 |
K3s agent node |
Kubernetes API Server |
| UDP |
8472 |
K3s server and agent nodes |
Required for Flannel VXLAN only |
| TCP |
10250 |
K3s server and agent nodes |
Kubelet metrics |
| TCP |
2379-2380 |
K3s server node |
Required only for embedded etcd high availability |
Installation Options
| Environment Variable |
Description |
| INSTALL_K3s_EXEC |
Subsequent subcommands used to start K3s in the service |
| K3s_CONFIG_FILE |
Specifies the location of the configuration file |
| K3s_TOKEN |
shared secret value for adding server/agent to the cluster |
| K3s_TOKEN_FILE |
shared secret file for adding the server/agent to the cluster |
| INSTALL_K3s_VERSION |
specifies the version of K3s to download |
| K3s_TOKEN_FILE |
specifies the cluster-secret/token file directory |
| INSTALL_K3s_SKIP_START |
will not start the K3s service |
| INSTALL_K3s_SKIP_DOWNLOAD |
for offline installation; remote tools will not be downloaded after setting |
 1
 2
 3
 4
 5
 6
 7
 8
 9
10
11
|
# 其实就把对应参数加到systemd配置文件里面去了
$ curl -sfL http://rancher-mirror.cnrancher.com/k3s/k3s-install.sh | \
    INSTALL_K3s_MIRROR=cn \
    INSTALL_K3s_EXEC="--docker" sh -

# 自动化部署(不用获取token值了)
# 主节点和工作节点使用我们指定的key来通信
$ curl -sfL http://rancher-mirror.cnrancher.com/k3s/k3s-install.sh | \
    INSTALL_K3s_MIRROR=cn \
    K3s_TOKEN=rancher-k3s sh -
$ sudo cat /var/lib/rancher/k3s/server/token
|
Other notes
K3s_TOKEN must also be set when running agent.- Environment variables starting with
K3s_ will be reserved for use by systemd/openrc.
- If
exec is not explicitly set and K3s_URL is set, the command will default to the working node.
Command parameters
Throughout the K3s documentation, you will see options that can be passed in as command flags and environment variables, so how do you use flags and environment variables?
Using flags and environment variables
1
2
3
4
5
6
7
8
9
|
# 使用标志
$ curl -sfL https://get.k3s.io | K3s_KUBECONFIG_MODE="644" sh -s -
$ curl -sfL https://get.k3s.io | sh -s - --write-kubeconfig-mode 644

# 环境变量
$ curl -sfL https://get.k3s.io | \
    INSTALL_K3s_EXEC="--flannel-backend none" sh -s -
$ curl -sfL https://get.k3s.io | \
    sh -s - server --flannel-backend none
|
K3s Server/Agent - Common Configuration
1
2
3
4
5
6
|
# write-kubeconfig
# 将管理客户端的kubeconfig写入这个文件
$ curl -sfL http://rancher-mirror.cnrancher.com/k3s/k3s-install.sh | \
    INSTALL_K3s_MIRROR=cn \
    K3s_KUBECONFIG_OUTPUT=/root/.kube/config \
    sh -
|
 1
 2
 3
 4
 5
 6
 7
 8
 9
10
11
12
13
14
15
16
17
18
|
# 使用docker作为容器运行时
$ curl -sfL http://rancher-mirror.cnrancher.com/k3s/k3s-install.sh | \
    INSTALL_K3s_MIRROR=cn \
    INSTALL_K3s_EXEC="--docker" sh -

# 指定运行时工具
$ curl -sfL http://rancher-mirror.cnrancher.com/k3s/k3s-install.sh | \
    INSTALL_K3s_MIRROR=cn \
    INSTALL_K3s_EXEC="--container-runtime-endpoint containerd" \
    sh -


# 设置私有镜像仓库配置文件
# 默认配置文件: /etc/rancher/k3s/registries.yaml
$ curl -sfL http://rancher-mirror.cnrancher.com/k3s/k3s-install.sh | \
    INSTALL_K3s_MIRROR=cn \
    INSTALL_K3s_EXEC="--private-registry xxx" \
    sh -
|
 1
 2
 3
 4
 5
 6
 7
 8
 9
10
11
12
13
14
15
16
|
# 针对多网卡主机安装K3s集群
# 默认多网卡会使用默认网关的那个卡
$ rout -n

# K3s server
$ curl -sfL http://rancher-mirror.cnrancher.com/k3s/k3s-install.sh | \
    INSTALL_K3s_MIRROR=cn \
    INSTALL_K3s_EXEC="--node-ip=192.168.100.100" \
    sh -

# K3s agent
$ curl -sfL http://rancher-mirror.cnrancher.com/k3s/k3s-install.sh | \
    INSTALL_K3s_MIRROR=cn \
    K3s_URL=https://192.168.99.211:6443 K3s_TOKEN=xxx \
    INSTALL_K3s_EXEC="--node-ip=192.168.100.100" \
    sh -
|
 1
 2
 3
 4
 5
 6
 7
 8
 9
10
11
12
13
14
|
# --tls-san
# 在TLS证书中添加其他主机名或IP作为主机备用名称
# 即在公网环境下允许通过公网IP访问控制、操作远程集群
# 或者部署多个Server并使用LB进行负责,就需要保留公网地址
$ curl -sfL http://rancher-mirror.cnrancher.com/k3s/k3s-install.sh | \
    INSTALL_K3s_MIRROR=cn \
    INSTALL_K3s_EXEC="--tls-san 1.1.1.1"  \
    sh -

# 获取配置
$ kubectl get secret k3s-serving -n kube-system -o yaml

# 然后本机复制公网主节点对应的yaml文件即可本地操作了
$ scp ci@1.1.1.1:/etc/rancher/k3s/k3s.yaml ~/.kube/config
|
 1
 2
 3
 4
 5
 6
 7
 8
 9
10
11
12
13
14
15
16
17
18
19
20
21
22
|
# 修改启动的服务对应配置(调整节点的启动的最大Pod数量)
$ curl -sfL http://rancher-mirror.cnrancher.com/k3s/k3s-install.sh | \
    INSTALL_K3s_MIRROR=cn \
    INSTALL_K3s_EXEC='--kubelet-arg=max-pods=200' \
    sh -

# 修改启动的服务对应配置(使用ipvs作为服务调度工具)
$ curl -sfL http://rancher-mirror.cnrancher.com/k3s/k3s-install.sh | \
    INSTALL_K3s_MIRROR=cn \
    INSTALL_K3s_EXEC='--kube-proxy-arg=proxy-mode=ipvs' \
    sh -

# 修改启动的服务对应配置(调整服务启动的端口范围)
$ curl -sfL http://rancher-mirror.cnrancher.com/k3s/k3s-install.sh | \
    INSTALL_K3s_MIRROR=cn \
    INSTALL_K3s_EXEC='--kube-apiserver-arg=service-node-port-range=40000-50000' \
    sh -

# kubelet-arg     --kubelet-arg
# kube-apiserver  --kube-apiserver-arg
# kube-proxy-arg  --kube-proxy-arg
# kube-proxy-arg  --kube-proxy-arg=proxy-mode=ipvs
|
1
2
3
4
5
6
|
# --data-dir
# 修改K3s数据存储目录
$ curl -sfL http://rancher-mirror.cnrancher.com/k3s/k3s-install.sh | \
    INSTALL_K3s_MIRROR=cn \
    INSTALL_K3s_EXEC='--data-dir=/opt/k3s-data' \
    sh -
|
1
2
3
4
5
6
7
8
9
|
# 禁用组件
$ curl -sfL http://rancher-mirror.cnrancher.com/k3s/k3s-install.sh | \
    INSTALL_K3s_MIRROR=cn \
    INSTALL_K3s_EXEC='--disable traefik' \
    sh -

# 自己加自己需要的服务
$ ls /var/lib/rancher/k3s/server/manifests
$ kubectl get pods -A | grep traefik
|
1
2
3
4
5
6
7
8
9
|
# 添加label和taint标识
$ curl -sfL http://rancher-mirror.cnrancher.com/k3s/k3s-install.sh | \
    INSTALL_K3s_MIRROR=cn \
    INSTALL_K3s_EXEC='--node-label foo=bar,hello=world \
        --node-taint key1=value1:NoExecute'
    sh -

# 查看一下
$ kubectl describe nodes
|
K3s Server/Agent - Database Options
1
2
3
4
5
6
7
|
# 指定数据源名称
# 标志位: --datastore-endpoint value
# 环境变量: K3s_DATASTORE_ENDPOINT
$ curl -sfL http://rancher-mirror.cnrancher.com/k3s/k3s-install.sh | \
    INSTALL_K3s_MIRROR=cn \
    INSTALL_K3s_EXEC='--datastore-endpoint etcd' \
    sh -
|
1
2
3
4
5
6
|
# cron规范中的快照间隔时间
# --etcd-snapshot-schedule-cron value
$ curl -sfL http://rancher-mirror.cnrancher.com/k3s/k3s-install.sh | \
    INSTALL_K3s_MIRROR=cn \
    INSTALL_K3s_EXEC='--etcd-snapshot-schedule-cron * */5 * * *' \
    sh -
|
Network options
By default, K3s will run with flannel as the CNI and use VXLAN as the default backend, both the CNI and the default backend can be modified via parameters. To enable encryption, use the IPSec or WireGuard options below.
 1
 2
 3
 4
 5
 6
 7
 8
 9
10
11
|
# 默认安装K3s之后的网络配置
$ sudo cat /var/lib/rancher/k3s/agent/etc/flannel/net-conf.json
{
    "Network": "10.42.0.0/16",
    "EnableIPv6": false,
    "EnableIPv4": true,
    "IPv6Network": "::/0",
    "Backend": {
        "Type": "vxlan"
    }
}
|
| CLI Flag and Value |
Description |
| –flannel-backend=vxlan |
Use VXLAN backend (default) |
| –flannel-backend=host-gw |
Use the host-gw backend |
| –flannel-backend=ipsec |
Use IPSEC backend; encrypt network traffic |
| –flannel-backend=wireguard |
Use WireGuard backend; encrypt network traffic |
Configuring Flannel Options
This allows me to modify the default backend network configuration options for Flannel (reboots will override this) when I install K3s or modify the corresponding configuration file afterwards. Here we show how to change it to host-gw mode.
 1
 2
 3
 4
 5
 6
 7
 8
 9
10
11
12
|
# 主节点
# flannel-backend使用host-gw
# 该模式会把对端主机的IP当做默认网管(多Server情况)
$ curl -sfL http://rancher-mirror.cnrancher.com/k3s/k3s-install.sh | \
    INSTALL_K3s_MIRROR=cn \
    INSTALL_K3s_EXEC='--flannel-backend=host-gw' \
    sh -

# 工作节点
$ curl -sfL http://rancher-mirror.cnrancher.com/k3s/k3s-install.sh | \
    INSTALL_K3s_MIRROR=cn K3s_URL=https://192.168.100.100:6443 \
    K3s_TOKEN=xxx sh -
|
 1
 2
 3
 4
 5
 6
 7
 8
 9
10
11
12
13
|
# 默认的路由信息
$ route -n
0.0.0.0         172.16.64.1     0.0.0.0         UG    100    0        0 enp0s2
10.42.1.0       172.16.64.9     255.255.255.0   UG    0      0        0 enp0s2

# 查看配置之后的网络配置
$ sudo cat /var/lib/rancher/k3s/agent/etc/flannel/net-conf.json
{
    "Network": "10.42.0.0/16",
    "Backend": {
        "Type": "host-gw"
    }
}
|
Enabling Directrouting Features
Flannel’s own feature: Enable direct routes (e.g. host-gw) when hosts are on the same subnet. vxlan is only used to encapsulate packets to hosts on different subnets, host-gw is used between hosts on the same subnet and the default value is false.
To add it, we can’t modify the corresponding network configuration file, because a reinstallation or reboot will flush out the configuration (and turn it into the default configuration), so we need to compromise. We create our own network configuration file and then execute the corresponding configuration file to be loaded from at boot time.
 1
 2
 3
 4
 5
 6
 7
 8
 9
10
11
12
13
14
15
|
# k3s的master和agent
$ sudo cat /etc/flannel/net-conf.json
{
    "Network": "10.42.0.0/16",
    "Backend": {
        "Type": "vxlan",
        "Directrouting": true
    }
}

# k3s master
$ curl -sfL http://rancher-mirror.cnrancher.com/k3s/k3s-install.sh | \
    INSTALL_K3s_MIRROR=cn \
    INSTALL_K3s_EXEC='--flannel-backend=host-gw' \
    sh -
|
Customizing CNI
Run K3s with --flannel-backend=none (disabled) and then install the CNI of your choice. Follow the Calico CNI Plugin Guide to modify the YAML configuration file for Calico to allow IP forwarding in the container_settings section.
1
2
3
4
5
6
7
8
|
# 加到Calico的YAML文件中
# 允许IP转发(这个是K3s的一个限制;需要开启)
"container_settings": {
    "allow_ip_forwarding": true
}

- name: CALICO_IPV4POOL_CIDR
  value: "192.168.200.0/24"
|
 1
 2
 3
 4
 5
 6
 7
 8
 9
10
11
12
13
|
# 通过在主机上运行以下命令,确保设置已被应用(true)
$ sudo cat /etc/cni/net.d/10-canal.conflist

# calico
# 其中--cluster-cidr可不设置
$ curl -sfL http://rancher-mirror.cnrancher.com/k3s/k3s-install.sh | \
    INSTALL_K3s_MIRROR=cn \
    INSTALL_K3s_EXEC='--flannel-backend=none \
        --cluster-cidr=192.168.200.0/24"' \
    sh -

# 启动网络服务
$ kubectl apply -f ./calico.yaml
|
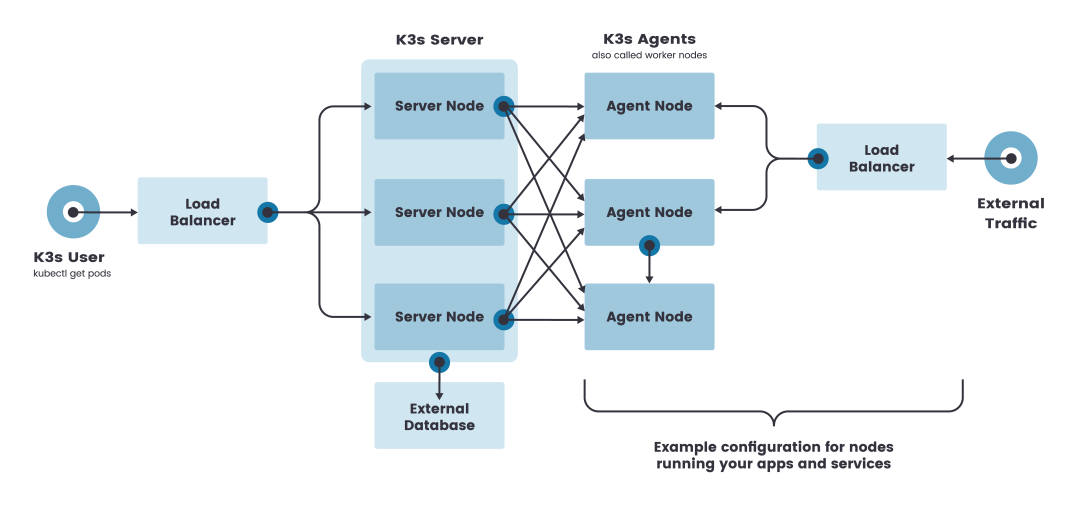
External database
Highly available installations using external databases
- Two or more
server nodes
- Zero or more
agent nodes
- External data store (
Etcd/MySQL/PostgRES )
- Fixed registered address (
LB )
While a single node k3s server cluster can satisfy various use cases, for critical environments that need stable operation to run K3s in an HA configuration, how can I install a highly available K3s cluster using an external database?
K3s Installation Matters - External Database:
| host name |
role |
IP |
| k3s-server-1 |
k3s master |
172.31.2.134 |
| k3s-server-2 |
k3s master |
172.31.2.42 |
| k3s-db |
DB |
172.31.10.251 |
| k3s-lb |
LB |
172.31.13.97 |
| k3s-agent |
k3s agent |
172.31.15.130 |
 1
 2
 3
 4
 5
 6
 7
 8
 9
10
11
12
|
# 1.创建一个外部数据存储
$ docker run --name some-mysql \
    --restart=unless-stopped -p 3306:3306 \
    -e MYSQL_ROOT_PASSWORD=password -d mysql:5.7

# 2.启动k3s-server节点(有读写权限不用加库名)
# mysql://username:password@tcp(hostname:3306)/database-name
# 可加污点 --node-taint CriticalAddonsOnly=true:NoExecute
$ curl -sfL http://rancher-mirror.cnrancher.com/k3s/k3s-install.sh | \
    INSTALL_K3s_MIRROR=cn sh - server \
    --datastore-endpoint="mysql://root:password@ip:3306/k3s" \
    --tls-san 172.31.13.97
|
 1
 2
 3
 4
 5
 6
 7
 8
 9
10
11
12
13
14
15
16
17
18
19
20
21
22
23
24
25
26
27
28
|
# 3.配置固定的注册地址(k3s-lb节点)
# Agent节点需要一个URL来注册(LB)
$ cat >> /etc/nginx.conf <<EOF
worker_processes 4;
worker_rlimit_nofile 40000;

events {
    worker_connections 8192;
}

stream {
    upstream k3s_api {
        least_conn;
        server 172.31.2.134:6443 max_fails=3 fail_timeout=5s;
        server 172.31.2.42:6443 max_fails=3 fail_timeout=5s;
    }
    server {
        listen     6443;
        proxy_pass k3s_api;
    }
}
EOF

# 启动服务
$ docker run -d --restart=unless-stopped \
  -p 6443:6443 \
  -v /etc/nginx.conf:/etc/nginx/nginx.conf \
  nginx:1.14
|
 1
 2
 3
 4
 5
 6
 7
 8
 9
10
11
12
13
|
# 4.加入Agent节点
# Agent会保存LB节点和每个Server节点的IP信息
# cat /var/lib/rancher/k3s/agent/etc/k3s-agent-load-balancer.json
$ curl -sfL http://rancher-mirror.cnrancher.com/k3s/k3s-install.sh | \
    INSTALL_K3s_MIRROR=cn
    K3s_URL=https://172.31.13.97:6443 K3s_TOKEN=mynodetoken \
    sh -

# 5.通过kubeconfig访问K3s集群
$ kubectl get nodes
NAME           STATUS   ROLES                  AGE   VERSION
k3s-server-1   Ready    control-plane,master   68s   v1.20.7+k3s1
k3s-server-2   Ready    control-plane,master   66s   v1.20.7+k3s1
|
High Availability for Embedded DB
To run K3s in this mode, you must have an odd number of server nodes, it is recommended to start with three nodes. In embedded, the default is to use Etcd as the highly available database.
 1
 2
 3
 4
 5
 6
 7
 8
 9
10
11
12
13
14
15
16
17
18
19
20
21
22
23
24
25
26
27
28
|
# 服务器节点(启动etcd集群)
# SECRET我们预定一个key值
# 使用cluster-init标志来启用集群
# 并使用一个标记作为共享的密钥来加入其他服务器到集群中
$ curl -sfL http://rancher-mirror.cnrancher.com/k3s/k3s-install.sh | \
    INSTALL_K3s_MIRROR=cn K3s_TOKEN=SECRET \
    sh -s - --cluster-init

# 查看类型
$ sudo  kubectl get nodes
NAME    STATUS  ROLES                      AGE  VERSION
ip-xxx  Ready   control-plane,etcd,master  19h  v1.23.6+k3s1

# 其他服务器节点(2/3)
$ curl -sfL http://rancher-mirror.cnrancher.com/k3s/k3s-install.sh | \
    INSTALL_K3s_MIRROR=cn K3s_TOKEN=SECRET \
    sh -s - --server https://<ip-or-host-server>:6443

# 查询ETCD集群状态
# etcd证书默认目录:/var/lib/rancher/k3s/server/tls/etcd
# etcd数据默认目录:/var/lib/rancher/k3s/server/db/etcd
$ ETCDCTL_ENDPOINTS='https://172.31.12.136:2379,\
    https://172.31.4.43:2379,\
    https://172.31.4.190:2379' \
ETCDCTL_CACERT='/var/lib/rancher/k3s/server/tls/etcd/server-ca.crt' \
ETCDCTL_CERT='/var/lib/rancher/k3s/server/tls/etcd/server-client.crt'\
ETCDCTL_KEY='/var/lib/rancher/k3s/server/tls/etcd/server-client.key' \
ETCDCTL_API=3 etcdctl endpoint status --write-out=table
|
Clustered Datastore Options
The ability to run K8S with a datastore other than etcd distinguishes K3s from other K8S distributions. This feature provides flexibility for K8S operators, and the available datastore options allow you to select a datastore that best fits the use case.
If your team does not have the expertise to operate etcd, you can choose an enterprise SQL database such as MySQL or PostgreSQL. If you need to run a simple, short-lived cluster in a CI/CD environment, you can use an embedded SQLite database.
If you want to use an external datastore such as PostgreSQL, MySQL or etcd, you must set the datastore-endpoint parameter so that K3s knows how to connect to it, and you can also specify parameters to configure authentication and encryption for the connection. The following table summarizes these parameters, which can be passed as CLI flags or environment variables.
| CLI Flag |
Environment Variables |
Description |
| –datastore-endpoint |
K3s_DATASTORE_ENDPOINT |
Specifies a PostgresSQL, MySQL, or etcd connection string. This is used to describe the connection to the datastore. The structure of this string is specific to each backend, as detailed below. |
| –datastore-cafile |
K3s_DATASTORE_CAFILE |
A TLS Certificate Authority (CA) file to help secure communication with the datastore. If your datastore requests through the TLS service using a certificate signed by a custom Certificate Authority, you can use this parameter to specify that CA so that the K3s client can properly validate the certificate. |
| –datastore-certfile |
K3s_DATASTORE_CERTFILE |
TLS certificate file for client certificate based authentication of the datastore. To use this feature, your datastore must be configured to support client certificate based authentication. If you specify this parameter, you must also specify the datastore-keyfile parameter. |
| –datastore-keyfile |
K3s_DATASTORE_KEYFILE |
TLS key file for client certificate based authentication of the datastore. See the datastore-certfile parameter earlier for more details. |
As a best practice, we recommend setting these parameters as environment variables rather than command line parameters, so that your database credentials or other sensitive information is not exposed as part of the process information.
Private image repository
K3s uses containerd as the container runtime by default, so configuring the image repository on docker does not take effect. The K3s image repository configuration file consists of two main parts: mirrors and configs.
Mirrors is a directive that defines the name and endpoint of a dedicated mirror repository- The
Configs section defines the TLS and certificate configuration for each mirror.
- For each
mirror, you can define auth and / or tls
The K3s registry configuration directory is: /etc/rancher/k3s/registries.yaml. When K3s starts, it will check if the registries.yaml file exists in /etc/rancher/k3s/ and instruct containerd to use the mirror repository defined in the file. If you want to use a private mirror repository, then you need to create this file as root on each node that uses the mirror repository.
Note that server nodes are schedulable by default. If you do not have taint on the server nodes, then the workload will be run on them, make sure to create registries.yaml files on each server node.
containerd uses a concept similar to svc and endpoint in K8S. svc can be understood as the access name, which resolves to the corresponding endpoint. It can also be understood that the mirror configuration is a reverse proxy that proxies client requests to the endpoint configuration’s back-end mirror repository. The mirror name is optional, but it must match the IP or domain name definition rules. And you can configure multiple endpoints, which resolve to the first endpoint by default, and if the first endpoint does not return data, it automatically switches to the second endpoint, and so on.
 1
 2
 3
 4
 5
 6
 7
 8
 9
10
11
12
13
14
15
16
17
18
19
20
21
22
23
24
25
26
|
# /etc/rancher/k3s/registries.yaml
# 同时可以设置多个mirrors地址
# 可以对mirrors设置权限和证书
mirrors:
  "172.31.6.200:5000":
    endpoint:
      - "http://172.31.6.200:5000"
      - "http://x.x.x.x:5000"
      - "http://y.y.y.y:5000"
  "rancher.ksd.top:5000":
    endpoint:
      - "http://172.31.6.200:5000"
  "docker.io":
    endpoint:
      - "https://fogjl973.mirror.aliyuncs.com"
      - "https://registry-1.docker.io"

configs:
  "172.31.6.200:5000":
    auth:
      username: admin
      password: Harbor@12345
    tls:
      cert_file: /home/ubuntu/harbor2.escapelife.site.cert
      key_file: /home/ubuntu/harbor2.escapelife.site.key
      ca_file: /home/ubuntu/ca.crt
|
1
2
3
4
|
# 镜像都是从同一个仓库获取到的
$ sudo systemctl restart k3s.service
$ sudo crictl pull 172.31.6.200:5000/library/alpine
$ sudo crictl pull rancher.ksd.top:5000/library/alpine
|
Here we describe how to use the TLS configuration.
 1
 2
 3
 4
 5
 6
 7
 8
 9
10
11
12
13
14
|
# 证书颁发机构颁发的证书
$ cat >> /etc/rancher/k3s/registries.yaml <<EOF
mirrors:
  "harbor.escapelife.site":
    endpoint:
      - "https://harbor.escapelife.site"
configs:
  "harbor.escapelife.site":
    auth:
      username: admin
      password: Harbor@12345
EOF

$ sudo systemctl restart k3s
|
 1
 2
 3
 4
 5
 6
 7
 8
 9
10
11
12
13
14
15
16
17
18
|
# 自签名证书
$ cat >> /etc/rancher/k3s/registries.yaml <<EOF
mirrors:
  "harbor2.escapelife.site":
    endpoint:
      - "https://harbor2.escapelife.site"
configs:
  "harbor2.escapelife.site":
    auth:
      username: admin
      password: Harbor@12345
    tls:
      cert_file: /home/ubuntu/harbor2.escapelife.site.cert
      key_file:  /home/ubuntu/harbor2.escapelife.site.key
      ca_file:   /home/ubuntu/ca.crt
EOF

$ sudo systemctl restart k3s
|
 1
 2
 3
 4
 5
 6
 7
 8
 9
10
|
# 不使用TLS证书
$ cat >> /etc/rancher/k3s/registries.yaml <<EOF
mirrors:
  "docker.io":
    endpoint:
      - "https://fogjl973.mirror.aliyuncs.com"
      - "https://registry-1.docker.io"
EOF

$ sudo systemctl restart k3s
|
K3s will generate config.toml for containerd in /var/lib/rancher/k3s/agent/etc/containerd/config.toml. For advanced settings of this file, you can create another file named config.toml.tmpl in the same directory and this file will replace the default settings.
 1
 2
 3
 4
 5
 6
 7
 8
 9
10
11
12
13
14
15
16
17
18
19
20
21
22
23
24
25
26
27
28
29
30
31
|
# 完整示例
$ cat >> /etc/rancher/k3s/registries.yaml
mirrors:
  "harbor.escapelife.site":
     endpoint:
     - "https://harbor.escapelife.site"
  "harbor2.escapelife.site":
     endpoint:
     - "https://harbor2.escapelife.site"
  "172.31.19.227:5000":
     endpoint:
     - "http://172.31.19.227:5000"
  "docker.io":
     endpoint:
     - "https://fogjl973.mirror.aliyuncs.com"
     - "https://registry-1.docker.io"

configs:
  "harbor.escapelife.site":
     auth:
       username: admin
       password: Harbor@12345

  "harbor2.escapelife.site":
     auth:
       username: admin
       password: Harbor@12345
     tls:
       cert_file: /home/ubuntu/harbor2.escapelife.site.cert
       key_file:  /home/ubuntu/harbor2.escapelife.site.key
       ca_file:   /home/ubuntu/ca.crt
|
Off-line installation
The offline installation process is divided into the following two main steps.
Install K3s from a private image repository
k3s-images.txt contains the image files for the corresponding version dependencies.k3s-airgap-images-amd64.tar contains the image file for the corresponding version.
 1
 2
 3
 4
 5
 6
 7
 8
 9
10
11
12
13
14
15
16
17
18
|
# 将所需镜像上传到私有镜像仓库
# https://github.com/k3s-io/k3s/releases
可以从K3s镜像列表获取到版本,下载上传到私有镜像仓库

# 创建镜像仓库(YAML)
# 按照私有镜像仓库配置指南创建并配置registry.yaml文件
$ mkdir -p /etc/rancher/k3s/
cat >> /etc/rancher/k3s/registries.yaml <<EOF
mirrors:
  "docker.io":
    endpoint:
      - "https://harbor.escapelife.site"
configs:
  "docker.io":
    auth:
      username: admin
      password: Harbor@12345
EOF
|
 1
 2
 3
 4
 5
 6
 7
 8
 9
10
11
12
13
14
15
|
# 安装单节点K3s集群
# https://github.com/k3s-io/k3s/releases
可以从K3s仓库获取到版本(二进制文件)

# 获取K3s安装脚本
$ wget https://get.k3s.io -o ./install.sh
$ wget http://rancher-mirror.cnrancher.com/k3s/k3s-install.sh

# 安装K3s-server
$ INSTALL_K3s_SKIP_DOWNLOAD=true ./install.sh

# 将agent加入到K3s集群
$ INSTALL_K3s_SKIP_DOWNLOAD=true \
    K3s_URL=https://myserver:6443 K3s_TOKEN=mynodetoken \
    ./install.sh
|
Install K3s via manual deployment image
 1
 2
 3
 4
 5
 6
 7
 8
 9
10
11
12
13
14
15
16
17
18
19
|
# 从Github页面获取你所运行的K3s版本及文件
# https://github.com/rancher/k3s/releases
k3s二进制文件+镜像tar文件

# 将tar文件放在images目录下
$ sudo mkdir -p /var/lib/rancher/k3s/agent/images/
$ sudo cp ./k3s-airgap-images-$ARCH.tar /var/lib/rancher/k3s/agent/images/

# 将k3s二进制文件放在/usr/local/bin/k3s路径上
$ mv ./k3s /usr/local/bin/
$ chmod 755 /usr/local/bin/k3s

# 安装K3s-server
$ INSTALL_K3s_SKIP_DOWNLOAD=true ./install.sh

# 将agent加入到K3s集群
$ INSTALL_K3s_SKIP_DOWNLOAD=true \
    K3s_URL=https://myserver:6443 K3s_TOKEN=mynodetoken \
    ./install.sh
|
Upgrade the K3s version offline. After completing the offline installation of K3s, you can also upgrade the K3s version through a script or enable the automatic upgrade feature to keep the K3s version in the offline environment in sync with the latest K3s version.
Upgrade K3s version
 1
 2
 3
 4
 5
 6
 7
 8
 9
10
11
12
|
# 通过脚本升级
# https://github.com/rancher/k3s/releases
从Github页面下载要升级到的K3s版本

# 替换
# 复制并替换每个节点上/usr/local/bin中的旧K3s二进制文件
$ mv ./k3s /usr/local/bin/
$ chmod 755 /usr/local/bin/k3s
$ wget http://rancher-mirror.cnrancher.com/k3s/k3s-install.sh

# 重启K3s服务
$ sudo systemctl restart k3s.service
|
Dashboard and uninstallation
Three dashboard tools are recommended, corresponding to Kubernetes Dashboard, kube-explorer and Rancher UI, each with its own advantages and disadvantages.
Kubernetes Dashboard
1
2
3
4
5
|
# 部署Kubernetes仪表盘
$ GITHUB_URL=https://github.com/kubernetes/dashboard/releases
$ VERSION_KUBE_DASHBOARD=$(curl -w '%{url_effective}' -I -L -s -S \
    ${GITHUB_URL}/latest -o /dev/null | sed -e 's|.*/||')
$ sudo k3s kubectl create -f https://raw.githubusercontent.com/kubernetes/dashboard/${VERSION_KUBE_DASHBOARD}/aio/deploy/recommended.yaml
|
 1
 2
 3
 4
 5
 6
 7
 8
 9
10
11
12
13
14
15
16
17
18
19
20
21
22
23
24
25
26
|
# 仪表盘RBAC配置
# 本指南中创建的admin-user将在仪表盘中拥有管理权限
$ sudo k3s kubectl create \
    -f dashboard.admin-user.yml \
    -f dashboard.admin-user-role.yml

# dashboard.admin-user.yml
apiVersion: v1
kind: ServiceAccount
metadata:
  name: admin-user
  namespace: kubernetes-dashboard

# dashboard.admin-user-role.yml
apiVersion: rbac.authorization.k8s.io/v1
kind: ClusterRoleBinding
metadata:
  name: admin-user
roleRef:
  apiGroup: rbac.authorization.k8s.io
  kind: ClusterRole
  name: cluster-admin
subjects:
  - kind: ServiceAccount
    name: admin-user
    namespace: kubernetes-dashboard
|
 1
 2
 3
 4
 5
 6
 7
 8
 9
10
11
|
# 获得Bearer-Token
$ sudo k3s kubectl -n kubernetes-dashboard \
    describe secret admin-user-token | grep '^token'

# 本地访问仪表盘
# https://192.168.100.100:8443
# https://www.escapelife.site/posts/180e93f1.html
# https://www.escapelife.site/posts/538ec6b1.html
$ sudo k3s kubectl proxy
$ sudo kubectl -n kubernetes-dashboard port-forward \
    --address 0.0.0.0 svc/kubernets-dashboard 8443:443
|
 1
 2
 3
 4
 5
 6
 7
 8
 9
10
|
# 升级仪表盘
$ sudo k3s kubectl delete ns kubernetes-dashboard
$ GITHUB_URL=https://github.com/kubernetes/dashboard/releases
$ VERSION_KUBE_DASHBOARD=$(curl -w '%{url_effective}' -I -L -s -S ${GITHUB_URL}/latest -o /dev/null | sed -e 's|.*/||')
$ sudo k3s kubectl apply -f https://raw.githubusercontent.com/kubernetes/dashboard/${VERSION_KUBE_DASHBOARD}/aio/deploy/recommended.yaml -f dashboard.admin-user.yml -f dashboard.admin-user-role.yml

# ## 删除仪表盘和admin-user配置
$ sudo k3s kubectl delete ns kubernetes-dashboard
$ sudo k3s kubectl delete clusterrolebinding kubernetes-dashboard
$ sudo k3s kubectl delete clusterrole kubernetes-dashboard
|
kube-explorer
kube-explorer is a portable resource manager for K8S without any dependencies.- and provides an almost completely stateless
K8S resource manager.
 1
 2
 3
 4
 5
 6
 7
 8
 9
10
11
|
# 从发布页面下载二进制文件
# https://github.com/cnrancher/kube-explorer

# 运行
# --kubeconfig 可以不配置(自己可以找到)
$ ./kube-explorer --kubeconfig=/etc/rancher/k3s/kube.yaml \
    --http-listen-port=9898 \
    --https-listen-port=0

# 打开浏览器访问
http://192.168.100.100:9898
|
Rancher UI
- You can import
K3s into Rancher UI to manage
- Official website Importing K3s clusters guidance document
1
2
3
4
5
6
7
8
9
|
# 导入K3s集群时,Rancher会将其识别为K3s类型,并且附件额外功能
# 1.能够升级K3s版本
# 2.可配置升级集群时升级的最大节点数
# 3.在主机详情页能够查看启动K3s集群时每个节点的配置参数和环境变量

# 配置K3s集群以允许导入到Rancher
$ curl -sfL https://rancher-mirror.rancher.cn/k3s/k3s-install.sh | \
    INSTALL_K3s_MIRROR=cn sh -s - \
    --write-kubeconfig-mode 644
|
Uninstall the K3s service
1
2
3
4
5
|
# 主节点
$ /usr/local/bin/k3s-uninstall.sh

# 工作节点
$ /usr/local/bin/k3s-agent-uninstall.sh
|
  1
  2
  3
  4
  5
  6
  7
  8
  9
 10
 11
 12
 13
 14
 15
 16
 17
 18
 19
 20
 21
 22
 23
 24
 25
 26
 27
 28
 29
 30
 31
 32
 33
 34
 35
 36
 37
 38
 39
 40
 41
 42
 43
 44
 45
 46
 47
 48
 49
 50
 51
 52
 53
 54
 55
 56
 57
 58
 59
 60
 61
 62
 63
 64
 65
 66
 67
 68
 69
 70
 71
 72
 73
 74
 75
 76
 77
 78
 79
 80
 81
 82
 83
 84
 85
 86
 87
 88
 89
 90
 91
 92
 93
 94
 95
 96
 97
 98
 99
100
101
102
103
104
105
106
107
108
109
110
111
112
113
114
115
|
# 包括docker等信息一并清理

#!/bin/bash

KUBE_SVC='
kubelet
kube-scheduler
kube-proxy
kube-controller-manager
kube-apiserver
'

for kube_svc in ${KUBE_SVC};
do
  # 停止服务
  if [[ `systemctl is-active ${kube_svc}` == 'active' ]]; then
    systemctl stop ${kube_svc}
  fi
  # 禁止服务开机启动
  if [[ `systemctl is-enabled ${kube_svc}` == 'enabled' ]]; then
    systemctl disable ${kube_svc}
  fi
done

# 停止所有容器
docker stop $(docker ps -aq)

# 删除所有容器
docker rm -f $(docker ps -qa)

# 删除所有容器卷
docker volume rm $(docker volume ls -q)

# 卸载mount目录
for mount in $(mount | grep tmpfs | grep '/var/lib/kubelet' | awk '{ print $3 }') /var/lib/kubelet /var/lib/rancher;
do
  umount $mount;
done

# 备份目录
mv /etc/kubernetes /etc/kubernetes-bak-$(date +"%Y%m%d%H%M")
mv /var/lib/etcd /var/lib/etcd-bak-$(date +"%Y%m%d%H%M")
mv /var/lib/rancher /var/lib/rancher-bak-$(date +"%Y%m%d%H%M")
mv /opt/rke /opt/rke-bak-$(date +"%Y%m%d%H%M")

# 删除残留路径
rm -rf /etc/ceph \
    /etc/cni \
    /opt/cni \
    /run/secrets/kubernetes.io \
    /run/calico \
    /run/flannel \
    /var/lib/calico \
    /var/lib/cni \
    /var/lib/kubelet \
    /var/log/containers \
    /var/log/kube-audit \
    /var/log/pods \
    /var/run/calico \
    /usr/libexec/kubernetes

# 清理网络接口
no_del_net_inter='
lo
docker0
eth
ens
bond
'

network_interface=`ls /sys/class/net`

for net_inter in $network_interface;
do
  if ! echo "${no_del_net_inter}" | grep -qE ${net_inter:0:3}; then
    ip link delete $net_inter
  fi
done

# 清理残留进程
port_list='
80
443
6443
2376
2379
2380
8472
9099
10250
10254
'

for port in $port_list;
do
  pid=`netstat -atlnup | grep $port | awk '{print $7}' | awk -F '/' '{print $1}' | grep -v - | sort -rnk2 | uniq`
  if [[ -n $pid ]]; then
    kill -9 $pid
  fi
done

kube_pid=`ps -ef | grep -v grep | grep kube | awk '{print $2}'`

if [[ -n $kube_pid ]]; then
  kill -9 $kube_pid
fi

# 清理Iptables表
## 注意:如果节点Iptables有特殊配置,以下命令请谨慎操作
sudo iptables --flush
sudo iptables --flush --table nat
sudo iptables --flush --table filter
sudo iptables --table nat --delete-chain
sudo iptables --table filter --delete-chain
systemctl restart docker
|
Notes
For the components we want to use, we can disable the default components at startup and deploy the components you need manually (usually under a specified directory that is automatically pulled up as the service starts) for flexibility.
1
2
3
|
# 查看所有Pod服务
# 比如helm/coredns也不是自带的就是通过这个方式创建的
$ sudo kubectl get pods -A
|
Register Agent node
- Working node password storage:
/etc/rancher/node/password.
- Password storage for master node:
/var/lib/rancher/k3s/server/cred/node-passwd.
Running the registration command at the agent node will initiate a websocket connection with the server node, which will then create a random password on top of the worker node. Then it will take this password and the hostname of the worker node and send it to the master node. The master node then saves this information ( k8s secrets) and any subsequent attempts must use the same password.
1
2
3
4
5
6
7
8
9
|
# 工作节点的密码信息(password+hostname)
$ sudo cat /etc/rancher/node/password

# 查看主节点的密码信息
# https://docs.rancher.cn/docs/k3s/architecture/_index#注册-agent-节点
$ sudo kubectl get secret k3s2.node-password.k3s -o yaml -n kube-system

# 可以查看日志信息验证这个信息的存在
$ sudo tail -200f /var/log/syslog | grep k3s
|
1
2
3
|
# 发现节点信息提示NotReady状态
# 可以尝试删除节点的密码存储信息,之后会自动获取新的
$ sudo kubectl delete secret k3s2.node-password.k3s -n kube-system
|
Custom Storage Types
After the cluster starts, a local-path component is started by default to provide service mount storage in the form of PVC by default. Afterwards, it is stored under the /var/lib/rancher/k3s/server/storageclass directory.
 1
 2
 3
 4
 5
 6
 7
 8
 9
10
11
12
|
# 查看组件
$ sudo kubectl get pods -A

# 查看对应存储
$ sudo kubectl get storageclass

# 可以使用参数修改默认存储地址
# --default-local-storage-path value
$ curl -sfL http://rancher-mirror.cnrancher.com/k3s/k3s-install.sh | \
    INSTALL_K3s_MIRROR=cn \
    INSTALL_K3s_EXEC='--etcd-snapshot-schedule-cron * */5 * * *' \
    sh -
|
4. K3s Cluster Upgrade
When upgrading K3s, the K3s service will restart or stop, but the K3s containers will continue to run. To stop all K3s containers and reset their state, you can use the k3s-killall.sh script. The killall script cleans up the containers, the K3s directory, and the network components, and also removes the iptables chain and all associated rules. Cluster data is not deleted.
Manual upgrade - Upgrade K3s using the install script
You can upgrade K3s by using the install script, or manually install the binaries for the desired version.
 1
 2
 3
 4
 5
 6
 7
 8
 9
10
11
|
# 升级到最新stable版本
$ curl -sfL https://get.k3s.io | sh -

# 升级到latest版本
$ curl -sfL https://get.k3s.io | INSTALL_K3s_CHANNEL=latest sh -

# 升级到v1.20的最新版本
$ curl -sfL https://get.k3s.io | INSTALL_K3s_CHANNEL="v1.20" sh -

# 升级到指定版本
$ curl -sfL https://get.k3s.io | INSTALL_K3s_VERSION=vX.Y.Z-rc1 sh -
|
Manual upgrade - Upgrade K3s manually using binaries
You can upgrade K3s by using the install script, or manually install the binaries for the desired version.
 1
 2
 3
 4
 5
 6
 7
 8
 9
10
11
|
# 从发布下载所需版本的K3s二进制文件
https://github.com/rancher/k3s/releases

# 将下载的二进制文件复制到/usr/local/bin/k3s
$ mv ./k3s /usr/local/bin/k3s

# 停止旧的K3s二进制文件
$ curl -sfL https://get.k3s.io | INSTALL_K3s_CHANNEL="v1.20" sh -

# 启动新的K3s二进制文件
$ curl -sfL https://get.k3s.io | INSTALL_K3s_VERSION=vX.Y.Z-rc1 sh -
|
You can use Rancher’s system-upgrade-controller to manage K3s cluster upgrades. This is a Kubernetes native approach to cluster upgrades. It uses custom resource definitions ( CRD), schedules, and controllers to schedule upgrades based on configured schedules.
The controller schedules upgrades by monitoring the plan and selecting the nodes on which to run upgrade jobs, and the plan defines which nodes should be upgraded via a tag selector. When a job completes successfully, the controller tags the node it is running on accordingly.
Automatic upgrade - manually upgrade K3s using binary files
1
2
|
# 将system-upgrade-controller安装到您的集群中
$ kubectl apply -f https://github.com/rancher/system-upgrade-controller/releases/download/v0.6.2/system-upgrade-controller.yaml
|
 1
 2
 3
 4
 5
 6
 7
 8
 9
10
11
12
13
14
15
16
17
18
19
20
21
22
23
24
25
26
27
28
29
30
31
32
33
34
35
36
37
38
39
40
41
42
43
44
45
46
|
# 配置计划
# 建议您最少创建两个计划
# 升级server节点的计划和升级agent节点的计划

# Server plan
apiVersion: upgrade.cattle.io/v1
kind: Plan
metadata:
  name: server-plan
  namespace: system-upgrade
spec:
  concurrency: 1
  cordon: true
  nodeSelector:
    matchExpressions:
    - key: node-role.kubernetes.io/master # 选择主节点
      operator: In
      values:
      - "true"
  serviceAccountName: system-upgrade
  upgrade:
    image: rancher/k3s-upgrade
  version: v1.20.4+k3s1

# Agent plan
apiVersion: upgrade.cattle.io/v1
kind: Plan
metadata:
  name: agent-plan
  namespace: system-upgrade
spec:
  concurrency: 1
  cordon: true
  nodeSelector:
    matchExpressions:
    - key: node-role.kubernetes.io/master # 选择工作节点
      operator: DoesNotExist
  prepare:
    args:
    - prepare
    - server-plan
    image: rancher/k3s-upgrade
  serviceAccountName: system-upgrade
  upgrade:
    image: rancher/k3s-upgrade
  version: v1.20.4+k3s1
|
1
2
3
4
5
6
7
8
9
|
# 自动升级到最新版本(不指定版本)
apiVersion: upgrade.cattle.io/v1
kind: Plan
...
spec:
  ...
  upgrade:
    image: rancher/k3s-upgrade
  channel: https://update.k3s.io/v1-release/channels/stable
|
5. K3s Backup Recovery
Backup and restore with embedded SQLite datastore
 1
 2
 3
 4
 5
 6
 7
 8
 9
10
|
# 方式1:备份/恢复数据目录

# 备份
$ cp -rf /var/lib/rancher/k3s/server/db /opt/db

# 恢复
$ systemctl stop k3s
$ rm -rf /var/lib/rancher/k3s/server/db
$ cp -rf /opt/db /var/lib/rancher/k3s/server/db
$ systemctl start k3s
|
 1
 2
 3
 4
 5
 6
 7
 8
 9
10
11
12
13
14
15
16
17
18
19
|
# 方式2:通过 SQLite cli

# 备份
sqlite3 /var/lib/rancher/k3s/server/db/state.db
SQLite version 3.22.0 2018-01-22 18:45:57
Enter ".help" for usage hints.
sqlite> .backup "/opt/kine.db"
sqlite> .exit

# 恢复
$ sudo systemctl stop k3s

sqlite3 /var/lib/rancher/k3s/server/db/state.db
SQLite version 3.22.0 2018-01-22 18:45:57
Enter ".help" for usage hints.
sqlite> .restore '/opt/kine.db'
sqlite> .exit

$ sudo systemctl start k3s
|
When using an external data store, backup and restore operations are handled outside of K3s. The database administrator needs to perform backups of the external database or restore from snapshots or dumps. We recommend that the database be configured to perform periodic snapshots.
Use external data storage for backup and recovery
1
2
3
4
5
6
7
|
# 备份
$ mysqldump -uroot -p --all-databases --master-data > k3s-dbdump.db

# 恢复
$ systemctl stop k3s
$ mysql -uroot -p  < k3s-dbdump.db
$ systemctl start k3s
|
Backup and restore with embedded etcd datastore
 1
 2
 3
 4
 5
 6
 7
 8
 9
10
|
# 创建快照(K3s默认启用快照)
# 快照目录默认: /var/lib/rancher/k3s/server/db/snapshots

# 要配置快照间隔或保留的快照数量
--etcd-disable-snapshots       禁用自动etcd快照
--etcd-snapshot-schedule-cron  定时快照的时间点;认值为每12小时触发一次
--etcd-snapshot-retention      保留的快照数量;默认值为5
--etcd-snapshot-dir            保存数据库快照的目录路径
--cluster-reset                忘记所有的对等体;成为新集群的唯一成员
--cluster-reset-restore-path   要恢复的快照文件的路径
|
When K3s restores from a backup, the old data directory will be moved to /var/lib/rancher/k3s/server/db/etcd-old/ . Then K3s will try to restore the snapshot by creating a new data directory, and then start etcd from a new K3s cluster with one etcd member.
1
2
3
4
5
6
|
# 从快照恢复集群
# 使用--cluster-reset选项运行K3s
# 同时给出--cluster-reset-restore-path
$ ./k3s server \
    --cluster-reset \
    --cluster-reset-restore-path=<PATH-TO-SNAPSHOT>
|
6. K3s volumes and storage
When deploying an application that needs to retain data, you need to create persistent storage. Persistent storage allows you to store application data from outside the pod running the application. This type of storage allows you to maintain application data even if the application’s pod fails.
Setting up Local Storage Provider support
K3s comes with Rancher’s Local Path Provisioner (LPP), which enables the creation of pvc out-of-the-box using local storage on the respective node. Depending on the user configuration, LPP will automatically create hostPath-based persistent volumes on the node. It takes advantage of the features introduced by the Local Persistent Volume feature of K8s, but it is a simpler solution than the local pv feature built into K8s.
 1
 2
 3
 4
 5
 6
 7
 8
 9
10
11
12
13
14
15
16
17
18
19
20
21
22
23
24
25
26
27
28
29
30
31
32
33
34
|
# pvc.yaml
apiVersion: v1
kind: PersistentVolumeClaim
metadata:
  name: local-path-pvc
  namespace: default
spec:
  accessModes:
    - ReadWriteOnce
  storageClassName: local-path
  resources:
    requests:
      storage: 2Gi

# pod.yaml
apiVersion: v1
kind: Pod
metadata:
  name: volume-test
  namespace: default
spec:
  containers:
  - name: volume-test
    image: nginx:stable-alpine
    imagePullPolicy: IfNotPresent
    volumeMounts:
    - name: volv
      mountPath: /data
    ports:
    - containerPort: 80
  volumes:
  - name: volv
    persistentVolumeClaim:
      claimName: local-path-pvc
|
1
2
3
4
5
6
|
# 应用yaml服务
$ kubectl create -f pvc.yaml pod.yaml

# 确认PV和PVC已创建
$ kubectl get pv
$ kubectl get pvc
|
Setting up Longhorn support
K3s supports Longhorn (which is an open source distributed block storage system for K8s).
 1
 2
 3
 4
 5
 6
 7
 8
 9
10
11
12
13
14
15
16
17
18
19
20
21
22
23
24
25
26
27
28
29
30
31
32
33
34
35
36
37
|
# 安装Longhorn
# 将被安装在命名空间longhorn-system中
$ kubectl apply -f https://raw.githubusercontent.com/longhorn/longhorn/master/deploy/longhorn.yaml

# pvc.yaml
apiVersion: v1
kind: PersistentVolumeClaim
metadata:
  name: longhorn-volv-pvc
spec:
  accessModes:
    - ReadWriteOnce
  storageClassName: longhorn
  resources:
    requests:
      storage: 2Gi

# pod.yaml
apiVersion: v1
kind: Pod
metadata:
  name: volume-test
  namespace: default
spec:
  containers:
  - name: volume-test
    image: nginx:stable-alpine
    imagePullPolicy: IfNotPresent
    volumeMounts:
    - name: volv
      mountPath: /data
    ports:
    - containerPort: 80
  volumes:
  - name: volv
    persistentVolumeClaim:
      claimName: longhorn-volv-pvc
|
1
2
3
4
5
6
|
# 应用yaml服务
$ kubectl create -f pvc.yaml pod.yaml

# 确认PV和PVC已创建
$ kubectl get pv
$ kubectl get pvc
|
CoreDNS
CoreDNS is deployed when the agent node is started. To disable it, run the -disable coredns option on each server. If you do not install CoreDNS, you will need to install a clustered DNS provider yourself.
1
2
3
4
5
6
|
# 如何修改coredns参数
# /var/lib/rancher/k3s/server/manifests/coredns.yaml
# 该文件重启K3s服务的话会导致coredns配置重新初始化
1.将coredns.yaml保存到其他目录
2.通过 --disable coredns 禁用coredns
3.复制coredns.yaml到/var/lib/rancher/k3s/server/manifests/目录并修改参数
|
Traefik Ingress Controller
When starting the server, Traefik will be deployed by default and any changes to this file will be automatically deployed to Kubernetes in a similar way to kubectl apply, which will use ports 80 and 443 on the host.
1
2
3
|
# 操作和上面基本是一致的
# 请使用 --disable traefik 选项启动每个server
# /var/lib/rancher/k3s/server/manifests/traefik.yaml
|
 1
 2
 3
 4
 5
 6
 7
 8
 9
10
11
12
13
14
15
16
17
18
19
20
21
22
23
24
25
26
27
28
29
30
31
32
33
34
35
36
37
38
39
|
# 如何启用 treafik2 dashboard
# http://traefik.example.com/dashboard

# Note: in a kubernetes secret the string (e.g. generated by htpasswd) must be base64-encoded first.
# To create an encoded user:password pair, the following command can be used:
# htpasswd -nb admin admin | openssl base64

apiVersion: v1
kind: Secret
metadata:
  name: authsecret
  namespace: default
data:
  users: |2
    YWRtaW46JGFwcjEkLkUweHd1Z0EkUjBmLi85WndJNXZWRFMyR2F2LmtELwoK

---
apiVersion: traefik.containo.us/v1alpha1
kind: IngressRoute
metadata:
  name: traefik-dashboard
spec:
  routes:
    - match: Host(`traefik.example.com`) && (PathPrefix(`/api`) || PathPrefix(`/dashboard`))
      kind: Rule
      services:
        - name: api@internal
          kind: TraefikService
      middlewares:
        - name: auth

---
apiVersion: traefik.containo.us/v1alpha1
kind: Middleware
metadata:
  name: auth
spec:
  basicAuth:
    secret: authsecret # Kubernetes secret named "secretName"
|
Service Load Balancer
K3s provides a load balancer called Klipper Load Balancer that can use the available host ports. It is allowed to create Service of type LoadBalancer, but does not include an implementation of LB. Some LB services require a cloud provider, such as Amazon EC2. In contrast, K3s service LB makes it possible to use LB services without a cloud provider.
8. K3s and Helm
Helm is a package management tool for Kubernetes. Helm Chart provides a templated syntax for Kubernetes YAML manifest files, and the corresponding chart can be installed via Helm. K3s does not require any special configuration to use the Helm command line tool.
Automatically deploy Helm charts
Any Kubernetes manifests found in /var/lib/rancher/k3s/server/manifests will be automatically deployed to K3s in a manner similar to kubectl apply. manifests deployed in this way are managed as AddOn custom resources. You will find AddOns for packaged components such as CoreDNS, Local-Storage, etc. The AddOns are automatically created by the deployment controller and named according to their filenames in the manifests directory.
1
2
3
4
5
|
# 查看运行AddOn资源
$ kubectl get addon -A

# 也可以将Helm-Chart作为AddOns部署
https://github.com/rancher/helm-controller/
|
Using Helm CRD
The HelmChart CRD captures most of the options that you would normally pass to the helm command line tool. Here is an example of how to deploy Grafana from the default Chart repository, overriding some of the default Chart values. Note that the HelmChart resource itself is in the kube-system namespace, but the Chart resource will be deployed to the monitoring namespace.
 1
 2
 3
 4
 5
 6
 7
 8
 9
10
11
12
13
14
15
16
17
18
19
|
apiVersion: helm.cattle.io/v1
kind: HelmChart
metadata:
  name: grafana
  namespace: kube-system
spec:
  chart: stable/grafana
  targetNamespace: monitoring
  set:
    adminPassword: "NotVerySafePassword"
  valuesContent: |-
    image:
      tag: master
    env:
      GF_EXPLORE_ENABLED: true
    adminUser: admin
    sidecar:
      datasources:
        enabled: true
|
9. K3s Advanced Options
Certificate Rotation
By default, a certificate for K3s expires in 12 months. If the certificate has expired or has less than 90 days remaining, the certificate is rotated when K3s is restarted.
 1
 2
 3
 4
 5
 6
 7
 8
 9
10
11
12
13
|
# 查询K3s证书过期时间
$ for i in `ls /var/lib/rancher/k3s/server/tls/*.crt`; \
  do \
    echo $i;\
    openssl x509 -enddate -noout -in $i; \
  done

# 修改系统时间为证书过期前90天或证书过期后
$ timedatectl set-ntp no
$ date -s 20220807

# 重启K3s服务
$ service k3s restart
|
Additional preparation for Red Hat and CentOS
It is recommended to run the following command to disable the firewalld firewall.
1
2
3
|
### Additional preparation for Red Hat and CentOS

It is recommended to run the following command to disable the `firewalld` firewall.
|