This article shares a scenario on how to build a VM image on a VMware vSphere environment using Packer, and how to Run a k3s cluster and then run redfish-esxi-os-installer through the argo-workflow workflow engine muzi502/redfish-esxi-os-installer) to automate the installation of ESXi OS on the bare metal server.
Prerequisites
- Download the ISO image of Base OS in advance, for example CentOS-7-x86_64-Minimal-2009.iso.
- A vCenter Server and a VMware ESXi are required -esx.html) host.
- A DHCP server is required on the ESXi’s VM Network network to assign IPs to the VMs.
Packer
When I was playing with VMware ESXi a long time ago, I didn’t have access to Packer, so I had to use the manual installation of virtual machine templates, which was time-consuming and error-prone. Here’s an introduction to this tool for automating the construction of virtual machine images.
Introduction
Packer is an open source VM image builder from hashicorp, similar to OpenStack diskimage -builder, AWS EC2 Image Builder, but these two only support their own platforms. Packer can support mainstream public, private and hybrid clouds, which is much higher than both of them. It is interesting to note that Packer is as important in IaaS virtualization as Docker is in PaaS container virtualization, one for building virtual machine images and the other for building container images, both of which were founded in 2013.
The Kubernetes community’s image-builder project is a project that uses Packer to build some of the public and private cloud VM templates provided to [cluster-api](https: //github.com/kubernetes-sigs/cluster-api) project, I highly recommend you to take a look at the code of this project, I just started to get familiar with Packer from this project, and learned a lot from it.
The following is an introduction to the basic use of Packer
Installation
For Linux distributions, it is recommended to download the binary installation package directly to install it, installation via package manager feels a bit cumbersome.
If you are a macOS user, the brew install packer command will install it directly.
Configuration
Unlike Docker, which has a Dockerfile file that defines how to build container images, Packer builds VM images by stitching together a series of configuration files, mainly consisting of Builders, Provisioners, Post-processors. The Builder is mainly the parameters related to the IaaS Provider builder; Provisioner is used to configure some tasks to be run during the build process; Post-processors is used to configure some post-processing operations after the build action is completed; the following is a detailed description of the use of these configurations in turn.
In addition, Packer’s recommended configuration syntax is HCL2, but I personally feel that the syntax style of HCL is strange, not as neat and nice as json, so I use json to configure the following unified, in fact, the parameters are the same, but the format is not the same.
vars/var-file
Packer’s variable profiles are somewhat similar to vars in Ansible, and it makes sense to sort each parameter by its scope and put them in a separate profile, which is easier to maintain. After referring to the ova build in the image-builder project, I have divided the parameters into the following profiles according to their different roles Several configuration files.
-
vcenter.json: mainly used to configure some parameters related to vCenter, such as datastore, datacenter, resource_pool, vcenter_server, etc.; in addition, it is recommended to use environment variables for the username and password of vcenter to avoid encoding them in plain text in the file.
1 2 3 4 5 6 7 8 9 10 11 12 13 14 15{ "folder": "Packer", "resource_pool": "Packer", "cluster": "Packer", "datacenter": "Packer", "datastore": "Packer", "convert_to_template": "false", "create_snapshot": "true", "linked_clone": "true", "network": "VM Network", "password": "password", "username": "administrator@vsphere.local", "vcenter_server": "vcenter.k8s.li", "insecure_connection": "true" } -
centos7.json: mainly used to configure some parameters for installing CentOS via ISO, such as the ISO download address, ISO checksum, kickstart file path, shutdown command, isolinux boot parameters, etc.
1 2 3 4 5 6 7 8 9 10 11 12 13 14 15 16 17{ "boot_command_prefix": "<tab> text ks=hd:fd0:", "boot_command_suffix": "/7/ks.cfg<enter><wait>", "boot_media_path": "/HTTP", "build_name": "centos-7", "distro_arch": "amd64", "distro_name": "centos", "distro_version": "7", "floppy_dirs": "./kickstart/{{user `distro_name`}}/http/", "guest_os_type": "centos7-64", "iso_checksum": "07b94e6b1a0b0260b94c83d6bb76b26bf7a310dc78d7a9c7432809fb9bc6194a", "iso_checksum_type": "sha256", "iso_url": "https://images.edge.kernel.org/centos/7.9.2009/isos/x86_64/CentOS-7-x86_64-Minimal-2009.iso", "os_display_name": "CentOS 7", "shutdown_command": "shutdown -h now", "vsphere_guest_os_type": "centos7_64Guest" } -
photon3.json: mainly used to configure some parameters for installing Photon3 OS via ISO, same as above centos7.json above.
 1
 2
 3
 4
 5
 6
 7
 8
 9
10
11
12
13
14
15
16
17
{ "boot_command_prefix": "<esc><wait> vmlinuz initrd=initrd.img root/dev/ram0 loglevel=3 photon.media=cdrom ks=", "boot_command_suffix": "/3/ks.json<enter><wait>", "boot_media_path": "http://{{ .HTTPIP }}:{{ .HTTPPort }}", "build_name": "photon-3", "distro_arch": "amd64", "distro_name": "photon", "distro_version": "3", "guest_os_type": "vmware-photon-64", "http_directory": "./kickstart/{{user `distro_name`}}/http/", "iso_checksum": "c2883a42e402a2330d9c39b4d1e071cf9b3b5898", "iso_checksum_type": "sha1", "iso_url": "https://packages.vmware.com/photon/3.0/Rev3/iso/photon-minimal-3.0-a383732.iso", "os_display_name": "VMware Photon OS 64-bit", "shutdown_command": "shutdown now", "vsphere_guest_os_type": "vmwarePhoton64Guest" } -
common.json: some public parameters, such as the ssh username and password of the virtual machine (to be consistent with those set in kickstart), some hardware configuration of the virtual machine such as CPU, memory, hard disk, virtual machine version, NIC type, storage controller type, etc.
1 2 3 4 5 6 7 8 9 10 11 12 13 14 15 16 17 18 19 20 21 22{ "ssh_username": "root", "ssh_password": "password", "boot_wait": "15s", "disk_controller_type": "lsilogic", "disk_thin_provisioned": "true", "disk_type_id": "0", "firmware": "bios", "cpu": "2", "cpu_cores": "1", "memory": "4096", "disk_size": "65536", "network_card": "e1000", "ssh_timeout": "3m", "vmx_version": "14", "base_build_version": "{{user `template`}}", "build_timestamp": "{{timestamp}}", "build_name": "k3s", "build_version": "{{user `ova_name`}}", "export_manifest": "none", "output_dir": "./output/{{user `build_version`}}" }
Builder
A Builder is a configuration that tells the Packer what type of builder to use to build what kind of virtual machine image, mainly related to the underlying IaaS resource provider. For example, there are two builders in vSphere Builder as follows.
- vsphere-iso builds from an ISO installation OS, typically built as a virtual machine or VM template
- vsphere-clone builds by cloning the virtual machine, usually as an exported OVF/OVA file
The configuration parameters of different types of Builders may vary, so please refer to the Packer official documentation for the detailed usage and description of each parameter. Because the configuration of Packer parameters is too complicated, it is difficult to explain them clearly in a few words. The best way is to read the official documentation and some other projects’ implementations, and just learn from the gourd.
builders.json: most of the configuration parameters are referenced from the var-file. The advantage of pulling these parameters out separately is that some common parameters can be reused between different builders. For example, vsphere-iso and vsphere-clone are two different builders with the same datacenter, datastore, vcenter_server, and other parameters related to vCenter.
-
vsphere-iso : Build a virtual machine or VM template with an ISO installation OS.
1 2 3 4 5 6 7 8 9 10 11 12 13 14 15 16 17 18 19 20 21 22 23 24 25 26 27 28 29 30 31 32 33 34 35 36 37 38 39 40 41 42 43 44 45 46 47 48 49 50 51 52 53 54 55{ "builders": [ { "CPUs": "{{user `cpu`}}", "RAM": "{{user `memory`}}", "boot_command": [ "{{user `boot_command_prefix`}}", "{{user `boot_media_path`}}", "{{user `boot_command_suffix`}}" ], "boot_wait": "{{user `boot_wait`}}", "cluster": "{{user `cluster`}}", "communicator": "ssh", "convert_to_template": "{{user `convert_to_template`}}", "cpu_cores": "{{user `cpu_cores`}}", "create_snapshot": "{{user `create_snapshot`}}", "datacenter": "{{user `datacenter`}}", "datastore": "{{user `datastore`}}", "disk_controller_type": "{{user `disk_controller_type`}}", "firmware": "{{user `firmware`}}", "floppy_dirs": "{{ user `floppy_dirs`}}", "folder": "{{user `folder`}}", "guest_os_type": "{{user `vsphere_guest_os_type`}}", "host": "{{user `host`}}", "http_directory": "{{ user `http_directory`}}", "insecure_connection": "{{user `insecure_connection`}}", "iso_checksum": "{{user `iso_checksum_type`}}:{{user `iso_checksum`}}", "iso_urls": "{{user `iso_url`}}", "name": "vsphere-iso-base", "network_adapters": [ { "network": "{{user `network`}}", "network_card": "{{user `network_card`}}" } ], "password": "{{user `password`}}", "shutdown_command": "echo '{{user `ssh_password`}}' | sudo -S -E sh -c '{{user `shutdown_command`}}'", "ssh_clear_authorized_keys": "false", "ssh_password": "{{user `ssh_password`}}", "ssh_timeout": "4h", "ssh_username": "{{user `ssh_username`}}", "storage": [ { "disk_size": "{{user `disk_size`}}", "disk_thin_provisioned": "{{user `disk_thin_provisioned`}}" } ], "type": "vsphere-iso", "username": "{{user `username`}}", "vcenter_server": "{{user `vcenter_server`}}", "vm_name": "{{user `base_build_version`}}", "vm_version": "{{user `vmx_version`}}" } ] } -
vsphere-clone: Build a virtual machine by clone VM and export VM OVF templates.
1 2 3 4 5 6 7 8 9 10 11 12 13 14 15 16 17 18 19 20 21 22 23 24 25 26 27 28 29 30 31 32 33 34 35 36{ "builders": [ { "CPUs": "{{user `cpu`}}", "RAM": "{{user `memory`}}", "cluster": "{{user `cluster`}}", "communicator": "ssh", "convert_to_template": "{{user `convert_to_template`}}", "cpu_cores": "{{user `cpu_cores`}}", "create_snapshot": "{{user `create_snapshot`}}", "datacenter": "{{user `datacenter`}}", "datastore": "{{user `datastore`}}", "export": { "force": true, "manifest": "{{ user `export_manifest`}}", "output_directory": "{{user `output_dir`}}" }, "folder": "{{user `folder`}}", "host": "{{user `host`}}", "insecure_connection": "{{user `insecure_connection`}}", "linked_clone": "{{user `linked_clone`}}", "name": "vsphere-clone", "network": "{{user `network`}}", "password": "{{user `password`}}", "shutdown_command": "echo '{{user `ssh_password`}}' | sudo -S -E sh -c '{{user `shutdown_command`}}'", "ssh_password": "{{user `ssh_password`}}", "ssh_timeout": "4h", "ssh_username": "{{user `ssh_username`}}", "template": "{{user `template`}}", "type": "vsphere-clone", "username": "{{user `username`}}", "vcenter_server": "{{user `vcenter_server`}}", "vm_name": "{{user `build_version`}}" } ] }
Provisioner
Provisioner is to tell Packer how to build the image, somewhat similar to the RUN/_COPY/ADD commands in Dockerile, used to execute some commands/scripts, add some files to the virtual machine, call third-party plugins to perform some operations, etc.
In this configuration file, I use the file module to upload some scripts and dependencies to the VM, and then use the shell module to execute the install.sh installation script in the VM. If you are building a large number of builders, such as multiple Linux distributions, it is recommended to use Ansible for this scenario, as I have already done some OS distribution related operations in the ISO install OS build process. The operations performed with the shell here do not need to distinguish between Linux distributions, so ansible is not used.
|
|
post-processors
Some post-processors, such as "type": "manifest", can export some of the configuration parameters of the build process for use in other operations. Another example is "type": "shell-local" which executes some shell scripts, in this case a Python script to convert OVF to OVA.
|
|
Build
packer-vsphere-example The directory structure of the project is as follows.
|
|
Similar to docker, packer’s subcommand to perform build operations is also build, packer build, but the options supported by packer build are not as rich as those of docker. The core options are -except, -only, -var, and -var-file.
|
|
The long and stinky packer build command above is wrapped in Makefile. It’s a lot of parameters to enter manually, which can drive people crazy.
-
First define some default parameters, such as build version, build time, base template name, export ova file name, etc.
1 2 3 4 5 6 7 8 9 10 11 12 13 14 15 16 17 18# Ensure Make is run with bash shell as some syntax below is bash-specific SHELL:=/usr/bin/env bash .DEFAULT_GOAL:=help # Full directory of where the Makefile resides ROOT_DIR := $(shell dirname $(realpath $(firstword $(MAKEFILE_LIST)))) RELEASE_VERSION ?= $(shell git describe --tags --always --dirty) RELEASE_TIME ?= $(shell date -u +'%Y-%m-%dT%H:%M:%SZ') PACKER_IMAGE ?= hashicorp/packer:1.8 PACKER_CONFIG_DIR = $(ROOT_DIR)/packer PACKER_FORCE ?= false PACKER_OVA_PREFIX ?= k3s PACKER_BASE_OS ?= centos7 PACKER_OUTPUT_DIR ?= $(ROOT_DIR)/output PACKER_TEMPLATE_NAME ?= base-os-$(PACKER_BASE_OS) OVF_TEMPLATE ?= $(ROOT_DIR)/scripts/ovf_template.xml PACKER_OVA_NAME ?= $(PACKER_OVA_PREFIX)-$(PACKER_BASE_OS)-$(RELEASE_VERSION) -
Then define the vars and var-file parameters
1 2 3 4 5 6 7 8 9 10 11 12 13 14 15 16 17 18 19 20 21# 是否为强制构建,增加 force 参数 ifeq ($(PACKER_FORCE), true) PACKER_FORCE_ARG = --force=true endif # 定义 vars 可变参数,比如 vcenter 用户名、密码 等参数 PACKER_VARS = $(PACKER_FORCE_ARG) \ # 是否强制构建 --var ova_name=$(PACKER_OVA_NAME) \ # OVA 文件名 --var release_version=$(RELEASE_VERSION) \ # 发布版本 --var ovf_template=$(OVF_TEMPLATE) \ # OVF 模版文件 --var template=$(PACKER_TEMPLATE_NAME) \ # OVA 的 base 虚拟机模版名称 --var username=$${VCENTER_USERNAME} \ # vCenter 用户名(环境变量) --var password=$${VCENTER_PASSWORD} \ # vCenter 密码(环境变量) --var vcenter_server=$${VCENTER_SERVER} \ # vCenter 访问地址(环境变量) --var build_name=$(PACKER_OVA_PREFIX)-$(PACKER_BASE_OS) \ # 构建名称 --var output_dir=$(PACKER_OUTPUT_DIR)/$(PACKER_OVA_NAME) # OVA 导出的目录 # 定义 var-file 参数 PACKER_VAR_FILES = -var-file=$(PACKER_CONFIG_DIR)/vcenter.json \ # vCenter 的参数配置 -var-file=$(PACKER_CONFIG_DIR)/$(PACKER_BASE_OS).json \ # OS 的参数配置 -var-file=$(PACKER_CONFIG_DIR)/common.json # 一些公共配置 -
Finally define make targrt
1 2 3 4 5 6 7 8 9.PHONY: build-template # 通过 ISO 安装 OS 构建一个 base 虚拟机 build-template: ## build the base os template by iso packer build $(PACKER_VARS) -only vsphere-iso-base $(PACKER_VAR_FILES) $(PACKER_CONFIG_DIR)/builder.json .PHONY: build-ovf # 通过 clone 方式构建并导出 OVF/OVA build-ovf: ## build the ovf template by clone the base os template packer build $(PACKER_VARS) -only vsphere-clone $(PACKER_VAR_FILES) $(PACKER_CONFIG_DIR)/builder.json -
Building BASE templates
-
Build OVF templates and export to OVA
Build process
After wrapping the Packer configuration file and Makefile, we can run the make build-template and make build-ovf commands to build the VM template, and the overall build process is as follows.
- First build a business-independent base VM using ISO
- Build the business VM on top of the base VM by vsphere-clone
- Export the OVF virtual machine file and package it as a virtual machine template in OVA format
Building a Base Virtual Machine with vsphere-iso
The base virtual machine is a bit like the FROM base image in Dockerfile. In Packer, we can make a base virtual machine of something that will rarely be changed. Then we can clone a new virtual machine from this base virtual machine to complete the build process, which saves the overall build time and makes the build more efficient.
-
centos7 build output log
1 2 3 4 5 6 7 8 9 10 11 12 13 14 15 16 17 18 19 20 21 22 23 24 25 26 27 28 29 30 31 32 33 34 35 36 37 38 39 40 41 42 43 44 45 46 47 48 49 50 51 52 53 54 55 56 57 58 59 60 61 62 63 64vsphere-iso-base: output will be in this color. ==> vsphere-iso-base: File /root/.cache/packer/e476ea1d3ef3c2e3966a7081ac4239cd5ae5e8a3.iso already uploaded; continuing ==> vsphere-iso-base: File [Packer] packer_cache//e476ea1d3ef3c2e3966a7081ac4239cd5ae5e8a3.iso already exists; skipping upload. ==> vsphere-iso-base: the vm/template Packer/base-os-centos7 already exists, but deleting it due to -force flag ==> vsphere-iso-base: Creating VM... ==> vsphere-iso-base: Customizing hardware... ==> vsphere-iso-base: Mounting ISO images... ==> vsphere-iso-base: Adding configuration parameters... ==> vsphere-iso-base: Creating floppy disk... vsphere-iso-base: Copying files flatly from floppy_files vsphere-iso-base: Done copying files from floppy_files vsphere-iso-base: Collecting paths from floppy_dirs vsphere-iso-base: Resulting paths from floppy_dirs : [./kickstart/centos/http/] vsphere-iso-base: Recursively copying : ./kickstart/centos/http/ vsphere-iso-base: Done copying paths from floppy_dirs vsphere-iso-base: Copying files from floppy_content vsphere-iso-base: Done copying files from floppy_content ==> vsphere-iso-base: Uploading created floppy image ==> vsphere-iso-base: Adding generated Floppy... ==> vsphere-iso-base: Set boot order temporary... ==> vsphere-iso-base: Power on VM... ==> vsphere-iso-base: Waiting 15s for boot... ==> vsphere-iso-base: Typing boot command... ==> vsphere-iso-base: Waiting for IP... ==> vsphere-iso-base: IP address: 192.168.29.46 ==> vsphere-iso-base: Using SSH communicator to connect: 192.168.29.46 ==> vsphere-iso-base: Waiting for SSH to become available... ==> vsphere-iso-base: Connected to SSH! ==> vsphere-iso-base: Executing shutdown command... ==> vsphere-iso-base: Deleting Floppy drives... ==> vsphere-iso-base: Deleting Floppy image... ==> vsphere-iso-base: Eject CD-ROM drives... ==> vsphere-iso-base: Creating snapshot... ==> vsphere-iso-base: Clear boot order... Build 'vsphere-iso-base' finished after 6 minutes 42 seconds. ==> Wait completed after 6 minutes 42 seconds ==> Builds finished. The artifacts of successful builds are: --> vsphere-iso-base: base-os-centos7 [root@localhost:/vmfs/volumes/622aec5b-de94a27c-948e-00505680fb1d] ls packer_cache/ 51511394170e64707b662ca8db012be4d23e121f.iso d3e175624fc2d704975ce9a149f8f270e4768727.iso e476ea1d3ef3c2e3966a7081ac4239cd5ae5e8a3.iso [root@localhost:/vmfs/volumes/622aec5b-de94a27c-948e-00505680fb1d] ls -alh base-os-centos7/ total 4281536 drwxr-xr-x 1 root root 72.0K Apr 1 09:17 . drwxr-xr-t 1 root root 76.0K Apr 1 09:17 .. -rw------- 1 root root 4.0G Apr 1 09:17 base-os-centos7-3ea6b205.vswp -rw-r--r-- 1 root root 253 Apr 1 09:17 base-os-centos7-65ff34a3.hlog -rw------- 1 root root 64.0G Apr 1 09:17 base-os-centos7-flat.vmdk -rw------- 1 root root 8.5K Apr 1 09:17 base-os-centos7.nvram -rw------- 1 root root 482 Apr 1 09:17 base-os-centos7.vmdk -rw-r--r-- 1 root root 0 Apr 1 09:17 base-os-centos7.vmsd -rwxr-xr-x 1 root root 2.3K Apr 1 09:17 base-os-centos7.vmx -rw------- 1 root root 0 Apr 1 09:17 base-os-centos7.vmx.lck -rwxr-xr-x 1 root root 2.2K Apr 1 09:17 base-os-centos7.vmx~ -rw------- 1 root root 1.4M Apr 1 09:17 packer-tmp-created-floppy.flp -rw-r--r-- 1 root root 96.1K Apr 1 09:17 vmware.log root@devbox-fedora:/root # scp 192.168.24.43:/vmfs/volumes/Packer/base-os-centos7/packer-tmp-created-floppy.flp . root@devbox-fedora:/root # mount packer-tmp-created-floppy.flp /mnt root@devbox-fedora:/root # readlink /dev/disk/by-label/packer ../../loop2 root@devbox-fedora:/root # ls /mnt/HTTP/7/KS.CFG KS.CFG -
Photon3 Build Output Log
1 2 3 4 5 6 7 8 9 10 11 12 13 14 15 16 17 18 19 20 21 22 23 24 25 26 27 28 29 30 31vsphere-iso-base: output will be in this color. ==> vsphere-iso-base: File /root/.cache/packer/d3e175624fc2d704975ce9a149f8f270e4768727.iso already uploaded; continuing ==> vsphere-iso-base: File [Packer] packer_cache//d3e175624fc2d704975ce9a149f8f270e4768727.iso already exists; skipping upload. ==> vsphere-iso-base: the vm/template Packer/base-os-photon3 already exists, but deleting it due to -force flag ==> vsphere-iso-base: Creating VM... ==> vsphere-iso-base: Customizing hardware... ==> vsphere-iso-base: Mounting ISO images... ==> vsphere-iso-base: Adding configuration parameters... ==> vsphere-iso-base: Starting HTTP server on port 8674 ==> vsphere-iso-base: Set boot order temporary... ==> vsphere-iso-base: Power on VM... ==> vsphere-iso-base: Waiting 15s for boot... ==> vsphere-iso-base: HTTP server is working at http://192.168.29.171:8674/ ==> vsphere-iso-base: Typing boot command... ==> vsphere-iso-base: Waiting for IP... ==> vsphere-iso-base: IP address: 192.168.29.208 ==> vsphere-iso-base: Using SSH communicator to connect: 192.168.29.208 ==> vsphere-iso-base: Waiting for SSH to become available... ==> vsphere-iso-base: Connected to SSH! ==> vsphere-iso-base: Executing shutdown command... ==> vsphere-iso-base: Deleting Floppy drives... ==> vsphere-iso-base: Eject CD-ROM drives... ==> vsphere-iso-base: Creating snapshot... ==> vsphere-iso-base: Clear boot order... Build 'vsphere-iso-base' finished after 5 minutes 24 seconds. ==> Wait completed after 5 minutes 24 seconds ==> Builds finished. The artifacts of successful builds are: --> vsphere-iso-base: base-os-photon3
From the output of the packer build command, we can roughly deduce the main steps and principles of building a Base virtual machine with vsphere-iso.
- Download the ISO file to the local ${HOME}/.cache/packer directory and save it as checksum.iso, which has the advantage of making it easier to cache the ISO file and avoid repeated downloads.
- Upload the local ISO file to the datastore of vCenter, which is saved in the packer_cache directory of the datastore by default, skipping the upload process if the ISO file already exists.
- Create the virtual machine, configure the virtual machine hardware, mount the uploaded ISO file to the CD/ROM on the virtual machine, and set the boot boot entry to CD/ROM
- If boot_media_path is of type http, then listen to a random TCP port locally to run an http service to provide HTTP downloads of kickstart files; if it is a directory type, create the kickstart file as a floppy file, upload the file to the datastore, and insert the floppy file into the virtual machine.
- The virtual machine boots up to the ISO boot page and sends keyboard input via the vCenter API to insert the path to the kickstart file.
- Send a carriage return keyboard input through the vCenter API and the OS installer in the ISO reads kickstart for OS installation.
- Install the open-vm-tools utility in the kickstart script.
- Wait for the OS installation to finish, reboot into the installed OS after the installation is complete, and get the IP address via DHCP after the OS boots.
- Get the IP address of the virtual machine through vm-tools, then ssh to the virtual machine to execute the shutdown command.
- Shutting down the virtual machine and uninstalling unneeded devices such as ISOs and floppy drives.
- creating snapshots or converting virtual machines to templates.
Personally, I find it interesting that you can actually use vCenter or ESXi’s PutUsbScanCodes API to send some keyboard input commands to the virtual machine, which is amazing. Previously our project was to build the kickstart file as an ISO file and then modify the isolinux startup parameters by rebuilding the source ISO. We felt that this was a stupid way to rebuild the ISO, so we took Packer’s idea and used the built-in vm.keystrokes command in govc to send keyboard commands to the virtual machine to complete the operation of specifying the kickstart file path parameter. The specific govc commands can be found below.
|
|
Build business VM and export OVF/OVA via vsphere-clone
After building the Base VM via vsphere-iso, we use this base VM to clone a new VM to build our business VM image, packing in a bunch of tools like k3s, argo-workflow, redfish-esxi-os-installer.
|
|
From the output of the packer build command, we can roughly infer the build process.
- clone the virtual machine, modify the hardware configuration of the virtual machine
- boot up the virtual machine and get the IP address of the virtual machine through vm-tools
- Get the IP address of the virtual machine and wait for ssh to connect properly.
- Once ssh is connected, upload files via scp
- ssh remotely execute the install.sh script in the virtual machine
- Execute virtual machine shutdown commands
- Create a snapshot of the virtual machine
- Export virtual machine OVF files
- Export the manifest.json file of the build configuration parameters
- Execute the ova.py script to convert the OVF format to OVA based on the manifest.json configuration parameters
At this point, the entire VM template building process is complete, and we end up with an OVA-formatted VM template. When you use it, you only need to install VMware Workstation or Oracle VirtualBox on your local machine to import the virtual machine with one click, and then you can use it after booting, which is out of the box.
argo-workflow and k3s
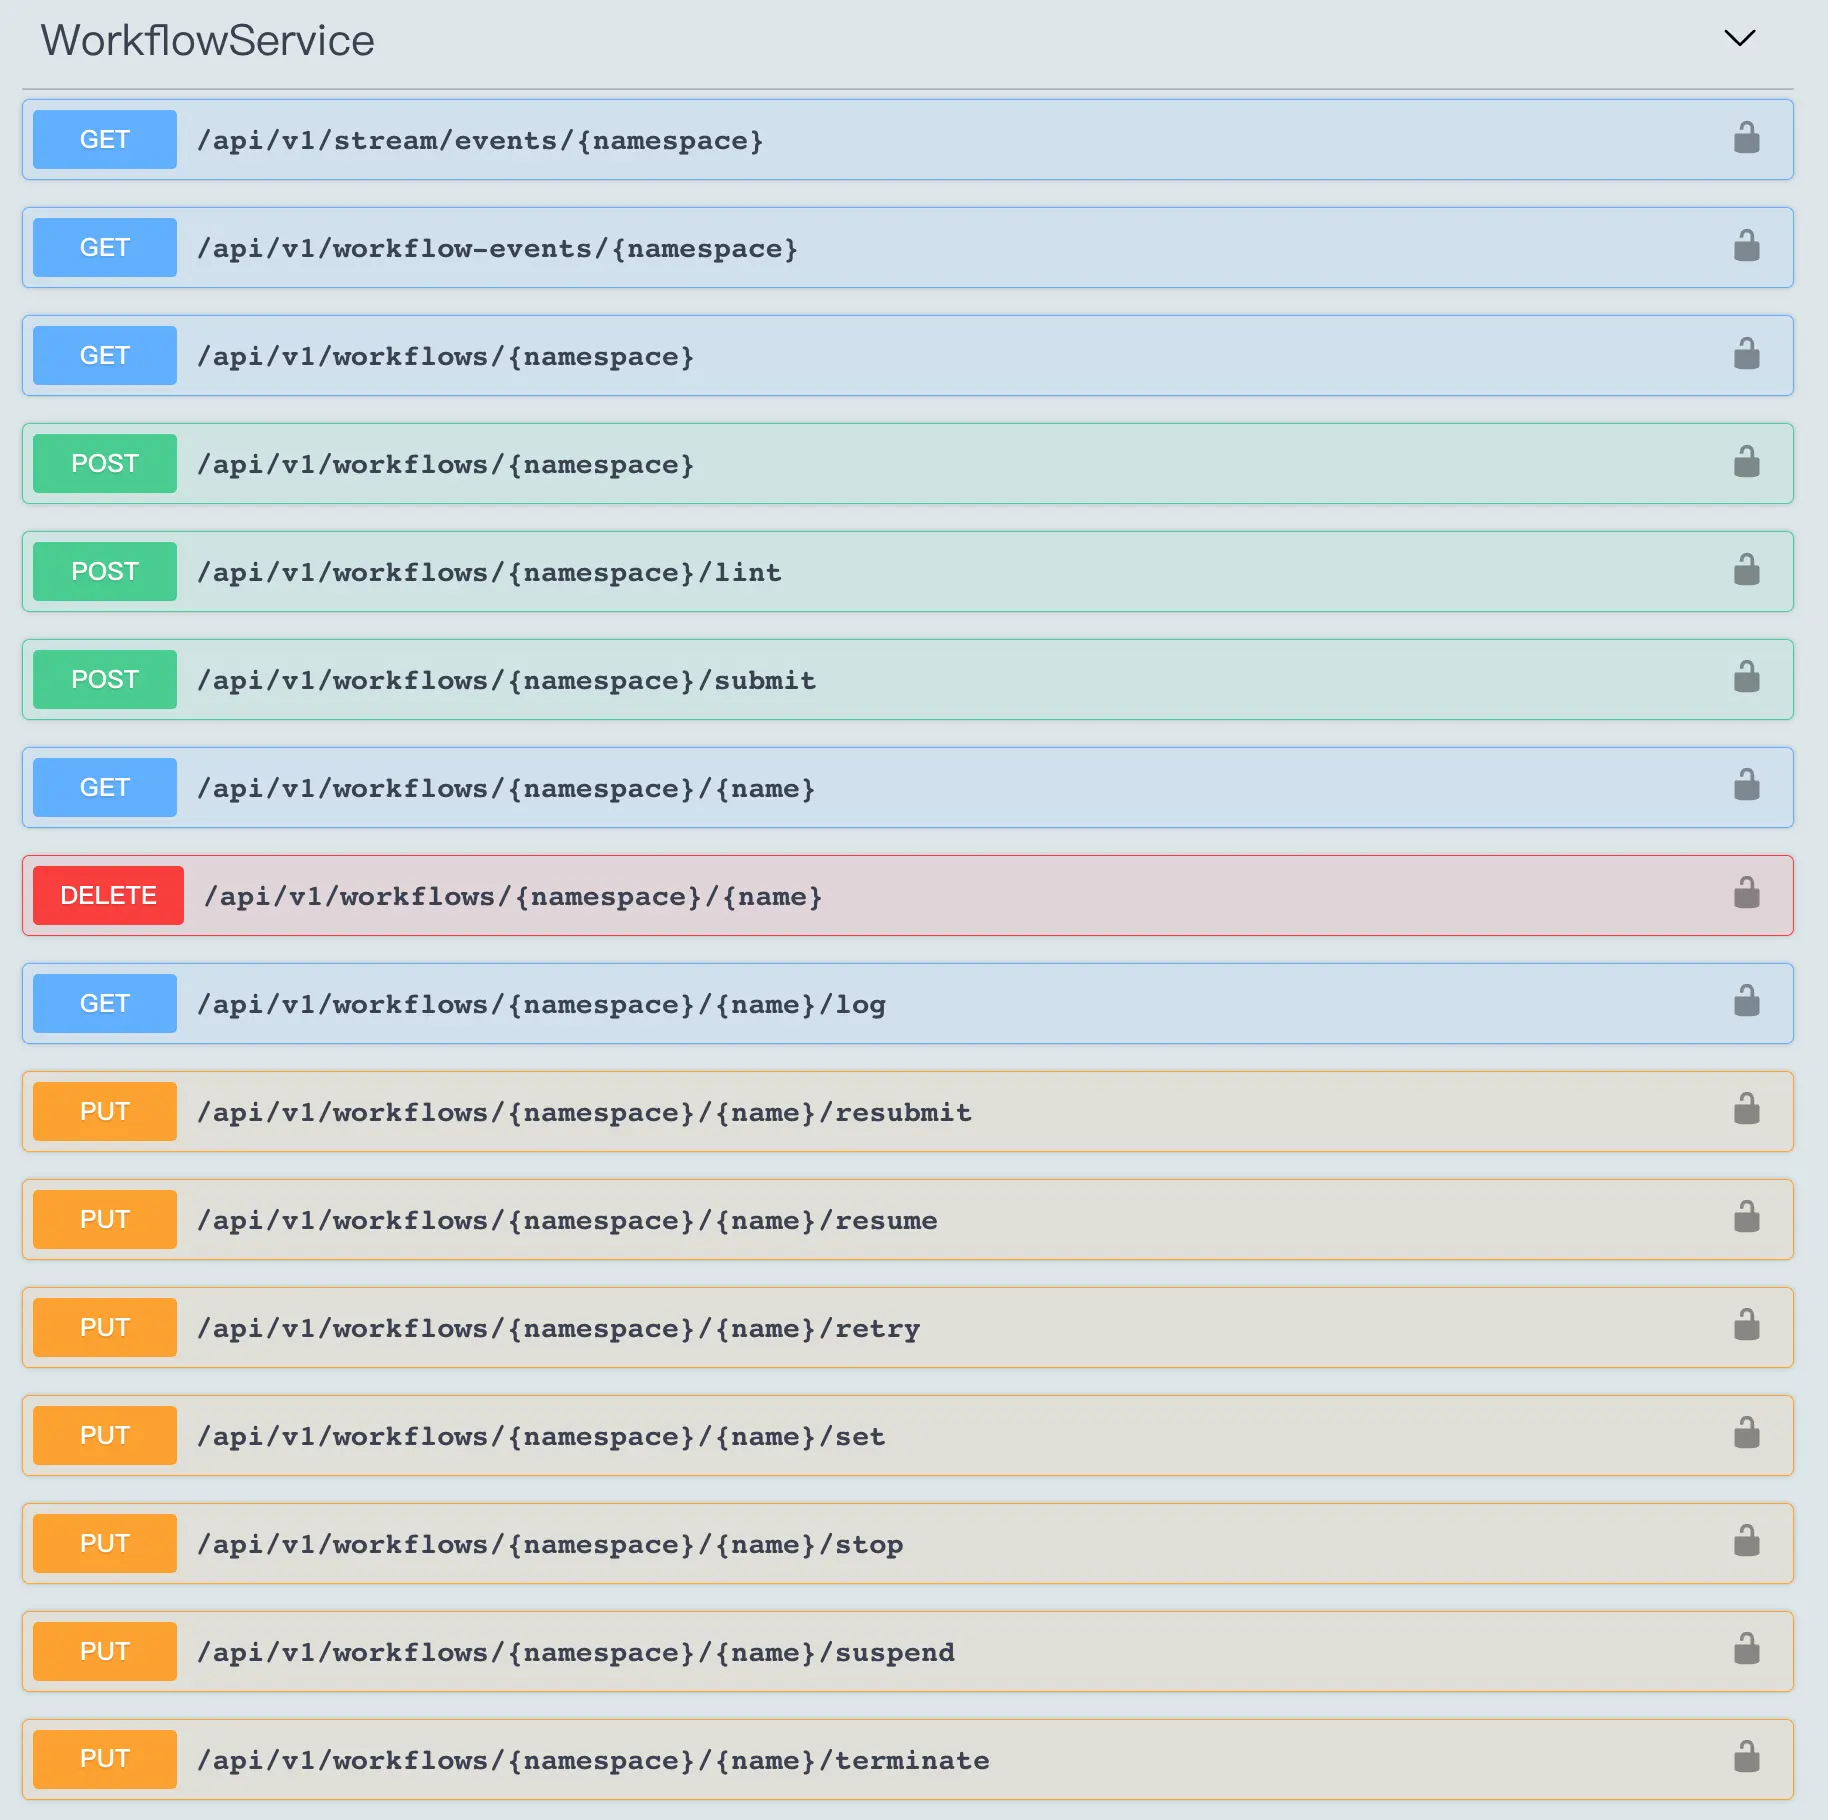
Using redfish-esxi-os-installer inside the VM is a bit special, it is executed inside the Pod of argo-workflow. In the workflow template file workflow.yaml we define several steps to run redfish-esxi-os-installer.
|
|
Since there is no Web UI and backend Server, you still need to edit /root/resources/workflow/configmap.yaml configuration file, and then execute kubectl create -f /root/resources/workflow to create the workflow workflow.
Once the workflow is created, you can view the progress and status of the workflow execution with the argo command.
|
|
argo-workflow
The reason why we use argo-workflow instead of command line tools like docker or nerdctl to run redfish-esxi-os-installer is that it is easier to schedule our installation and deployment tasks through argo-workflow to run multiple tasks at the same time, get the and logs, get task execution time, stop and retry, and so on. Using argo-workflow to orchestrate our installation and deployment tasks and getting the progress logs of the deployment tasks through argo-workflow’s RESTful API is a bit more cloud-native.
Our ultimate goal is to make this solution a product tool, providing a web UI to configure deployment parameters and displaying deployment progress logs. When we designed the solution, we also referred to the VMware Tanzu Community Edition: to deploy Tanzu management cluster, you need to have an existing k8s cluster, or a new k8s cluster through Tanzu. kind cluster. You can deploy a tanzu management cluster either through the tanzu command line or through the Tanzu Web UI, which is actually a product-oriented tool.
This solution is mainly for some productization scenarios, and the overall technology stack will be a bit complicated due to the introduction of K8s, a huge thing, but there are some benefits.
k8s and k3s
argo-workflow relies on a k8s cluster to run, and we have tested kubekey, sealos, kubespray, and k3s as common deployment tools internally. The k3s cluster takes up the least amount of resources. Referring to the resource requirements given in K3s Resource Analysis, a minimum of 768M RAM is required to run. For laptops with less than adequate hardware resources, k3s is undoubtedly the best solution available.
Another very important reason is that k3s server makes it easy to change the IP address of a single control plan node, which is not perceptible to the user. This allows the installation of k3s to be done at the time of building the OVA, rather than manually executing the installation script at the time of use.
As long as the boot virtual machine can be assigned an intranet IPv4 address via DHCP or manually configured with a static IP, k3s will be up and running out of the box, rather than having to fill out a complicated configuration file like kubekey, sealos, or kubespray, and then run some commands to install k8s cluster. This is a very user-friendly way of importing virtual machines out-of-the-box.
Of course, it is not impossible to use kubekey, sealos, or kubespray to install a k8s cluster when building a virtual machine, but the IP address of the virtual machine when we build it (for example, 10.172.20.223) and the IP address when we use it (for example, 192.168.20.11) are basically not the same.
In fact, the idea of installing k8s when building a VM template was originally borrowed from the cluster-api project. I built some of the files and container images that k8s depends on into the VM template, so that when deploying k8s, you don’t need to download these dependencies online. The difference is that we deploy the k8s cluster directly in advance with k3s, eliminating the need for the user to perform the deployment operation.
In summary, k3s is the best K8s base for this solution.
Other
Feeling of using
After using Packer for a while, I feel that it is an order of magnitude more complex and difficult to get started than Docker to build container images. This is probably because virtual machines do not have a unified industry standard for building, distributing, and running OCI like container images do. The creation and cloning of virtual machines is very tightly coupled with the underlying IaaS provider, which means that there are not many configuration parameters that can be reused between different IaaS providers such as vSphere, kvm/qemu. For example, vSphere has the concepts of datastore, datacenter, resource_pool, folder, etc., but kvm/qemu does not, which makes it difficult to unify them into one configuration.
OVA format
OVA is used instead of other formats like vagrant.box, vmdk, raw, qcow2, etc. because OVA supports the one-click import feature, which is easier to use on Windows. After all, installing Vagrant or qemu/KVM on Windows is enough of a hassle for you, VMware Workstation or Oracle VirtualBox are more widely used.
In addition, Packer does not support exporting virtual machines to OVA directly, but only to ovf via vCenter’s API by default.
There is also feedback in ISSUE Add support for exporting to OVA in vsphere-iso builder #9645 about the need to support OVA export, but Packer does not support it yet. To convert OVF to OVA I refer to the image-builder project’s image-build-ova.py to do this.
The installation of open-vm-tool failed
Since the ISO does not contain the open-vm-tool package, it is necessary to install open-vm-tools over the network during the ISO installation of the OS. open-vm-tools installation may fail if the network jittered during the installation. open-vm-tools installation failure cannot be sensed by the packer and can only be executed after The packer cannot sense the failure of open-vm-tools installation, and can only wait until it times out to get the virtual machine IP and then exit. There is no good way to do this, but to retry when installing open-vm-tools in kickstart until open-vm-tools is successfully installed.
Reducing exported vmdk file size
The size of the exported vmdk file of a virtual machine can be significantly reduced by zeroing the dd.
It should be noted that you should stop the k3s service before dd zeroing, otherwise the root root partition will be full when zeroing, which will cause kubelet to start GC and delete some images. I found some images missing after exporting a virtual machine before, and it took me a long time to find out that the kubelet GC deleted my images.
In addition, you can also delete some unnecessary files, such as containerd io.containerd.content.v1.content/blobs/sha256 some image layer of the original blob file is not needed, you can delete them, so as to reduce part of the disk space occupation.
|
|
Photon3
VMware’s Linux distribution Photon. Unlike traditional Linux distributions, Photon’s system is very lean, so using it instead of CentOS can reduce system resources to a certain extent, and the exported vmdk file is smaller than CentOS.
goss
During the build process we installed some other components on the k3s cluster, such as filebrowser, which provides file upload and download services, and argo-workflow, the workflow workflow engine, to ensure that these services are running properly, we need to check if they are working in different ways. Generally, we use commands like kubectl get to see if deployment, pod, daemonset, etc. are running properly, or curl to access the health check APIs for these services.
Because of the number and complexity of the checks, it is not very convenient to use traditional shell scripts to do this, which require parsing the exit codes and return values of each command. So we use goss to define some checks via YAML formatted configuration files and let it perform them in bulk, instead of writing a bunch of awk/grep commands to check each check in the shell.
-
k3s.yaml: check if k3s and the services it comes with by default are running properly.
1 2 3 4 5 6 7 8 9 10 11 12 13 14 15 16 17 18 19 20 21 22 23 24 25 26 27 28 29 30 31 32 33 34 35 36 37 38 39 40 41 42 43 44 45 46 47 48 49 50 51 52 53 54 55 56 57 58 59 60 61 62 63 64 65 66 67 68 69 70 71 72 73 74 75 76 77 78 79 80 81 82 83 84 85 86 87 88 89 90 91 92 93 94 95 96 97 98 99 100 101 102 103 104 105 106 107 108 109 110 111 112 113 114 115 116 117 118 119 120 121 122 123 124 125 126 127 128 129 130 131 132 133 134 135 136 137 138 139 140 141 142 143 144 145 146 147 148# DNS 类型的检查 dns: # 检查 coredns 是否能够正常解析到 kubernetes apiserver 的 service IP 地址 kubernetes.default.svc.cluster.local: resolvable: true addrs: - 10.43.0.1 server: 10.43.0.10 timeout: 600 skip: false # TCP/UDP 端口类型的检查 addr: # 检查 coredns 的 UDP 53 端口是否正常 udp://10.43.0.10:53: reachable: true timeout: 500 # 检查 cni0 网桥是否存在 interface: cni0: exists: true addrs: - 10.42.0.1/24 # 本机端口类型的检查 port: # 检查 ssh 22 端口是否正常 tcp:22: listening: true ip: - 0.0.0.0 skip: false # 检查 kubernetes apiserver 6443 端口是否正常 tcp6:6443: listening: true skip: false # 检查一些 systemd 服务的检查 service: # 默认禁用 firewalld 服务 firewalld: enabled: false running: false # 确保 sshd 服务正常运行 sshd: enabled: true running: true skip: false # 检查 k3s 服务是否正常运行 k3s: enabled: true running: true skip: false # 定义一些 shell 命令执行的检查 command: # 检查 kubernetes cheduler 组件是否正常 check_k8s_scheduler_health: exec: curl -k https://127.0.0.1:10259/healthz # 退出码是否为 0 exit-status: 0 stderr: [] # 标准输出中是否包含正确的输出值 stdout: ["ok"] skip: false # 检查 kubernetes controller-manager 是否正常 check_k8s_controller-manager_health: exec: curl -k https://127.0.0.1:10257/healthz exit-status: 0 stderr: [] stdout: ["ok"] skip: false # 检查 cluster-info 中输出的组件运行状态是否正常 check_cluster_status: exec: kubectl cluster-info | grep 'is running' exit-status: 0 stderr: [] timeout: 0 stdout: - CoreDNS - Kubernetes control plane skip: false # 检查节点是否处于 Ready 状态 check_node_status: exec: kubectl get node -o jsonpath='{.items[].status}' | jq -r '.conditions[-1].type' exit-status: 0 stderr: [] timeout: 0 stdout: - Ready skip: false # 检查节点 IP 是否正确 check_node_address: exec: kubectl get node -o wide -o json | jq -r '.items[0].status.addresses[] | select(.type == "InternalIP") | .address' exit-status: 0 stderr: [] timeout: 0 stdout: - {{ .Vars.ip_address }} skip: false # 检查 traefik loadBalancer 的 IP 地址是否正确 check_traefik_address: exec: kubectl -n kube-system get svc traefik -o json | jq -r '.status.loadBalancer.ingress[].ip' exit-status: 0 stderr: [] timeout: 0 stdout: - {{ .Vars.ip_address }} skip: false # 检查 containerd 容器运行是否正常 check_container_status: exec: crictl ps --output=json | jq -r '.containers[].metadata.name' | sort -u exit-status: 0 stderr: [] timeout: 0 stdout: - coredns - /lb-.*-443/ - /lb-.*-80/ - traefik skip: false # 检查 kube-system namespace 下的 pod 是否正常 check_kube_system_namespace_pod_status: exec: kubectl get pod -n kube-system -o json | jq -r '.items[] | select((.status.phase != "Running") and (.status.phase != "Succeeded") and (.status.phase != "Completed"))' exit-status: 0 stderr: [] timeout: 0 stdout: ["!string"] # 检查 k8s deployment 服务是否都正常 check_k8s_deployment_status: exec: kubectl get deploy --all-namespaces -o json | jq -r '.items[]| select(.status.replicas == .status.availableReplicas) | .metadata.name' | sort -u exit-status: 0 stderr: [] timeout: 0 stdout: - coredns - traefik skip: false # 检查 svclb-traefik daemonset 是否正常 check_k8s_daemonset_status: exec: kubectl get daemonset --all-namespaces -o json | jq -r '.items[]| select(.status.replicas == .status.availableReplicas) | .metadata.name' | sort -u exit-status: 0 stderr: [] timeout: 0 stdout: - svclb-traefik skip: false -
goss.yaml: used to check if some of the services we deployed are working
1 2 3 4 5 6 7 8 9 10 11 12 13 14 15 16 17 18 19 20 21 22 23 24 25 26 27 28 29 30 31 32 33 34 35 36 37 38 39 40 41 42 43 44 45 46 47 48 49 50 51 52 53 54 55 56 57 58 59 60 61 62 63 64 65 66 67 68 69 70 71 72 73 74 75 76 77 78 79 80 81 82 83 84 85# 通过 include 其他 gossfile 方式将上面定义的 k3s.yaml 检查项也包含进来 gossfile: k3s.yaml: {} dns: # 检查部署的 filebrowser deployment 的 service IP 是否能正常解析到 filebrowser.default.svc.cluster.local: resolvable: true server: 10.43.0.10 timeout: 600 skip: false # 检查部署的 argo-workflow deployment 的 service IP 是否能正常解析到 argo-workflow-argo-workflows-server.default.svc.cluster.local: resolvable: true server: 10.43.0.10 timeout: 600 skip: false # 一些 HTTP 请求方式的检查 http: # 检查 filebrowser 服务是否正常运行,类似于 pod 里的存活探针 http://{{ .Vars.ip_address }}/filebrowser/: status: 200 timeout: 600 skip: false method: GET # 检查 argo-workflow 是否正常运行 http://{{ .Vars.ip_address }}/workflows/api/v1/version: status: 200 timeout: 600 skip: false method: GET # 同样也是一些 shell 命令的检查项目 command: # 检查容器镜像是否齐全,避免缺镜像的问题 check_container_images: exec: crictl images --output=json | jq -r '.images[].repoTags[]' | awk -F '/' '{print $NF}' | awk -F ':' '{print $1}' | sort -u exit-status: 0 stderr: [] timeout: 0 stdout: - argocli - argoexec - workflow-controller - filebrowser - nginx skip: false # 检查容器运行的状态是否正常 check_container_status: exec: crictl ps --output=json | jq -r '.containers[].metadata.name' | sort -u exit-status: 0 stderr: [] timeout: 0 stdout: - argo-server - controller - nginx - filebrowser skip: false # 检查一些 deployment 的状态是否正常 check_k8s_deployment_status: exec: kubectl get deploy -n default -o json | jq -r '.items[]| select(.status.replicas == .status.availableReplicas) | .metadata.name' | sort -u exit-status: 0 stderr: [] timeout: 0 stdout: - argo-workflow-argo-workflows-server - argo-workflow-argo-workflows-workflow-controller - filebrowser skip: false # 一些硬件参数的检查,比如 CPU 核心数、内存大小、可用内存大小 matching: check_vm_cpu_core: content: {{ .Vars.cpu_core_number }} matches: gt: 1 check_vm_memory_size: content: {{ .Vars.memory_size }} matches: gt: 1880000 check_available_memory_size: content: {{ .Vars.available_memory_size }} matches: gt: 600000
In addition, goss is also better suited to do some inspection work. For example, in a k8s cluster: check the status of the pods in the cluster, the status of kubernetes components, the running status of CNI, the network of nodes, disk storage space, CPU load, kernel parameters, daemonset service status, etc. You can define a series of checks in the above way, and use goss to do them automatically for us.
Pod status abnormal after importing OVA VMs
After importing an OVA virtual machine on VMware Workstation, some Pods may be in an abnormal state due to changes in the virtual machine IP, which requires a forced removal and reboot of the Pods to restore them to normal. Therefore, you need to add a prepare.sh script to the virtual machine to restart these Pods in an abnormal state. When the OVA VM is imported, run this script to get all Pods up and running, and then call goss to check if the other services are up and running.
|
|