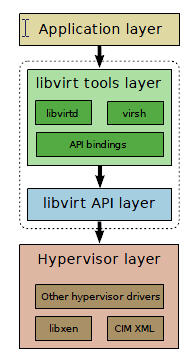
Libvirt is a set of open source software tools developed by Redhat. The goal is to provide a common and stable software library to manage virtual machines on a node efficiently and securely, and to support remote operations. Libvirt shields different virtualization implementations and provides a unified management interface. Users only care about the high-level functions, and the implementation details of VMM should be transparent to end users. libvirt then acts as a bridge between VMM and high-level functions, receiving user requests and then calling the interface provided by VMM to do the final work.
What is Libvirt
Why do I need Libvirt?
- Hypervisor such as qemu-kvm has many parameters for command line virtual machine management tools and is difficult to use.
- There are many different Hypervisors and no unified programming interface to manage them, which is very important for cloud environments.
- there is no uniform way to easily define the various manageable objects associated with VMs.
What does Libvirt provide?
- It provides a unified, stable, open-source application programming interface (API), a daemon (libvirtd), and a default command-line management tool (virsh).
- It provides management of the virtualized client and its virtualized devices, network and storage.
- It provides a more stable set of application programming interfaces in C. Currently, bindings to libvirt are provided in a number of other popular programming languages, and there are already libvirt libraries available directly in Python, Perl, Java, Ruby, PHP, OCaml, and other high-level programming languages.
- Its support for many different Hypervisors is implemented through a driver-based architecture. libvirt provides different drivers for different Hypervisors, including a driver for Xen, a QEMU driver for QEMU/KVM, a VMware driver, and so on. Driver source code files like qemu_driver.c, xen_driver.c, xenapi_driver.c, vmware_driver.c, vbox_driver.c can be easily found in the libvirt source code.
- It acts as an intermediate adaptation layer, allowing the underlying Hypervisor to be completely transparent to the management tools in the upper user space, because libvirt shields the details of the underlying Hypervisor and provides a unified, more stable interface (API) for the upper management tools.
- It uses XML to define various virtual machine-related managed objects.
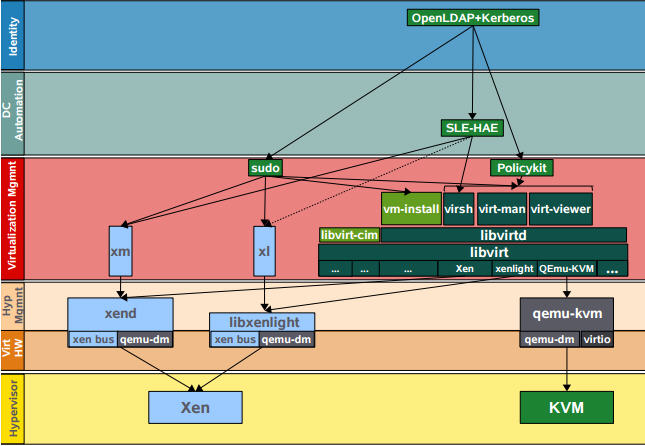
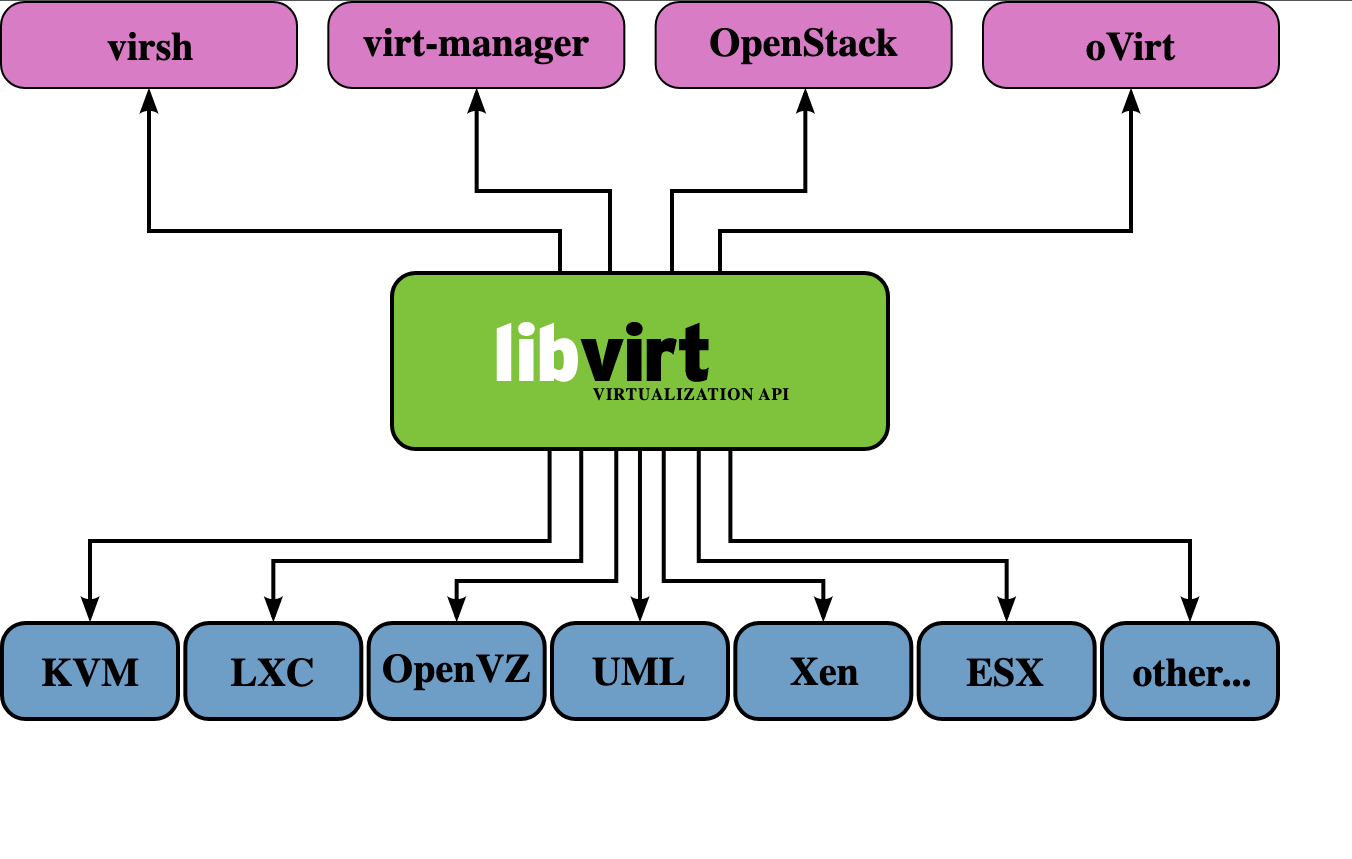
Currently, libvirt has become the most widely used tool and API for managing various virtual machines, and some common virtual machine management tools (e.g. virsh, virt-install, virt-manager, etc.) and cloud computing framework platforms (e.g. OpenStack, OpenNebula, Eucalyptus, etc.) all use libvirt APIs on the underlying.
Libvirt C API
Main objects managed by the Libvirti API
| Object | Explanation |
|---|---|
| Domain | refers to an instance of an operating system (often a virtual machine) running on a virtual machine provided by the Hypervisor or the configuration used to start the virtual machine. |
| Hypervisor | a software layer of a virtualized host |
| Node (host) | a physical server. |
| Storage pool | A collection of storage media, such as physical hard drives. A storage pool is divided into small containers called volumes. Volumes are distributed to one or more virtual machines. |
| Volume | A storage space allocated from a storage pool. A volume is divided into one or more domains, often becoming a virtual hard drive within a domain. |
Management model of objects
| Object Name | Object | Python Class | Description |
|---|---|---|---|
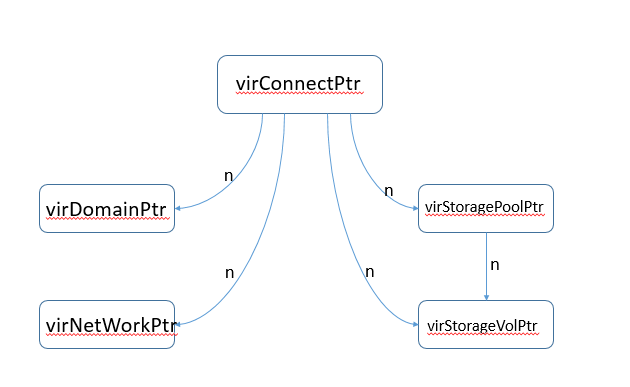
| Connect | Connection to Hypervisor | virConnectPtr | Before any API can be called to manage a local or remote Hypervisor, a connection to that Hypervisor must be established. |
| Domain | Guest domain | virDomainPtr | Used to enumerate and manage existing virtual machines, or to create new ones. Unique identifier: ID,Name, UUID. a domain may be temporary or persistent. A temporary domain can only be managed for the duration of its operation. A persistent domain has its configuration stored on the host. |
| Virtual Network | Virtual Network | virNetworkPtr | The network device used to manage the virtual machines. A virtual network may be temporary or persistent. When libvirt is installed on each host, it has a default network device, “default”. It provides DHCP services to the virtual machines running on that host, and connects to the host via NAT. |
| Storage Pool | Storage Pool | virStoragePoolPtr | Used to manage all storage within a virtual machine. This includes local disk, logical volume group, iSCSI target, FibreChannel HBA and local/network file system. unique identifier: Name, UUID. a storage pool may be temporary or persistent. the type of Pool can be be dir, fs, netfs, disk, iscsi, logical, scsi,mpath, rbd, sheepdog, gluster or zfs. |
| Storage Volume | Storage Volume | virStorageVolPtr | Used to manage storage blocks within a storage pool, including blocks allocated within a pool, disk partitions, logical volumes, SCSI/iSCSI Lun, or files within a local or network file system, etc. Unique identifier: Name, Key, Path |
| Host device | Host device | virNodeDevPtr | Used to manage the physical hardware devices on the host, including NIC, disk, diskcontroller, sound card, etc. Unique identifier: Name. |
Libvirt XML Definitions
Libvirt uses XML to define various objects, detailed XML definitions are described at https://libvirt.org/format.html Several major objects are listed here.
disk
Any disk device, including floppy, hard disk, cdrom, or semi-virtualized drives are defined using the elements.
|
|
Where.
typeis used to specify the type of device source:file,block,dir,networkorvolume. The specific source is defined by the tag.deviceis used to specify the type of device target:floppy,disk,cdrom, and “lun”, default isdisk. The specific target is defined by the label.
volume type disk
file type disk
block type disk
network type disk
host device assignment
|
|
network interface
There are several interface types.
-
type = ’network’ defines an interface that connects to the Virtual network
1 2 3 4 5 6 7 8 9 10 11 12 13 14 15<devices> <interface type='network'> <source network='default'/> #虚拟网络的名称为 'default' </interface> ... <interface type='network'> <source network='default' portgroup='engineering'/> <target dev='vnet7'/> <mac address="00:11:22:33:44:55"/> <virtualport> <parameters instanceid='09b11c53-8b5c-4eeb-8f00-d84eaa0aaa4f'/> </virtualport> </interface> </devices>1# virsh:attach-interface --domain d-2 --type network --source isolatednet1 --mac 52:53:00:4b:75:6f --config -
type=‘birdge’ Define a Bridge to LAN (bridge to physical network) interface: provided that a bridge exists on the host and the bridge is already connected to the physical LAN.
1 2 3 4 5 6 7 8 9 10 11 12 13 14<interface type='bridge'> #连接到 br0 <source bridge='br0'/> </interface> <interface type='bridge'> #连接到br1 <source bridge='br1'/> <target dev='vnet7'/> <mac address="00:11:22:33:44:55"/> </interface> <interface type='bridge'> #连接到 Open vSwithc bridge ovsbr <source bridge='ovsbr'/> <virtualport type='openvswitch'> <parameters profileid='menial' interfaceid='09b11c53-8b5c-4eeb-8f00-d84eaa0aaa4f'/> </virtualport> </interface>1#virsh:attach-interface --domain d-2 --type bridge --source virbr0 --mac 52:22:33:44:55:66 --config -
type=‘ethernet’ Define an interface that connects to the LAN using the specified script
-
type=‘direct’ Define a direct attachment to physical interface: requires Linux macvtap driver support
-
type=‘hostdev’ Defines an interface that is directly assigned by the host PCI NIC (PCI Passthrough): assigns the host NIC to the virtual machine
1 2 3 4 5 6 7 8 9 10 11 12<devices> <interface type='hostdev' managed='yes'> <driver name='vfio'/> <source> <address type='pci' domain='0x0000' bus='0x00' slot='0x07' function='0x0'/> </source> <mac address='52:54:00:6d:90:02'/> <virtualport type='802.1Qbh'> <parameters profileid='finance'/> </virtualport> </interface> </devices>
network
- bridge: Define a bridge used to construct this virtual network.
- domain: Define the DNS domain of the DHCP server.
- forward: Defines how the virtual network connects directly to the physical LAN. “mode” means forwarding mode.
-
mode=‘nat’: All virtual networks connected to this virtual network will pass through the physical machine’s NIC and be converted to the physical NIC’s address.
1 2 3 4 5 6 7 8 9 10 11<network> <name>default</name> <bridge name="virbr0" /> <forward mode="nat"/> <ip address="192.168.122.1" netmask="255.255.255.0"> <dhcp> <range start="192.168.122.2" end="192.168.122.254" /> </dhcp> </ip> <ip family="ipv6" address="2001:db8:ca2:2::1" prefix="64" /> </network>You can also specify a public IP address and port number.
-
mode=‘route’: similar to NAT, but instead of using NAT, you use routing table.
1 2 3 4 5 6 7 8 9 10 11<network> <name>local</name> <bridge name="virbr1" /> <forward mode="route" dev="eth1"/> <ip address="192.168.122.1" netmask="255.255.255.0"> <dhcp> <range start="192.168.122.2" end="192.168.122.254" /> </dhcp> </ip> <ip family="ipv6" address="2001:db8:ca2:2::1" prefix="64" /> </network> -
mode=‘bridge’: use a bridge that is not managed by libvirt, such as an existing bridge on the host; open vswitch bridge; use macvtap’s “bridge” mode
-
mode=‘passthrough’: Use a macvtap “direct” connection in “passthrough” mode to specify a specific NIC on the host for virtual networking
-
mode=‘hostdev’: Directly assign the network device on the host.
Libvirt API implementation
The libvirt API is implemented in the individual Hypervisor drivers and Storage dirver.
The Hypervisor drivers include.
- LXC - Linux Containers
- OpenVZ
- QEMU
- Test - Used for testing
- UML - User Mode Linux
- VirtualBox
- VMware ESX
- VMware Workstation/Player
- Xen
- Microsoft Hyper-V
- IBM PowerVM (phyp)
- Parallels
- Bhyve - The BSD Hypervisor
Principle implementation
Overall architecture
kvm
kvm is a module of the linux kernel that requires hardware-assisted virtualization technologies, such as Intel-VT for cpu, AMD-V; memory-related technologies such as Intel’s EPT and AMD’s RVI. guest OS CPU instructions do not have to be translated by Qemu and run directly, greatly increasing speed. kvm exposes the interface through /dev/kvm. User programs can access this interface via the ioctl function. See the following pseudo-code.
The kvm kernel module itself can only provide virtualization of cpu and memory, so it must be paired with QEMU to form a complete virtualization technology, which is the following qemu-kvm.
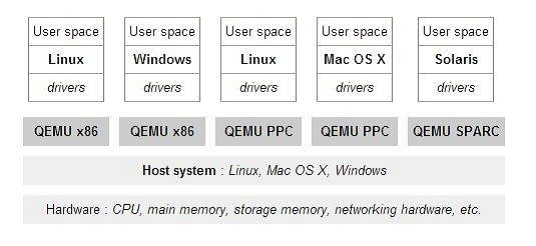
qemu
Qemu is an emulator that simulates hardware to the Guest OS, which thinks it is dealing directly with the hardware, but is actually dealing with the hardware simulated by Qemu, which translates these instructions to the real hardware. Since all the hardware has to pass through Qemu, the performance is poor.
qemu-kvm
Qemu integrates kvm, calls the /dev/kvm interface via ioctl, and leaves the cpu instructions to the kernel module. kvm is responsible for cpu virtualization + memory virtualization, but kvm cannot emulate other devices. qemu emulates IO devices (NICs, disks, etc.), and kvm with Qemu makes it possible to virtualize servers in the true sense. It is called qemu-kvm because it uses both of these things.
virtio
Qemu emulates I/O devices, which also affects the performance of these devices, so semi-virtualized devices virtio_blk and virtio_net are created to improve device performance.
Libvirt
libvirt is the most widely used tool and API for managing kvm virtual machines
- Libvirtd is a daemon process that can be called locally by virsh or remotely by virsh
- Libvirtd calls qemu-kvm to operate the KVM virtual machine
Code Implementation
The main objects defined in the Libvirt code are shown below.
- VirConnectPtr: represents a connection established by a specific VMM. Every Libvirt-based application should first provide a URI to specify a particular VMM locally or remotely to get a VirConnectPtr connection. For example, xen+ssh: //host-virt/ represents a Xen VMM running on a host-virt machine via ssh. After getting a virConnectPtr connection, the application can manage the virtual machines of this VMM and the corresponding virtualization resources, such as storage and network.
- VirDomainPtr: represents a virtual machine, which may be active or just defined.
- VirNetworkPtr: represents a network
- VirStorageVolPtr: represents a storage volume, usually used as a block device by a virtual machine.
- VirStoragePoolPtr: represents a storage pool, which is used to allocate and manage logical areas of storage volumes.
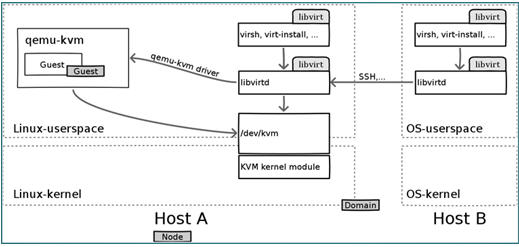
Communication between local machines
During the initialization process, all drivers are enumerated and registered. Each Driver loads specific functions to be called by the Libvirt API. As shown in the figure below, the Application calls the Public API through a URI, and then the Public API is implemented by calling the real Driver using the API interface provided by the Driver.
Communication between remote hosts
Libvirt aims to support remote management, so access to Libvirt’s drivers is handled by the Libvirt daemon libvirtd, which is deployed on the node running the virtual machine and managed by the remote Driver on the opposite end via RPC, as shown in the following diagram.
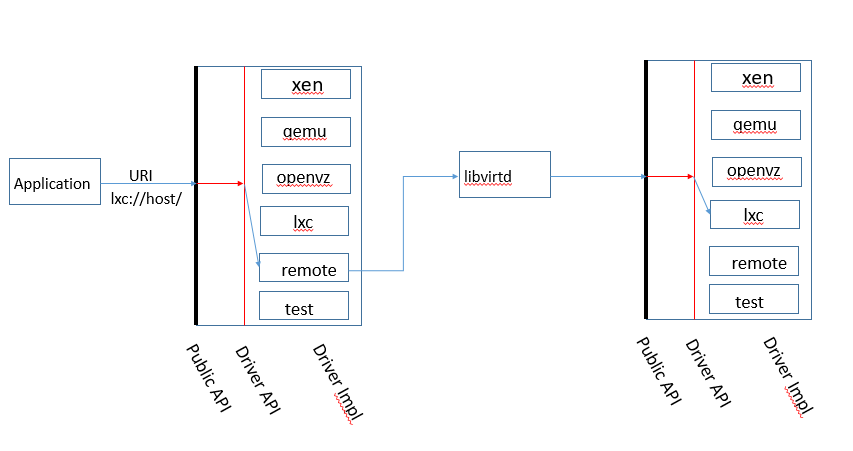
In remote management mode, virConnectionPtr actually connects the local remote Driver to the remote specific Driver. all calls reach libvirtd on the cloud first via the remote Driver, and libvirtd accesses the corresponding Driver.
Cross-reference
here has a cross-reference to the virsh command, the Libvirt C API, the QEMU driver method and the QEMU Monitor command (in part).
| virsh command | Public API | QEMU driver function | Monitor command |
|---|---|---|---|
| virsh create XMLFILE | virDomainCreateXML() | qemudDomainCreate() | info cpus, cont, change vnc password, balloon (all indirectly) |
| virsh suspend GUEST | virDomainSuspend() | qemudDomainSuspend() | stop |
| virsh resume GUEST | virDomainResume() | qemudDomainResume() | cont |
| virsh shutdown GUEST | virDomainShutdown() | qemudDomainShutdown() | system_powerdown |
| virsh setmem GUEST MEM-KB | virDomainSetMemory() | qemudDomainSetMemory() | balloon (indirectly) |
| virsh dominfo GUEST | virDomainGetInfo() | qemudDomainGetInfo() | info balloon (indirectly) |
| virsh save GUEST FILENAME | virDomainSave() | qemudDomainSave() | stop, migrate exec |
| virsh restore FILENAME | virDomainRestore() | qemudDomainRestore() | cont |
| virsh dumpxml GUEST | virDomainDumpXML() | qemudDomainDumpXML() | info balloon (indirectly) |
| virsh attach-device GUEST XMLFILE | virDomainAttachDevice() | qemudDomainAttachDevice() | change, eject, usb_add, pci_add (all indirectly) |
| virsh detach-device GUEST XMLFILE | virDomainDetachDevice() | qemudDomainDetachDevice() | pci_del (indirectly) |
| virsh migrate GUEST DEST-URI | virDomainMigrate() | qemudDomainMigratePerform() | stop, migrate_set_speed, migrate, cont |
| virsh domblkstat GUEST | virDomainBlockStats() | qemudDomainBlockStats() | info blockstats |
| - | virDomainBlockPeek() | qemudDomainMemoryPeek() | memsave |
Practice
Installing a kvm environment
KVM is an open source, Linux-native, fully virtualized solution for X86 hardware based on virtualization extensions (Intel VT or AMD-V). in KVM, virtual machines are implemented as regular Linux processes that are scheduled by standard Linux schedulers; each virtual CPU of a virtual machine is implemented as a regular Linux process. This allows the KMV to use the existing functionality of the Linux kernel. However, KVM itself does not perform any hardware emulation and requires a client space application to set up a client virtual server’s address space via the /dev/kvm interface, provide it with emulated I/O, and map its video display back to the host’s display. This application is currently QEMU.
Kvm related installation packages and their roles:
- qemu-kvm The main kvm package
- python-virtinst Command line tools and libraries needed to create virtual machines
- virt-manager GUI interface for managing virtual machines (can manage remote kvm hosts)
- virt-viewer: Interact directly with the virtual machine through the GUI interface (can manage remote kvm hosts)
- virsh: libvirt-based command line tool (CLI)
- virt-top virtual machine statistics command
- virt-viewer GUI connection to a configured virtual machine
- libvirt: Provides simple and unified tools and APIs for managing virtual machines, shielding the underlying complex structure. (supports qemu-kvm/virtualbox/vmware)
- libvirt-client A c-language toolkit for virtual clients
- virt-install Virtual machine creation command based on libvirt services
- bridge-utils Tools for creating and managing bridged devices
|
|
Create a directory /data under the root, (do not put the virtual machine files in /root or root mainly because after the virtual machine starts qemu these users do not have permission to read the virtual machine configuration files under /root or root)
Install the virtual machine
Before installation, set the environment language to English LANG=“en_US.UTF-8”, if it is Chinese, some versions may report an error.
kvm to create a virtual machine, pay special attention to the .iso image file must be placed in /data or root directory to recreate the directory, otherwise it will be unable to create a virtual machine because of permission errors.
First learn the virt-install command, use -help to view it here, and learn only the important ones, the others can be learned later.
Execute the create virtual machine command.
|
|
The above create virtual machine command eventually needs to configure the system base settings with [!] are basically to be configured, after the configuration is complete, you can enter the virtual machine installation process.
View the virtual machine
|
|
Basic virtual machine operations
|
|
|
|
Edit kvm’s xml file, change VM CPU configuration
Edit the xml file of kvm to change the CPU configuration of the virtual machine. There are two ways to configure the CPU of a virtual machine
- Specify the number of cores at boot time
- Change the xml
In order to hot add CPUs, you need to change the maximum number of CPUs, and the number of hot adds cannot exceed the maximum.
Current is 2, change to automatic bracketing, maximum is 4
|
|
Restart the virtual machine, check the CPU information, confirm the number of CPUs, and then hot add CPUs.
At this point, check the virtual machine CPU.
Dynamic modification of the virtual machine CPU.
|
|
Go back to the virtual machine and check the CPU information.
Edit kvm xml file, change VM memory configuration
The memory settings have a balloon mechanism, which can be increased or decreased, but also set a maximum value, which is not set by default, and can be specified during installation.
|
|
You can modify XML to change the virtual machine memory configuration.
Create virtual machines by mirroring
Mirroring creation principles
- When partitioning, only one / root partition, do not need swap partition, because the performance of the virtual machine’s disk is bad, if you set up a swap partition, when the swap works, the performance will be even worse. Ali cloud hosting, for example, there is no swap partition.
- Mirroring requires removing the UUID from the NIC (eth0)
- Turn off selinux, turn off iptables
- Install the package for the base software: net-tools lrzsz screen tree vim wget
Create a virtual machine image file
|
|
Edit the new virtual machine configuration file
The main changes are the virtual machine file name, UUID, image address and NIC address, where the UUID can be generated using the uuidgen command under Linux.
|
|
How to define a virtual machine based on XML
|
|
Reference https://houmin.cc/posts/efda97c6/